
A personal blog curated by a gremlin. There is no rhyme or reason here.
233 posts
Artorodd - Art By Name, Gremlin By Trade - Tumblr Blog


Heyheyheyheyhey is there any way we could be blessed with Jester’s plush pattern? I too could not find anything about them online and now I need my own watermelon golbo as soon as physically possible. Even if it’s shitelly traced out on tise paper or something— I will expect anything crumb of info on how to make a him
Oh yes, why of course!
I don't have any means of making a printable pdf currently, but I was able to guesstimate a sketch of what the pieces should look like

Do take it with a grain of salt, as I haven't tested these and they could probably use a bit of tweaking
I should also add that although I drew these in an A4 sketchbook, the actual plush is around 60 centimetres long (or about 24 inches)
For anyone confused, this is the plush in question:

This is Jester! I recently shared him with the Zoolim blog because of his striking resemblance to a Golbo
I did not make him, he's a plush I've had for about 9 or 10 years now and he's been a complete enigma from the very start
[More info for those interested]
I found him secondhand at a school fair, so I don't really have any particular store I can pin his origin to
I've tried searching online with what little information is on his tag, but all my searches have yielded nothing


If anyone's as curious as I am, and you manage to somehow find anything to do with Jester's origins, please let me know! I'd like to see what anyone out there might be able to find ^v^
(One final thing, here's the original post referring to Jester)

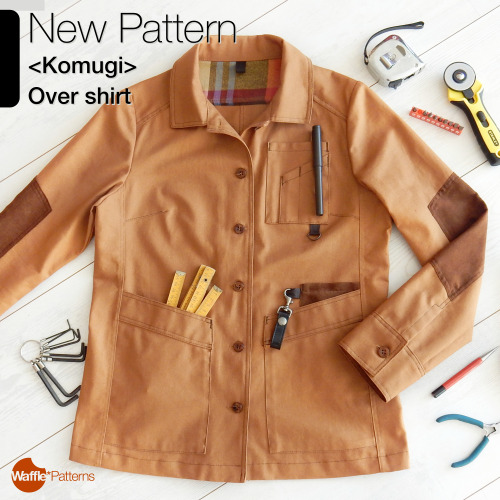
Meet new sewing pattern <Komugi> Over shirt
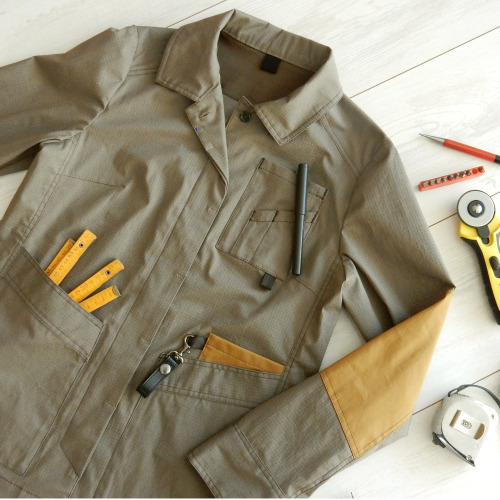
A new item is just published from Waffle Patterns. Meet Over shirt <Komugi> sewing pattern, a work wear style over shirt with many functional pockets. Depending on your fabric and design choice, it will be a work shirt, uniform-like service shirt or outdoor style shirt jacket. You can make just a simple shirt as well.
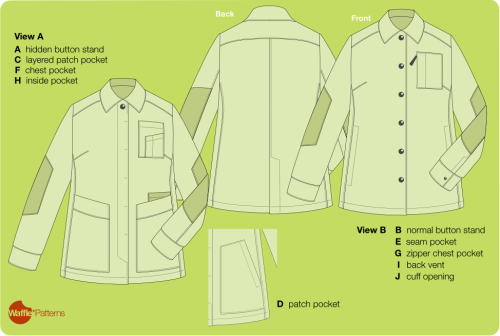
<design options>
View A features a hidden button stand front opening + patch side pockets + an inside pocket. The patch side pockets are 2 types ; side opening or layered type. The cuff is no-opening design.
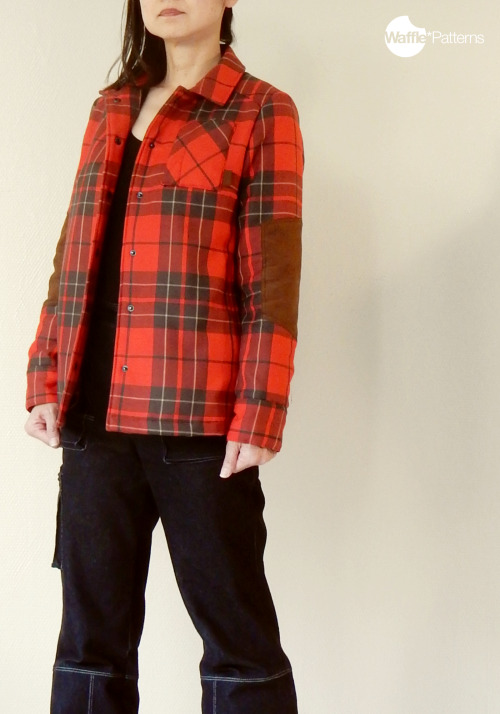
View B has a normal button stand + seam pocket + back bent and cuff opening.
The chest pocket design has 2 options, layer type or zipper pocket.
View A is intended as non-scratch design suitable for a work shirt especially if you are working on fragile things. View B can be made as a more outdoor-like shirt jacket with details like cuff openings or a vent. But of course you can choose and mix the options as you like!
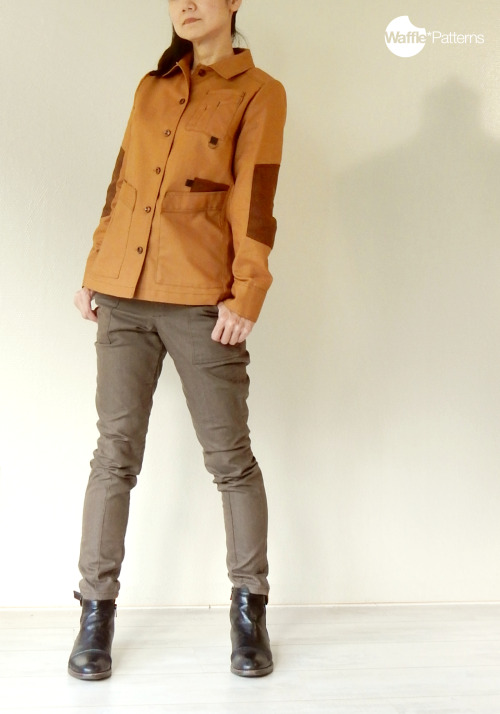
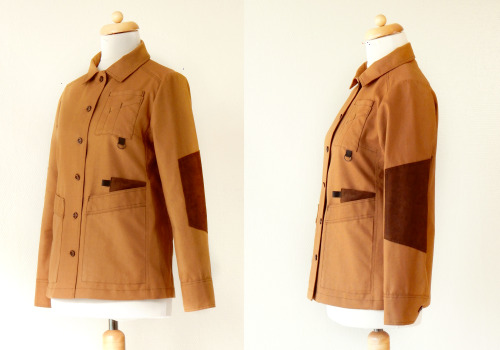
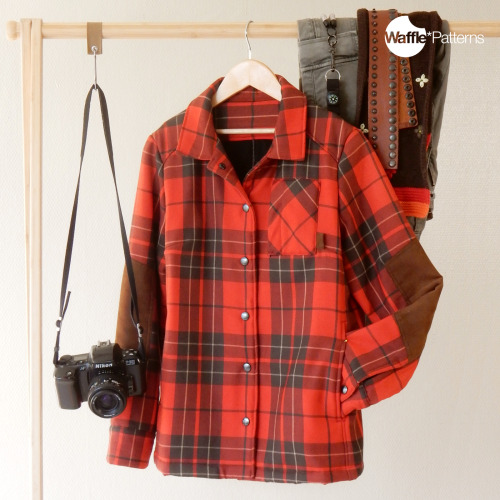
The khaki sample in the photos features viewA, and the red plaid one is view B. The caramel brown one has mixed features.
My favourite feature is the sleeve patches. Adding compliment textures/colours is really fun! But you can sew without them, too.
Please make your creative style by mixing your favourite details.
<fabric recommendation>
The pattern is drafted for woven fabrics. Light-medium weight durable shirt fabrics are recommended. like corduroy, duck, twill, denim, linen, flannel, light wool or canvas etc.
It is not impossible to use very light drapery fabric, but those are not suitable for some details like patch pockets or vent.
Also, some very thick/stiff fabrics might not work well for details like pockets with facing. In that case, please consider using other lighter fabrics partly like the inside yoke, facing, or pocket parts.
Please choose a suitable one for your design intension.
For the caramel brown sample in the photos, I used cotton canvas. Suitable for work shirts and very easy to handle. The contrast fabric used for the sleeve patch and pocket layer is faux suede.
If you want very durable patches, leather or rubber-mixed fabrics are used for professional work apparel. But for general daily usage, like mine, design oriented choice like nice compliment colours or textures will be enough. Using leftover or old clothes is a fun choice, too.
The khaki sample is cotton ripstop. This one is also very suitable for work wear. The patch part is mixed twill.
The red plaid one is light wool backed fleece. I backed all the pieces with fleece except the folded parts like pocket openings or hem.
I bought all those fabrics from my local fabric market, but most of them are from years ago. I wanted to share where I bought them, but I actually forgot all.
I think light water repellent or windproof fabrics are nice functional options, too.
<Size>
The shirt is drafted regular fit.
I made on size bigger the red plaid sample because I wanted to wear this as a jacket. Also because the fabric gets thicker with fleece backing.
The caramel brown and khaki samples were made with just fit size.
<Other material>
If you attach the hidden button stand design, it is better to use flat and thin buttons for clean look opening.
*********************
The sewing pattern includes 18 pages of instructions and all the sewing processes are described with detailed illustrations. The pattern files are available for both home printers (A4 or US letter) and copyshop(A0 format).
You can check other photos of this model on my Flickr page.
The over shirt -Komugi- (size 32 - 54) PDF sewing pattern is available here. Also in the Etsy shop.
Special discount price until 13th Mar 2024 (CET) with other popular patterns. No discount code is needed! The sale page is here.
***** Special offer for Paper pattern and free shipping Paper pattern + PDF option is available limited time. *The paper includes only the pattern, please print out the instruction by yourself or read it with your tablet or PC. The PDF + Paper listing page is here.
Enjoy your sewing!
(Japanese post here 日本語ポストはこちら).
**********************
follow me! Instagram /// Facebook /// Shop /// Pinterest /// Newsletter
1998 Furby Pattern (Tail Version)
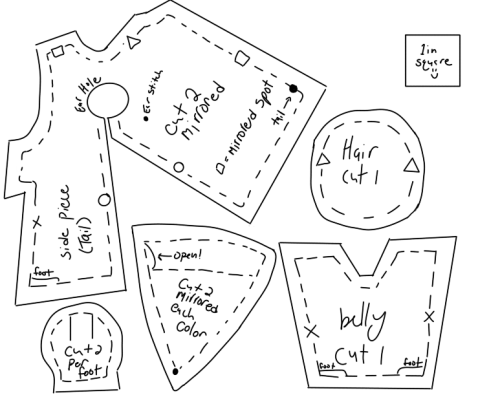
1998 Furby Pattern (Mane Version)
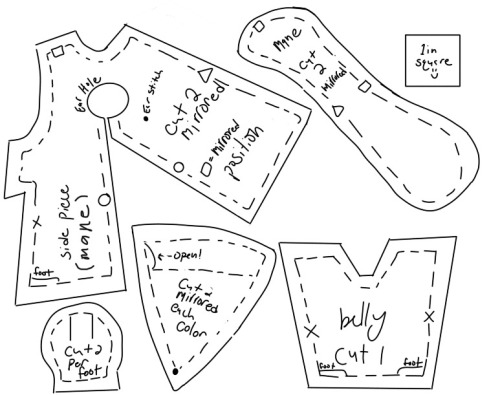
Do Not Crop Or Resize!
This pattern will print out proportional to a regular piece of printer paper (8.5in x 11in)! This pattern includes seam allowance! I have marked in where the ear gets sewn on, where the feet go, and to leave a portion of the ear open. Otherwise, just match up the markings! There is a note on the side piece to match squares with their mirrored position. For the ears "2 of each color" means the inner color and the outer color.
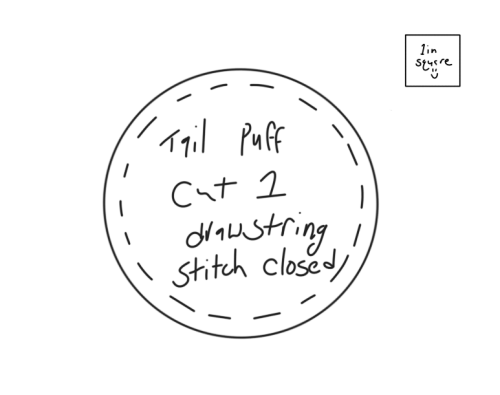
I guessed on the hair puff, so it may not be entirely accurate. However it seems to be about that size and based on the funky sewing on the inside, its a circle. PLEASE CORRECT ME IF IM WRONG AND I WILL ADJUST!
I dont yet have a pattern piece for the tail bc that requires disassembling one, which i will do when I begin my next custom.
I hope to make patterns for 1998 babies, 2005 adults, and connects before the end of the summer.
Edit: I have added the mane pattern! please note that the mane and tail version of the side piece are DIFFERENT!! You cannot use the tail side piece for a maned furby, or the skin will be too big.
Edit 2: Please don't forget to add the fabric at the bottom for the zip tie/elastic!! The band is about 1/2 inch wide, so I would suggest making the strip you cut 1 1/2 to 2 inches wide. I dont have a measuring tape on me rn, so I can't measure how long it is :/
Edit 3: Tail added! You might need to resize the tail one a bit bc for some reason the 1in reference square doesn't look the same size? Hope this helps! :)
FREE POETSHIRT PATTERN
Some assembly required
Ok so. I made a sewing pattern that involves a lot of maths on the end users part - this is the only way I, a complete pattern making novice, can make this 100% size inclusive. Luckily it’s super simple and it just a whole bunch of rectangles.

Yes it’s written in cm. Bite me.
So to elaborate a bit:
It’s pretty straight forward. You plug in your own measurements in the places it’s needed.
Body x2: should be twice your either shoulder width or your widest point (if you’re more pear shaped you might want to use your hip width) by the length from your shoulder to about mid thigh* (you can make it as long or short as you want. This could probably also work as a shift pattern in a pinch). In one of the pieces, you should cut a slit in the middle, which as shown above should be about from your neck to your sternum.
Sleeves x2: these should be 2-3 times your bicep measure (this will determine the poofiness of the sleeves), by your arm length. Adding a few cm to the length can be a good idea here. I usually just round up to what seems most logical.
Cuffs x4: your wrist measure + 3-4cm of ease, by how ever long you want them - 5-10cm is a good place to start.
Collar x2: your collar measure** by however tall you want your collar. Keep in mind that it will be folded over.
Gussets
Oh glorious gussets. The whole reason this pattern works! But also where it gets a bit mathy
Sleeve gussets: these are square. The diagonal should be about 1/6 of your total armscye (all the way around). Rather a bit too small than too big - it can fuck up the fit (it did for me)
Shoulder gussets: these will depend wholely on how buff your trapezius muscles are. If your neck/shoulder is at a right angle, they’re not strictly necessary, but if you’re super buff, they’re very necessary. I’d say an average shoulder gusset is about 5-7cm, but it’s up to you.
Reinforcements
Again, these aren’t strictly necessary, but if you want your shirt to last it’s a good idea to put them in. You can choose to use between 5 and 10 total. These don’t need to be very big, they just go at any split in the fabric. About 2,5cm is good.
Instructions
I used these videos for assembly instructions
This is going to be hard without pictures…
*you can also keep the body as one piece, which should then be twice the length you want it. The slit at the neck will also have to be cut in the middle of the piece.
**your collar measure is the measurement at your neck going over your collarbone rather than tight to the neck.


just listed some more prints of these "2heads" (I edition) "6 wings" (II edition) and "6 legs" (I edition) linocuts to my online store SHOP HERE


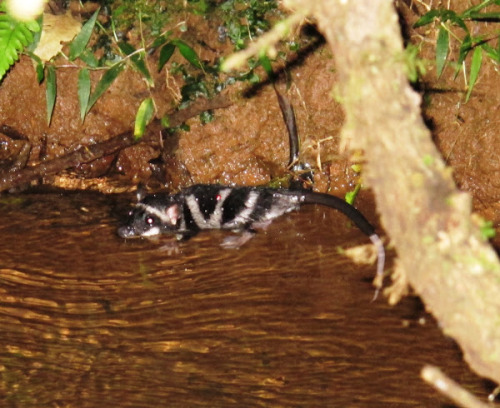
on the topic of different unrelated aquatic mammals wasn't there also one marsupial that became aquatic and is notable as the ONLY semiaquatic marsupial?
somehow it gets past the whole "babies might drown in the pouch" issue
yeah, the yapok! it's native to mexico and central america, and it's the result of the north american branch of opossums trying to make an otter and mostly succeeding :)
there are many many MANY partially-aquatic mammals out there, but only a few totally-aquatic marine mammals.
comic of my malevolent p.i au
a domestic sketch #1 if you want something less violent
comicstrip#1(client pov)


this is basically my first try to make a comic so don’t judge me. i did my best 🤷♂️


Turdus aficionados of Costa Rica please know I love your national bird but this is objectively hilarious
