
262 posts
How To Show Expression With The Mouth!
How to show expression with the mouth!
This was a request and at first I wasn’t sure if I had anything to provide with, but as it turn out it got a little longer than I expected because there were actually things I had to say!! Wow!!
Anyway, this is some guidelines I follow when I try to make the face expressfull, more specifically the mouth! It is often neglected, since it’s actually pretty hard, I’ll admit. But I’m here to help (hopefully…)! A mouth expression tutorial as per request. Enjoy and hopefully it will help some a little. ʕ•ᴥ•ʔ
Draw the teeth at the right angle.
This is super important. The upper jaw follows the angle of the head, and the lower jaw will depend on how open it is. Make sure you have a rough estimate of where the teeth are, and how much of them you’re going to see!
The lips will VERY roughly follow the same angle as the teeth. It really depends on the character, but it gives you a sense at least.

If you DON’T do this, you’re going to lose so much volume and the mouth is going to end up looking unrelatable. I showed this example in this tutorial:

It’s not just the lips!
The cheeks, chin, and tongue play a role too!

Try look at your own mouth or references! I have a very pliable and large mouth, so that’s one reason why my characters have it too lmao.
ASYMMETRYYYYY (ง ͠° ͟ل͜ ͡°)ง
I cannot emphasize how important asymmetry is when drawing expressions. It applies not only to the eyebrows to achieve the Dreamwork Face™, but also the mouth. Seriously if you draw a symmetric mouth I will deliver myself to your mailbox and then shout at you until you fix it.
Look at the difference between these two for example: which one has more “life”?

I think you get the idea.
Push and squish - give it flow
Here’s an old drawing I have but it illustrates how I think when I squish the mouth, and use folding and wrinkles to my advantage.

Look at your own face and see where skin bundles up, where it creases the most and when bumps appear on your chin. Subtle details makes all the difference!
One VERY effective detail is illustrated in the first sketch, where I pull upwards on one side, and downwards on the other. That’s a good detail to use when the character is making a skewed expression, or is extremely frustrated. I encourage you to play around with that concept bc it’s ~super effective~!
EXAMPLES:
Happy: Your entire mouth is pushed upwards, not just the corners of your mouth!

I tend to draw a :3 mouth bc I’ve been drawing Lance too much….. You don’t have to but it’s basically imprinted in my motor memory by now.
Pouting/frowning: corners are pushed down, middle pushed slightly up. Sometimes, there’s a slight dip in the middle too. It can give a sense that the character is biting their lips.

Showing frustration/intimidating/is intimidated: basically showing a lot of teeth. The corners are as open as possible and the middle sorta more squished. An extremely important detail here is showing some of the gums, and open space between the cheeks and teeth. That way it looks like the mouth it open to it’s full potential. Here is also where you basically MUST add folds and bumps, or else it’s not going to look relatable.

(Here I am again with the pulling upwards on one side and downwards on the other, as illustrated on the last sketch)
And then again, here’s just another doodle showing how important it is to show the gums. It’s the same face twice, but the second one looks slightly more frustrated doesn’t it?

(from my other tutorial on how to draw facial expressions)
As you can see, this last one is very versatile and I draw it a lot. Play around with the basic shape and see how much subtle details makes a lot of difference!
That’s it!
I hope that cleared some things up and was somewhat helpful! Enjoy drawing ✨
-
 chilljoy141 liked this · 6 months ago
 -
 shalvis liked this · 6 months ago
 -
 classifiedprojectciel liked this · 6 months ago
 -
 craftyphantombanana liked this · 7 months ago
 -
 nymphaeamoon liked this · 7 months ago
 -
 wolfsskull liked this · 7 months ago
 -
 takahe1 liked this · 8 months ago
 -
 biggiecheeseman liked this · 8 months ago
 -
 mar-chive reblogged this · 8 months ago
 -
 bbonezie liked this · 9 months ago
 -
 witchtig liked this · 9 months ago
 -
 rrawrreyes liked this · 9 months ago
 -
 sillyyethereal reblogged this · 10 months ago
 -
 mel0nt0 liked this · 10 months ago
 -
 emomomortal liked this · 10 months ago
 -
 eumenidi liked this · 10 months ago
 -
 floofyfungi reblogged this · 10 months ago
 -
floofyfungi liked this · 10 months ago
-
 nomiyakazehaya reblogged this · 10 months ago
 -
nomiyakazehaya liked this · 10 months ago
-
 steelthroat reblogged this · 10 months ago
 -
 voraciousvore liked this · 10 months ago
 -
 sukunekatano liked this · 10 months ago
 -
 sodasexual liked this · 10 months ago
 -
 ygodmyy20 liked this · 10 months ago
 -
 cheese-enjoyer9471 reblogged this · 10 months ago
 -
cheese-enjoyer9471 liked this · 10 months ago
-
 part-3 reblogged this · 10 months ago
 -
 russenoire liked this · 10 months ago
 -
russenoire reblogged this · 10 months ago
-
bbonezie reblogged this · 10 months ago
-
 quelquundesympathique liked this · 10 months ago
 -
 flowerkidlove-refs reblogged this · 11 months ago
 -
 dotdotdotpng reblogged this · 11 months ago
 -
dotdotdotpng liked this · 11 months ago
-
 nusyalovekyman2 liked this · 11 months ago
 -
 ye-old-references reblogged this · 11 months ago
 -
 grimaussiewitch liked this · 11 months ago
 -
 soft---reset reblogged this · 11 months ago
 -
 oddzo liked this · 11 months ago
 -
 er1c-c4rtman liked this · 11 months ago
 -
 tar-tea-grade liked this · 11 months ago
 -
 pedestrian-pop liked this · 11 months ago
 -
pedestrian-pop reblogged this · 11 months ago
-
 memetrash-coyote reblogged this · 11 months ago
 -
 littleelectric reblogged this · 11 months ago
 -
 haunted-plush liked this · 11 months ago
 -
 noodle-armed-artist liked this · 11 months ago
More Posts from Chikasartrefblog

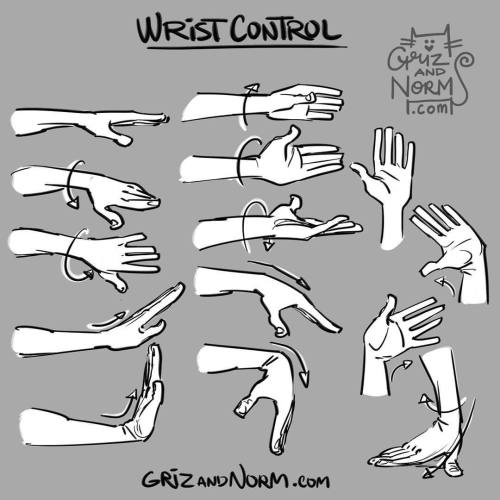
Tuesday Tip - Wrist Control An expressive hand gesture can be the exclamation point to a nice pose or gesture. We tend to forget how much mobility can be achieved through the wrist. Here’s a reminder of a few different ways the wrist can bend and twist, allowing for even more expressive poses. -norm #tuesdaytips #grizandnorm #norm #wristcontrol
How I draw kisses!
A quick tutorial/cheat sheet on how I draw kisses!! I’m going to assume you already know how to draw a head and how to angle it, because that’s an entire procedure in itself. I’m going to focus on mainly the lips and also try and tackle some common mistakes when you’re first starting out.
Pursing the lips

So this is boring but crucial. If you don’t purse, their is no real kiss (take notes) bc placing your lips on top of someone else’s is not how you kiss… The most important part are the corners of the mouth, especially from the side view, because that’s what changes the most.
The actual kissing yeee
Let’s start do a basic side view kiss on the lips. And believe it or not, I think this one is the hardest!

Think about which parts of the face are going to be in front of the other! This can take some time to get the hang of, but once you get that down it’s easy. Also, focus on getting the heads at the right distance and angle. A common mistake is drawing them too close.
The Lightning Shape:

Still keeping in mind which part of the line is “Red’s” upper lip and which part is “Blue’s” lower lip, play around with the shape of the lightning. Very subtle changes can have a very strong impact! I usually go by feel, so take your time, but here are some things to look out for:

Details squishing etc.
So yeah once the lightning shape looks good, I usually add details and squish parts of the face that will touch. Which usually includes the noses, but from this angle they won’t squish unless you intend on making nice big noses <3. By now it should look something like this:

You don’t have to add the corners of the mouth! I usually do when I want to show that the character is smiling.
One technique used a lot in anime/manga + other cartoony art styles, is fading lines where two soft-ish objects press hard against each other. The picture above explains it.
Common mistakes
Getting down the crucial kissing part of fanart is hard and you will mess upp SO MANY TIIIIIIMES, but you learn from your mistakes, so don’t be discouraged. There are some things though that I frequently see when people draw kisses that makes it look awkward and stale, many of which I used to do myself. Here are some examples:

Try your best to avoid these. Most of the mistakes have little to do with the lips and more to do with the angle of the head. So getting that down before you move on to the lips is important.
¾ view Kissing
There are not a lot of angles where you actually see the lips meet (or at least not that I can draw…). Depending on how the heads are placed in relation to each other, you may or may not see the lips in a ¾ view. The way I have demonstrated is done in a way that the nose will bump into the other’s upper cheek.

Aaand that’s about it! These things will make more and more sense the more you draw them. At first it can seem very hard with so many things to keep track of, and it is, but practice makes perfect!
Rule of thumb: does the angle and position of the heads make sense? How are the lips going to align? What parts of the face are going to be in front of the other? How much will the lips purse? And finally, what is going to squish?
Thank you for reading! 😘

(☞゚∀゚)☞ now draw kisses
Ahaha Someone asked me for some tips on how I draw simple muscles. Unfortunately, my inbox glitched on me again and that message was no where to be seen. I apologize to that person who sent me it and, hopefully, I can make it up to you with this.
This is a short and simple tutorial.
I just use basic shapes that goes well together. Mainly, these two shapes, oblong and square, when I draw big characters.

The arm muscles are basically like big curves to me.
Apply this with a line of action and this is what you get.

Your muscles don’t necessarily have to be big. They could be slim, long, round and etc. This could also work really well if you have the basic anatomy down, but don’t stress about it. Just simplify them as much as you can without stressing over perfect details.

Tuesday Tips - Half and Half A technique I apply to help me draw the torso/hips area as well as the face. Splitting it in half helps me compare the width of mirrored features on the the other half. Also very useful when the body twists and folds on itself. Norm #grizandnorm #tuesdaytips #100tuesdaytips #halfandhalf