
🤣 destroyer of worlds 💣 🐔 i will eat your dad 🍷
135 posts
Cryking - Cryking - Tumblr Blog


quick tutorial on how I shade with solid black (a lot of people ask, hope this helps)
prints | patreon
Hey there, art advice anon again! Your tips have been very helpful, especially the idea that you just have to keep trying until you find the right combination of lines. Thank you!
Do you have any advice on drawing facial expressions?? I’m autistic and I have a really hard time with them.


Howdy again, and sorry for the delay! Not sure how well some of this advice would translate into different styles, this is just what works for me.
Expressions are hard! There's a lot of nuisance and subtle differences between them, and a lot of different expressions share similar features. Ya just have to play around with them.
There are a lot more things that can all help convey emotion, that aren't just limited to the face, like posing and angling, but I focused solely on expressions, here.
Anyway, I hope this helps at least a little :0!
Can you make like, a watercolor tutorial? Cause I've been trying to learn watercolor since I was baby and can never figure it out ❤
Hell yeah!! This tutorial might suck so my apologies and since I’m not sure where you’re at I’m just gonna start with everything I can think to say, and in terms of materials I’m just gonna tell ya what I use, but hopefully this’ll work for whatever you’ve got as long as it’s not a crayola set (that’s what I started on so I can say will full authority those are bad)
My deepest apologies to everyone abt the length of this post djdjdj I don’t freakin know how to do the read more thingy
So! To start, these are just the materials I use:
I use this portable set from Amazon, it’s lasted a while and the paints are really quite good for it being $15, It comes with a lot of variance in colors and shades, though I mix most of my colors myself! The white in that palette isn’t too great so for fixing mistakes I use this! It works pretty well for fixing any mistakes watercolors are wont to make.
I buy my brushes at Joann Fabrics And Crafts store, though I think most art stores will have a good selection. Joann’s usually has really good thin long brushes which are super useful since I paint small, as well as large and pointed brushes for painting large swaths of paint. I recommend having one or two of each, here’s a picture of the ones I use regularly and a paint covered ruler for reference!

Currently for all of my taz art I’ve been using this Arteza sketchbook (just in general be careful of your finger/hair oils touching the paper, that sketchbook especially will cause the watercolor to not adhere to the page if I touch it too much, so I just put a little scrap of paper under my hand while I paint and sketch and it works great) but for my professional work I use this Canson brand, if you’d like just a visual kind of reference for how I paint, albeit edited (I promise, it’s a lot less of a satisfying and fast process unedited) I do painting videos on tiktok!
Palette
So! Mixing paints. I’ll get to color theory in a second, but mixing your own colors is good to do, and most paint sets will come with a palette to use, but if they don’t any slick white surface will do! I use a big ol piece of glass from a frame and the white backing from it.
Swatching
I always do little test swatches before I lie the actual color down! It helps so ya don’t mess up colors, it’s become kinda muscle memory for me but usually just lil swatches like a couple centimeters wide and an inch long is probably gonna be enough for you to know if the color is how you want it!
Size
Just wanna say: I paint really small! The largest my paintings get is like 5 inches tall, and that’s usually only for my professional stuff, but I dunno if you’d like to do that! If you paint big, just be careful of using too much water or your paper will warp! It’s not the end of the world though, and use of water is something that definitely took me a sec to learn.
Drying
Make sure to let stuff dry! If you’re painting sections, for example like this painting I did, I let the red dry completely before painting the yellow! Or else those bois would’ve bled together, but if you wanna use that to your advantage, go ahead and mess with watercolor textures! Also If you’re using a lot of pigment, it’ll take longer, just don’t make the mistake I’ve made many a time in touching the not dry yet paint! But!! Be wary: watercolors are tricky bastards and if you want a smooth coat of paint, work fast! Or else some parts’ll dry and you’ll get a wonky coat, this isn’t all too worrisome except when you’re painting skin tones!
Pigment
Okay so pigment to water ratio is a tricky thing, and I must admit it probably comes with a bit of practice as dumb as that is to hear, but I’ll try and give ya some tips on how how to implement it!! So for my fanart work on here I don’t use a lot of pigment since I don’t use that many super saturated and flat colors, unlike in my tiktok stuff where I do thick coats of paint for maximum visual asmr stuffs or whatever. It also probably depends on the paints you’re using, but I’d recommend trying to find a consistency that isn’t too thick, or else it’ll be really weird to work with, and always remember to mix enough of a color before you start painting with it!!
Colors and unifying them
Unifying your colors can be a dope trick! Basically like instead of using a bright green and a bright blue and yellow and pink for a color scheme you can change each color depending on if you want like a warm tone or a dark/blue tone! So the bright green would turn into an army green, the yellow would get orangier, the blue would be kinda greyish, and so they’ll all fit nicer with the pink or reds and the piece will be soft and nice on the eyes! Some examples of how if unified colors and stuff in my work below! Also I should say, I use a lot of edits to get it this warm toned! On my iPhone there’s a lil slider for warmth and tints and stuff


So I’m a big fan of warm and orangey toned stuff so for mixing paint here’s the color you’d add to make one color less bright and more neutral so it doesn’t clash with the other colors! This gets into color theory which there are probably some great YouTube videos on! This mixing also goes vice versa.
Blue: add orange, green: add red, Red: add green to make a nice brown or a skin tone, yellow: add purple.
Also! Watercolors are tricky when mixing, basically you’re not always gonna get a perfectly saturated vibrant color when you mix two colors together like red and blue to make purple, so it’s usually just best to use a purple watercolor if you have it.
painting light:
This is honestly something I’ve just recently been incorporating into my work and I don’t have a great way to explain it so I’ll just give a few references. Painting light and shadow isn’t nescessary but if you wanna do it here’s a kinda easy way to:


Painting shadow
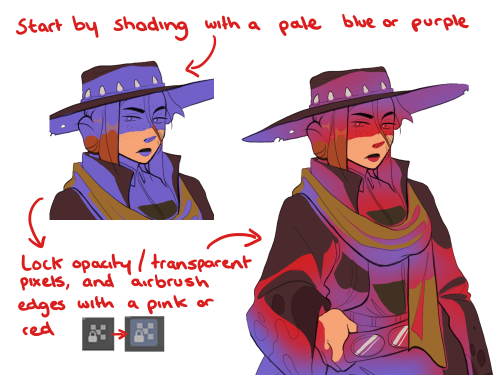
For shadows don’t just use grey or black! This usually can make a piece desaturated (or so I have been told) so instead you can use a blue or maybe a red or pink depending on if you’re painting skin or not! Also if you wanna add just a bit of dimension to your piece but don’t wanna go overboard on the shadows, i usually just paint a lil half triangle under the chin!


Blush
It’s not nescessary but it’s a way I’ve found fun to make the characters look more human and cute! Just on the ears, fingertips, knuckles, knees, shoulders, nose if you draw noses, elbows, and toes should do the trick!
black paint
Black is an extremely tricky color to paint with! Sometimes if you’re painting like a goth outfit for example and you have a lot of overlapping black shapes, it’s hard to differentiate them and so I usually do these weird lil lines to show distinction between things!

Lastly, I hope you have lots of fun and tons of success in whatever form that may come in! Let me know if you have any more questions or clarifications or details! Sorry this took me so long! <3
A general cane guide for writers and artists (from a cane user, writer, and artist!)
Disclaimer: Though I have been using a cane for 6 years, I am not a doctor, nor am I by any means an expert. This guide is true to my experience, but there are as many ways to use a cane as there are cane users!
This guide will not include: White canes for blindness, crutches, walkers, or wheelchairs as I have no personal experience with these.
This is meant to be a general guide to get you started and avoid some common mishaps/misconceptions in your writing, but you absolutely should continue to do your own research outside of this guide!
This is NOT a medical resource!!! And never tell a real person you think they're using a cane wrong!
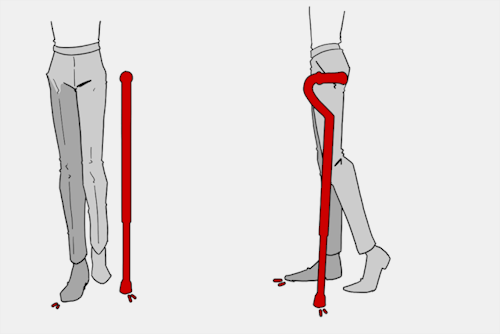
![[Image text] Arm bends a little. Cane height at hip joint. Many canes have adjustable height. Cane sits within the natural center of balance. Causes stress on: Triceps, upper back, wrist (pressure) fingers (grip). Helps with: Joints (lower back, hip, knee, ankle, foot), weakness, balance, pain.](https://64.media.tumblr.com/0c8731401f496885dc8d4309a7dbe7ee/f831b3159e1d7635-e7/s500x750/6e5fe00081a6ce3b64cbe1a648f0c967f9f601e9.jpg)
The biggest recurring problem I've seen is using the cane on the wrong side. The cane goes on the opposite side of the pain! If your character has even-sided pain or needs it for balance/weakness, then use the cane in the non-dominant hand to keep the dominant hand free. Some cane users also switch sides to give their arm a rest!
A cane takes about 20% of your weight off the opposite leg. It should fit within your natural gait and become something of an extension of your body. If you need more weight off than 20%, then crutches, a walker, or a wheelchair is needed.
Putting more pressure on the cane, using it on the wrong side, or having it at the wrong height can make it less effective, and can cause long term damage to your body from improper pressure and posture. (Hugh Laurie genuinely hurt his body from years of using a cane wrong on House!)
(some people elect to use a cane wrong for their personal situation despite this, everyone is different!)
(an animated GIF of a cane matching the natural walking gait. It turns red when pressure is placed on it.)
When going up and down stairs, there is an ideal standard: You want to use the handrail and the cane at the same time, or prioritize the handrail if it's only on one side. When going up stairs you lead with your good leg and follow with the cane and hurt leg together. When going down stairs you lead with the cane and the bad leg and follow with the good leg!
Realistically though, many people don't move out of the way for cane users to access the railing, many stairs don't have railings, and many are wet, rusty, or generally not ideal to grip.
In these cases, if you have a friend nearby, holding on to them is a good idea. Or, take it one step at a time carefully if you're alone.
Now we come to a very common mistake I see... Using fashion canes for medical use!
![[Image text] 4 Major Handle Shapes (significant variation and uses). Tourist/Crook/Hook. Classic shape, fashion and medical, easy to hook on things (arm, door, chair, etc), generally solid wood (stronger, heavier). Offset. Newer design, not a fashion handle, only handle for quad-bases, generally better balance, usually aluminum (light + cheap), soft handle, adjustable (rattles/clicks when swinging). Derby/Fritz/Anatomical/Contour. Classic medical shape, many fashion variants, some fashion + medical, varies in many ways, sometimes contoured to hand, comes in foldable styles, many aluminum styles, many customizable styles. Knob/Decorative. Fashion exclusive, knob shape hurts the hand after prolonged pressure (especially with designs), tend to be heavy, "sword canes" have the same issues.](https://64.media.tumblr.com/102d2e5f13a88817eaa44974bc5a7486/f831b3159e1d7635-e2/s500x750/887023dbcfc758db12a7fcf3f258bca52eba2d53.jpg)
(These are 4 broad shapes, but there is INCREDIBLE variation in cane handles. Research heavily what will be best for your character's specific needs!)
The handle is the contact point for all the weight you're putting on your cane, and that pressure is being put onto your hand, wrist, and shoulder. So the shape is very important for long term use!
Knob handles (and very decorative handles) are not used for medical use for this reason. It adds extra stress to the body and can damage your hand to put constant pressure onto these painful shapes.
The weight of a cane is also incredibly important, as a heavier cane will cause wear on your body much faster. When you're using it all day, it gets heavy fast! If your character struggles with weakness, then they won't want a heavy cane if they can help it!
This is also part of why sword canes aren't usually very viable for medical use (along with them usually being knob handles) is that swords are extra weight!
However, a small knife or perhaps a retractable blade hidden within the base might be viable even for weak characters.
![[Image text] 4 Major base shapes (significant variation and uses). Adjustable base. Aluminum, standard modern medical, adjustable height, rubber base, wears down over time. Tripod/ quad base. If you need extra balance. Terrain attachment (varies, this is for ice). Removable, helps stop slipping on ice/snow/sand/etc, some canes have a retractable tip for ice. Classic base. Non-adjustable, custom only, modern standard still has a rubber base.](https://64.media.tumblr.com/78d350cfac4077376b7ce521a9a7d929/f831b3159e1d7635-ab/s500x750/4b4a6b8062c06686baf17c83c28b793bfb89e05b.jpg)
Bases have a lot of variability as well, and the modern standard is generally adjustable bases. Adjustable canes are very handy if your character regularly changes shoe height, for instance (gotta keep the height at your hip!)
Canes help on most terrain with their standard base and structure. But for some terrain, you might want a different base, or to forego the cane entirely! This article covers it pretty well.
Many cane users decorate their canes! Stickers are incredibly common, and painting canes is relatively common as well! You'll also see people replacing the standard wrist strap with a personalized one, or even adding a small charm to the ring the strap connects to. (nothing too large, or it gets annoying as the cane is swinging around everywhere)
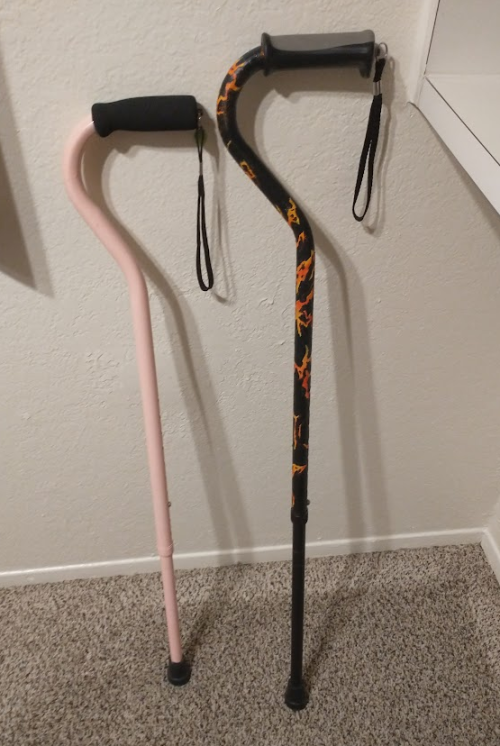
(my canes, for reference)
If your character uses a cane full time, then they might also have multiple canes that look different aesthetically to match their outfits!
When it comes to practical things outside of the cane, you reasonably only have one hand available while it's being used. Many people will hook their cane onto their arm or let it dangle on the strap (if they have one) while using their cane arm, but it's often significantly less convenient than 2 hands. But, if you need 2 hands, then it's either setting the cane down or letting it hang!
For this reason, optimizing one handed use is ideal! Keeping bags/items on the side of your free hand helps keep your items accessible.
![[Image text] Where to put your stuff. Purses/bags. A lot of size range, Can mess with balance, Zippers are too hard with one hand, Handheld means you have no hands, over the shoulder only. Fanny pack. Accessible with one hand, Limited space, Good for balance. Backpack. Very physically comfortable, evenly weighted, holds a lot (medicine, foldable cane, emergency supplies, etc) can't access without fully stopping and putting cane down/hooking it on arm/dangling on strap. Pockets. Can only use on free side, many outfits don't have good pockets.](https://64.media.tumblr.com/de0f85e864c0ac470fb08900d78d8375/f831b3159e1d7635-21/s500x750/dbc646d95d144bb9c097f220361f074cc4b59584.jpg)
When sitting, the cane either leans against a wall or table, goes under the chair, or hooks onto the back of the chair. (It often falls when hanging off of a chair, in my experience)
When getting up, the user will either use their cane to help them balance/support as they stand, or get up and then grab their cane. This depends on what it's being used for (balance vs pain when walking, for instance!)
That's everything I can think of for now. Thank you for reading my long-but-absolutely-not-comprehensive list of things to keep in mind when writing or drawing a cane user!
Happy disability pride month! Go forth and make more characters use canes!!!


My first anatomy tutorial. How I connect arms to the torso. Simplified the muscles for better comprehension
PS. Pectoral is misspelled as “pectorial” in the picture. Don’t make that mistake haha
And I’d love to see the art made from using these as reference, you can message or tag me.. whatever you want
Edit: The extended names of the muscles:
Neck - Sternocleidomastoideus
Traps - Trapezius
Lats - Latissimus Dorsi


Source: Gregor Kari
Here's some notes on some of the upper body muscles so you, artist, don't need to look them up


They are not medically accurate, just enough for artists to know the necessary muscles and how they work together
I 100% recommend doing the last exercise I did to be able to actually place the muscles
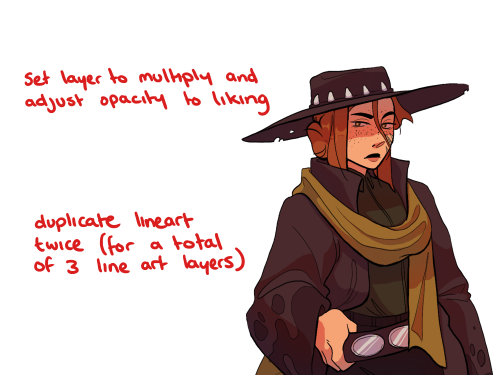
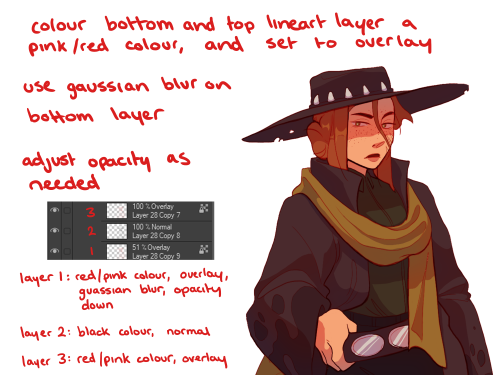
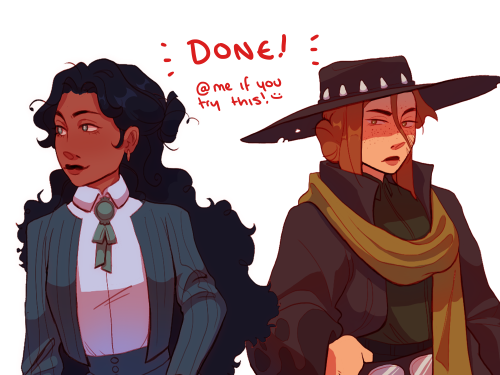
Short thread on how to do minimal work on shading and line art that makes your art 1000 times better
sorry if this is confusing, ask and I’ll try to clarify

would you like a nice glass of


This made me so fucking angry I have to inflict it on all of you.

Look at these goobers


And some wallpapers cause why not


And then they went back home and watched a movie or something
vegans make peace with honey
no shut up do it
Unmute !


dads the same in all universes
How Animals Eat Their Food
Jason & Friends

i love cheating if you don’t cheat what the hell is wrong with you
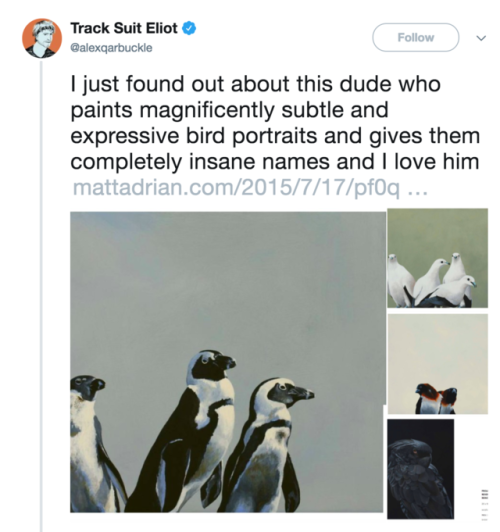
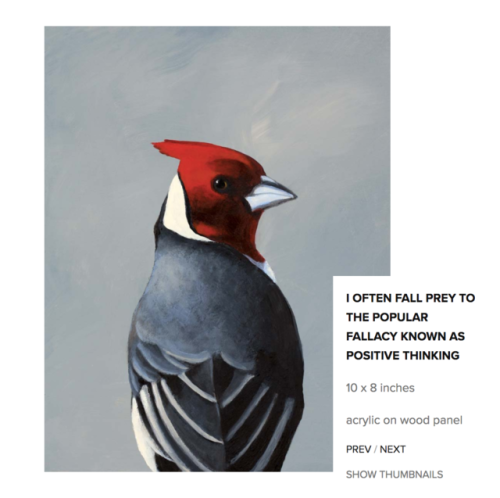
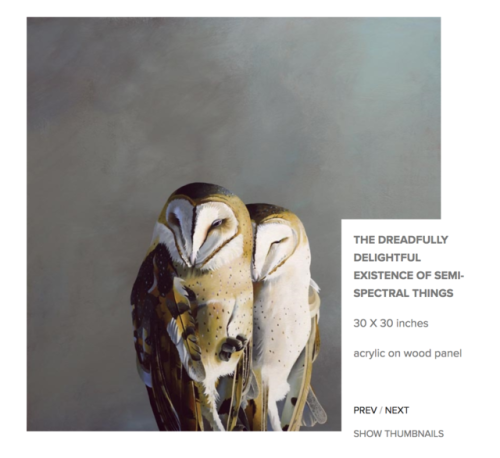


Tag yourself I’m the “Overdressed and Underappreciated”. Artist : http://www.mattadrian.com/
Isn't Hannibal problematic...
no, but i understand the confusion! it's a common misconception, but serial murder and cannibalism are okay in real life.
What makes you think it’s okay to watch Hannibal given its subject matter?
sometimes i watch television shows for entertainment purposes.
A booked and busy king!!

