
Hhhhh Your Art Is So Beautiful U V U. I'm Wondering If You Could Do Some References On Backs? Of Course
hhhhh your art is so beautiful u v u. I'm wondering if you could do some references on backs? Of course only if you have time and feel like doing so o v o;;;


forgive my handwriting I HOPE THIS HELPS A LITTLE BC IM NOT RLY SURE IF IT MAKES SENSE also here are some pics of rl backs which you can also locate via google 1,2,3,4,5(nsfw bc butt)
-
 user-with-no-name liked this · 8 months ago
 -
 manycowboypirates liked this · 9 months ago
 -
 landipan liked this · 9 months ago
 -
 d0g-m0tif liked this · 9 months ago
 -
 goartplease liked this · 9 months ago
 -
 goddessofcoloredpencils liked this · 9 months ago
 -
 the-letter-horror-lover liked this · 9 months ago
 -
 givemethelore reblogged this · 10 months ago
 -
givemethelore liked this · 10 months ago
-
 toffeesbabbles reblogged this · 10 months ago
 -
 sweethoneybear reblogged this · 10 months ago
 -
sweethoneybear liked this · 10 months ago
-
 killlerfang1 liked this · 10 months ago
 -
 enzaiety liked this · 10 months ago
 -
 h1ghndry liked this · 10 months ago
 -
 escuerel liked this · 10 months ago
 -
 a-boring-boi reblogged this · 10 months ago
 -
 hiimsuperawkwarddontmindme liked this · 10 months ago
 -
a-boring-boi liked this · 11 months ago
-
 arthalo reblogged this · 11 months ago
 -
 diabolic-wave liked this · 11 months ago
 -
 artking-4 reblogged this · 1 year ago
 -
 mochi-paradise liked this · 1 year ago
 -
 origami-crab liked this · 1 year ago
 -
 velqur liked this · 1 year ago
 -
 imperiel liked this · 1 year ago
 -
 kammavenus liked this · 1 year ago
 -
artking-4 reblogged this · 1 year ago
-
 courtjestrr liked this · 1 year ago
 -
 marikolove07 liked this · 1 year ago
 -
 zorosnavigator liked this · 1 year ago
 -
 cremebrulee-69 reblogged this · 1 year ago
 -
cremebrulee-69 liked this · 1 year ago
-
 archiveoffavstuff reblogged this · 1 year ago
 -
 mistkissedmoon liked this · 1 year ago
 -
 k4karma liked this · 1 year ago
 -
 ikolaiigh liked this · 1 year ago
 -
 starrylibraryofresources reblogged this · 1 year ago
 -
 kaoarika liked this · 1 year ago
 -
 ghostlyculturepeach liked this · 1 year ago
 -
 goeth878897 liked this · 1 year ago
 -
 voidref reblogged this · 1 year ago
 -
 llama-grimoire liked this · 1 year ago
 -
core29394 liked this · 1 year ago
-
 nuttseeker liked this · 1 year ago
More Posts from Voidref


sorry for any grammar mistakes
long time without a tutorial… I tried to explain my general process of working here, hope someone will find it useful :)


hey you said companion tarot cards usually use really specific and limited color schemes and i was wonder what you mean by that? like what kind of colors or what kind of schemes do you mean?
Hi anon! This is kind of a complicated one so I drew some diagrams : D


From my observations, most of the cards seem to be built on a warm/cold contrast over a spread analogous palette. It’s the ratio of these colours that is important to the overall tone - while some are fairly even analogous, others are instead simply complementary with an accent or even complementary without an accent (e.g. Varric’s lyrium card).
Typically, one colour will come strongly saturated with the other less so, but they will remain within a sort of ‘traditional’ range so as not to look too obviously digital. I would stress the use of hue and saturation gradients and shifts as you paint or fill in your shapes, but the shapes should remain clearly readable as a single colour. Most shadows are also full of colour - for example the ambient occlusion shadows on Hawke’s arms are full of cold greens and warm reds. Blend in some of the opposite cold and warm colours into the highlights and shadows to give the image more coherence where it is painted (this is particularly the case in the Bull/Qunari card).
Bear in mind this is just colour stuff and of course there are a lot of other steps to the cards, but I hope it helps : D Good luck!
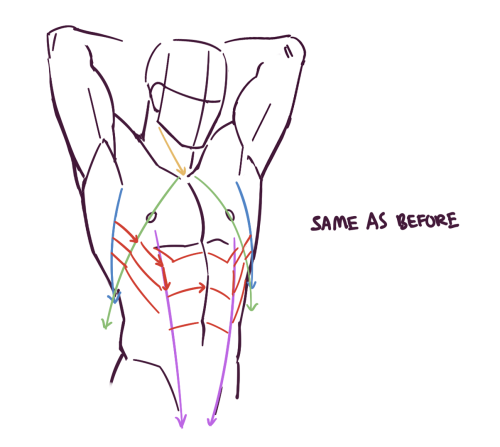
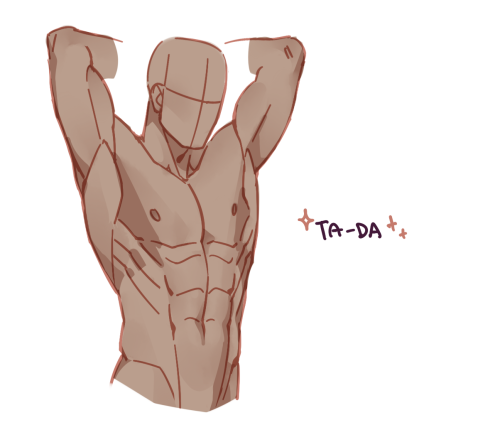
by any chance could you do a lil tutorial/process of how you draw limbs in different poses? esp. legs/thighs, your legs always look so jaunty and charming i love it but i never know what to, ,, ,,, do with mine, like where to put them so
Okay! I’m going to try to answer this best I can, but before I do, please remember I am just a humble animation student and by no means a professional artist or a seasoned expert, so this might not be the correct way to do things or be extremely accurate. This is just how I do it, and a couple tips I’ve picked up from teachers at school.
First of all, getting familiar with the anatomy of legs helps a lot! (I know this is the dreaded answer to every art question) I don’t know too much about the muscles of the legs other than the basics, so I don’t talk about them here because I don’t want to look like an idiot. They’re very worth studying though, especially the muscles that form the inside of the thigh and back of the calf.

Those are some leg studies I did from life in class last year, with the key parts labelled.
Chances are you’ve tried to draw legs and??

Unless you’re going for a certain style, legs that look like straight tubes or 90 degree angles are gonna look a bit weird.
As you can see with the life drawings above, legs have certain natural curves and rhythms to them! None of the bones in the legs are straight or tubular, so your legs should not be either.
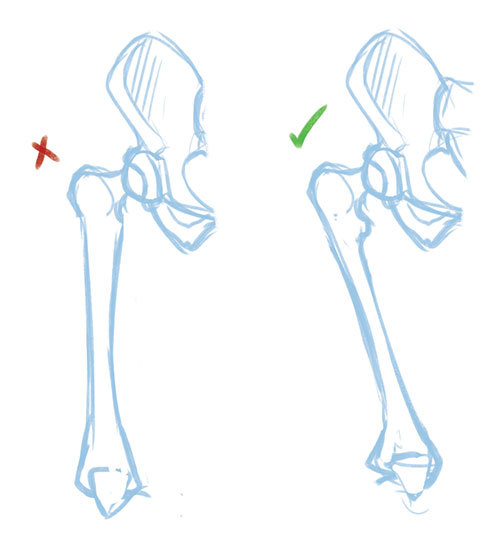
Sorry for the really mediocre pelvis it’s not my strong suit oh god. It’s easy to characterize the legs as something like this:

Remembering that the knee is a hinge joint and that it has a sort of curved offset from the upper leg to the lower leg really helps.

So when you keep that offset in mind and apply some curves over the muscle and fat layered on top of those BEAUTIFULLY RHYTHMIC bones, you get dynamic flow in your legs. The hip (trochanter), kneecap (patella) and ankle (fibula/tibia malleolus) are good landmarks to keep in mind.

So by applying some curves, you get a softer/more dynamic/rhythmic feel to the legs that makes your figure look a lot less static even if they are standing entirely still. It’s also worth noting most people shift their weight onto one hip or another, position their feet weirdly, etc etc.
Hope that helps!
Watercolour Skin Tones

Hi there! Thanks for your question. I don’t have these down to an exact science, but there are just a few colours I tend to use for skin tones with different ratios for each. I’ve tried to break it down according to how I think about them - I’ll first figure out whether the person is cool or warm-based. Cooler skintones have more blues in their undertone, and warmer have pink/yellow undertones, and there’s also the occasional neutral skin tone that almost reads as a green (sometimes found in olive-skin types). I always start with a very, VERY light wash of a colour, and this could be either a pale version of their final skintone or the undertone - usually a blue, yellow, or red. Afterwards I’ll start layering colours on top of that, to finally reach the darkness of colour I want. The colours used for the images below are lemon yellow (cool yellow), new gamboge (warmer yellow), quinacridone red (warmer red), quinacridone magenta (cool red), phthalo blue, and burnt umber in Daniel Smith watercolours. Sorry for the wonky face drawings, but here we go:

A very, very watered down mix for those who pretty much burn if they go out in the sun, new gamboge & quin. red. These types are very pale and tend to be bright pink-based. I’d say you could get away with the skin base being the white of the paper and just use straight-up watered down red for the very porcelain.

A darker version of above - starting to use more yellows in the mix. New gamboge & quin red. Still pink-based.

Starting to use more yellows here, with lemon yellow coming into the mix alongside new gamboge & quin red.

This is the same exact mix as above, except I layered down lemon yellow first, and then the mix of new gamboge and quin red on top of it later. It’s similar but reads more yellow.

Getting into the more olive-skinned territory with the addition of phthalo blue.

More blue, with new gamboge and quin red, and darker make a tanner skin tone.

Started using burnt umber into the mix for a richer colour, leaning red here with new gamboge and quin red.

A darker almost brick-coloured skin tone, with new gamboge, quin red, phthalo blue, and quin magenta coming into the mix.

Reddish undertone with new gamboge, quin red & magenta, phthalo blue.

Gold-based undertone - this one’s just new gamboge and burnt umber.

More neutral undertone with new gamboge, burnt umber, and phthalo blue.

Dark skin with blue undertones - burnt umber and phthalo blue with the smallest smidge of quin magenta.
I’ll usually put a bit more saturation into the skin tone mix for blush and lips, and some blue into the shadows. Again, definitely start light and layer layer layer until you find the colours you like. Experiment with what you have and see what works for you. Hope this helps!