10 Days CAS Challenge By @musicalplumbob


10 days CAS challenge by @musicalplumbob 😋
This sim is the spoiled brat.
I think she is not really mean. Well she just doesn't know what to do with her life. Her interests are endless, but she loses the sparkle really quickly. So only thing that she knows it's to show her leadership to everyone 👑
-
 atomiclight liked this · 4 years ago
 -
 persianflaw liked this · 4 years ago
 -
 brightblueinky liked this · 5 years ago
 -
 musicalplumbob liked this · 5 years ago
More Posts from Windenfalls
Editing Tips!
This isn’t quite a “How I edit my screenshots” tutorial, but it is some advice for those of you who like my editing style and want to try something similar yourselves. Go to my Resources page to find links to most of the brushes I use regularly. Although, it is recommended you have a graphics tablet, tbh. If you don’t have one, you can for sure still make pretty CAS edits, and these tips are adaptable, but I couldn’t tell you how to go about it, either. Take it as an opportunity to get creative and succeed over your current limitations :D
1. Cleaning up the Screenshot.

I use the Topaz Clean + Texture Smoothing actions from the Clean and Clear Set. This isn’t necessary, but I do this before I cut out the sim from the background using Select and Mask (here’s another tutorial that focuses on cutting sims out from backgrounds).
After that is where the true clean up begins. Even though what is pictured up above is pretty smooth and clean, I’m still going to go around almost all of the edges and draw my own, usually keeping in mind where my light source is and how it’s hitting my sim (Google is your best bet on shadow and light; I would be crap at explaining it).
Before:

After:

The basic concept here is making the folds and edges clear and smooth. You’re tracing over what’s already there (unless there’s clipping to fix; you’ll probably have to draw new stuff if you’re fixing clipping body parts or clothes… yay…)
2. Depth with Shadows + Highlights.
I use a very dark, almost black navy blue as my shadow color. There are a lot of other ways to achieve a similar effect you can find through Sims 4 Edits on YouTube, but that’s what I do. And white is my highlight.
You’re basically following where all the shadow and light is already laid out for you. I also use the select tool to select my entire sim. After that, I create a new layer (super important!), make the opacity of my airbrush about 50%, and then place down the shadows and highlights. Somewhere between shadow and highlights, I change the layer style to overlay.
Before overlay:

After overlay:

And along the way, you use an airbrush smudge tool to keep things where you want them. I also tend to top the highlighting with a hardbrush, 100% opacity white like this:

3. Color Balance
I adjust the color balance in all of my edits. All of them. Even my gameplay shots, too. Some people do this through Curves, but I use Color Balance. It is a testament to my lack of pro knowledge that I honestly couldn’t give you any theory about how to correctly use Color Balance…. I just mess with it until it looks good.
Before:

After:

As you can see, I used Exposure, too. I adjust it very slightly because usually, with all the highlights and shadows I’ve already given this piece, anymore through exposure would ruin the look. Sometimes I mess with Vibrance, too.
4. Gaussian Blur
I am a little addicted to the soft, dreamy sunlight aesthetic. Not only does it cover up some of the flaws I was either too lazy or otherwise lacking in talent to properly correct, but it can give an edit that final flare it needed to really feel finished for me. If that makes sense?
Anyway, I tend to do this before color balance and all the other adjustments, but that’s mainly just a preference thing. First, we’re going to make a new layer that merges all the previous layers without actually merging them. (I’ll be using a different edit as an example here).
Ctrl+Shift+Alt+E

If you did it right, the new layer will pop up above all the layers below it that it merged together.
Then, you go up top, go to Filter>Blur>Gaussian Blur and decide how much blur you want to start with. From there, with your blurry top layer, make the eraser an airbrush, turn the opacity to 20-30%, and start erasing away the parts of the pic you want to gradually become clearer.
Before:

After:

And that’s the gist of it!
If you’re anxious about your Sims edits or even just your art in general, know that I eventually when from this to that in the span of like 4 years.

So if you’re not good now, that’s not to say you can’t eventually be better in the future so long as you continue to make the effort and practice with purpose.
Hopefully, this was helpful to someone :O

These poses override some of the Gallery poses for female sims. I didn’t merge the files so you can pick only the ones you like (top left is 1, top right is 2, etc). The poses are close-ups and they make really silly portraits if the household has many sims :’)
• ♥ Download ♥ •
Let me know if they don’t work as intended! Happy simming!
I like her so much 😍

simblreen gifts part two! 🔮👻🖤
• hair • accessory bangs • bodysuit • skirt • fishnets • earrings • rings • liner • boots
thank you to all creators: @aharris00britney x @ayoshi x @dogsill, @atashi77, @dear-solar, @trillyke, @helgatisha, @viiavi, @simpeaches, @crypticsim, @sentate ♡
Love it 😍

HERE IT IS GUYS! my first lookbook video! i’m so proud and excited to finally share this with all of you. thank you to everyone who encouraged and motivated me to do this, you’re all so amazing!
✨ please check it out and leave a comment letting me know what think! ✨
all cc links can be found here. 💕 also, a special thank you so much to all of the wonderful creators whose content i used! ♡
I actually want it irl 😍
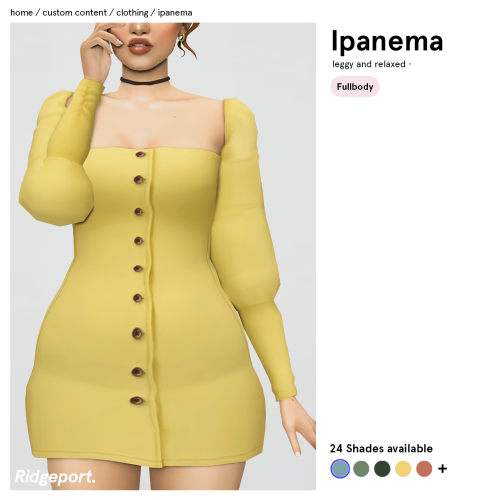
Ipanema Dress •
my cc niche is very quickly becoming recreating dresses from reformation lmao!! but anyway, this is based on this dress irl - aka a square necked bishop sleeved button down dress. it’s fun! hope u like it!!

24 swatches from @softerhaze‘s gorgeous wildflower palette, including a white swatch and a few patterns
feminine frame; teen-elder (enabled for both frames)
morphs, custom shadow, bump, spec map & thumbnail
base game compatible
note: there will be a bit of clipping due to the size of the sleeve
let me know if you have any issues!
Download. (ALWAYS FREE on patreon)