A place of random musings and writings from a quietly disturbed individual.
128 posts
Wolfbison - The "Blank" Page - Tumblr Blog
This is important. :D
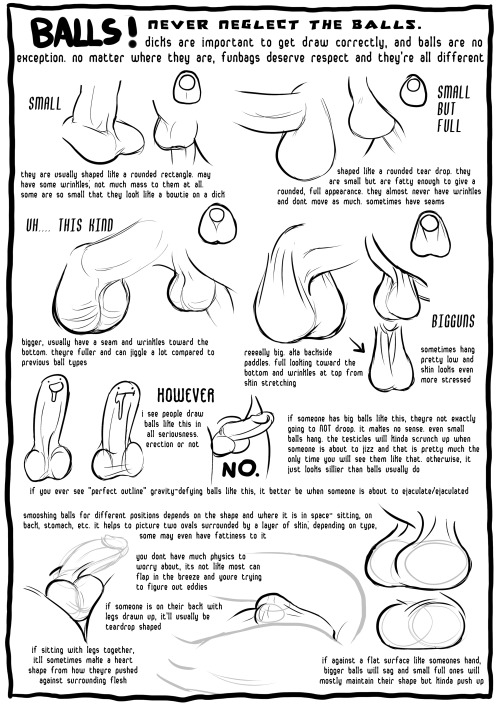
i cant believe i did this i am sorry for this contribution
i just really love balls ok

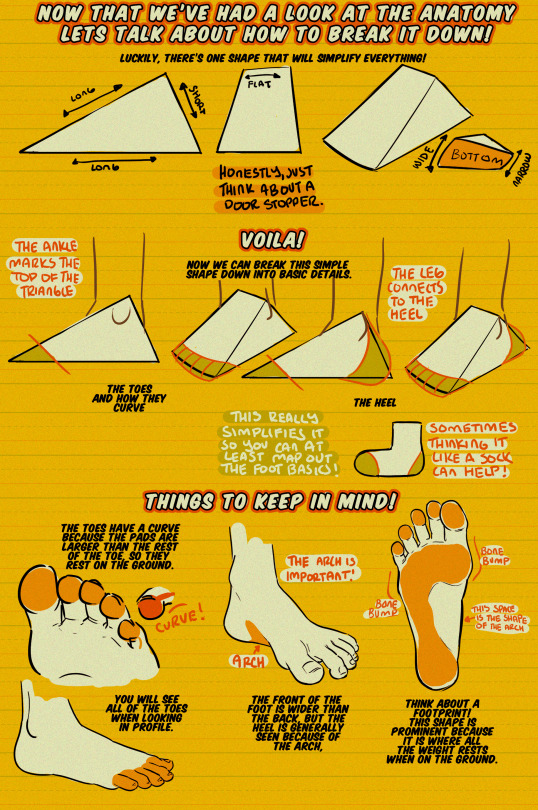

Hey friends, it’s Meg!
Back for another TUTOR TUESDAY! Today we take a look at feet and how they work! I’m always looking for recommendations, so if you have anything you’d like help with feel free to send it in here or on my personal blog. Keep practicing, have fun, and I’ll see you next Tuesday!
I CAN'T EVEN.
OMFG
I really love his process. Such amazing stuff.
Painting process


What are studios looking for? How can I get into a good animation school? What should I be studying?
I get a lot of these types of questions now and again, and I never know how to answer them. I can’t be sure of what studios are looking for, I don’t control admissions policies to schools, and I have little idea what makes for a current and relevant curriculum. There are a lot of variables in your bid for a career in animation, and it’s kind of impossible to control most of them. You must be crazy to want this job!
I find it helpful to focus on the things I can control. Among those things are your study habits and how you spend your personal time. It’s good to work hard and have goals—without them we would get nowhere. Study hard and make decisive strides towards achieving your art goals. But in the heat of that pursuit, don’t forget to go out and live your life!
If you spend any amount of time looking at artists online, you’ve probably figured out by now that there are about a million dudes and dudettes in internetville who draw better than you (I relive this realization daily). Once your have done your best to rise to their level, the only tool you have to compete with these crazy talents is your background, your personal character—is you!
Consider developing your whole self with the same raw focus and intensity that you develop a particular skill set. Get focused. Go out, have adventures. Run, jump, skin your knee, fall in love, root loudly for the away team at a baseball game, barely escape a crash of stampeding rhinos, live to see another day. Experience things big and small. Go for a walk. The world is full of wonders.
I know this advice is not particularly animation-specific, but maybe that’s for the best. At any rate, it is something I feel strongly about. Animation is great, and there are few things that I enjoy doing more than drawing and storytelling. But in order to have stories to tell, first you have to live them.
Be good, and see you soon!
PS, if you were looking for advice on draftsmanship you should probably be reading this.

I see this kinda advice passed around all the time here is the thing: shading with black will indeed look bad if you don’t know what you are doing. However, telling people not to do things without explaining why is terrible advice.
Shadows are the opposite of light, this includes in colour.
This means that if you have light in one colour, the shadow will be of the opposing hue, saturation, and value.

Unless the object is white, it has its own local colour - the object’s true colour, how it would appear if the light were pure white.
The colour of the light influences the local colour of the object. so if you had yourself a brown cube and a blue light, the colours would get bluer and pinker.

now the reason shadows do not tend to be black is because pure white light is hard to find in nature.
the closest you will get to pure white light is during a really overcast day and the sun is filtering through the clouds, but even then it’ll lean towards yellow so the shadows will be slightly blue.
During a clear day, the shadows will pick up a lot of bounce light from the blue sky and have a blue tinge. You can learn more about this in this tutorial: [http://artbyriana.deviantart.com/art/Why-shadows-aren-t-gray-321656856]
But! None of this means you are never allowed to use black.
realistically shadows will have a hint of a colour to them, but stylistically you might be going for, say, a film noir look and deep black shadows are needed for impact for example.
The more you know about how light works, the more informed decisions you can make about shading and the more options you have.
If someone tells you that you can’t do something, they’re wrong! you can do what you like!
yes, black is hard to use and if you just mix a colour with black it’ll get muddy, but thats easily resolved by choosing your colours manually - which ideally you want to do regardless bc the computer doesnt have your eyes & cant choose the colours you like

basically if someone gives you some art advice and says you can’t do something, they’re wrong! you can, you just might need to study a little to figure out how to make things work.
I mean for example, people will say you must make your composition follow the rule of thirds and never align centrally, but while the rule of thirds makes it easy to create visual interest, Mad Max Fury Road is a testament to the fact that central composition can and will work if you experiment.
there are no rules in art! there are theories based on reality, this has been a post on colour theory & light theory, but they exist to inform you, not to restrict you.
Do what you like! Trust your eyes, if you think something looks good, then great! If you don’t, then research & experiment until you do.
Also if you wanna learn more abt colour theory, I go into it in a lot more depth over yonder: http://helpfulharrie.tumblr.com/post/131822744966/ http://helpfulharrie.tumblr.com/post/131958395841/


Here is a comic I made for the newest issue of Broken Pencil Magazine (#60, summer 2013). Note: I ignored most of my own advice to get this thing done. Update: I cross-posted this to my regular blog so that it’s a readable size, and not that crappy, microscopic tumblr size.


If you’re someone who wants to make original stuff for people to see, DO IT!!!
Your worth as an artist is not determined by the number of Tumblr notes you get. Followers are NOT a currency. Don’t worry about instant gratification, because you’re creating something only you can own for the rest of your life! It will take you longer to build up an audience around something that doesn’t have a pre-loaded fanbase. In fact it’ll probably take longer than you think, but you’ll have a much more satisfying artistic career.

Texture x2 by betsyillustration


More tips:
Just use any old toothbrush. I used to use the ones that my dentist would give me after a visit, just because those were kind of cheap and I wouldn’t actually use them anyways.
I use acrylic for flicking and highlights because watercolour-whites tend to fade when they dry.
Also, remember to keep your hands clean, because nothing’s worse than smudging graphite into your watercolours and then unable to get it out.
Try to avoid black and white when possible. They tend to dull the colours and it loses that watercolouring lustre.
Tools:
The closest I could find on Amazon to the watercolour set I use is Talens Japan watercolour, but I think the closest american version is the Koi brand.
Canson Fontenay. I’ve never used Montval from Canson but it’s the only Canson watercolor block i could find on amazon
I’d say Arches has better paper though.
Since I started watercolouring again for my daily sketches, I’ve gotten a lot of asks/dA notes on if I could give a tutorial on watercolouring and also more specific questions that overlapped each other, so I decided to do a semi guide/tips/answering thing.
I actually started watercolouring before I went into digital medium, so I have a bit of personal experience, but I am essentially self-taught when it comes to watercolouring since there weren’t a lot of watercolour tutorials online back then to begin with, so I cannot promise that these are the absolute correct way of doing things.
Hope it helps anyways :)
My Other Tutorials/Guides | My Daily Sketches
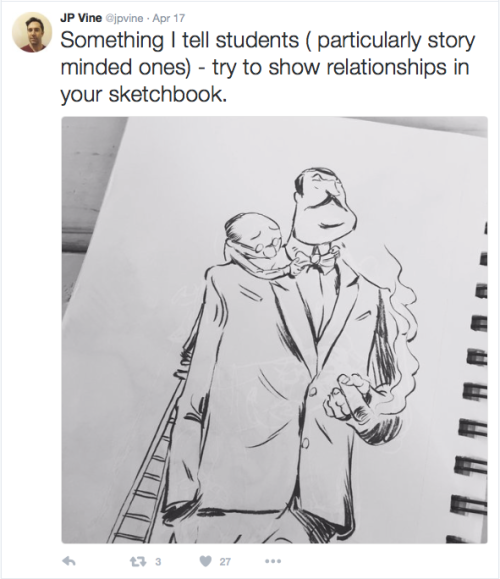

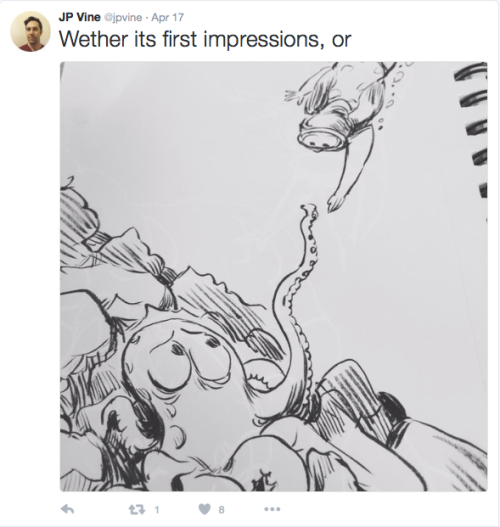

Story is in Relationships
Some great portfolio advice, by storyman JP Vine. (via twitter, obviously)
jpvine.com

HOW TO MAKE YOUR ART LOOK NICE: Lighting by trisketched
HOW TO DRAW EXPRESSIONS - A process tutorial
ALL LINKS HERE: http://javicandraw.com/2016/07/how-to-draw-expressions-a-process-tutorial/
Can you draw expressions? Doesn’t it drive you crazy when you want to draw a character and you don’t grasp how the face moves correctly? Well, in this looooong video I go through the steps of discovering what makes an expression great, and how to draw them! Join me as I look for other tutorials, use Benedict Cumberbatch’s face and draw a girl getting punched in the face! This is gonna be fun!!
Thanks for watching this video and remember to Subscribe for the best drawing lessons, tutorials and videos on How to draw eyes, head, the human body and more! All using Photoshop, Manga Studio, Sketchbook Pro and more!
Instagram: http://www.instagram.com/javicandraw Web: http://javicandraw.com DeviantArt http://javicandraw.deviantart.com Twitter http://www.twitter.com/javicandraw Facebook http://www.facebook.com/javicandraw
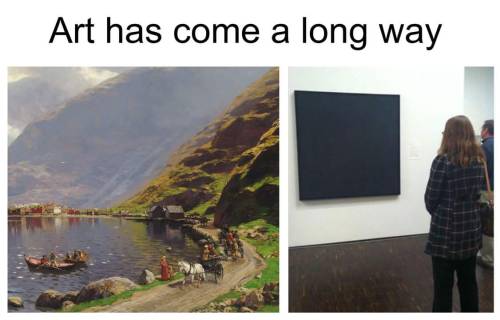
So somebody on my Facebook posted this. And I’ve seen sooooo many memes like it. Images of a canvas with nothing but a slash cut into it, or a giant blurry square of color, or a black circle on a white canvas. There are always hundreds of comments about how anyone could do that and it isn’t really art, or stories of the time someone dropped a glove on the floor of a museum and people started discussing the meaning of the piece, assuming it was an abstract found-objects type of sculpture.
The painting on the left is a bay or lake or harbor with mountains in the background and some people going about their day in the foreground. It’s very pretty and it is skillfully painted. It’s a nice piece of art. It’s also just a landscape. I don’t recognize a signature style, the subject matter is far too common to narrow it down. I have no idea who painted that image.
The painting on the right I recognized immediately. When I was studying abstraction and non-representational art, I didn’t study this painter in depth, but I remember the day we learned about him and specifically about this series of paintings. His name was Ad Reinhart, and this is one painting from a series he called the ultimate paintings. (Not ultimate as in the best, but ultimate as in last.)
The day that my art history teacher showed us Ad Reinhart’s paintings, one guy in the class scoffed and made a comment that it was a scam, that Reinhart had slapped some black paint on the canvas and pretentious people who wanted to look smart gave him money for it. My teacher shut him down immediately. She told him that this is not a canvas that someone just painted black. It isn’t easy to tell from this photo, but there are groups of color, usually squares of very very very dark blue or red or green or brown. They are so dark that, if you saw them on their own, you would call each of them black. But when they are side by side their differences are apparent. Initially you stare at the piece thinking that THAT corner of the canvas is TRUE black. Then you begin to wonder if it is a deep green that only appears black because the area next to it is a deep, deep red. Or perhaps the “blue” is the true black and that red is actually brown. Or perhaps the blue is violet and the color next to it is the true black. The piece challenges the viewer’s perception. By the time you move on to the next painting, you’re left to wonder if maybe there have been other instances in which you believe something to be true but your perception is warped by some outside factor. And then you wonder if ANY of the colors were truly black. How can anything be cut and dry, black and white, when even black itself isn’t as absolute as you thought it was?
People need to understand that not all art is about portraying a realistic image, and that technical skills (like the ability to paint a scene that looks as though it may have been photographed) are not the only kind of artistic skills. Some art is meant to be pretty or look like something. Other art is meant to carry a message or an idea, to provoke thought.
Reinhart’s art is utterly genius.
“But anyone could have done that! It doesn’t take any special skill! I could have done that!”
Ok. Maybe you could have. But you didn’t.
Give abstract art some respect. It’s more important than you realize.

The Breakfast Club
What this movie did for me.
My parents left it up to me and my (step)sister to pick a movie. I wanted some forgettable 80s action/adventure movie. My sister wanted this. I cried. We went.
My first day of high school, the 13s had spent the night camped out at the school. I showed up and a boom-box was blaring Simple Minds’ ‘Don’t You Forget About Me’ as I showed up.
My last night out in August ‘90 with my buddies in Hull, dancing in a circle, arms around each other, was to that song.
Bookends.
I watch this movie to this day, and can recite almost all the dialogue. Sad. And wonderous.
Thank you cast. Thank you Simple Minds. Thank you John Hughes.
Source: Johanna the Mad
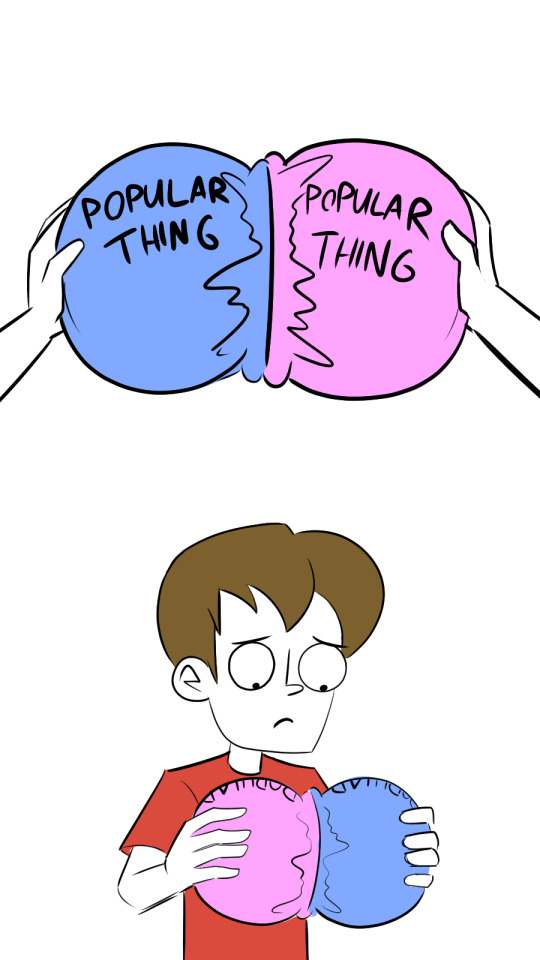
It still surprises me at how few people have seen Freak of the Week, and I love sharing it with friends because of the inevitable, “How the hell have I never seen this?” look of awe drawn out on their face.
And man, it really is gorgeous.


Directed by Juanjo Guarnido, it took the team about a year of hard work to hammer out this bloody masterpiece (which you can learn about in his video here) using a combination of 3D animation with the power of college interns skill of a team of artists to painstakingly re-draw the 3D elements they wanted in 2D frame-by-frame, not to mention the post processing and… everything else.
Even though it came out in 2014, it doesn’t seem to have ever garnered the attention it truly deserves.
I really wanna drive this point home, so to give you an idea, Ghost by Mystery Skulls, animated by MysteryBen27 has 18,147,263 views. Freak of the Week has only 2,271,121 views at the time I’m writing this. That’s fucking depressing for something so … phenomenal. I want more of this, and hell, maybe you do too. But we’re not going to see anymore simply because the right people haven’t seen it. In fact, it failed to reach a respectable level of Internet Popularity®, Juanjo himself even described it in the comments section as having ruined him because of how little attention it got.
So if you’re reading this and you’ve got some connections with a TV network or something, consider pulling some strings to get this video spoon-fed to the masses, because people ought to see this. I’m sure Juanjo would be all too happy to oblige. And hell, if you wanna buy the art book, you can get the link here for about $50.
Now, maybe you recognize the former Disney animator Juanjo Guarnido for his other work: Blacksad.

Which is a comic set in the late 1950′s about a hardboiled private investigator published originally by Dark Horse Comics that does… y’know, the …
… noir investigator …

… aloof ladies man…

… badass …

… detective story thing.

That I haven’t yet read but I TOTALLY NEED TO.
Look,
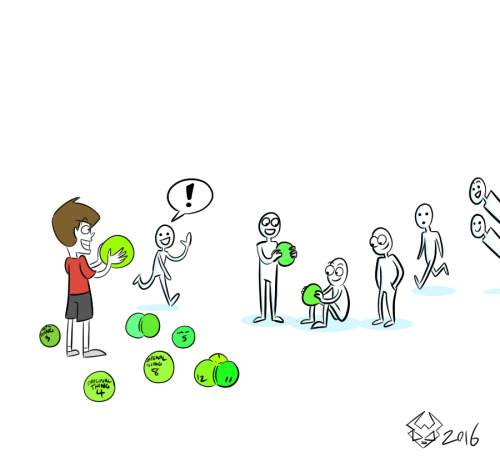
I guess I’m bringing up Freak of the Week because I was reading the comment section and, man, it kinda got me down.

Some of the best things things out there just haven’t been seen by the right people, I guess. But I suppose it’s also a depressing statement on the culture of the internet that the video makes.

Hello again guys! Here are some tips about brushes- once again, I’m no expert, so explore these points on your own! Some of these are a little more abstract, while others are to help deal with minor brush annoyances ;) 1. PHOTOSHOP BRUSHES are based on a “stamp” system, not a brush system like some painting programs. That is why photoshop brushes are great for things like chains and repeated patterns, but you have to fiddle with them a bit to make them look natural. 2. The first brush setting underneath the brush panel you must become familiar with is “transfer.” this tab plays with the opacity and flow of the brush. 3. As stated in previous tutorials, the essential hotkeys for brushwork are: [/]= brush size larger and smaller alt= eyedropper tool Numbers= opacity of brush Shift+Number= flow of brush 4. Brush icon not showing up/ behaving correctly? Usually one of four things: Caps Lock is on, Edit in Quick Mask Mode is on (which can be found on your left main tool panel), the brush blend mode is on a different setting (found next to opacity and flow), or you have something selected (crtl+d will do the trick). 5. DON’T knock the photoshop brush sets that come with the program. Many artists I know use these brushes while tweaking the settings. Consider utilizing settings such as dual brush and texture to make these ordinary brushes great. 6. Brushes with large amounts of detailed texture tend to pixelate and not work correctly when scaled down too far. 7. Trying to create a natural brush tip? Brush settings>Shape Dynamics> Angle Jitter> Control: Direction. This will make the brush more natural and dependent on how you stroke your pen. 8. Do you use a signature/watermark a lot? A certain shape or pattern? Make it a brush. 9. When changing things like opacity and flow in both the brush settings and the layer settings, Photoshop will sort of get “stuck” there, and you will see the number highlighted. Simply hit enter (don’t bother reaching for the mouse!) and it will go away. 10. Rotating the canvas will help you with your brushstrokes. Shift+R rotates the canvas in nice equal increments, and is a easy way to set the rotation back to 0. 11. Texture brushes just don’t look right? Make a selection, zoom out, and make the brush slightly bigger while you paint. Think of them as big sponges, not brushes. Thanks again guys! I have a lot of tutorial requests from you, and I’ll be working through more soon! Drawmaevedraw
Attention all digital artists!
Krita, an actual FREE digital art program, recently released an Alpha 3.0 version that features tools for creating “hand-drawn animations”.
If you’re looking for an art program with more advanced tools than Paint Tool Sai but don’t want to cough up the cash, then Krita is your program. (However donations to support the people making the program are very much appreciated!)
I understand that when you first download it, the layout and tools can be a little intimidating, but don’t worry. The program comes with a manual and there are tutorials on Youtube that can help you understand the basics.
Even if you don’t want to download this program or donate, please reblog to help spread the word and tag people you think might enjoy this.
Edit: Also, there are different brush packs you can download here. And if you don’t like this program there is also MediBang Paint.
Also, the 3.0 version is out now.
Omg SO GOOD.


Disney viz dev + story artist, Paul Felix, shares tips for creating layouts.
DrawingDen’s Top Picks #1
Using Colour In Your Paintings by marcobucci
By far one of the best video tutorials I’ve come across that’s available for free, it changed how I think about colour and I really felt like I had learnt something new after watching it!
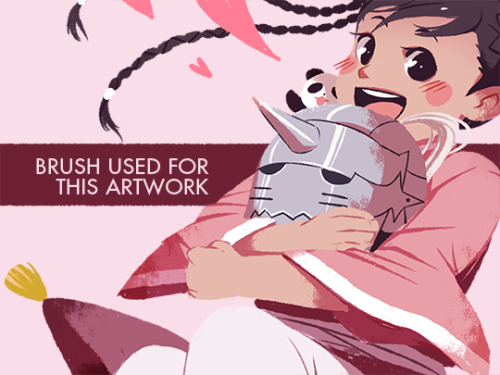
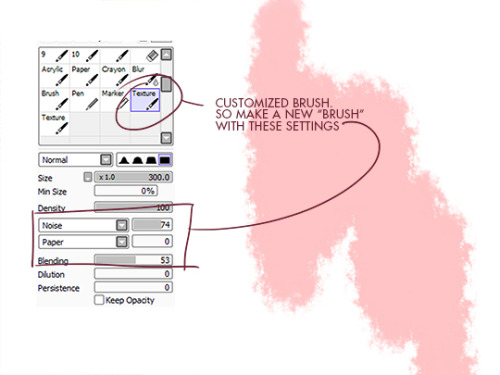
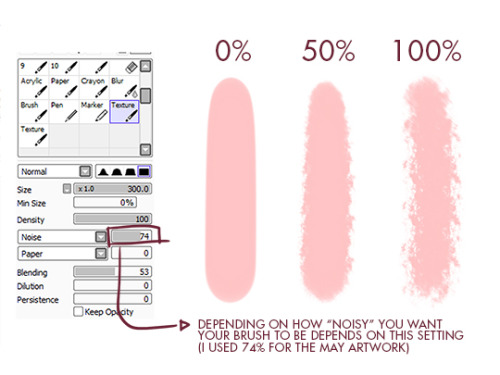
brush setting used for this artwork! (which I also used for the shadows on this one), since @blissful-baka asked for the settings :D the only problem is, the bigger the brush, and the nosier it is, the “crispness” lessens. So I guess it would depend on the kind of style you’re going for!
How to do “extra” facial expressions!
Drawing basic facial expressions is not the hardest. Most people can draw a sad face, a happy face, angry etc., but making more multidimensional expressions is more of a challenge. I have gotten a lot of compliments on how I draw facial expressions, (specifically “angsty ones”) telling me that they are very dramatic and well… expressive! And there are actually only a few things I think about when I draw faces that take them to the next level, so I thought i’d illustrate them all here!
SUPER IMPORTANT TIP BEFORE WE START: Look at your own face when you draw faces. Even making the face when you are drawing (you don’t even have to look at it), will give you some sense of how the face muscles pull and where things fold and stretch, because you can feel it. You are the best reference when it comes to facial expressions!
Angles
Draw the head in an angle that matches the expressions you want to make. It is not a requirement, but is going to add to the effect.

Symmetry vs asymmetry
A face is rarely symmetric. Unless the face the character is making is 100 % relaxed or even dissociating, the eyebrows, mouth and facial muscles will have different placements of their respective side. This image shows the dramatic impact asymmetry has on a face:

That’s the difference between a smile and a smirk!

The first one’s like “oh yeah?” and the second is like “oH YEAH??”
The “balloon squishing principle”
This is something I did subconsciously, and I didn’t know about until I made this tutorial. And this principle goes hand in hand with an asymmetric face. Basically, if you squish one part of the face, you need to even out the empty space by “inflating” the other part of the face so that it doesn’t appear shrunken. The picture hopefully explains it:

Teeth
Don’t forget to add the gum when the mouth is open to its full potential!

Squinting and folding
Adding folds around the eyes when a character is squinting makes a HUGE difference. It makes a smile more genuine and a growl more intimidating. Adding folds to the face in general makes your characters more lifelike and ‘visually relatable’. Like, they look human, and less plastic or fake.


and so on..
Pupils and irises
The placement of the iris and pupil in relation to the eyelids is very important! The less of the white you see, the more relaxed the character is.

And then of course eyebrows and eyes go hand in hand!


Gestures, spitting, sweating…
Adding more elements than just a face is key to making the character actually look like they are feeling what you want them to feel. Just the tiniest sweat drop adds to their anxiety, spitting adds frustration to their rage, slouching shoulders, waving hands, a double chin, extreme angles, the list goes on! Add whatever and see what kind of impact it makes! Does it do the trick? Great! Add it!
Over exaggeration!!
Remember that you can almost always exaggerate more. Don’t be afraid to do draw “too much” because you’re just experimenting. See what works and what doesn’t. What do you like to exaggerate?


Now that you know some theory, it’s time to practice!
Practicing!!
The 25 Essential Expressions (a classic! I’ve done it multiple times)

And the one I do when I’m bored:
Fill a page with circles and fill them in with different expressions. Try and exaggerate as much as you can!


This is mostly for experimenting. They are quicker to draw than complete faces, but the same rules should apply!
And that’s about it!
I don’t know if I covered everything in this tutorial, since some things might be obvious for me, and this post perhaps only scratches the surface. So feel free to send me a message if you want an explanation about something more in depth! Thank you for reading! And now DRAW!!! ✨🎨
Just gonna leave dis herr.


My Concept Brushes for Photoshop are live! Please tell your art friends. Thanks!
This is really important.

Via Schatky with thanks to Lickal0lli for the translation