262 posts
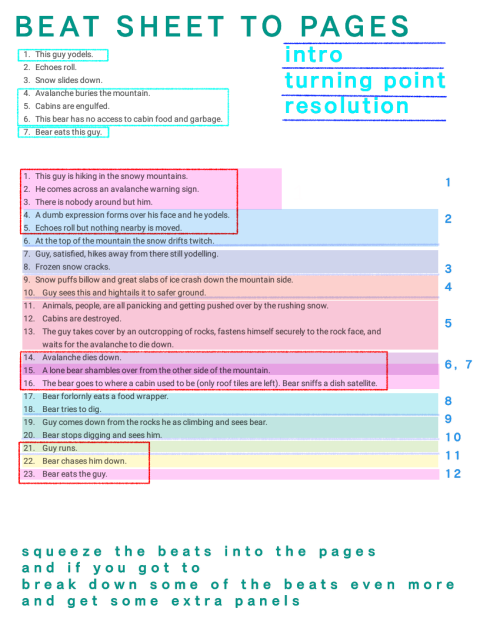
Tuesday Tips - With A Twist!Add Some Vitality To A Pose By Twisting Parts Of The Body. A Little Or A
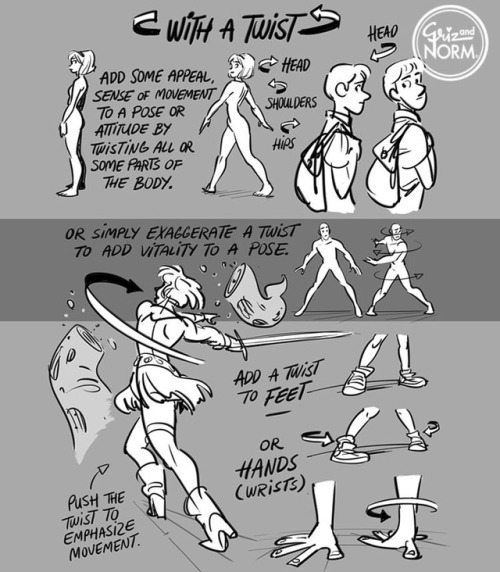
Tuesday Tips - With a Twist! Add some vitality to a pose by twisting parts of the body. A little or a lot. Give it a shot. #Norm #100tuesdaytips #WithATwist #grizandnorm #arttips #arttutorial
-
 russenoire liked this · 5 months ago
 -
 bibstirs reblogged this · 6 months ago
 -
 lobstersatan liked this · 9 months ago
 -
 someones-anachronism liked this · 11 months ago
 -
 hydrangeahelper reblogged this · 1 year ago
 -
 smolraccoon liked this · 1 year ago
 -
 wrstudio-br liked this · 1 year ago
 -
 shadowpiratemonkey7 liked this · 1 year ago
 -
 dumbify1 liked this · 1 year ago
 -
cortomaltese21 liked this · 1 year ago
-
 silverpenwrites liked this · 1 year ago
 -
 insanityinanuttshell liked this · 1 year ago
 -
 salty-sweaters liked this · 1 year ago
 -
hydrangeahelper reblogged this · 1 year ago
-
 kafbatood liked this · 1 year ago
 -
 kaorumurasaki liked this · 1 year ago
 -
 rannontmilsru liked this · 1 year ago
 -
 name-here-or-something-idk liked this · 1 year ago
 -
 glamourooze liked this · 1 year ago
 -
 aroundaroundaround reblogged this · 1 year ago
 -
 excavatinglizard liked this · 1 year ago
 -
 anonymous--anonymous liked this · 1 year ago
 -
 writingalterras liked this · 1 year ago
 -
 atsume-no-nettie liked this · 1 year ago
 -
 diacoha21 reblogged this · 1 year ago
 -
 marca-espana liked this · 1 year ago
 -
 jogging-staticbag liked this · 1 year ago
 -
 kikosoon reblogged this · 1 year ago
 -
 sirgogetter liked this · 2 years ago
 -
 arcalis-melanthios reblogged this · 2 years ago
 -
arcalis-melanthios liked this · 2 years ago
-
 the-letter-horror-lover reblogged this · 2 years ago
 -
 fawkary liked this · 2 years ago
 -
 ch3rubt33th liked this · 2 years ago
 -
 nookstoaster reblogged this · 2 years ago
 -
 r0adkillriot liked this · 2 years ago
 -
 veldora-thetsuderedragon liked this · 2 years ago
 -
 steweeii liked this · 2 years ago
 -
 koikkyu reblogged this · 2 years ago
 -
koikkyu liked this · 2 years ago
More Posts from Chikasartrefblog
I hope you don't mind me asking, you do your shadows so well and was wondering how you do them?! They set such an incredible dark mood, it makes your artwork instantly recognizable!! Thanks for your time
Im pretty shit at explaining things so i’ll use this for basic example. Firstly if you know how shadows work and stuff then it shouldnt be to hard. Otherwise go study that shit.
So you got your flat colors down for the first step

Next lay down a dark tone set to multiply, idk about 70% i guess? up to you

Start adding some shadows set on another multiply, shadows can be however dark. 50-70%

The add your light source, i used color dodge in this one. Dont use super bright color or it will look like blinding light. (again if you know light/shadows shouldnt be to hard)

I add a touch more dark in the shadows for effect…or something like that.

And there you have it, this maybe helpful lesson was brought to you by a potato, chur.


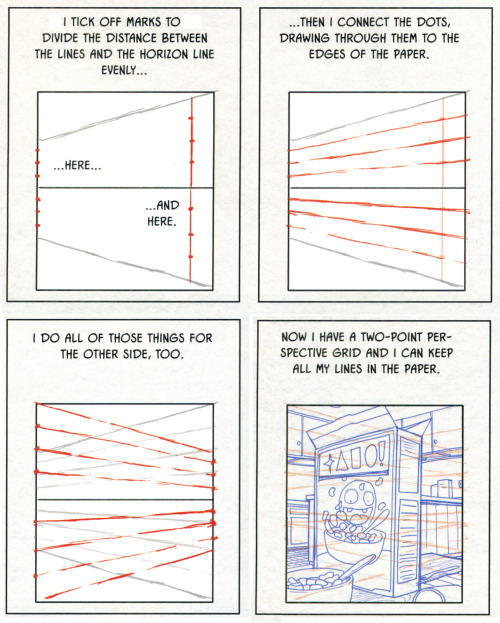
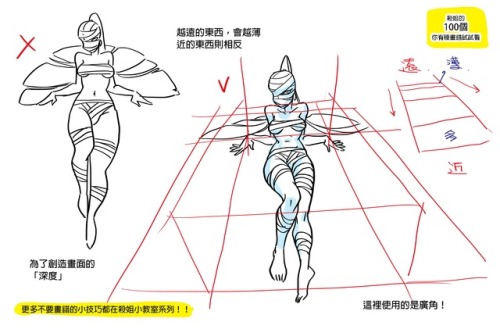
Receding objects in perspective.

Have you ever been trying to draw tiles on a wall or on the floor in perspective, but notice that after you’ve drawn them, they don’t look like they’re all the same shape or size? Well here’s a tutorial on how to fix that. Your picture probably looks like this, right?

Well, i’m here to tell you how to fix that…Let’s start out with your basics.

The gray line is the horizon line, and the black dot is your horizon line. These are essential for the first steps of perspective. Without these, your perspective may turn out wonky and just not flattering to the eyes. Right now we’ll work in One point perspective.

Now let’s pretend we’ll be drawing a hallway. Draw a vertical line where the edge of the wall is.

Now, from the tips of the bottom and top of your wall, you’re going to need to draw a line extending all the way to the vanishing point. If you’re working in photoshop you could either use the line tool, or shift+click. If traditional, you’ll need to use a ruler.

Now that we have the wall that’s in perspective, it’s time to draw the rest of the lines. here I’ve drawn the wall facing us that’s closest, the ceiling, the floor line, and the end of the hallway. ASSUMING that you are working in one point perspective, all vertical lines are straight and parallel to each other, and all horizontal lines are straight and parallel to each other.

Now here I have erased the lines that extended beyond the back wall, and found the center point of the edge of the left wall. From there, you draw an extended line just as before towards your vanishing point.
now make a vertical line where your first “tile” is.


now this may be a little hard to explain. Now you’re going to draw a line coming from the corner of the wall, through the corner where your line meets the tile you just drew, and all the way to the ground line.
You see where these two lines meet? you’re going to draw a vertical line to the ceiling from here.

Like so!

Now rinse and repeat! you should have perfectly even spaced tiles now! And if you have tiles on the ceiling


Just draw horizontal lines connecting to the vertical lines!
Now just erase anyhing you don’t need and…viola! Perfect tiles in perspective!! I hope this helps!! :D