
They/them - AroaceLego MOCs and photography with a wide range of different characters and environments, every Wednesday (in theory-)
63 posts
Trade Space Station !
✨Trade Space Station !✨
[1/4] >Next>
Finally...More than 60 hours of work, I can present my masterpiece. I have been working and planning this project for a long time. Given the sheer amount of things to talk about, I will split all of my rambling in (at least) four posts : one about the concepts, ideas, and general aspect (you're here !); one about the technical side of things; one depicting how the project evolved (using pictures taken during the construction); and one dealing with all the smaller details, ships, and such.
Enough with planning, though. Explanations, other images and more explanations below the cut !
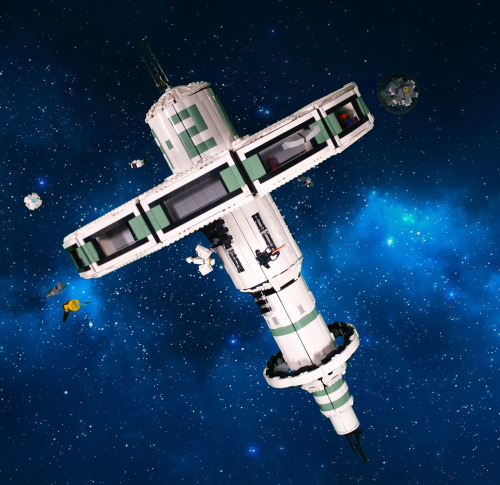
(less) edited picture of the build :

So. You might see, now that I got rid of all that pesky editing (or most of it) that there is a big arm holding the thing in place. It's easily a fifth of all the work of this build, because I absolutely wanted to hold this thing at an angle, and it's heavy, at around 15 kilograms (33 pounds). I'll talk about the technical difficulties of that in a later post, but it was important for it to be solid, because the station was the central piece of my second ever (very small) lego exhibition. AND it allowed me to meet the recruiter of a much larger exhibit. Long story short, in a month, I'm presenting this piece again (just before my exams, whoops-).
Anyway. Not only is it heavy, but it's also quite tall and wide. Around a meter at the highest point (tilted or not), while the diameter of the main ring is at around 0.75m. Quite a difficult thing to move around. Or is it ? Well, yes and no.

Here are all the main components (excluding the holding arm), when I move the piece around. Of course, all the ships are detachable (it allows me to move them around from one day to the other), but the dome carrying the antenna can also be removed, and then, the entire ring can be disconnected (that, too, was quite a challenge).
Removing the ring obviously makes it waaay easier to transport, because a single wooden plank can then be used (again, except for the arm, but that thing was made to be sturdy, so it can be transported with less care); and , once the dome is removed, I can just let the central cylinder stand upside-down (useful for storage). The only trouble I found with this system is that I once connected the ring the wrong way around, meaning everything in the small hangars was upside down. Quite an embarrassing moment.
Speaking of the hangars, I initially wanted to keep them all empty, to store ships inside, but it didn't really offer this piece the sparkle of life. Setting up these small decors inside most of them, with colors contrasting with the general theme of the build, was actually a really good addition.
The colour scheme as it is now is not exactly the one I had planned at the start of the project. I originally planned on using bright light orange (bricklink colour name) instead of sand green, but I found out that this colour was tough to find in large quantities, and I already had quite a bunch of the sand green, so this tragic decision was made. I think it would have offered a more vibrant colour to the build (resembling a Subnautica default palette, which I enjoy quite a lot), but in hindsight, the green works really well, appart from a small detail I'll expand on in a minute.
What's really funny for this project is that, when it started, I actually only wanted a nice way of showcasing all the little space ships that I tend to make whenever I have access to a small amount of cool pieces. Then came a long time where I only daydreamed about it and planned how I would want it to go, and only when I had a clear vision did I start the actual building process. So, taking all that into account, you can probably double the amount of time I spiritually spent on this project.
What I knew is that I wanted to get this huge ring held by beams to the station's body, which made the build both more interesting and more complicated that it would have been. But the challenge was appealing.
At first, the main body was completely flat and white, but I soon had to add texture, both because it was becoming ugly and because the 2*2 white curved slopes were starting to diminish fast. The first modifications I did were to add the sand green curved slopes instead to create stipes, then letters : the big A-2 you can easily spot. With the few bits of lore that I have created for this piece, you have to imagine that there are hundreds of these stations spread in the galaxy, which can be easily described through 3 criteria : the Letter, the Number, and the Colour. That would mean that, if you wanted to meet with someone at the exemplar I made, you would say something along the lines of 'Meet you at Sand Green A2'.
Texture-wise, the other element of the largest cylinder is the exposed bits of machinery, very classic in sci-fi, I know, but it does work well in this context. The second cylinder has much less textures, with only a few grates, and some 2*1 ingot pieces (because they look cool); but it also has its own, smaller ring (diameter slightly larger than the largest cylinder's).
Then come the smaller cylinders, which don't have much texture, except in their transition from one to another (barely visible in any of the pictures, but it exist).
Overall, I'm also really happy of how round it looks, given that circles are not my speciality.

Here is a completely unedited picture of the support arm (Lewa for scale), with a nice counterweight which might be necessary to hold the entire thing in place (it may not be, but I'm not trying to remove it. Bad idea.).
As you might notice, my studio is not a shelf anymore. I built something new from scratch with a green screen, because I thought it would make my editing job easier. And it would have, if I didn't use sand green in my build. Anyway, I'm keeping this for a few days, to snap some pictures of the MOCs which don't fit in my shelve (and are not green, meaning editing will be easier.
Here is the 'studio' from an outside point of view :

I know it's quite a mess outside of my clean perimeter, but I do as I can. You can see one light in the foreground, but there is also one (less visible in the background), symmetrical to the first one, and a third one behind and above the camera (outside of the picture).
You may also notice a lot of sorting boxes. Sorting pieces can greatly improve your productivity, if you label all your box correctly. Covered by the greenscreen is essentially a shelf full of these sorting boxes, labelled by colour and piece type, and it was really practical. Anyway. Thank you for reading until this point, I guess ? If you survived through all this rambling, you probably deserve something...
I mean- Have these pictures I took during the exhibition, I guess...


(You can notice that these are two different days because of the ships’ placement).
-
 brandstifter31 liked this · 9 months ago
 -
 aeramisu liked this · 9 months ago
 -
 mrmrsdarklordjrthethird liked this · 10 months ago
 -
 bababricksheep reblogged this · 11 months ago
More Posts from Enteroctopusdarkysilis

✨Custom air Toa !✨
6/6, that’s the last one ! And the biggest one, too-
Closeups under the cut !
Front/back views


As you might notice, it is tall. And it has more than four limbs, which would not be a problem if it was the only one. But. It appears that all my green mocs end up with too much limbs, and I can’t fathom why. Really, another prototype standing on my desk also has for and so does the green hero factory one…You get the idea.
Anyway, the colour scheme for this one is dark green and silver, with some translucent bright green accents. Using only bright green would have brought too much contrast with the others Toas (notably the dark red one), but I had these cool pieces to use and no one else to put them onto. And since these are experimental…
The two supplementary limbs are intended as movement claws, given that we usually see air Toas moving in jungles (Lewa mostly, that is). The silver pieces at the front and back ends are respectively Kopaka’s skis and Pohatu’s foot pieces (shoes ?). The largest bits are made out of technic pieces directly, to give some simple angles.
Bust views


I find this silver/green chest piece really cool, it’s a shame I don’t have much of them. The two bright pieces on either sides are Vahki head pieces, and since their only connectors are on their relative tops (side of the piece in their actual orientation), you may remark that they are connected to nothing. I’m having the arm socket go through them, and the rest of the body’s shape avoid too many movements. While nice, this also limits the movement range of the arms, but it works well enough (these are not really made to play, anyway~). The two bright pieces with spikes are from a Ehlek. Wish I could have managed to put that one back together, but it instead served a higher purpose.
The Kanohi is Hordika Matau’s, with transparent Bohrok eyes underneath (it share this technic with my previous white Toa). The back piece is coming from a Piraka, but it’s actually a broken piece. I have quite a bunch of these, where the mask and flexible parts have broken off, so I make the most of it (like you might see in the future on another MOC). I’m using technic angle (type 3, to be precise) to keep the shape of the middle ones, but the others are free.
Finally, a (dismantled) leg view.

Finally, the leg segment !
The Toa was too big for proper leg showcase, my lights created terrible contrasts (shelf not deep enough…), so here is a stand alone leg instead.
Once again I have integrated the Metru chest piece to the leg, but as a foot this time. It offers a good stability and looks nice.
The next part doesn’t have much interesting bits, except that I’m using technic tubes to hold the additional piece, making this technic less illegal that my usual works (keyword : less; there is still a whole lot of stress on these poor pieces).
The top part is…somewhat more complicated. The frame is of technic pieces (like the additional limbs), which keeps together an immobile socket joint which keeps the double socket and two Bohrok feet (one for decoration, one connected to the hip socket). The double socket is used both to connect the two halves of the leg and to hold the small arm piece which is here only for decoration.
And that’s it for this series ! I’m hoping to bring them to next month’s exhibition, along with some Bionicle MOCs I haven’t showcased here because…shelf…Given the sheer size of my big project (posted here next week in theory), I’m gonna have to improvise something quickly, and profite of it to get some pictures of my other big ones while I’m at it. Eh, I’ll figure it out (and if I don’t, I’ll just delete that statement later :}
Thanks for reading, have a good day !

✨Custom ice Toa !✨
And another one ! If the others were already experimental, this one is much, much more-
Closeups under the cut !
Front/back views :


That one was a lot of fun ! But it’s also not really stable, considering there are some weird piece combinations. This one also has disproportionate legs, compared to the rest of the body, but it’s alright.
With that one, I really tried to remain within Kopaka’s spirit (notice the ski blades and the Kanohi). The bow and arrow (which doubles down as a lance, and is using one of Kopaka’s blades), is a weapon I don’t think has been used before in the original bionicles (correct me if I’m wrong).
The arms/hands are using Pridak’s feet, because it works well and still allows for large movements.
I used some darker white pieces on the back and shoulders to get some slight contrats, and used technic pieces on the chest to get a proper body shape, with a leg piece underneath.
Legs :

(Too) Many details on the legs ! The blades under the feet are a combination of Kopaka Nuva’s blades and Glatoran blades, which also hold a shoulder piece used as a supplementary leg pieces.
Now is the here we enter the mess : all of the ankle sockets you can see are not used for the articulations, and are only here to keep the back piece in place (Star leg), while the actual socket is behind the technic gear plate. Then there is a socket which doesn’t even have a ball, it is directly stacked on top of another socket, and I use multiple feet to cover the leg areas which would expose how terrible the inside is. At the front, you might also notice a 1*2 curved slope tile held by two technic pins. It’s floppy, and it looks weird from the side, but the front appearance makes it worth it. Finally, at the front, I also use part of a Vahki’s head as a final plate, before we finally reach the connection between the legs and the body. As I said, that whole part is a mess.
Head :

Tried to remain close to Kopaka’s appearance here too, by adding a X-ray vision thing, but the most important part is that the Kanohi is Hero Factory Stormer’s mask, but sideways. The trans blue pieces are Borhok eyes, which fit perfectly, and I managed to cram a socket connector inside, making the head quite mobile and sturdy.
Next week is another one ! Not sure which of the three it will be, but I haven’t decided which one yet (tell me if you have a preference~).
I also finally received my new parts, meaning I can get back to working on my big project, yay !

✨Progress pride flag !✨
Yay ! Finally some colours ! This was definitely trickier to do, compared to all the other ones, because of the triangles, but I like how it looks !
See previous here.
A tangent about hexagons
Because the project I’m working on brought it, I found it interesting, and I thought some people might need it.
So, as I’m working on a quite large project (hopefully done by next week, although I have doubts on that), and the base structure of it is more or less hexagonal. Anyway, here are some of my tips to get good hexagonal shapes.
The easiest way to do this is obviously with hinges and plates, like that :

While not necessarily accurate, it’s cheap and efficient, albeit squishy, and can be expanded to any size.
Instead, we can go the technical way, and use maths, by considering that a hexagon is the combination of 6 equilateral triangles. We end up with this :

Practically unbreakable, very stable, and can be made with as much technical bricks as possible, so it is easily expandable, but it’s harder to attach it to classic bricks.
So, none of these two designs are really good alone, whether on pure usability, or on durability. Alone, that is. Now, here is the fun part : thanks to the way Lego works…


…they work together ! And, with some modified 2*2 plates, they mostly hold to one another ! Isn’t that awesome ? What’s more is that, while I’m using 2*4 plates and a 7 holes technic bars, that also works with 2*6 and 11 holes bars, which is good.
Now, let’s apply this knowledge to make a solid prism with an hexagonal base :

By using a bunch of plate and two of these hexagonal bases, we get a hollow tube, which is solid through the hexagons, but can still break because of a diagonal force. To fix that, we need to add supports between the supports, like so :
This also means that this design becomes stackable. Congrats, you made a long hexagon tube ! It can also be round, with the right modifications, notably with 2*2 curved tiles :

It fits perfectly, and it’s good to make solid near-circles !
Sorry for the photos’ quality !- They were taken quite late with my phone, and without proper lighting.

✨Space ships (and hangars, too !) !✨
(Or, last post for the space station)
<Previous< [4/4]
Under the cut are closeups of (practically) all ships and hangar from the station !
Before anything, the third post is somehow completely gone, even if I do have proofs that I did do it. Well, it was already posted late, and I don’t have the courage to do it again — and it’s not like people would care much anyway, so how this station is holding up will remain a mystery~
Anyway, closeups.
Hangars (groupes by similarities)


This first batch here contains the 'empty' hangars. Left is meant to be a closing/opening hangar, which I usually keep in the back because it's not the most interesting one; while the right one is the bare hangar. There are two of these across the ring, in which I sometimes pluck a ship, though it's hard to keep them in place because of the station's inclination.


Next is a batch of random boxes and other scifi-y grates and boxes. To keep the boxes in place, I use modified 1*1 bricks (because the floor is is made of horizontal pieces, aligned with the outer tiles). Minor variation are present in the middle hangar, where a third of the floor is composed of 1*2 modified bricks to add a tiny bit of texturing. While these might a tad repetitive displayed like above, they actually are separated by three other different hangars, so the repetition is barely visible.


A bit similar to the previous ones, these have (in my opinion) more interesting details. Left is two racks of large barrels, supposedly fuel. Middle had another barrel (made with flowers pieces) and a yellow cable, which was surprisingly hard to add because it pushed the back plate (which holds a lot of the hangar together). The last one is a stack of long crates, and an observation deck (I'm guessing the original sticker comes from a small star destroyer).


Last batch, and probably the best of all, the containers (scaling from not too crowded to very crowded). These are the same size as the big ship's. There are very few attachment points to the ground, as most of them are held by other containers above or bellow, although the middle hangar had two modified 1*4 bricks in the floor. The original plan was to get them all aligned, but it looked terrible, so I went for this more haphazard placement, which works better.
Ships


These first two are the smallest of my little fleet. The top one is two 2*1 plates held by black 1*1 mod plates. It's small, it's smooth, and it works quite well with the station. I'm probably gonna make other of these in different colours someday.
The next is one of the first I made, using some shiny pieces. The two chromatic studs on the reactors are differently shades of chroma silver on purpose because this is meant to be a much older ship (compared to other most of the other, smoother ships).


This is a much larger one. More of a military design, I mostly played with angles on that one (and added big reactors for fun purposes). The transparent light blue used here is the same as the fuel barrels of the station, and are the most used on the ships I have. Lore would say it's because it's the most common fuel used in the universe; pragmatism would say it's because it's the most common transparent colour in my boxes.


More blue reactors ! The top one is my one of my favorite. Only 7 pieces, including an old aquaraiders piece which I had to use as a ship the moment I found it. It's simply ship-shapes ! Given the colours, you could imagine it's an old model (not as old as the small one). The bottom one is a very thin one, with a Y piece which can allow for many cool shapes (like this one) !


Weird alien ships ! The first one is curvy~~ It's a nice concept which is quite common, but I really like the idea, and thus made one. Notice the green reactor this time, because alien fuel. Next one is more organic (or at least trying to), using mostly car pieces (and an orange reactor, wew !). It's also quite compact, with a single mod 1*1 brick as the core. The final one is by far my favorite (and not only because it has a purple trail). While hard to because of my lighting, the three main parts of the ship are separated by clear studs. I originally made it without the in-between studs, but then it fell the the floor, broke, and separated, and it looked much more futuristic. Consider this a very advanced ship of a peaceful species, or something like that.