
Evilgoof - Goofy


the ranch hand i made over, as promised. forgot his name 'cause i'm not in game right now but i think it was miguel or something idk man. but he's very pretty.
-
 kingsimdom liked this · 1 year ago
 -
 vhsmage liked this · 1 year ago
 -
 elderwisp liked this · 1 year ago
 -
 vampir3ss liked this · 1 year ago
 -
 dreamstatesims liked this · 1 year ago
 -
 rebouks liked this · 1 year ago
 -
 miss-may-i liked this · 1 year ago
 -
 leighsmemorybox liked this · 1 year ago
 -
 sloedancing liked this · 1 year ago
 -
 galiccfinds liked this · 1 year ago
 -
 llamabees liked this · 1 year ago
 -
 siddplayssims liked this · 1 year ago
 -
 sanssequoia liked this · 1 year ago
 -
 nightlifeseries liked this · 1 year ago
 -
 simmysunset liked this · 1 year ago
More Posts from Evilgoof
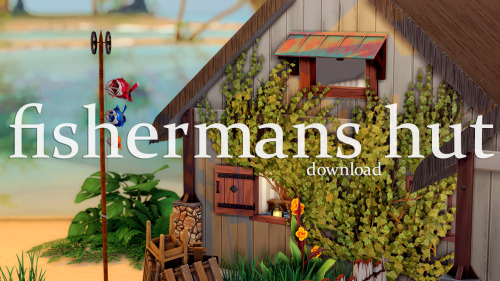
fisherman's hut: cc free build
a little fisherman's hut with a rich, wholesome history: built by a married couple in their early 20s, this little hut has lived alongside these two very in love sims until sadly, the wife passed away. she was a world renowned painter, and hated the fame. although her craft brough in millions of simoleons, they stayed in their humble hut, happy with the small life they had built together. with no children, and only a small pet (cat/dog), the fisherman fell into a lonely depression after the passing of his wife. he has let the house fall into disarray, and left all her belongings and paintings as where she left them. he vows to never leave his little home, as it holds too many fond memories of his beautiful wife that he loved very much
1 bed 1 bath
30x20
$44,350
cc free
packs used:

download: patreon (free) | simfileshare (no adfly)
gallery: boeybum
watch my speed builds here!
i will work on my own lil goth family (mostly gonna be inspired by the addams) tomorrow after my shift. i fr didn’t open my game today but i did download a bunch of goodies so i’m very excited!
i did it! i survived my first day of work!

How do you get your lighting so scrumptious in edits?
Lighting tutorial under the cut (it's long lol) I use photoshop + topaz clean btw :)

This will be our starting pic!! I use @hazelminesims photoshop action (all in one) to get the smoothening and overall base done first.

First step to colograding is using the 'Camera Raw Filter' in photoshop and adjusting the tint and curves tools. I generally like a greener, more cool toned color for pictures.

2. Now for the shadows on the sim! I make a new layer, set to 'Multiply' and use a soft brush at around 25-40% opacity with the color Black. I generally will add shadows to the parts of the body that are being 'covered' (neck, side of the nose, forehead, insides of arms and clothes). *If you use reshade/ gshade and have the mxao filter on, mimic where that filter adds shadows and either enhance it or add it in photoshop!*

3. In a new 'Multiply' layer, I do the same thing with the background. I darken the elements in the back to emphasize that my sim is in the forefront of the shot. TIP: don't add shadow to the light sources (neon signs, lights in the background) ! We actually want to enhance those.

4. Make a new layer, set to 'Pin light' at 100%. Grab a soft brush and highlight those light sources in the back. You can go crazy here, just take the Eyedropper tool to color match the highlights you want to emphasize. It might look a bit much right now, but we can tone this down by decreasing the layer opacity, Gaussian blurring the layer, and erasing any excess highlights if we want.

5. Now we add highlights to the sim. I make a new layer, set to 'Soft light' at 100% opacity, and with the white color, I highlight the sims body and clothes. (Now we want to add light to the 'raised areas' such as the center of the forehead, nose bridge, chin, chest, and arms). I also like to highlight any jewelry (necklace and belt buckle).
On a separate new layer, set to 'Vivid Light', I changed the brush colors to the ones in the background light sources (I used blue, yellow, and purple.) I'll go over the outlines of the sim's body with these colors (shoulders and arms, hair, side of face and neck.)
If you ever feel like you've gone overboard, just lower the opacity of the highlight layers and Gaussian blur them!

6. After you've messed around with the highlights, add the finishing touches. Usually once I merged all the layers I would go over with the Dodge and Burn tools to enhance the contrasts even more. I also recommend downloading and using LUTs for photoshop (I just use any free ones I find online).