
Main: @mothnoir
34 posts
Mothnoir - Saving Stuff Blog - Tumblr Blog


due to popular demand…. my sick mens return. look at them NEOWW


I feel confident enough to post these now. A collection of all the existing posters after some edits from the other post that got 13k notes! These are full size/quality. Go nuts.
You may use them for wallpapers, tabletop campaigns, whatever. Consider tipping me or buying a print or sticker on ko-fi here! If you do use them, let me know what for, or send pictures!
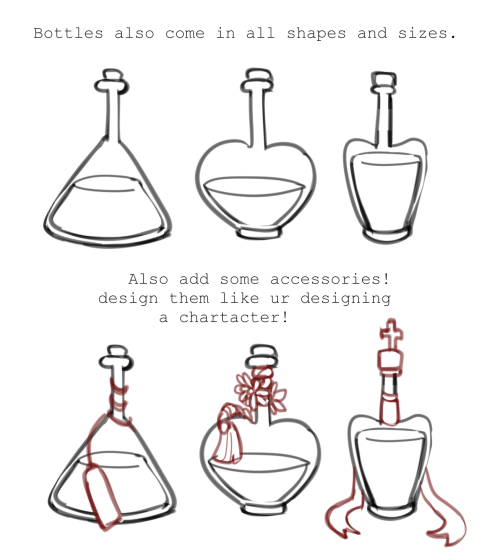
Oh my god I love how you draw wings!! Can you give a mini tutorial? I’m trying to draw my own Skywing elf OC but I just s u c k at drawing wings quq
aa ofc!! im not great at explaining things but i really do love drawing wings so i’ll do my best!! (this is long as fuuuck so it’s going under a readmore)
Keep reading


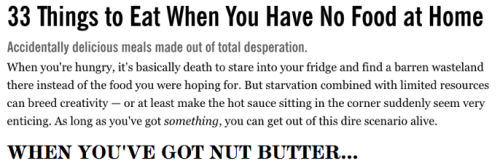
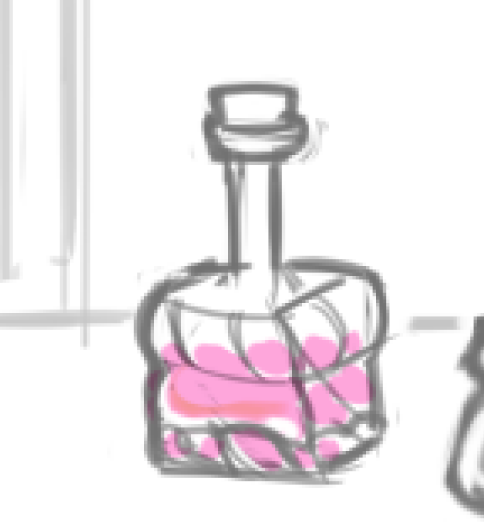
could you talk about how you color things? i dont know how to put this but im in love w how theres this pink hue around the outlines of your drawings, my favorite coloring especially being in your fluttershy piece
so with the pink hue around the outline of the drawings this is what you do, heres a spongebob to demonstrate

you just duplicate the lineart layer and change its colour, i usually choose something like pink or orange. then with the pink lineart layer you blue it by a small amount and then set that layer to either darker colour or linear burn, whichever you think looks better and then lower its opacity to around 30%
Cinnamon Butterscotch Pie
(inspired by the Requiem Cafe Undertale event picture and description, as seen below)


For the crust, buy a premade one (I got the Marie Callender’s deep dish pastry shells) and let thaw for 10 minutes, poke the crust with a fork to prevent air bubbles, then bake at 400 degrees F for 8-10 minutes (until slightly golden but not fully baked).
Let the crust cool while you make the filling.
The filling is inspired by the House of Nash Eats Indiana Sugar Cream Pie recipe (with mods to make it fit the Cinnamon Butterscotch flavor profile).
You will need:
-4 tablespoons salted butter, browned (I used a full stick, then measured out after browning with a tablespoon)
-1 cup light brown sugar (not packed down)
-4 tbsp cornstarch
-3 tbsp butterscotch sauce (you can make your own, but I’m trying to make this as easy as possible for people to follow. I bought the Graeter’s brand Butterscotch dessert sauce)
-1 tsp ground cinnamon
-2 cups heavy cream (aka one pint and the rest of the 2 cups measure filled with half and half or water)
-1 teaspoon (or as much as you eyeball pour) vanilla
Directions:
First, brown your butter on the stove over medium high heat. Keep an eye on it because it can burn very quickly!
Use a light tinted saucepan or a silver one to make the process easier—You’ll know it’s done when it’s a toasty golden brown color like a perfectly roasted marshmallow!
Remove the butter to cool while you finish the filling.
Place the brown sugar, cornstarch, and butterscotch sauce into a saucepan and combine with a whisk (I use a silicone one, as to not damage coated pans).
Add in your heavy cream and cinnamon, then cook over medium heat until the mixture boils, stirring frequently. Continue cooking for 1-2 minutes, stirring constantly while the filling thickens.
Remove from heat after and stir in vanilla and browned butter, whisking until the mixture is homogeneous (all the same consistency).
Pour the filling into the pie crust and bake at 325 degrees F for 15 minutes. Check pie, turn if getting too browned on one side, then bake for another 10 minutes.
Remove from oven and let cool to room temperature before placing in fridge to cool (at least 4 hours, but can be overnight!)
For a lighter texture, serve around 3-4 hours of chilling, and for a denser, fully solid texture, serve after chilling overnight.
Serve cold with whipped cream and a sprinkle of cinnamon on top! Enjoy <3


^^ partially cooled texture vs fully cooled texture
(recipe created by amethystsoda, October 2022)
How To Make Your Own Clown Doll ! (A Guide)

Hello good people !!
I have made a few clown dolls before, and someone submitted a question asking if I followed any guide for them or had a guide myself. I sorta made it up as I went for the first doll, but I have learned better methods of doing things since then!
Here is my guide on how to make some dudes for yourself!
You will need:
Fabric for the body - I used an off-white fleece for the torso and limbs for this one, but have previously used a thin off-white sorta cotton fabric, which works better if you want floppier/thinner limbs!
Fabric for the clothes - Use whatever you want, honestly! I used some cool stretchy silver-metallic fabric for mine but have previously used cotton and polyester patterned fabrics !
Polymer clay - I used Sculpey III for this one, but for my previous two I used some other kind of Sculpey that was very very light and airy, which made it hard to sculpt properly without squishing it! If you want to add any detail to the face shape, use some firm polymer clay !
Posca pens (optional) and acrylic paints - Acrylics are used for the base coat on the head. I used the paints for the details too previously, but used posca pens on this one which was much easier to do the face details with! Either works just fine, though : )
Faux fur - for hair! If you want a bald clown or one with just a hat without hair, you don't need this!
Decorative trims and such - I used some pink frilly elastic trim, blue dotted non-elastic trim, white elastic frilly mesh, buttons, a silver bell and some blue velvet ribbon for this guy! You can literally use whatever you want (ribbons, bows, pom-poms, lace, etc) to make your clown look cute!!
Varnish - Use spray varnish if you can! It'll help prevent the face paint from smudging (all 3 of mine have had this happen using varnish with a brush). It is possible to use varnish with a brush on them but be careful with it! I used sculpey gloss varnish.
Tin/aluminium foil
Basic sewing supplies (needles, thread, pins, scissors)
Steps
1. Make a ball out of the foil, a little smaller than the size you want the finished head.
2. Cover it in a layer of Sculpey and sculpt the face shape you want. Include a pretty thick neck with the base at the bottom WIDER than the rest of the neck. This will be how the head is anchored to the body!

3. Bake the clay, let it cool, and sand it down so that it is nice and even without any finger-prints!
4. Paint a base coat on it with acrylic paints!
5. Paint/draw on whatever face details you want using acrylics or posca pens! Let your creativity flow!!

6. Varnish it!
7. Draw out the body pieces (torso and limbs) on your body fabric. You'll need two torso pieces, four leg pieces and four arm pieces. Honestly there's no method to what shape to draw, just draw what shapes you want them to be! (Remember to reverse each second piece though so that they match up when sewing them together). I used a rounded rectangle for the torso, and chose to make the legs on mine very long!
8. Cut out all the pieces and sew them together with the CORRECT sides facing INWARDS and the WRONG sides facing outwards. Once sewn, flip them inside out. MAKE SURE TO LEAVE THE TOP SIDE OF THE TORSO UN-SEWN TO INSERT THE HEAD!

9. Almost fully fill the body with plastic pellets, and only partially fill the limbs (I filled them about 1/4 full)! If you don't have those, use dry rice like I did (or dry lentils) or sand! If you use sand, ensure sure you make your stitches REALLY close together so sand doesn't come out of any gaps! If you want the limbs to be chunkier, fill them with more pellets OR stuff the rest of them with poly-fill or cotton wool!
10. Insert the neck into the torso and sew the opening tight around it, like this! The wide base of the neck stops the head from coming out : )

11. Sew on the limbs! The stitching doesn't have to be perfect here since the clothes will hide it!
12. Make the clothes! You can make whatever kind of clothing you like; I just made a baggy little jumpsuit sorta thing for my guy! To do this, I laid the clown out on the fabric and roughly drew the shape for clothes around him based on what I wanted! Flip it, lay it down in the fabric again and then trace this to get the second jumpsuit piece!

13. Use the same method of sewing the pieces together with the CORRECT sides facing each other so the WRONG sides are facing outwards. Then turn the clothes inside-out so that the right sides are now facing outwards! MAKE SURE TO LEAVE OPENINGS FOR THE HEAD AND LIMBS TO COME OUT THROUGH!
14. Put the clothes on the clown!!

15. (Optional) Glue fake fur on the top of the head in the style you want it! I used hot glue because I didn't have anything else, but fabric glues and all-purpose glues would be good too! If you don't want hair, just skip this step!
16. (Optional) Hat!! Cut out a wide triangle shape, sew the opposite sides together and then sew a circle to the base if you want a pointy hat like my dude's one (I don't have photos of this sadly but I'm sure there's a tutorial out there of how to sew a cone)! Then glue the base to the top of the head.
16. And finally, add all the trims and extra bits you want to make them look super cute !!! I just sewed on some ribbon to the base of the hat and around the ankles, sewed some frilly elastic trims around the neck, added a little silver bell to the hat, sewed frilly trim around the wrists and ankles and then sewed two buttons onto the front of his clothes!


And then, your little clown is done !!!
I hope this comes in handy to anyone wanting to make their own clown dude!
I would appreciate any reblogs and such of this to help spread the clown joy !!
Have fun !!!
(Small note! I would appreciate if you didn't copy any of my clowns directly! Please use this as more of a guide than an exact tutorial to make this specific clown! Being creative with yours is much more fun!! :•D)


Getting a job:
How to Write a Resume so You Actually Have a Prayer of Getting Hired
How to Write a Cover Letter like You Actually Want the Job
Ask the Bitches: What the Hell Else Can I Do to Get a Job?
How to Frame Volunteering on Your Resume When You’ve Never Had a Job
How To Get Ready For a Job Interview: Prep Yourself Before You Wreck Yourself
Common Job Interview Questions and How to Answer Them with the Confidence of a Mediocre White Dude
10 Questions You Should Never Be Asked in a Job Interview
What to Wear (and What Not to Wear) to a Job Interview
What to Do When You’re Asked About Your Salary Requirements in a Job Interview
How NOT to Determine Your Salary
How to Find Remote Work: On Getting the Elusive Work-From-Home Job
High School Students Have No Way of Knowing What Career to Choose. Why Do We Make Them Do It Anyway?
The Actually Helpful, Nuanced, Non-Bullshit Way to Choose a Future Career
Myers-Briggs Personalities and Income: What Your Type Says About Your Salary
I Just Applied for a Job. How (And When) Should I Follow Up?
Our Best Secrets for a Successful, Strategic, and SHORT Job Search
Season 2, Episode 11: “I Tripped and Fell into a Career I Don’t like. How Do I Reinvent Myself?”
Freelancing and side jobs:
Should Artists Ever Work for Free?
Stop Undervaluing Your Freelance Work, You Darling Fool
Romanticizing the Side Hustle: When 1 Job Isn’t Enough
The Ugly Truth About Unpaid Internships
Freelancer, Protect Thyself… With a Fair Contract
Ask the Bitches: My Boss Won’t Give Me a Contract and I’m Freaking Out
I Lost My Job and It Might Be the Best Worst Thing That’s Ever Happened to Me
Becoming a Millennial Entrepreneur (in the Midst of a Pandemic) with Katelyn Magnuson
11 Awful Mistakes I Made as a Self-Employed Freelancer, and How YOU Can Avoid Them
Workplace benefits:
Workplace Benefits and Other Cool Side Effects of Employment
Your School or Workplace Benefits Might Include Cool Free Stuff
Your Yearly Free Medical Care Checklist
Dafuq Is a Retirement Plan and Why Do You Need One?
How to Save for Retirement When You Make Less Than $30,000 a Year
Season 2, Episode 6: “Someone Offered to Mentor Me! How Do I Be a Non-Sucky Mentee?”
Navigating the workplace:
My Secret Weapon for Preparing for Awkward Boss Confrontations
Are You Working on the Next Fyre Festival?: Identifying a Toxic Workplace
Woke at Work: How to Inject Your Values into Your Boring, Lame-Ass Job
Can Looking Weird at Work Be Good for Your Career?
Why Is Short Hair Controversial? An Examination of Expensive, Annoying Beauty Standards
Season 1, Episode 1: “Should I Tell My Boss I’m Looking for Another Job?”
You WILL Regret Accepting Your Coworker’s Social Media Friend Request
Season 1, Episode 5: “I Don’t Love My Job, but It Pays Well. Should I Quit—or Tough It Out?”
Season 2, Episode 7: “How Do I Throw My Incompetent Coworkers under the Bus?”
Sexual Harassment: How to Identify and Fight It in the Workplace
Getting a raise:
Salary Range: Are You Asking for Enough?
A Millennial’s Guide to Growing Your Salary
The First Time I Asked for a Raise
You Need to Ask for a Fucking Raise
Should You Increase Your Salary or Decrease Your Spending?
Getting a promotion:
Santa Isn’t Coming and Neither Is Your Promotion: How To Get Promoted
How I Chessmastered Myself Into a Promotion at Work
Job Hopping vs. Career Loyalty by the Numbers
The Fascinating Results of Our Job Hopping vs. Career Loyalty Poll
I Hate My Job and I Don’t Know How To Leave It: A Confession
A New Job, a New Day, a New Life, and I’m Feeling Good
Season 1, Episode 9: “I’ve Given up on My Dream Career. Where Do I Go From Here?”
Working remotely
How to Successfully Work from Home Without Losing Your Goddamn Mind (Or Your Job)
How to Find Remote Work: On Getting the Elusive Work-From-Home Job
8 Genres of Productivity Music (Plus Our Secret Stash of Personal Favorites)
My 25 Secrets to Successfully Working from Home with ADHD
hey writers! OneLook Thesaurus lets you find that word you can’t think of but can describe! go check it out!


i know we're all sick of self-care being a marketing tactic now, but i don't think a lot of us have any other concept of self-care beyond what companies have tried to sell us, so i thought i'd share my favorite self-care hand out


brought to you by how mad i just got at a Target ad
if you are looking for breast removal top surgery, please check out this website if you are struggling to find a surgeon!

this was recommended to me by my endocrinologist who has used them for their own top surgery! i have to go out of state for my top surgery so i am also searching rn!


let's make fearne horns!
a step-by-step tutorial for making foam horns for cosplay

this was originally posted to twitter last year, but since twitter’s decided to ram itself through a brick wall repeatedly for some reason, i’m reposting here.
materials/supplies:
wire (the hardware store kind, not the flimsy jewelry kind. you want it bendable but sturdy enough to hold whatever size horns you’re making.)
craft foam/eva foam (thickness depends on project needs)
triangular foam dowel
tape or paper for patterning
barge cement (or other brand contact cement)
foam clay
plastidip spray
acrylic paints
gloss spray
heat gun
scissors
paint brushes
something to wrap horns around depending on curl needs
headband or something else to attach the horns to for wearing
the process:
1️⃣ pattern horn curl using tape or paper. mine is going to be a long triangle shape along it’s top face.

2️⃣ cut out of craft foam & trim/taper triangular foam dowel to match. cut wire to match this length plus a couple extra inches for attaching to a headband later on.
3️⃣ carve valley into dowel & glue wire into it using barge cement. tape is helpful for holding the wire down while it dries. be sure to follow glue instructions for use which usually requires good airflow/ventilation in the space! for me, that means opening the window, turning on a fan, and wearing a mask to avoid fumes.

4️⃣ glue foam dowels to craft foam.

5️⃣ spiral horns carefully around a cylinder, heat forming tips where wire can’t reach. the hardest part here is to get both sides even. (i think i used a wooden dowel or a curtain rod for my spirals??)

6️⃣ fill gaps between dowel & craft foam with foam clay, using finger + water to smooth it out. if you want to add any ridges or scars to your horns, do it once this part is dry and before the next step—but i wanted mine to be smooooth.

7️⃣ once dry (give it a couple days just in case), heat seal with a heat gun & spray with plastidip. do multiple coats to get all the angles because spirals are WEIRD!
8️⃣ paint with acrylics.

9️⃣ gloss spray!

🔟 using the bit of wires sticking out, attach to a headband or wig to wear! mine actually poke through my wig and attach to a headband that sits inside the wig which fearne’s ears also attach to.

i hemmed and hawed over how to approach these originally because i know most folks would either 3d print them or do a proper full craft-foam pattern, but i’m crap at cutting craft foam and i hate sculpting digitally and ALSO don’t have a 3d printer. so i did it my way! and it was fun!! plus, the final horns are super lightweight which makes them great for wearing all day! the flexibility of the wire also allows them to have some pose-ability which can be nice for photos to make sure they’re visible.
I'm seeing a lot of people say that punk fashion is expensive and inaccessible, which is very wrong. here is a list of some ways you can make punk fashion easier, cheaper and more accessible for you, since that's... kinda the whole point.
others are encouraged to add onto this!! (just don't recommend corporations like amazon. not cool.)
1. patches!! you don't need to buy them. DIY patches are not ugly or boring. in fact, they are encouraged here!! DIY, in my opinion, is always the best thing to do when it is an option and is safe to do so.
2. speaking of DIY, spikes!! you can make them!!
cut the top and bottom off of an empty can. cut down the middle of the cylinder and flatten it, so it's just a flat rectangle of metal.
cut out a shape that is kind of a third of a circle, but around 3/4 of the curved edge is taken up by triangle shapes. (I'm not very good at describing, so here's a badly drawn picture)

roll it into a cone, leaving the 4 triangles sticking out at the bottom. this bit is optional, but you can fill it with hot glue to make it more sturdy, just be careful touching the hot metal. I tend to hold the cone by one of the triangles with a bit of fabric wrapped around my fingers for this bit. cut 4 small holes in your fabric in this kind of shape:

and put the spiky bits of triangle through the holes. fold the triangles in on themselves to secure the spike in place. boom. spike obtained. this is one I made and attached to a little piece of fabric to test this method out:

3. battle vests!! (like the base jackets). the best places to buy these are charity shops and second hand websites in my opinion, but if anyone else knows any better options, please reblog with those!!
a good trick I find works well on eBay is to filter search results to your country (or state? can you do that in the US? idk) so that a: fast delivery because local, and b: all the sellers of everything that shows up are in YOUR TIME ZONE.
why is this important? when people sell something for really cheap, it goes FAST. check eBay at like, 2am or something. all the scalpers in your area are asleep. grab the cheap stuff while they can't.
4. sewing!! want patches, but can't sew for whatever reason? I've heard of a lot of people with joint conditions like arthritis complain about the inaccessibility of patch stuff, and that does sound extremely annoying, however:
safety pins!! while they are still a little fiddly, they're much less work so you don't have to fiddle about for long. if you can, you could even ask a friend to help, since it doesn't take long at all I'm sure someone will be willing to help out!! (I know I would, but that's just me, and I love this kind of thing). safety pins on clothes are also widely considered to be a symbol of solidarity, so if anything, you're adding some extra love and meaning to your patch pants/battle jacket.
if that's still too fiddly, fabric glue is always an option. unfortunately this means you won't be able to remove/reposition patches, at least without leaving a massive patch of residue, but if you're ok with that then fabric glue is probably your best bet.
for people who prefer sewing: as for where to get the thread, I've heard a lot of people recommending dental floss, as it's apparently much cheaper and works just as well. I haven't tried this myself so can't confirm that, but I thought I'd share it regardless.
5. where to get fabric!! old clothes. rip em up. you don't need any kind of fancy fabric from the craft store. my patches are made of old jeans that I grew out of.
don't have any old clothes and you don't want to waste any good ones? I'm not sure about other countries, but in the UK, as long as you're not on private property (trespassing), dumpster diving is perfectly legal.
I definitely ;) do NOT encourage ;) trespassing rich people's land ;) to steal from their dumpsters ;)
or tbh it doesn't matter too much how rich the person is, since it's all going to landfill anyway. if it's in the bin, it's free game, but you didn't hear that from me. ;)
please add onto this where you can!! and if I missed something or got anything wrong, add that on too!!


refseek.com

www.worldcat.org/

link.springer.com

http://bioline.org.br/

repec.org

science.gov

pdfdrive.com
[edit: 10/4/24 using this blog to archive our old username, our main is @chai-dye !!]
Tags:
Arts and Crafts: Crafts, Cosplay
Art: Tips, Tutorials, Resources
Food: Tips, Resources
Gender: Tips, Resources
Mental Health
Miscellaneous
Recipe
Resource: Useful Links, Tips
Writing