Paperoxalis - Paper Oxalis

-
 runawayrevenant reblogged this · 2 years ago
 -
runawayrevenant liked this · 2 years ago
-
 memento-moogle liked this · 2 years ago
 -
 thegrindragon reblogged this · 2 years ago
 -
thegrindragon liked this · 2 years ago
-
 abrielarnold liked this · 2 years ago
 -
 mintyeel liked this · 2 years ago
 -
 paperoxalis reblogged this · 2 years ago
 -
 coffebooksandwitchcraft liked this · 3 years ago
 -
 wrogs liked this · 3 years ago
 -
 terrestrialgarden liked this · 3 years ago
 -
 rotcarnival liked this · 3 years ago
 -
 unknownamoeba liked this · 3 years ago
 -
 mispelled liked this · 3 years ago
 -
 jonasiapie liked this · 3 years ago
 -
 iainmorland liked this · 3 years ago
More Posts from Paperoxalis
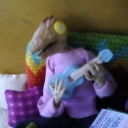
Here's Stitches, the character from the making-of post


Again, this character was designed by my sibling @nerdbabelovesyou
They made it as sort of a sibling character to my usual persona. It also has a lot of nerdbabe's traits and other ideas, and it's their doll now, so if you want more lore on them, go ask there. I think they also plan on making another outfit or two for them.


Because we're siblings, Stitches still lives in the same house I do, so there's a chance I'll do some animation with them, or at least feature them in some more pictures later.


Noticed a bit of a trend in the fan art characters I've made

How do you make your dolls? Also all your art is amazing!
I've been meaning to make a post like this
My process changes all the time cause the things I make have different details needing different things, but there is sort of a base process I do. I'll show it with an example.
First, a reference picture or concept sketch is helpful. I'm making a doll for @nerdbabelovesyou using this page they drew for refference.

Then make a skeleton. I use floral wire with a bit of hot glue on the major joints, and several stripped pipe cleaner pieces tied for the hands.

I ended up reshaping it some after talking with nerdbabe, they had a lot of input during this project. The basic shape still applies though.
The eyes are beads set in hot glue, so they can swivel around, but won't move on their own or fall out. The head shape is usually crumpled paper or paper clay- light enough to not make the doll fall over, but sturdy enough to hold its shape.

If you want eyelids, here is where you'd do that, but they I'm still figuring those out, so I'm not putting them on this doll.
Now for the fun part, cloth for the skin. I cut several shapes from felt to be arms, legs and a torso.

I start with the torso, stitching the back for the spine. Then I do the arms and legs. I add fluff as I'm going to give it shape.


The thumb to-be goes straight through the fabric. I keep my stitches loose-ish here so the next step, needlefelting along the stitch lines to smooth them out.

Feet (or hooves in this case) are the next step. Horns are done in the same. For shaped things, I make or find a model, cast it in silicon, and cast it in hot glue. Then I color them with paint sharpies. It's kind of it's own process. Here's what I used though, and some process photos.


The shapes come from an unsharpened pencil for the hooves and a wire wrapped pencil tip for the horns. They were hot glued onto the head, and the wire was stabbed into/ hot glued on the foot wire.
This post won't let me have more pictures, so I'll finish in a reblog.