Stitches - Tumblr Posts


Stitches wears a tux and instantly regrets it

Twig belongs to @becauseimgabbeh-blog
Moth Kid belongs to @theoryfan205
Stitches and Wicket belong to me
I'm gonna be doing something different here for october
Every day, I'm going to draw my favorite song with my OCs or my Sona
The first song a spinning wheel picked for me


We Three by The Ink Spots
Featuring Stitches, Wicket, and Tyler/Mort
Featuring the Dreamcatcher au from @nightlightdragon1
Day 12 of my October challenge
This time with 2 special guests
Now

Heather by Conen Gray!
Ft. Stitches and Twig
Twig belongs to @becauseimgabbeh-blog

Pull Yourself Together!!!

My stripes didn’t last too long so I did some patchwork where they chipped
Someone help me // I’m crawling in my skin
Love this new song from Shawn Mendes. His sound has matured so much since his debut single, and I feel like that growth is highlighted so well in this song. The topic is much heavier than other songs he’s released before, and you can feel the rawness and realness in his voice and in the words he sings. It also has a slight John Mayer/James Bay vibe to it. It’s a great step in coming into his own as a singer/songwriter.


Orgy | Stitches | Released April 30, 1998 | Dir: Rocky Morton
Flashing gif ⚠️
How do you make your dolls? Also all your art is amazing!
I've been meaning to make a post like this
My process changes all the time cause the things I make have different details needing different things, but there is sort of a base process I do. I'll show it with an example.
First, a reference picture or concept sketch is helpful. I'm making a doll for @nerdbabelovesyou using this page they drew for refference.

Then make a skeleton. I use floral wire with a bit of hot glue on the major joints, and several stripped pipe cleaner pieces tied for the hands.

I ended up reshaping it some after talking with nerdbabe, they had a lot of input during this project. The basic shape still applies though.
The eyes are beads set in hot glue, so they can swivel around, but won't move on their own or fall out. The head shape is usually crumpled paper or paper clay- light enough to not make the doll fall over, but sturdy enough to hold its shape.

If you want eyelids, here is where you'd do that, but they I'm still figuring those out, so I'm not putting them on this doll.
Now for the fun part, cloth for the skin. I cut several shapes from felt to be arms, legs and a torso.

I start with the torso, stitching the back for the spine. Then I do the arms and legs. I add fluff as I'm going to give it shape.


The thumb to-be goes straight through the fabric. I keep my stitches loose-ish here so the next step, needlefelting along the stitch lines to smooth them out.

Feet (or hooves in this case) are the next step. Horns are done in the same. For shaped things, I make or find a model, cast it in silicon, and cast it in hot glue. Then I color them with paint sharpies. It's kind of it's own process. Here's what I used though, and some process photos.


The shapes come from an unsharpened pencil for the hooves and a wire wrapped pencil tip for the horns. They were hot glued onto the head, and the wire was stabbed into/ hot glued on the foot wire.
This post won't let me have more pictures, so I'll finish in a reblog.
Ok, here's Part 2
After the glue steps, the main parts of the doll are done, and it's time for details. The most important part of this being the skin on the head. It's a word shaped piece of fabric that glues on to the face, wraps around and seams are fixed and smoothed via needlefelting. Past this point, the details apply mostly to this doll, but its techniques I use all the time, and I want to show the doll being completed.
The ears are similar to the arms and legs. With the added step of pink insides (glued the outsides to the pink when it wouldn't stay together with felting and stitching)

Might've forgotten to take a picture before I added color patches, but those are just felted on. Also the iris is painted on. I'm still trying to find the most reliable paint for this. I sometimes use paint sharpies or acrylic paint, but here I've tried nail polish.
Hands time! The secret ingredient is rectangles and glue. I stitch the base of the finger to the hand piece, but the felt would fall apart if I tried felting or stitching, so I bind it up in string and glue. The string comes off, and the finger wire stays hidden.

The last step is hair. It can be glued or felted on. Glue is a bit sturdier, but I felted it in this case.

And that's the completed doll.

It was important to nerdbabe that the doll be able to change clothes, so I did the whole body for it. I'll post fun pictures with clothes and props in a bit.
Clothing I do is sort of based off basic clothing patterns but sized to the doll.
Sometimes steps can be skipped if you know the clothes will never be removed though. For example

How do you make your dolls? Also all your art is amazing!
I've been meaning to make a post like this
My process changes all the time cause the things I make have different details needing different things, but there is sort of a base process I do. I'll show it with an example.
First, a refference picture or concept sketch is helpful. I'm making a doll for @nerdbabelovesyou using this page they drew for refference.
Then make a skeleton. I use floral wire with a bit of hot glue on the major joints, and several stripped pipe cleaner pieces tied for the hands.
I ended up reshaping it some after talking with nerdbabe, they had a lot of input during this project. The basic shape still applies though.
The eyes are beads set in hot glue, so they can swivel around, but won't move on their own or fall out. The head shape is usually crumpled paper or paper clay- light enough to not make the doll fall over, but sturdy enough to hold its shape.
If you want eyelids, here is where you'd do that, but they I'm still figuring those out, so I'm not putting them on this doll.
Now for the fun part, cloth for the skin. I cut several shapes from felt to be arms, legs and a torso.
I start with the torso, stitching the back for the spine. Then I do the arms and legs. I add fluff as I'm going to give it shape.
The thumb to-be goes straight through the fabric. I keep my stitches loose-ish here so the next step, needlefelting along the stitch lines to smooth them out.
Feet (or hooves in this case) are the next step. Horns are done in the same. For shaped things, I make or find a model, cast it in silicon, and cast it in hot glue. Then I color them with paint sharpies. It's kind of it's own process. Here's what I used though, and some process photos.
The shapes come from an unsharpened pencil for the hooves and a wire wrapped pencil tip for the horns. They were hot glued onto the head, and the wire was stabbed into/ hot glued on the foot wire.
This post won't let me have more pictures, so I'll finish in a reblog.
Here's Stitches, the character from the making-of post


Again, this character was designed by my sibling @nerdbabelovesyou
They made it as sort of a sibling character to my usual persona. It also has a lot of nerdbabe's traits and other ideas, and it's their doll now, so if you want more lore on them, go ask there. I think they also plan on making another outfit or two for them.


Because we're siblings, Stitches still lives in the same house I do, so there's a chance I'll do some animation with them, or at least feature them in some more pictures later.


GORETOBER 1 & 2 -|Stitches/Sharp Objects|-


Soooooo, I meant to post the first one yesterday but like was fatigued and forgot lmao sorry but anyways, Happy October Goretober! :D

Goretober Day 4: Stitched Together
You can tell I’m getting more into the groove of these now/
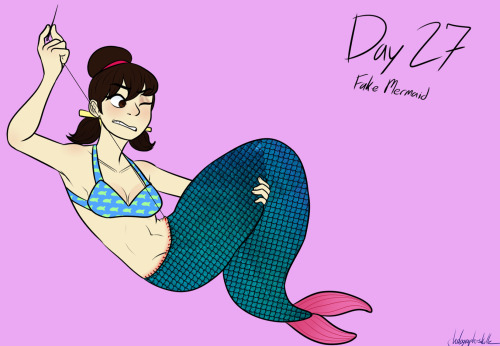
Goretober Day 27: Fake Mermaid
This was an interesting prompt but it was fun to figure out


Tw: sh
Guess who just got broken up with and is on his way to the hospital to get stitches??
Yesss, you're right, it's meee!
