
saving here all the tutorials that helped me learn something
280 posts
Somehelpfulart-tutorials - Some Helpful Art Tutorials

More Posts from Somehelpfulart-tutorials
hot artists don't gatekeep
I've been resource gathering for YEARS so now I am going to share my dragons hoard
Floorplanner. Design and furnish a house for you to use for having a consistent background in your comic or anything! Free, you need an account, easy to use, and you can save multiple houses.
Comparing Heights. Input the heights of characters to see what the different is between them. Great for keeping consistency. Free.
Magma. Draw online with friends in real time. Great for practice or hanging out. Free, paid plan available, account preferred.
Smithsonian Open Access. Loads of free images. Free.
SketchDaily. Lots of pose references, massive library, is set on a timer so you can practice quick figure drawing. Free.
SculptGL. A sculpting tool which I am yet to master, but you should be able to make whatever 3d object you like with it. free.
Pexels. Free stock images. And the search engine is actually pretty good at pulling up what you want.
Figurosity. Great pose references, diverse body types, lots of "how to draw" videos directly on the site, the models are 3d and you can rotate the angle, but you can't make custom poses or edit body proportions. Free, account option, paid plans available.
Line of Action. More drawing references, this one also has a focus on expressions, hands/feet, animals, landscapes. Free.
Animal Photo. You pose a 3d skull model and select an animal species, and they give you a bunch of photo references for that animal at that angle. Super handy. Free.
Height Weight Chart. You ever see an OC listed as having a certain weight but then they look Wildly different than the number suggests? Well here's a site to avoid that! It shows real people at different weights and heights to give you a better idea of what these abstract numbers all look like. Free to use.
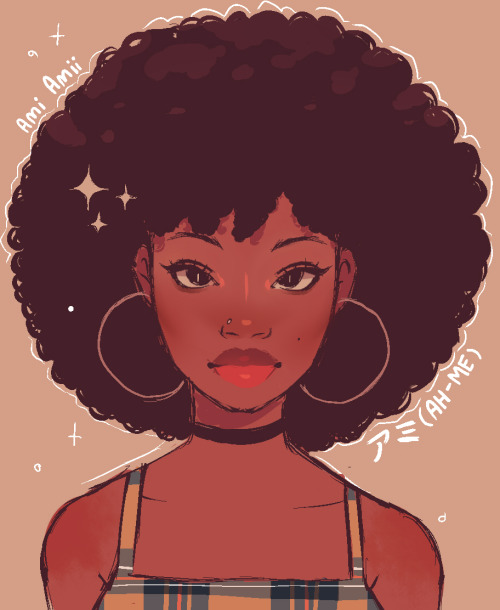
How to draw Afro textured 4c hair - an explanation/Tutorial
For those of you that don’t know what 4c hair is, 4c hair is a hair texture type that contains coils to small and tight that the hair appears to be more puffy rather than curly ( like to photo below ) this is in NO WAY to be confused with curly hair. there is a drastic difference.

As a black artist that primarily draws characters with 4c hair, I’ve been asked many times to do a tutorial on 4c hair so here we go~
before we get into 4c hair, lets take a moment to fully understand it by talking about hair texture in a general sense first
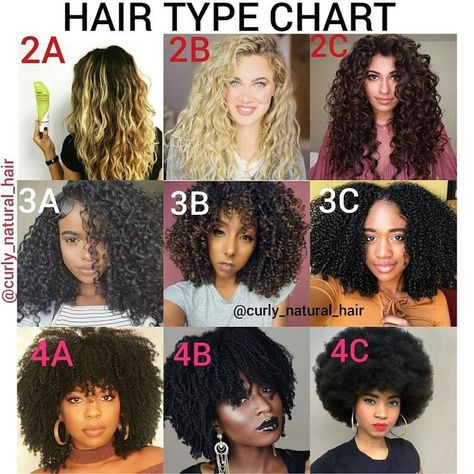
let’s take a look at this example of straight hair vs curly hair ( 1 type straight hair vs 3 type curly hair )

If you take a moment to compare the two you’ll notice straight hair is flat, it has no texture. Straight hair perfectly hangs down similar to liquid-like silk. It’s lack of curl pattern is the reason as to why it hangs perfectly flat.
curly hair on the other hand doesn’t lie down flat and silky like straight hair, It’s more thick. Curly hair in it’s raw and unstyled state has a trapezoid like shape this is because the sides of the hair spread more outward.

So why is this? Why is straight hair flat and curly hair thick?
the answer to that question is a thing called piling up. When it comes to hair texture, the shape of the hair strands aren’t the only thing that matters, its how the strands coexist with each other, Curly hair strands coexist by piling up on top each other.
moisture also effects hair texture too, different hair types absorbs moisture differently, thus the thickness of each hair type is different.


…..soooo, how does this all relate to how to draw 4c hair??
Well let’s take a look at the drawing below. Notice how the arrows go outward more as the hair texture gets curlier. As we’ve already discussed, this is because hair piles up, The curlier the hair texture, the more it piles up on each other, the bigger it gets, the more outward the arrows go.
Out of any hair texture, 4C hair has the most curls. Because of this, the hair piles up on each other so much that it doesn’t lie down flat like straight hair, nor does it make a trapezoid like shape like curly hair, it instead becomes more cloud like.❤️

This is what you need to take into account when it comes to drawing 4C hair.

Think of it as piling up a bunch of cotton balls on each other. The most cotton on top of top to lead to a bigger patch of cotton. this is 4c hair.
How to not draw 4c hair:
Garnet fanart. Let’s talk about Garnet Fanart. I notice a trend that when artists draw Garnet from Steven universe, her hair texture is usually changed to 3 type curly like texture. This subtle form of White washing has confused me because this is inaccurate.

Garnet’s hair is in the shape of a cube. Though 3 type hair piles up on each other, it isn’t curly nor thick enough for their hair to stay in the shape of a cube. Curly hair lies down more than 4c hair. So garnet’s hair being in the shape of a cube is a dead giveaway that it is 4C. Why do you think hairstyles like flat tops are usually seen on black men with 4c hair? It’s because, the 4c hair texture is thick and strong enough to stay in whatever shape you put it in.

please, if you’re drawing a character with 4c hair, avoid drawing it like curly 3 type hair, this is very anti-black and texturist.
So, how do you draw 4c hair?
honestly, its the most easy thing in the world


i wanna clarify that blobby looking 4c drawings ( like the one on the top left ) can work depending on how cartoony your art style is.
Another thing that I want to greatly clarify when it comes to drawing 4C hair is, YOU. DONT. NEED. TO. DRAW. EVERY. HAIR. STRAND!…..like, seriously. I’ve gotten many messages about how 4C hair is hard to draw, and it’s always left me confused; but then I find out that the same people that have trouble drawing 4C hair, attempt to draw every single strand of hair. This is unnecessarily time consuming because it’s merely impossible to get every single detail down, especially when you have a simple cartoon style. 4C hair does not require much effort, all you’re doing is drawing lumps. It’s that simple, nothing more nor nothing less.
The reason why I greatly advise all of you to avoid drawing every single hair strand is because in real life, when you look at a 4C textured Afro, your eyes don’t pick up on each individual hair strand like straight or curly hair. 4C hair, appears to be more undefined and cloud like, so attempting to draw each and every individual strand is unnecessary and will most likely end up looking inaccurate.


Anyways! that’s it for now! there will be a part 2 to this tutorial that will come out next week! i hope you guys have learned from this and apply it to your black character in your art!~


A general cane guide for writers and artists (from a cane user, writer, and artist!)
Disclaimer: Though I have been using a cane for 6 years, I am not a doctor, nor am I by any means an expert. This guide is true to my experience, but there are as many ways to use a cane as there are cane users!
This guide will not include: White canes for blindness, crutches, walkers, or wheelchairs as I have no personal experience with these.
This is meant to be a general guide to get you started and avoid some common mishaps/misconceptions in your writing, but you absolutely should continue to do your own research outside of this guide!
This is NOT a medical resource!!! And never tell a real person you think they're using a cane wrong!
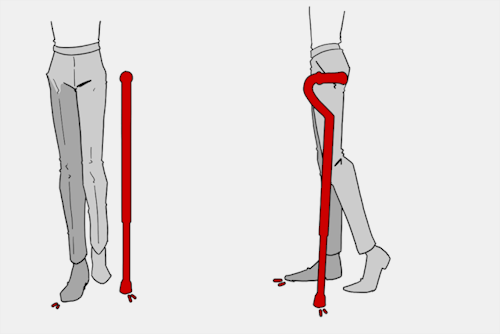
![[Image text] Arm bends a little. Cane height at hip joint. Many canes have adjustable height. Cane sits within the natural center of balance. Causes stress on: Triceps, upper back, wrist (pressure) fingers (grip). Helps with: Joints (lower back, hip, knee, ankle, foot), weakness, balance, pain.](https://64.media.tumblr.com/0c8731401f496885dc8d4309a7dbe7ee/f831b3159e1d7635-e7/s500x750/6e5fe00081a6ce3b64cbe1a648f0c967f9f601e9.jpg)
The biggest recurring problem I've seen is using the cane on the wrong side. The cane goes on the opposite side of the pain! If your character has even-sided pain or needs it for balance/weakness, then use the cane in the non-dominant hand to keep the dominant hand free. Some cane users also switch sides to give their arm a rest!
A cane takes about 20% of your weight off the opposite leg. It should fit within your natural gait and become something of an extension of your body. If you need more weight off than 20%, then crutches, a walker, or a wheelchair is needed.
Putting more pressure on the cane, using it on the wrong side, or having it at the wrong height can make it less effective, and can cause long term damage to your body from improper pressure and posture. (Hugh Laurie genuinely hurt his body from years of using a cane wrong on House!)
(some people elect to use a cane wrong for their personal situation despite this, everyone is different!)
(an animated GIF of a cane matching the natural walking gait. It turns red when pressure is placed on it.)
When going up and down stairs, there is an ideal standard: You want to use the handrail and the cane at the same time, or prioritize the handrail if it's only on one side. When going up stairs you lead with your good leg and follow with the cane and hurt leg together. When going down stairs you lead with the cane and the bad leg and follow with the good leg!
Realistically though, many people don't move out of the way for cane users to access the railing, many stairs don't have railings, and many are wet, rusty, or generally not ideal to grip.
In these cases, if you have a friend nearby, holding on to them is a good idea. Or, take it one step at a time carefully if you're alone.
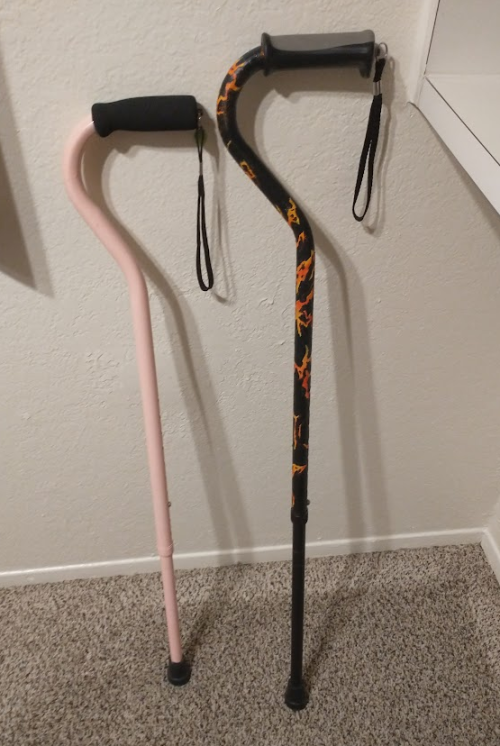
Now we come to a very common mistake I see... Using fashion canes for medical use!
![[Image text] 4 Major Handle Shapes (significant variation and uses). Tourist/Crook/Hook. Classic shape, fashion and medical, easy to hook on things (arm, door, chair, etc), generally solid wood (stronger, heavier). Offset. Newer design, not a fashion handle, only handle for quad-bases, generally better balance, usually aluminum (light + cheap), soft handle, adjustable (rattles/clicks when swinging). Derby/Fritz/Anatomical/Contour. Classic medical shape, many fashion variants, some fashion + medical, varies in many ways, sometimes contoured to hand, comes in foldable styles, many aluminum styles, many customizable styles. Knob/Decorative. Fashion exclusive, knob shape hurts the hand after prolonged pressure (especially with designs), tend to be heavy, "sword canes" have the same issues.](https://64.media.tumblr.com/102d2e5f13a88817eaa44974bc5a7486/f831b3159e1d7635-e2/s500x750/887023dbcfc758db12a7fcf3f258bca52eba2d53.jpg)
(These are 4 broad shapes, but there is INCREDIBLE variation in cane handles. Research heavily what will be best for your character's specific needs!)
The handle is the contact point for all the weight you're putting on your cane, and that pressure is being put onto your hand, wrist, and shoulder. So the shape is very important for long term use!
Knob handles (and very decorative handles) are not used for medical use for this reason. It adds extra stress to the body and can damage your hand to put constant pressure onto these painful shapes.
The weight of a cane is also incredibly important, as a heavier cane will cause wear on your body much faster. When you're using it all day, it gets heavy fast! If your character struggles with weakness, then they won't want a heavy cane if they can help it!
This is also part of why sword canes aren't usually very viable for medical use (along with them usually being knob handles) is that swords are extra weight!
However, a small knife or perhaps a retractable blade hidden within the base might be viable even for weak characters.
![[Image text] 4 Major base shapes (significant variation and uses). Adjustable base. Aluminum, standard modern medical, adjustable height, rubber base, wears down over time. Tripod/ quad base. If you need extra balance. Terrain attachment (varies, this is for ice). Removable, helps stop slipping on ice/snow/sand/etc, some canes have a retractable tip for ice. Classic base. Non-adjustable, custom only, modern standard still has a rubber base.](https://64.media.tumblr.com/78d350cfac4077376b7ce521a9a7d929/f831b3159e1d7635-ab/s500x750/4b4a6b8062c06686baf17c83c28b793bfb89e05b.jpg)
Bases have a lot of variability as well, and the modern standard is generally adjustable bases. Adjustable canes are very handy if your character regularly changes shoe height, for instance (gotta keep the height at your hip!)
Canes help on most terrain with their standard base and structure. But for some terrain, you might want a different base, or to forego the cane entirely! This article covers it pretty well.
Many cane users decorate their canes! Stickers are incredibly common, and painting canes is relatively common as well! You'll also see people replacing the standard wrist strap with a personalized one, or even adding a small charm to the ring the strap connects to. (nothing too large, or it gets annoying as the cane is swinging around everywhere)
(my canes, for reference)
If your character uses a cane full time, then they might also have multiple canes that look different aesthetically to match their outfits!
When it comes to practical things outside of the cane, you reasonably only have one hand available while it's being used. Many people will hook their cane onto their arm or let it dangle on the strap (if they have one) while using their cane arm, but it's often significantly less convenient than 2 hands. But, if you need 2 hands, then it's either setting the cane down or letting it hang!
For this reason, optimizing one handed use is ideal! Keeping bags/items on the side of your free hand helps keep your items accessible.
![[Image text] Where to put your stuff. Purses/bags. A lot of size range, Can mess with balance, Zippers are too hard with one hand, Handheld means you have no hands, over the shoulder only. Fanny pack. Accessible with one hand, Limited space, Good for balance. Backpack. Very physically comfortable, evenly weighted, holds a lot (medicine, foldable cane, emergency supplies, etc) can't access without fully stopping and putting cane down/hooking it on arm/dangling on strap. Pockets. Can only use on free side, many outfits don't have good pockets.](https://64.media.tumblr.com/de0f85e864c0ac470fb08900d78d8375/f831b3159e1d7635-21/s500x750/dbc646d95d144bb9c097f220361f074cc4b59584.jpg)
When sitting, the cane either leans against a wall or table, goes under the chair, or hooks onto the back of the chair. (It often falls when hanging off of a chair, in my experience)
When getting up, the user will either use their cane to help them balance/support as they stand, or get up and then grab their cane. This depends on what it's being used for (balance vs pain when walking, for instance!)
That's everything I can think of for now. Thank you for reading my long-but-absolutely-not-comprehensive list of things to keep in mind when writing or drawing a cane user!
Happy disability pride month! Go forth and make more characters use canes!!!