Lighting Is Often Underestimated In Illustration A Lot Of Illustrators And Beginning Artists Look At


Lighting is often underestimated in illustration – a lot of illustrators and beginning artists look at it as a decorative element, or as purely a tool used to showcase the form. A lot of beginning artists are afraid of shading and of using harsh lights. But even with the lighting mastered, even with perfect rendering and good understanding of form in space an integral element of the light remains missing in their pieces.
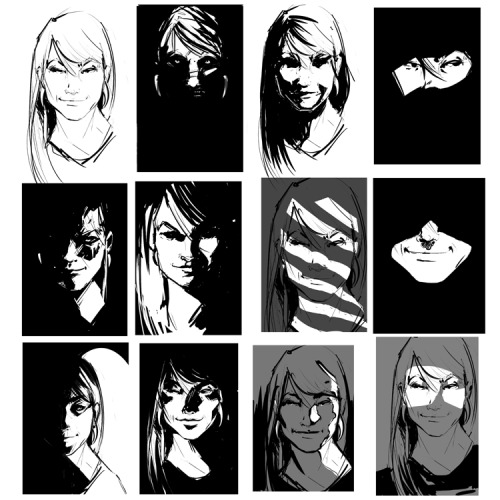
Look at the samples above: the same character’s head has been used in every thumbnail, and the only thing I have tweaked was the cropping and manner of light used on the features. Every single one of these frames tells a different story and gives off a different vibe simply by using light to focus on the features I want you to focus on.
Read how lighting can be used to enhance character, mood, and interaction within your pictures below the cut.
Keep reading
-
 thischristianguy reblogged this · 9 months ago
 -
 mothzarellaman liked this · 11 months ago
 -
 baronessofmischief liked this · 11 months ago
 -
 twins-resources reblogged this · 1 year ago
 -
 artking-4 reblogged this · 1 year ago
 -
 eagleflieswiththedove liked this · 1 year ago
 -
 greykittycat liked this · 1 year ago
 -
 voidref reblogged this · 1 year ago
 -
 kitsuna21 liked this · 1 year ago
 -
 twadi-gurl reblogged this · 1 year ago
 -
 crowdoesart21 reblogged this · 1 year ago
 -
 asexualwonderwoman liked this · 1 year ago
 -
 jollycapybara liked this · 1 year ago
 -
 martialwriter liked this · 1 year ago
 -
 door88 liked this · 1 year ago
 -
 joynalist liked this · 1 year ago
 -
 prismatic-gay reblogged this · 1 year ago
 -
prismatic-gay liked this · 1 year ago
-
 pansss reblogged this · 1 year ago
 -
pansss liked this · 1 year ago
-
 pibzby liked this · 2 years ago
 -
 amitybrightlights liked this · 2 years ago
 -
 modarthelp reblogged this · 2 years ago
 -
 alltheartrefereces reblogged this · 2 years ago
 -
 dragonni liked this · 2 years ago
 -
 m1r10123 liked this · 2 years ago
 -
 icarusxwings reblogged this · 2 years ago
 -
 bellamatto reblogged this · 2 years ago
 -
 drmaroon liked this · 2 years ago
 -
 ratsh4ckles liked this · 2 years ago
 -
jammysammys liked this · 2 years ago
-
 happyfunnycoolgirl96 reblogged this · 2 years ago
 -
 billdecipher liked this · 2 years ago
 -
 hilriouspengiuin reblogged this · 3 years ago
 -
 tuturialreblog reblogged this · 3 years ago
 -
tutoriarts reblogged this · 3 years ago
-
 rosa-raine liked this · 3 years ago
 -
 comet-fairy liked this · 3 years ago
 -
 klarkester liked this · 3 years ago
 -
 jallwoint liked this · 3 years ago
 -
 biwashington liked this · 3 years ago
 -
 itsukua reblogged this · 3 years ago
 -
 sevencoloredstar liked this · 3 years ago
 -
 pinkapplely liked this · 4 years ago
More Posts from Voidref


sorry for any grammar mistakes
long time without a tutorial… I tried to explain my general process of working here, hope someone will find it useful :)
Watercolour Skin Tones

Hi there! Thanks for your question. I don’t have these down to an exact science, but there are just a few colours I tend to use for skin tones with different ratios for each. I’ve tried to break it down according to how I think about them - I’ll first figure out whether the person is cool or warm-based. Cooler skintones have more blues in their undertone, and warmer have pink/yellow undertones, and there’s also the occasional neutral skin tone that almost reads as a green (sometimes found in olive-skin types). I always start with a very, VERY light wash of a colour, and this could be either a pale version of their final skintone or the undertone - usually a blue, yellow, or red. Afterwards I’ll start layering colours on top of that, to finally reach the darkness of colour I want. The colours used for the images below are lemon yellow (cool yellow), new gamboge (warmer yellow), quinacridone red (warmer red), quinacridone magenta (cool red), phthalo blue, and burnt umber in Daniel Smith watercolours. Sorry for the wonky face drawings, but here we go:

A very, very watered down mix for those who pretty much burn if they go out in the sun, new gamboge & quin. red. These types are very pale and tend to be bright pink-based. I’d say you could get away with the skin base being the white of the paper and just use straight-up watered down red for the very porcelain.

A darker version of above - starting to use more yellows in the mix. New gamboge & quin red. Still pink-based.

Starting to use more yellows here, with lemon yellow coming into the mix alongside new gamboge & quin red.

This is the same exact mix as above, except I layered down lemon yellow first, and then the mix of new gamboge and quin red on top of it later. It’s similar but reads more yellow.

Getting into the more olive-skinned territory with the addition of phthalo blue.

More blue, with new gamboge and quin red, and darker make a tanner skin tone.

Started using burnt umber into the mix for a richer colour, leaning red here with new gamboge and quin red.

A darker almost brick-coloured skin tone, with new gamboge, quin red, phthalo blue, and quin magenta coming into the mix.

Reddish undertone with new gamboge, quin red & magenta, phthalo blue.

Gold-based undertone - this one’s just new gamboge and burnt umber.

More neutral undertone with new gamboge, burnt umber, and phthalo blue.

Dark skin with blue undertones - burnt umber and phthalo blue with the smallest smidge of quin magenta.
I’ll usually put a bit more saturation into the skin tone mix for blush and lips, and some blue into the shadows. Again, definitely start light and layer layer layer until you find the colours you like. Experiment with what you have and see what works for you. Hope this helps!