Tutorial - Tumblr Posts
Schau dir "How to draw Kenma Kozume from Haikyuu!!" auf YouTube an
Me drawing kenma
I CANT- BrOoo!!HOw dO YoU drAw a hAlOoooo??!!! AND NOW DO YOU MAKE IT GLOOWWWOWOOW?!?!🔥🔥

edit i misread cuz im dumb and sleep deprived just draw a circle and follow the light part
first, you need to know where your hair is coming from in the first place. i like to divide it in lenght so here we have bangs (pink outline), side hair (green outline) and back hair (blue outline).
in most front facing works the attention will be on the face so our priority is bangs, side hair then back hair. you can divide all of them into smaller subsections too but its most commonly done with the bangs, such as how i showed with the different bisexual colors.
think of hair flowing like the wind, despite there being imperfections, overlaps, strong and weak areas it all follows a general flow.
know what your hair is like in 3d and see how strands would overlap and interact like strangely shaped ribbons, which you can mostly do just by feel but still follow the wind rule
feel free to twist and turn them like ribbons too
for longer hair, strands might pop out just to loop back in as shown on her back hair (shes wearing loose twintails), those most often show ribbon-like behavior
make sure their thickness doesnt decrease too abruptly and that the lenght of the stray hairs is the same as the section they come from
now light:

know where your light source is coming from, here its useful to think in 3D instead of just picking a side of the canvas. Here, the light source is above and slightly in front of the character.
Those ball-shading exercises your art teachers made you do will come in handy here, so map out how light would fall on your characters mostly round head
now just think about which strands stick out enough to catch more light than the others, and carve shadows into sections that wouldnt catch light like that

you also just follow the general flow here, its all about that flow
pro tip: use a low opacity big size airbrush to erase the lower part of the bangs that cover ur characters face to make them ~glow~
and remember, dont be shy with the aggressiveness of your lighting

@dimiclaudeblaigan asked for a tutorial on how to begin drawing. Good news! If you can draw a funky looking stick man, you have already started!
I think that stick people are a great starting point for artists because of the things you can learn from them that will be important later on.
If you are able to draw a circle and a couple of lines, you can easily put together a stick person.

Congratulations! You have started to draw. :)
A stick person is a very minimal artistic representation of a real life person. It is simple yet recognizable, and is widely used in art, media, and signage.

But what can a stick person teach us about drawing people that look more like… well, people? Lets have a look!
By simply adding a few more lines, we can add a pair of eyes and a mouth. Maybe even a little triangle nose! Or half circles for ears. We can now draw a face, which provides a basis for all sorts of expressions.

These simple additions can allow us to explore the wide range of human emotion and individuality.

This may seem like the basics of the basics. But that is what we want! In order to get to the point where we are able to draw complex, elaborate representations of humans and objects, we will need to start with simple shapes like lines and circles and build our understanding from there.
For instance, lets give our stick person some cool new features, such as hands and feet. I chose little squiggly circles to represent hands, and triangles to represent feet.

We can go a step further and modify the body of the stick person to include shoulders, hips, elbows and knees. These parts of the human body are quite complex in real life But here, all we need to do is add a few simple lines and dots to our stick person.

The lines provide some additional structural elements to our stick person's body, which are the shoulders and the hips. The dots indicate the points of articulation - elbows and knees, the places where the arms and legs bend!
Now we can use our stick person to show us an even wider range of human movement, action, and expression.

Our little drawing of a human being is evolving! All it took was adding a few more lines and shapes here and there.
By elongating some of the existing lines and making the head an oval instead of a circle, we can give our stick person proportions that resemble that of a real life human.

By this point, we have managed to add more complexity to our stick person simply by using our ability to draw lines, circles, and other basic shapes!

These basic ideas are the building blocks that will enable us to create more complex shapes.
The next part may be a considerable step up if you are absolutely new to drawing, but I have decided to include it in order to show you how complex objects like the human body can be built from shapes that are a bit more complex than circles and lines.
For example. Two ovals and a rectangle can be combined to create a cylinder.

Six squares can be combined to create a cube, or a box. Here, each square is distorted slightly depending on which way the cube is facing.

Note that the back faces of the cube and the bottom of the cylinder are hidden. These shapes allow us to visualize that which should not normally visible.
A sphere from all perspectives can be represented by a circle. But we can make it more like a sphere by adding lighting and shadow if we so desire.

Cubes, cylinders, and spheres are examples of 'solid shapes' because they consist of 3 dimensions.
Lets see how these solid shapes can be used to compose the human body.
By stacking three cylindrical objects, we can create a torso. Two spheres have been added to form shoulders, while a smaller cylinder forms the neck.

An arm is an alternating sequence of spheres and cylinders connected together. Note that the hand has been simplified for this example.

We can apply these solid shapes to the rest of the body to give us a more recognizable representation of the human form. It doesn't even have to be perfect. And just like that, our stick figure now has a silhouette that is unmistakably a person!

In the above examples, notice that we kept the stick person at the beginning while building up the shapes and solids around it. This is because the stick person serves as a guide for positioning the body and its various parts -> also known as posing.
You can do the same thing to everyday objects! Here, I drew a wine glass by stacking these three dimensional solid shapes.

The cup and its contents are two ovoid shapes that were cut in half. The stem is a very thin cylinder shape. The base is a cylinder with a slightly wider bottom.
Solid shapes help inform us how objects and parts of the human body may appear from different perspectives.

For example, a sphere can be used to demonstrate how the human head appears when looking up or down, turned to the side, or tilted at an angle.

With these examples, I hope I have managed to convinced you that if you can draw a circle and a couple of lines, you can draw a person! You just have to train your eye to recognize the simple shapes within complex objects. Try it with everyday objects as well! Or even your favourite media! A drawing subject can be as simple or as complex as you envision it to be.

Once you have mastered that, there are many aspects of drawing you can explore from here that may require you to seek additional resources or a fellow artist's advice.

Last of all, remember that drawing is an iterative process. Even if you draw something correct the first time, you will need to draw it again and again to get it right all times! And by making small changes like the ones we explored in this tutorial, your drawings will gradually transform!
I hope what I've demonstrated here are enough to provide the basics of how to get started with drawing objects and people, and also to help refresh more experienced artists. :) Hopefully I didn't go too off topic with what was requested, and let me know if there are any more questions I can answer.
Cheers :3
BTW i colored most of this i did by just dropping really big circles at low opacity w a watercolor texture brush and let the overlaps create lighting for me! and then rendered over it to emphasize the folds


^^ since ppl been asking how i rendered this (the trick is that i kinda didn’t!!)

MIDNIGHT COWBOY


little breakdown abt the same 4 lines i tend to use for drawing folds!!
not a tutorial just some notes ^^


ps sorry for spelling accordion wrong every single time. i will not learn from this
second ps the biggest diff between accordion and pinch is that pinch lines meet at the origin point while accordion lines imply a future meeting but don’t actually touch

another add on is that i do the same lines in diff places and directions for diff hairstyles as well!! twists locs braids esp
hii, first of all your art is absolutely gorgeous and you are so talented 💞!! i was just wondering if you had any advice on how you draw curly and textured hair? no worries if you don’t have the time to answer this!!
hi thank you!!! sorry this took me forever HAHA i wanted to put together a coherent detailed thing but realized i uhhh honestly don’t think that hard abt it when i draw

i tend to just plan out the hair parting n hairline
and then i just simplify n stylize curls by only drawing the front half of the curl? like this ^^ i like drawing them in an implied sort of style
rest of advice i’d give is to just observe how real hair sits (ie looser curls being more visible from further away n coming off as bigger etc etc) n how other artists draw hair !


my recipe for drawing hands!
(small note that this is a shortcut that is more abt style and ease than anatomical accuracy. it helps to take time to really properly study hands, makes it easier to bend the rules a bit like this and have it still look good!!)
(learn rules b4 u break them or whatevah)


wanted to add little bonus note that the thing i like most w this method is that they’re such simple shapes u don’t even have to draw them entirely. after a while it gets pretty easy 2 just infer and imagine the rest of the lines!!
makes for very quick but efficient sketching ^_^
my recipe for drawing hands!
(small note that this is a shortcut that is more abt style and ease than anatomical accuracy. it helps to take time to really properly study hands, makes it easier to bend the rules a bit like this and have it still look good!!)
(learn rules b4 u break them or whatevah)
i know we joke about cis artists having the weirdest sense of anatomy, but also even when the anatomy is fine, no one seems to want to draw women doing normal things
Steven Universe Color Correction!
I was doing some screenshot edits when I had a brainfart and decided to find out the colors of the zircons and the wormy boi.
Basic Tutorial
There are a number of different types of blending modes for layers, as many of you undoubtedly know. Most screenshots from SU that are worth editing seem to have a darker shade, similar to a multiply layer.
Anyone who passed 5th grade math knows that the opposite of multiply is divide, which also happens to be a blending mode.
So, the method I used to correct my colors goes as follows:
Load your screenshot into your art program
Add a new layer and set the blending mode to divide. Hide this layer for now.
Find something on the screenshot that would be white under normal lighting. Eyes, teeth and the like.
Use the eydropper tool to copy the color on one of these areas.
Make the divide layer visible, and use the bucket/fill tool to fill the layer with the color you copied.
Tada! You should now have an edited screenshot with accurate colors.
Actual Theories
Remember when the biggest controversy in the fandom was if the prosecuting Zircon was yellow or green? Simpler times. Anywho: I used the same method, and...


Why yellow there.
I cross checked this with other people's edits, and it seemed pretty consistent. She yello!
I decided to do the defending Zircon just for fun:


So, next bit: Wormy Boi.
@novantinuum made an interesting post about the similarities in scenery and lighting between the Wormy Boi's title sequence appearance and a number of scenes in the most recent trailer. I sampled the color from the trailer, put it on the title sequence, and well... the results speak for themselves.
This is how a trailer scene looked before it was fixed:

This is how a trailer scene looks when fixed:

And the Worm?

Yup.
Please tell me if there is any way to improve my method!
Also, I’m working on the high school AU thing.
- Pasta
🇮🇹Ciao😃 Ecco un modo originale di piegare un tovagliolo. Seguite il tutorial se volete apparecchiare la vostra tavola in modo dicerso dal solito!😉
🇬🇧 Hello😃 This is an original way to fold a napkin. Follow the tutorial if you want to lay your table differently! 😉
Making Animated GIFs
Someone asked how I make GIF animations after I posted the Sanders Sides animation I did for @thatsthat24 and I wanted to share my answer with others!

This will be a pretty in-depth answer, so I’m sorry in advance for the length!
To start, for me, the best way to make gifs is first to just think of them as animations (don’t think about it being a gif). There's plenty of programs you can use to make gifs, and some of them (especially the ones you have to pay for) make the process much easier. But while it might take a little leg work to find a process you can afford that works best for you, don't get too bogged down trying to find the best program -- that's kind of what I did after I had to cancel my Photoshop subscription and it just made me waste time that I could've spent animating.
Animation is simply the art of tricking people into thinking that a well-timed sequence of still drawings is actually showing movement -- it’s all a big illusion~ So any program you use to draw could potentially help you make gifs. In Photoshop, I made simple animations using the frame animation tool as shown in this helpful tutorial by @everydaylouie:
https://www.youtube.com/watch?v=AUJe8Bil7Sw
But for the Sanders Sides animation, I used a combination of FireAlpaca and Krita, both of which are free programs. I did frame-by-frame animation in FireAlpaca first, starting with an incredibly, roughly drawn animation for the first pass to get the initial timing down.

At this stage, you start with keyframes and then just keep drawing inbetween frames until you get the movement you want. Here's a tutorial on Inbetweening by @howardwimshurst:
https://www.youtube.com/watch?v=xAYS94xAAc4
On the next pass, I refined the lineart, shapes and expressions a bit on each frame.

On the next pass, I cleaned up the lineart. Then finally, I went back and added color -- this is the final result.

Here are two pretty good tutorials on animating using FireAlpaca:
By @leslielumarie:
https://www.youtube.com/watch?v=WDF-DaVi0qU
By @scotchtapeofficial:
https://www.youtube.com/watch?v=mpN5QD9aM4g&t=193s
For shorter animations, I draw less frames and animate at around 8-12fps (sometimes up to 30 frames). For the Sanders Sides animation, I drew it on 2′s at 24 fps for a smoother, more cinematic looking animation -- but that also means drawing MUCH more frames to get the look you want (The Sanders Sides animation ended up being 211 frames, including duplicates for the timing TTwTT;). I rendered out the animation as a PNG Sequence (usually I would just do it as a gif using FireAlpaca, but I wanted to do a bit more tweaking with the timing) and imported it into Krita that, for me, has an easier timeline to work with.
In Krita, I just extended a few of the frames to make the mouth movement easier to read and put together the three different shots. Animating something this long on ONE file project in FireAlpaca would've eaten up my computer’s memory, so I had to separate each shot into a different file to work under -- after rendering out the three shots as three separate PNG Sequences, like I said earlier, I put them together in Krita, tweaked the timing, and rendered it all out as one single animated GIF. Here's how to animate using Krita by @marts-struggle-with-drawing:
https://www.youtube.com/watch?v=u1EhWydbdVk&t=1s
I know this seems long and complicated, but most of this stuff is just the technical part of finding programs you can use and afford to render out PNG Sequences as animated GIF files. This is only the method I used in this instance; chances are, I'll find a much easier one in the future, especially if I can get a faster computer or can pay for animation programs. The thing to remember is that no matter what program you use, it's just a tool -- like a pencil or a pen or a crayon -- the tool itself might change, but in the end, you're still just animating. So even if you can't afford expensive programs, you can still animate using the many free programs online that amazingly awesome people have created for artists and animators. In order to animate well (whether for a simple 10-frame gif or a fully rendered 24fps animation), watch a lot of animations, figure out the style you like, see what you can do with what you have available, and learn the 12 basic principles of animation; here’s a playlist you can knock out pretty quickly by AlanBeckerTutorials on the 12 principles:
https://www.youtube.com/watch?v=haa7n3UGyDc&list=PL-bOh8btec4CXd2ya1NmSKpi92U_l6ZJd
Also study/observe how things and people move so that you can use all you've learned to either copy this movement or exaggerate it for extra effect.
I hope this doesn't scare you away from wanting to animate! It can seem like a very daunting venture and in many cases, it is, especially if you attempt to make something ridiculously advanced and complex on your first try and end up discouraged when it doesn’t look perfect. But the results can be very rewarding if you've taken the time to learn all that you need to in order to achieve the kind of animation you want. So start small...


...and work your way up. With practice and dedication, you’ll get there!
Good luck and happy animating! :D
Free drawing/animation programs:
FireAlpaca: http://firealpaca.com/
Krita: https://krita.org/en/

Origami: the traditional Japanese art of paper folding. The first craft I fell in love with, about 20 years ago 😍 Imagine my joy today, when I discovered the A4 printed vellum sheets from @jenslittlet are the perfect size to make a bracelet packet! It's a great way to make reusable, recyclable packaging for small items. Originally a seed packet, this model could be used for beads, sweets, all sorts of little gifts for birthdays and Christmas. I think children will love doing a bit of finger painting to make their own gift wrap as well! #dollydaydream #origami #packaging #jenslittlet #smallbusiness #howto #papercraft #paperfolding #tutorial HOW TO: Use a rectangle of paper (I used A4). Begin with your paper landscape, pattern side down. Fold the bottom edge up to about an inch below the top edge. Fold the top edge over the front layer. Fold all layers of the top over. Turn over. Fold the left and right corners down to meet the bottom edge. Fold the bottom left and right triangles up, and tuck them underneath the side flaps. Simply unfold one edge to add or remove the contents and re-fold. No need for tape :)
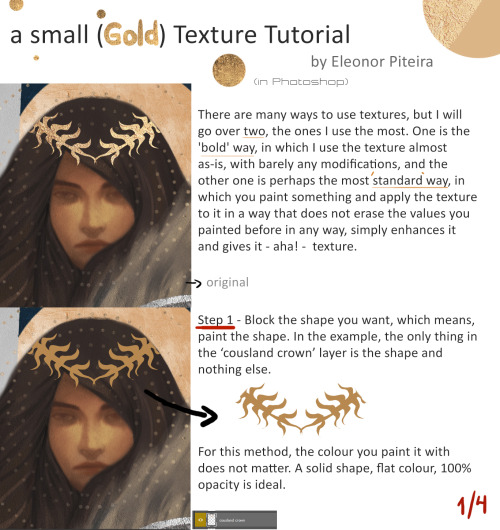
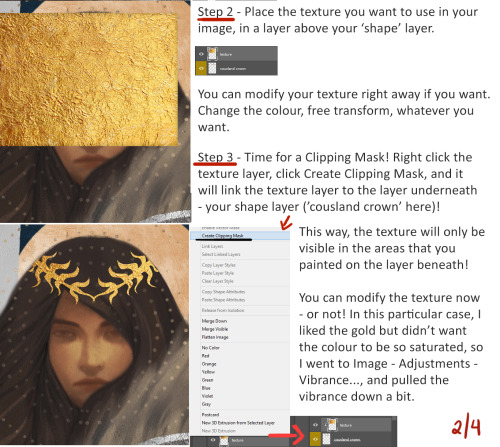
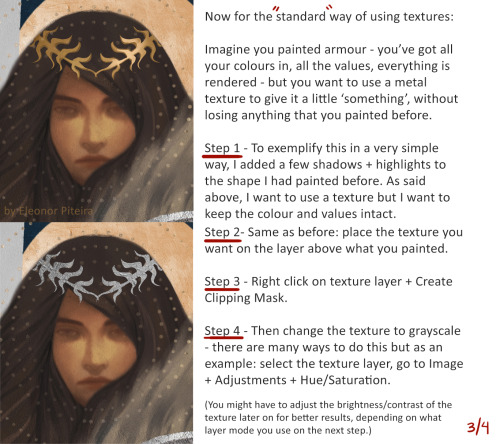
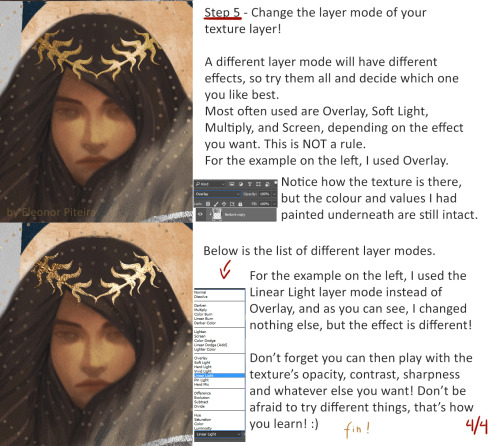
a small Texture Tutorial
I’ve been asked a few times about how I use textures, especially gold textures, so I’ve decided to try and do a little tutorial about it. I’ve never really done a tutorial, but I hope it’s easy to understand, since it’s not difficult to apply :)
There are a hundred ways of doing the same thing, this is just one of those ways. For other (BETTER) tutorials explaining more about textures and other ways to use them, I point you all towards the 3 tutorials that taught ME the basics!
TUTORIAL: how to use textures by agosbeatle
TUTORIAL: Applying texture by Shinerai
Texture tutorial by Tervola

https://www.clipstudio.net/how-to-draw/archives/161327
Drawing Clouds - Tutorial
By Ann Maulina
Great environment tutorials, worth checking out!


:D ok! i’ve updated the Sonic character anatomy, this is basic though but i really hope is easy to understand (because i’ think i’m not good enough explaining things with words lol) and it results useful to anyone who might need it ^_^
just some other tips to improve:
try drawing comics! on comics you have to try new poses, angles and expressions.. is reaally helpful to improve your drawing skills!
look at official art for reference
listen to cool music! XD it always helps to get inspired hehe
here are some other tutorial things from before:
Rouge / Amy and Silver’s quills / Sonic and Shadow’s quills / neck and shoulders


Hands,poses,perspective…
________
Some hands, poses and stuff drawn for someone asking for art tips
That’s pretty rough but maybe still helpful?
Bonjour! I love your art and i'm terribly sorry for all the anons who send you hate. You do not deserve that and they are acting like children. You've inspired me to pick up a pencil again and start drawing but i understand the other anon feeling, i'm a lil ways older than you (been drawing for a good 11 years now) but after a nasty motorcycle accident i stopped drawing completely. Do you have any tips on how to draw semi realistic faces and any anatomy tips? Love your art and merci beacoup.
Bonjour! I’m no professional but I hope this helps :)


And this is something I did for a friend :)
