Meet Shirley Summers.


Meet Shirley Summers.
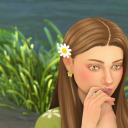
Shirley is the best friend's mom for @kiwisim4 CAS challenge. Never tried one before actually. And it was interesting, thank you @kiwisim4
I didn't have actual friend’s cool mom because it’s my mom was called cool all the time. Haha
I started with Stifler’s mom. But then something went wrong. lol. I imagine that she gives her children freedom and doesn't care much about grades and curfew. All because she knows from her childhood that she wanted trust from her parents. She believes in it and doing well with her kids. Other kids always say ” Your mom is great”. She is that kind of mom.
I still don’t understand how to add links to cc that I use. But I want to give credit because I love those creators and their work.
-
 honeypoticns liked this · 5 years ago
 -
 kiwisim4 liked this · 5 years ago
 -
 shyartnerd564 liked this · 5 years ago
More Posts from Windenfalls

📚 Witchy Books Set 6 - Wicca 📚
4 more books for your witchy Sims. Awhile ago a lovely simmer requested some more Wiccan-specific items, so here are a few!
Sims 4
Spa Day required
These are DEBUG item recolors.
Enable the bb.showhiddenobjects cheat to access the items in build mode. Start typing the book’s title into the search query in build mode to find quickly. You can always find items like this, just begin typing in part of the item title and it will appear.
Note you can find these books in real life to read if they are of interest!
Books in this set are:
Wicca Practical Magic by Patti Wigington Wiccan Spells by Luna Sidana A Little Bit Of Wicca by Cassandra Eason Wicca Book of Herbal Spells by Lisa Chamberlain
Download Ad-Free at Sims File Share: <HERE> Pick & Choose
Remember that these are real books that can be held and read in real life. If they interest you, go check them out!
My other book sets can be found:
<HERE>
<HERE>
<HERE>
<HERE>
and <HERE>
Single Books:
<HERE>
and <HERE>
And as always, please let me know if you have any issues!
~I take no credit for the images used for these recolors, all credit goes to the authors and artists.~
I hope you are all having a good weekend!
And if you like witchy CC in your game, I have lots more for you <HERE>
Happy Simming! 🌒 🌊 🔮

Love it 😍

HERE IT IS GUYS! my first lookbook video! i’m so proud and excited to finally share this with all of you. thank you to everyone who encouraged and motivated me to do this, you’re all so amazing!
✨ please check it out and leave a comment letting me know what think! ✨
all cc links can be found here. 💕 also, a special thank you so much to all of the wonderful creators whose content i used! ♡

Well, Veronica found out who’s the sims lottery winner.

She already knew him. So...

How convinient. Sorry, Simeon.
I absolutely love this sweater by @anessasims 💕
Editing Tips!
This isn’t quite a “How I edit my screenshots” tutorial, but it is some advice for those of you who like my editing style and want to try something similar yourselves. Go to my Resources page to find links to most of the brushes I use regularly. Although, it is recommended you have a graphics tablet, tbh. If you don’t have one, you can for sure still make pretty CAS edits, and these tips are adaptable, but I couldn’t tell you how to go about it, either. Take it as an opportunity to get creative and succeed over your current limitations :D
1. Cleaning up the Screenshot.

I use the Topaz Clean + Texture Smoothing actions from the Clean and Clear Set. This isn’t necessary, but I do this before I cut out the sim from the background using Select and Mask (here’s another tutorial that focuses on cutting sims out from backgrounds).
After that is where the true clean up begins. Even though what is pictured up above is pretty smooth and clean, I’m still going to go around almost all of the edges and draw my own, usually keeping in mind where my light source is and how it’s hitting my sim (Google is your best bet on shadow and light; I would be crap at explaining it).
Before:

After:

The basic concept here is making the folds and edges clear and smooth. You’re tracing over what’s already there (unless there’s clipping to fix; you’ll probably have to draw new stuff if you’re fixing clipping body parts or clothes… yay…)
2. Depth with Shadows + Highlights.
I use a very dark, almost black navy blue as my shadow color. There are a lot of other ways to achieve a similar effect you can find through Sims 4 Edits on YouTube, but that’s what I do. And white is my highlight.
You’re basically following where all the shadow and light is already laid out for you. I also use the select tool to select my entire sim. After that, I create a new layer (super important!), make the opacity of my airbrush about 50%, and then place down the shadows and highlights. Somewhere between shadow and highlights, I change the layer style to overlay.
Before overlay:

After overlay:

And along the way, you use an airbrush smudge tool to keep things where you want them. I also tend to top the highlighting with a hardbrush, 100% opacity white like this:

3. Color Balance
I adjust the color balance in all of my edits. All of them. Even my gameplay shots, too. Some people do this through Curves, but I use Color Balance. It is a testament to my lack of pro knowledge that I honestly couldn’t give you any theory about how to correctly use Color Balance…. I just mess with it until it looks good.
Before:

After:

As you can see, I used Exposure, too. I adjust it very slightly because usually, with all the highlights and shadows I’ve already given this piece, anymore through exposure would ruin the look. Sometimes I mess with Vibrance, too.
4. Gaussian Blur
I am a little addicted to the soft, dreamy sunlight aesthetic. Not only does it cover up some of the flaws I was either too lazy or otherwise lacking in talent to properly correct, but it can give an edit that final flare it needed to really feel finished for me. If that makes sense?
Anyway, I tend to do this before color balance and all the other adjustments, but that’s mainly just a preference thing. First, we’re going to make a new layer that merges all the previous layers without actually merging them. (I’ll be using a different edit as an example here).
Ctrl+Shift+Alt+E

If you did it right, the new layer will pop up above all the layers below it that it merged together.
Then, you go up top, go to Filter>Blur>Gaussian Blur and decide how much blur you want to start with. From there, with your blurry top layer, make the eraser an airbrush, turn the opacity to 20-30%, and start erasing away the parts of the pic you want to gradually become clearer.
Before:

After:

And that’s the gist of it!
If you’re anxious about your Sims edits or even just your art in general, know that I eventually when from this to that in the span of like 4 years.

So if you’re not good now, that’s not to say you can’t eventually be better in the future so long as you continue to make the effort and practice with purpose.
Hopefully, this was helpful to someone :O