🌸Oliver/Kwristi | 22 | Artist | She🌸 ◇Faceup/MOD BJDs◇ 💐Commsions are OPEN💐 ♡Question? Feel free to message me!♡ 💜SUPORT ARTIST
140 posts
Yukis-bjds - BJD FaceUp Artist - Tumblr Blog

The story of Nikita & Sharon💞 #dollzone #dzdoll #dollchateau #dcdoll #artdoll #bjd #bjddoll #balljointeddoll #doll #bjdhobby #dollhobby #bjdstagram #dollstagram #bjdsale #dollsale #bjdartist #dollartist

I was going to do a more in-detail progress of how I dye my dolls black, so here we go! Took these pics during the dyeing of @snow-and-resin‘s caramel Lyse. Blabbering under the cut!
Keep reading
The Chive Cart (spray booth for faceups)

Most of the problems associated with sealing sprays occur during the action of spraying itself. If there is a lot of moisture in the air (which can also be brought about by cold temperature) during those few seconds while you release the spray, it can get trapped underneath your sealant layer which causes the layer to later crack, craze or chip. Staying indoor, at least during the spraying action, allows me to control my room temperature, source of lighting and I do not have to deal with annoying wind which can cause dust and other particles to get sprayed onto the doll as well. However, I needed a way to encapsulate all that toxic fumes I am about to be spraying. The idea of using a spray booth for this purpose is definitely not new, but thought I’d show you one I made out of am archive box:

I chose this box because it’s not too big and has handles on the sides for portability. Below is a second version of the spray boxy: I’ve cut out the arm holes at differing heights. Because of the way I hold my spray bottle, I just find this position more comfortable.

Here is me putting my spray boxy to use: Video . Right after i finish spraying, i wait a few minutes until the sealant layer settles and solidifies a bit, then i gently place the head on the tissue i got inside the box, take both of my hands out and carry the box by the handle outside of the house. Only when I’m outside, I open the lid of the box to take my doll head out. While i’m out there, i let my boxy air so the fumes dissipate (fanning it helps), sometimes i wipe the inside of the box too to get rid off the sealant that has stuck to the sides. I then put the lid back down and take everything back inside the house. If I need to do another spraying, I repeat this process but start with being outside when I place the object inside of the box, then bring the box inside and wait until the temperature of the air inside the box matches my indoor condition before I begin spraying again. Another Video showing the two designs. Some photos showing how the box was made:

First I cut out some arm holes. I started with same level, but later I figured out that I am more comfortable having the arm holes at differing heights.

Cut the top of the box as well as a bit of the side so I can see a lot more inside the box.

I just used this clear plastic from the back of an old booklet to make my window.

Stick the plastic with duct tape. Also, I make sure the lid opens this way (toward the back), it’s just more practical having it away from me while I spray.

Now I attach some gloves

I use the cardboard from the old booklet to make reinforcements for the arm holes.


I make sure the angle of the gloves will be comfortable for the angle of my arms for when I spray.

I then duct taped the crap out of it. Put all my object and spray in it and I’m ready to go.

DIY: TEMPORARY TATTOOS
If you’ve always had an idea of a tattoo in your head that your not sure if you want or not, or you’re just bored on the holidays, you might want to try out this DIY and make our own temporary tattoo.

What You Need:

Eyeliner (liquid pen is easiest, preferably waterproof and/or smudgeproof) 3B, 4B, 5B or 6B pencil Baking or tracing paper Talcum Powder Fluffy make-up brush Wet cloth Spray-on bandage (waterproof)


Firstly, you’ll need to find an image you want to tattoo (or come up with one) and decide where you want to put it. I’m going to draw the design on the new Endless Drain Major Leagues t-shirts and put it on my left wrist.

You’ll then want to print out the image and trace it (or draw it) onto your baking paper with your pencil.


Place the tracing where you want it, then apply a wet cloth on top and remove after approximately 20 seconds.

Draw along the tracing with your eyeliner.


Sprinkle talcum powder on your design and spread it with the make-up brush.

Spray on top the design with the spray-on bandage and wait for it to dry completely.

Now your tattoo is waterproof and should last for about 3 days. Try not to rub or wash the tattoo too much and it should last longer. Enjoy tattooing.
- Tayla Ashley
I want one

you know this started out as a joke but I got kind of into it. it can’t see for shit and moves awkwardly but it has pretty powerful venom so don’t let it even get close to biting you. Hunts sort of like a komodo dragon does.
since its eyesight is so horrible it’s constantly like owo whats this
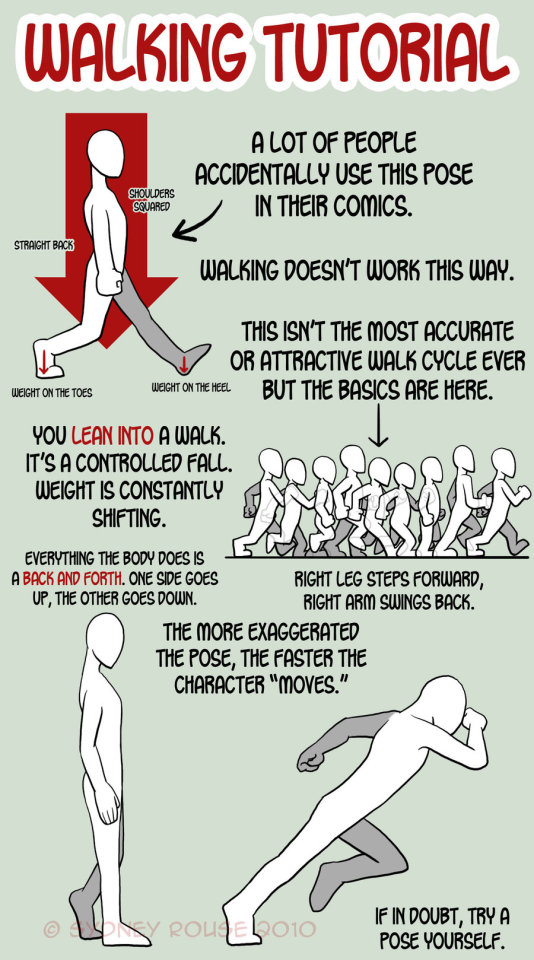
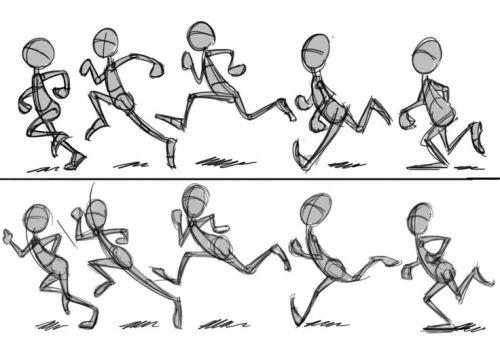
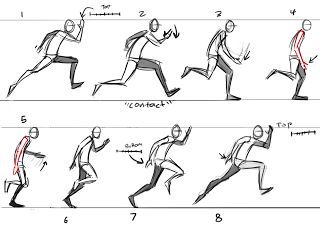
Walking Animation Tutorial
Top Image
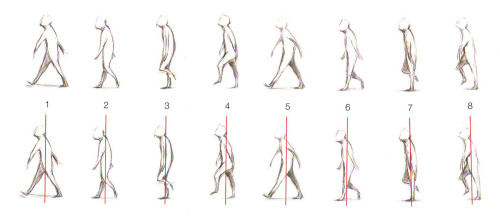
Row 2: Left, Right
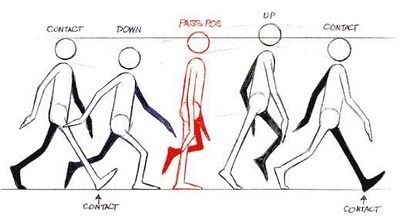
Row 3
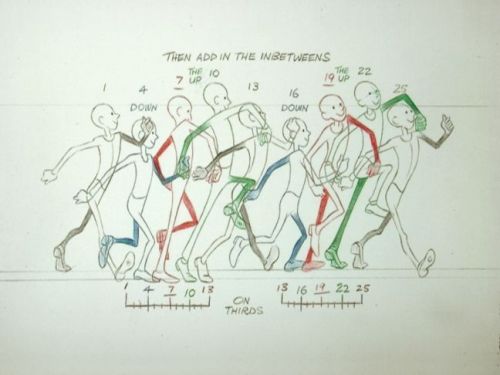
Row 4: Left, Right
Row 5 & Bottom Image
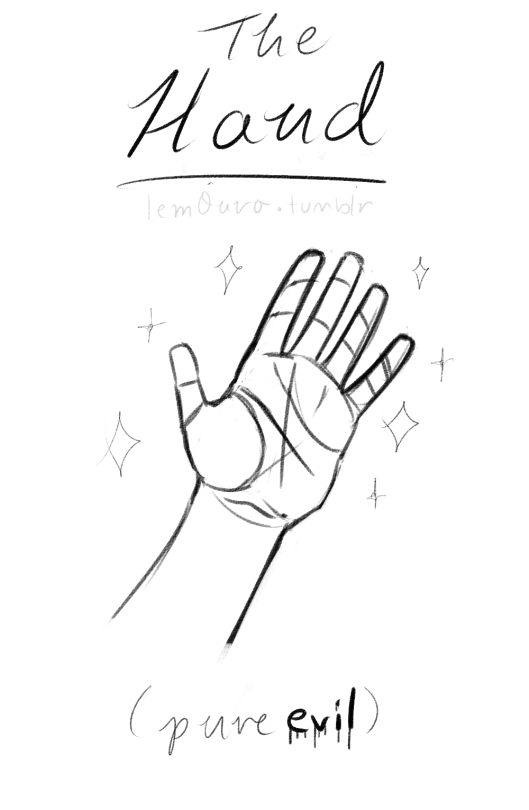
I'm kinda ashamed to ask this, but could you make a tutorial on how to draw hands? ;A;
omg dont be ashamed at all!! Hands are generally tough to get used to, lots of artists struggle with it! so dont be ashamed i feel you.
and I actually have made a hand anatomy guide before in fact! If you want to get better at drawing hands I def recommend you learn the basic anatomy first. Please check out the ones I made, I try to make it simple and easy to understand:
Artistic Anatomy: Hands Part 1
Artistic Anatomy: Hands Part 2
There’s my guide to the anatomy, but here’s some more tips that I’ve noted to myself that I’d like to include
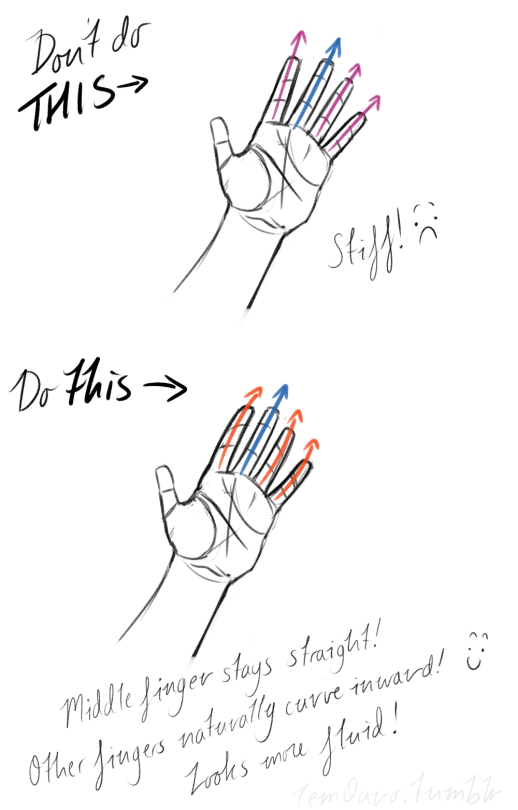
First off, I’d like to just note on the fingers: if you pay close attention to your own hand, you may notice the fingers are ever ever so slightly curved inward. It’s a very subtle detail, but I noticed that, despite how slight it is, it can make a hand look more lively, and less stiff.
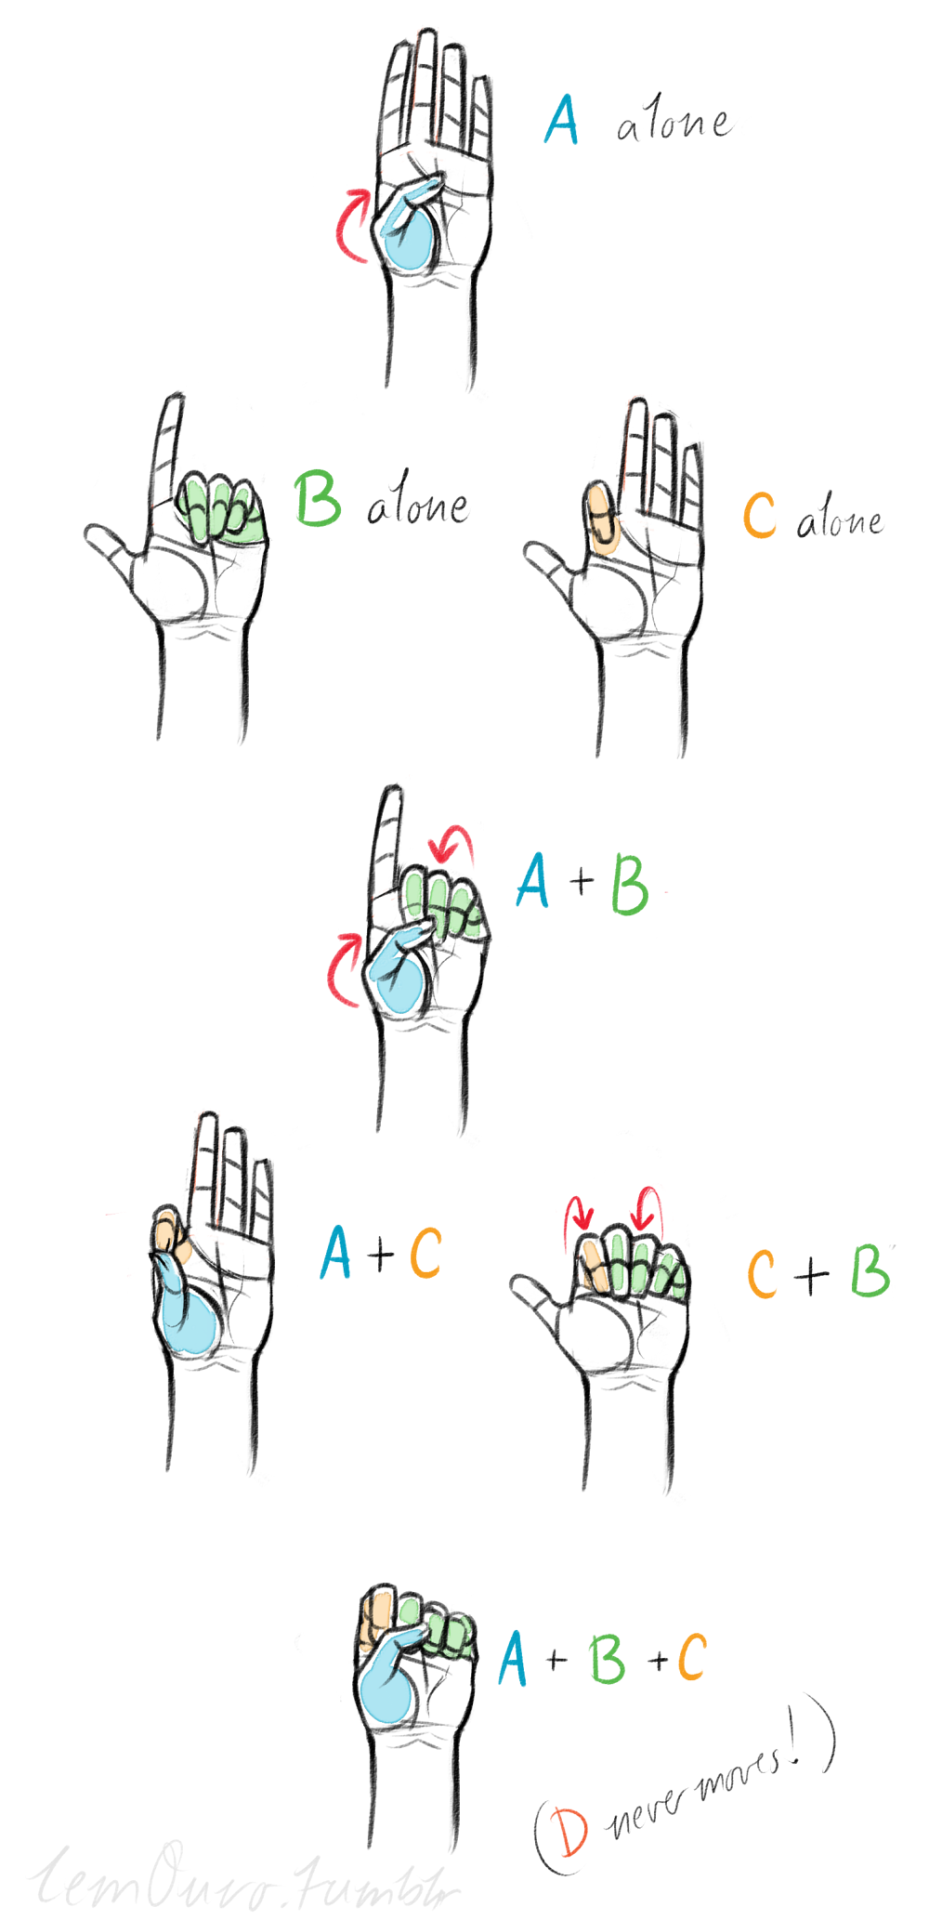
Second, the “M” on the palm! Your hand moves in many ways, and because it does it creates creases in your hand. The most prominent creases appear to make an M shape; this is handy to remember for what I’m going to talk about next. (It also could be a “W” I guess, or to be more specific a “ )X( “; just think of it in whatever way helps you remember!)

SO now that you see the M, draw your hand as a basic blocked shape and add your details. As you do, you can see that the M divides the palm into four basic parts!


When the hand moves, parts A, B, or C of the palm, alone or in different combos, will create the general poses that the hands do normally. These parts are the parts that move, with D being stationary, no matter what!
Here’s a chart of all the possible combos. Once you have down what part of the hand moves for a certain pose, you can change up the fingers and tweak it a bit to do what you need to make it more specific!
This is simply my method of drawing hands. God knows there are hundreds of tutorials out there by other artists, but personally, this way helps me the best (after learning the anatomy first).
This way I can divide the hand and combine the parts in any such way I need!
Hands take a lot of effort to grapple, and you need to practice them a lot, especially foreshortening of the hand; that’s really something you need to learn through your own studies. Look at your own hands, draw hands from life, from magazines, shows, comics; just draw hands! You’ll eventually figure out a method that works best for you. So to get better at drawing hands; draw hands!! And don’t stress over it, have fun with it!


Two dashing gentlemen here to save the universe

Falling in love was never part of the mission.🌹


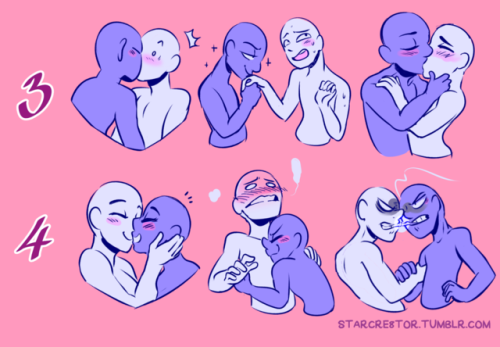
Is this meme still happening?? lol Send me some smooches y’all~ you know the drill 💖 (character+number )
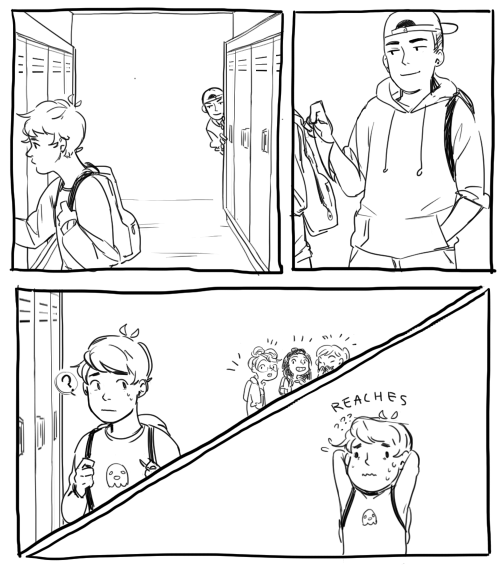
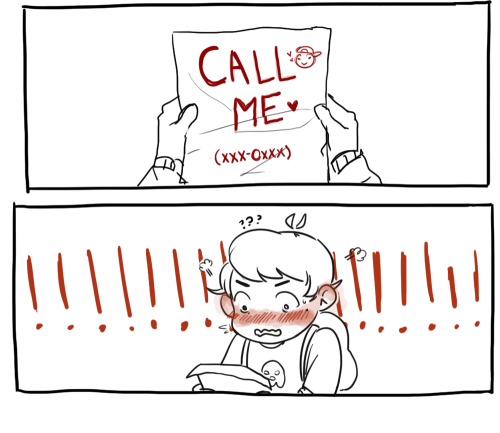

anyone please ask your crush out like this

–writes in all caps except the vowel –all the letters are different sizes –clearly did not practice a lot on the handwriting practice sheets –adorable

–writes in all caps WTF WHY –has fairly neat and clear handwriting –clearly excelled at those handwriting practice sheets

–small letters!!! so small!!!! –look at the little curls on the i and the t –literally me and him have the same handwriting –i love him

–every letter is a mess –has bizarre spacing –it’s so beautiful

–literally writes like a kid –the cutest g literally wtf –i will love it, I want to see it grow up healthy, i want to tell my friends and neighbors about it

–beautiful –perfection –i want her to write my wedding invitations

–Neat –adult handwriting –he’s my dad


Hands Row 1 & 2 Row 3 - 5 Row 6

actual?? sunshine boys


“the darkest nights produce the brightest stars”
this picture was possible thanks to my patreons 🌙

Had some colored pencils and a pen. I asked my coworker for a prompt and got “80’s”.
So of course how could I doodle anything but Keith from the amazing @fenri’s “Alien Sex Fiend”? Tbh it’s only a matter of time before I make fanart for all their fics…
I was gonna add a Shiro with an arm around him, but pen is too unforgiving for me to attempt that today.

Picture I did for the Sheithzine back in Nov!
This version is actually a little different than the actual one I submitted for the zine. I struggled a lot with the BG and didn’t like the results;; >< Sorry for the change;;
Thank you to everyone who supported the zine! I’m so thankful that I was able to participate!


(doing the air quotes gesture) anatomy practice

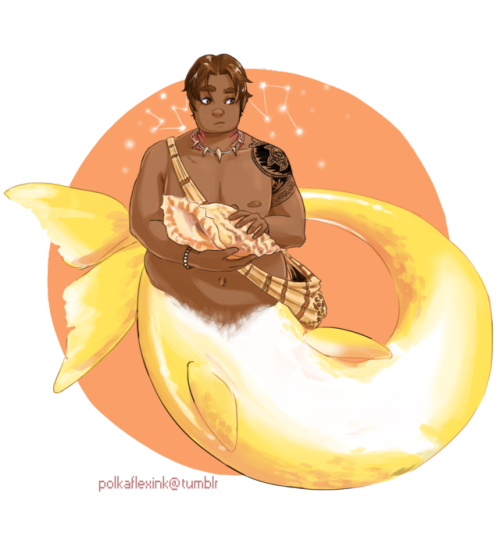

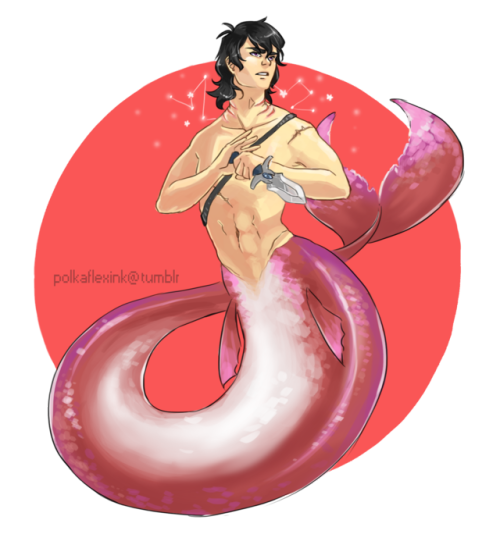
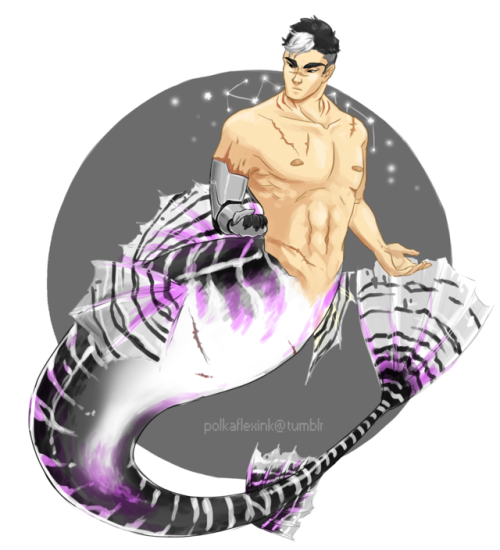
mermaids are forever my favorite thing


Neon Nights, 2016 | by Elsa Bleda

the world isn’t simple enough to explain in words
How to show expression with the mouth!
This was a request and at first I wasn’t sure if I had anything to provide with, but as it turn out it got a little longer than I expected because there were actually things I had to say!! Wow!!
Anyway, this is some guidelines I follow when I try to make the face expressfull, more specifically the mouth! It is often neglected, since it’s actually pretty hard, I’ll admit. But I’m here to help (hopefully…)! A mouth expression tutorial as per request. Enjoy and hopefully it will help some a little. ʕ•ᴥ•ʔ
Draw the teeth at the right angle.
This is super important. The upper jaw follows the angle of the head, and the lower jaw will depend on how open it is. Make sure you have a rough estimate of where the teeth are, and how much of them you’re going to see!
The lips will VERY roughly follow the same angle as the teeth. It really depends on the character, but it gives you a sense at least.

If you DON’T do this, you’re going to lose so much volume and the mouth is going to end up looking unrelatable. I showed this example in this tutorial:

It’s not just the lips!
The cheeks, chin, and tongue play a role too!

Try look at your own mouth or references! I have a very pliable and large mouth, so that’s one reason why my characters have it too lmao.
ASYMMETRYYYYY (ง ͠° ͟ل͜ ͡°)ง
I cannot emphasize how important asymmetry is when drawing expressions. It applies not only to the eyebrows to achieve the Dreamwork Face™, but also the mouth. Seriously if you draw a symmetric mouth I will deliver myself to your mailbox and then shout at you until you fix it.
Look at the difference between these two for example: which one has more “life”?

I think you get the idea.
Push and squish - give it flow
Here’s an old drawing I have but it illustrates how I think when I squish the mouth, and use folding and wrinkles to my advantage.

Look at your own face and see where skin bundles up, where it creases the most and when bumps appear on your chin. Subtle details makes all the difference!
One VERY effective detail is illustrated in the first sketch, where I pull upwards on one side, and downwards on the other. That’s a good detail to use when the character is making a skewed expression, or is extremely frustrated. I encourage you to play around with that concept bc it’s ~super effective~!
EXAMPLES:
Happy: Your entire mouth is pushed upwards, not just the corners of your mouth!

I tend to draw a :3 mouth bc I’ve been drawing Lance too much….. You don’t have to but it’s basically imprinted in my motor memory by now.
Pouting/frowning: corners are pushed down, middle pushed slightly up. Sometimes, there’s a slight dip in the middle too. It can give a sense that the character is biting their lips.

Showing frustration/intimidating/is intimidated: basically showing a lot of teeth. The corners are as open as possible and the middle sorta more squished. An extremely important detail here is showing some of the gums, and open space between the cheeks and teeth. That way it looks like the mouth it open to it’s full potential. Here is also where you basically MUST add folds and bumps, or else it’s not going to look relatable.

(Here I am again with the pulling upwards on one side and downwards on the other, as illustrated on the last sketch)
And then again, here’s just another doodle showing how important it is to show the gums. It’s the same face twice, but the second one looks slightly more frustrated doesn’t it?

(from my other tutorial on how to draw facial expressions)
As you can see, this last one is very versatile and I draw it a lot. Play around with the basic shape and see how much subtle details makes a lot of difference!
That’s it!
I hope that cleared some things up and was somewhat helpful! Enjoy drawing ✨
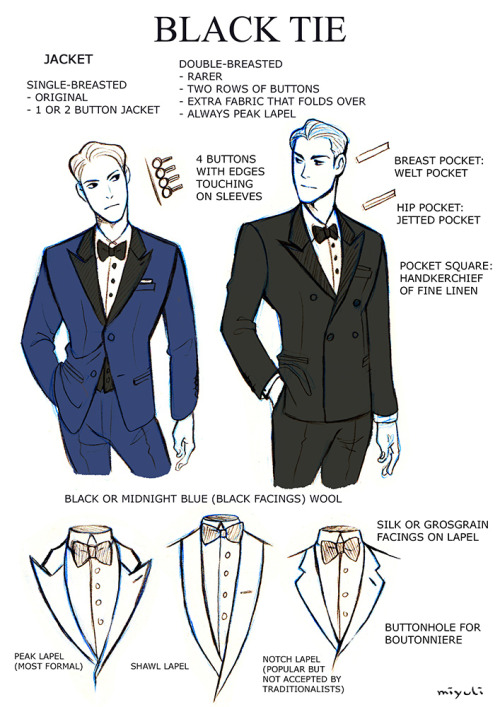
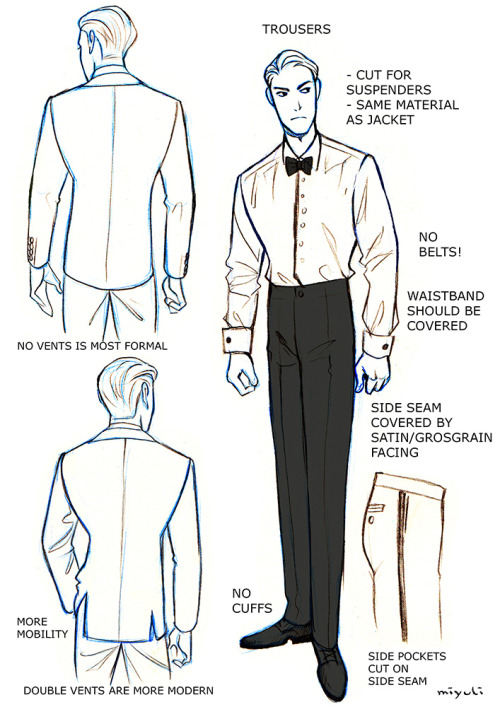

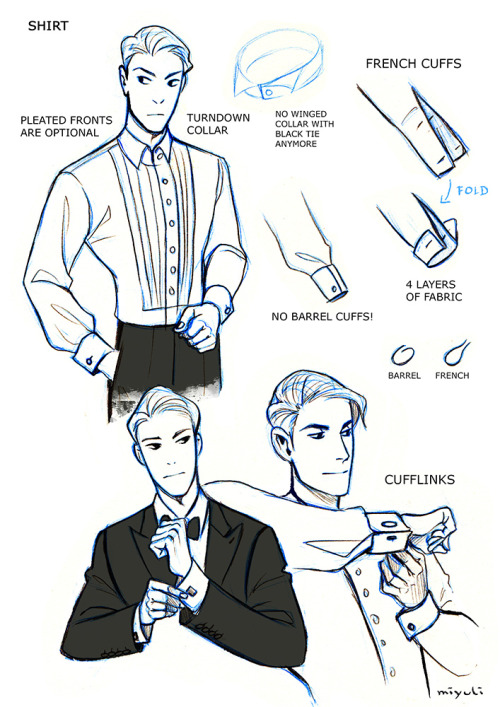
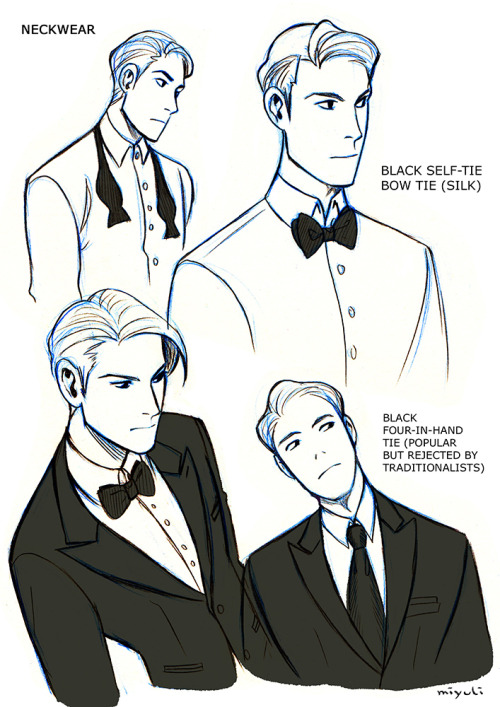
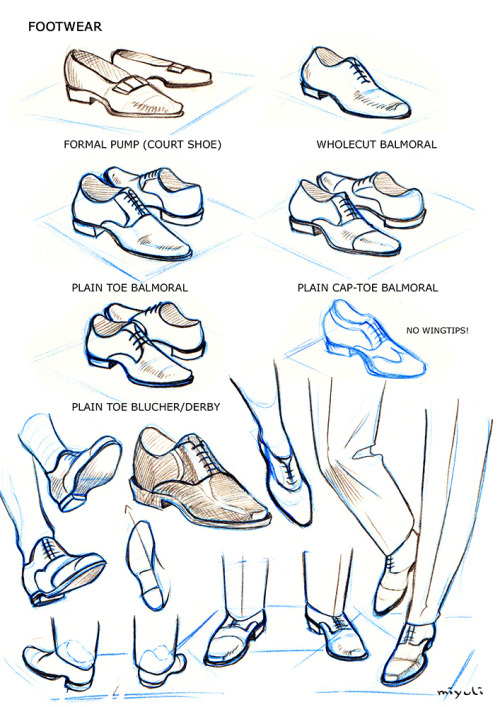
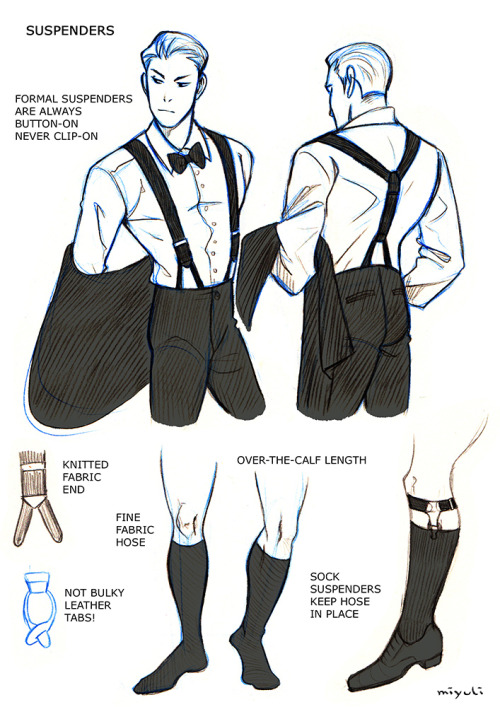
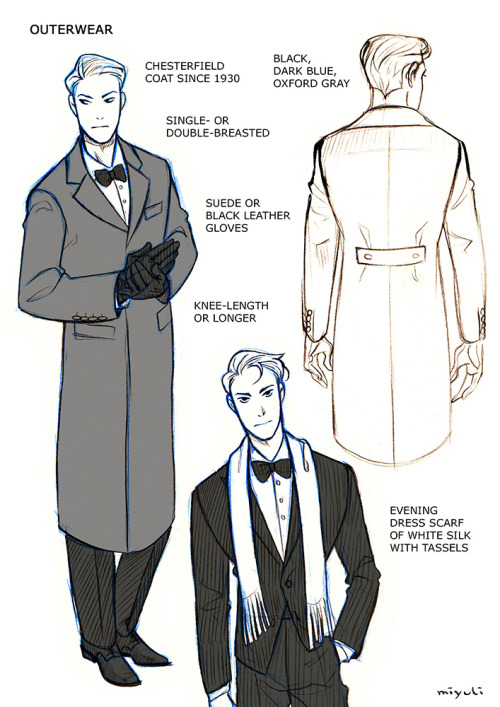
I’ve been studying the classic black tie dress code (mainly from here) so I thought I could share my notes. Maybe they can be helpful to someone else, too. If I made any mistakes or things are really confusing please tell me. I also have some notes on white tie which I could share as well…