May I Even Add - Tumblr Posts


As per folks asking, have the Joltik plush pattern on a DIN A 4 sheet!
First I sewed everything together from 1. - 3. and stuffed it. Next up come the 4 legs (I like to sew paw and leg parts together (4. + 5.) first before sewing both mirrored parts).
Joltik love to crawl all around your room, preferably in high places , so adding small magnets inside the paws gives the Joltik a lot of potential hiding places! A round magnet with 10 mm x 1 - 2 mm might work best. A short furred Joltik might also need fringes like in 11. to stay warm... (The longer furred Joltik is able to hide any edges and weird proportions more efficiently as I noticed! Though both are nice to touch, so go with whatever you prefer or have on hand.)
They love th play with you, so help them out by only sewing the tips of the legs to the lowest part of the body. That way the Joltik has as much mobility as possible! More spidery that way, too!
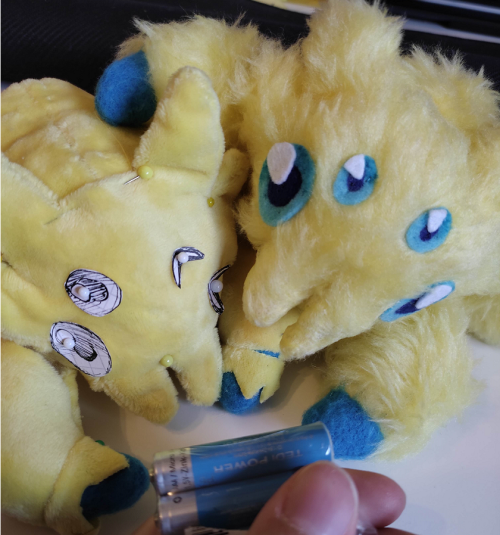
Sewing the face is the most fickle part. I sewed extra backsides for the larger spikes and plan to add small ones on the short furred Joltik. (Small spikes didn’t really work with the long fur unfortunately...) Add a bit of wadding and a few stitches to get them into shape as well!
The eyes are done with cutting out felt! Cut a hole for the pupil and press the smaller felt inside. (I love to add a small gradient with a copic marker). The white hightlights can be glued on top and the whole eye can be glued and sewed on the face.
For the finishing touches I trimmed some of the long hair on the long furred Joltik and glued the fur on the teeth together since that’s no place for long fur and pulled out any fur caught in between the seams.
For the short furred Joltik I plan to add more custom small spikes to the face and back (a feature the long haired Joltik doesn’t need).
That’s all! And without further ado:
Feeding time~!