Overlays - Tumblr Posts - Page 2
norah’s mega blending tutorial


hi guys! i’ve gotten requests from a few mutuals over the past few years on my blending and while i usually redirect them to other tutorials i decided to make a tutorial now (i am also very bored and am putting off my bio lab report)
tutorial under the cut!
Keep reading
gif tutorial: how to blend images together using layer vector masks
@molinajules asked how to blend images together using a torn paper effect. This tutorial will show you how to do this using layer masks. There are two different methods i use depending on the set i wanna make. i either use a brush or png images from mask packs i’ve found. since tumblr has a thing about links in posts, links for the resources i use will be provided in a reblog right after this tutorial.
this tutorial is made assuming you already know how to make gifs and will be done using photoshop on a mac. i’ll be showing you how to make these two edits: the first one will be done using a png:

the second one will be done using a brush:

note: these gifs were ones i made for @dailytvwomen i did not steal them to use in this tutorial. they are mine! i was too lazy to make new ones :’)
Keep reading
do you think you could please do a tutorial for your greys anatomy edit (kinda similar to your brittana edits) i'm shocked if no one has ever asked you before for tutorials (and if you do i'd love to see them) your edits are so gorg and you're incredibly talented !
Totally! Bare with me, this is my first tutorial in like 8 years. Haha. I'll show you how I made this one:

For reference, I use Photoshop CS5. (My computer hates the newer versions. It'll run three different video editing softwares but hates photoshop. Idk lol.)
Okay, first you want to make 2 gifs with the same amount of frames. That's important. And then you want to convert them to a smart object.
So we have these two gifs.


Now, depending on what you're doing, you can do this next step now or you can color your gifs how you like, save them separately and then reopen them with all the coloring on them. Sometimes I do this if I'm working with a lot of effects but since these two gifs have the same coloring, we're going right click on one of them (it doesn't matter which one tbh) and you're going to select "duplicate layer"

A little box will pop up and this is where you're going to select the project name that you want to essentially paste this gif on top of.
Set the top gif to Screen.
The first thing I usually do is sharpen them. So I use Smart Sharpen and Unsharp Mask with these settings:
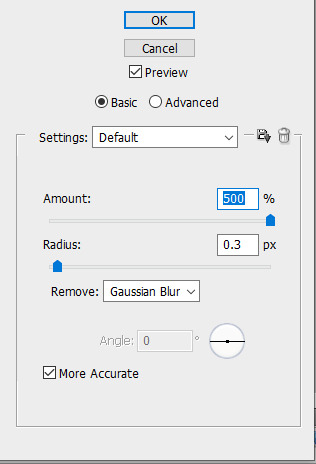

With Unsharp Mask, you have to tweak them depending on the gif, quality, what effect you're going for, etc.
Then we add some basic coloring:
Now, I have a base for specific shows because all shows are colored different. Grey's is more blue toned whereas Glee is more yellow toned. However, since coloring is a bitch sometimes, I'll add a PSD that I use ALOT. You can download it here.
So now that we've sharpened and added some coloring, this is what we have (separately):


This is what it looks like after I set it to Screen (and I moved the top gif a little to the right.)

Obviously, we need to get rid of those lines and make it so that each gif is more visible.
So now we blend.
On the top gif, you're going to add a layer mask to that gif. So with that top gif selected, you're going to select the mask button that looks like this:

Select your brush tool and use a soft brush to erase what you want from the background of each gif. (Make sure to repeat the previous steps to get a layer mask on the bottom gif.)
I have this now, after using the brush tool.

As you can see, it's very blue and I wasn't feeling blue for this gif so we want to change blue color. That's where the Selective Color comes in.
We're going to get rid of that cyan tone. So you're going to add adjustment layer and select Selective Color.
All I did for this one was adjust the cyan tones in the drop down box.

Now we have a pretty purple tone!

Now, we're going to add a light grey squareish box this to outline.
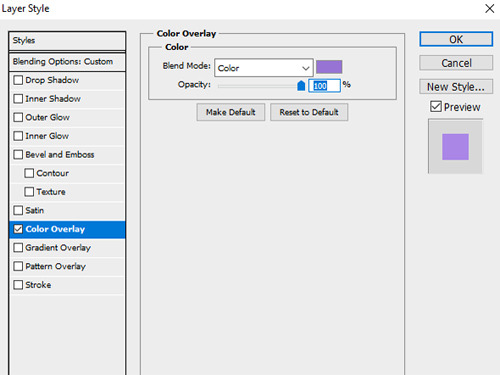
Set the blending mode to exclusion. To get the bar (and we'll do this again with the text) you're going to select the FX icon.

Select Color Overlay. A box will popup. You're going to set the blending mode to Color and then select whatever color you want the bar to be. (If it comes out with too much white, adjust the color of the bar itself to a darker shade.)
Lastly, we're going to add our text. For this gif I used Magnolia Script and Montserrat.
To get the purple effect on the "The Story" text, you're going to do the same thing you just did for the bar.
Voila! I hope this helped. If you need any further assistance, I'm always happy to help!

We recently got someone asking how to put little gifs on top of a bigger gif so here’s a quick explanation below!
Keep reading
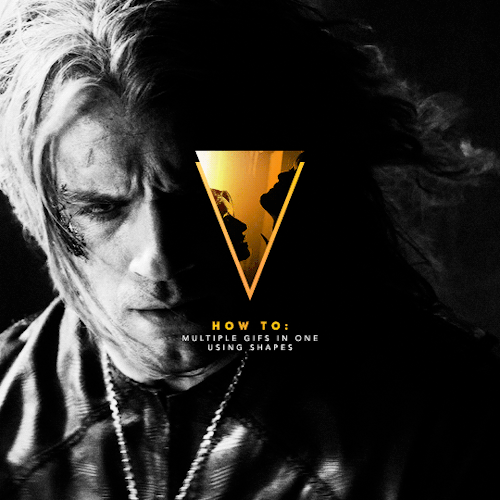
I’ve recently been asked by several lovely and curious souls to break down this Witcher set, so I thought I’d go ahead and put together a proper tutorial for everyone. All you need is Photoshop and basic giffing knowledge, preferably using the timeline. This isn’t necessarily simple, but I would say it’s one of the simpler things I’ve done—somewhere between easy and medium difficulty, maybe.
Keep reading


Texture Tutorial for GIFs by @antoniosvivaldi
This tutorial is requested by @glorious-sunrise and is based on this post. In this tutorial, I will show you how I set up my workspace and apply textures onto my GIFs.
The structure of this tutorial is as follows:
Getting started
Useful Photoshop tricks
Applying textures
Additional examples
Where to find high quality textures
For quick reference, here are the additional examples included in the tutorial: these are modified from the GIFs that I’ve made in the past.

What you need & need to know:
Software: Photoshop
Difficulty: Intermediate; knowledge in making gifs assumed
Key concepts: Blend Modes / Adjustment layers / Smart Object Layers / Layer Mask
Supplementary resources: tutorial textures
Tutorial under the cut. Like/reblog if you find this useful.
Keep reading
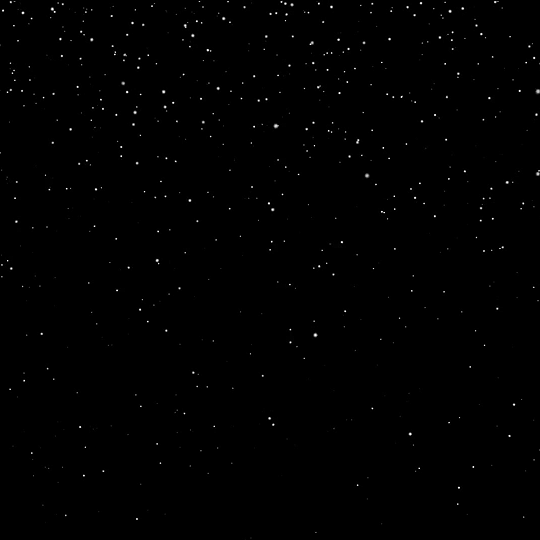


smalllady’s gif overlay pack 1 - because i got tired of people saying “just google it bro” (ノಠ益ಠ)ノ彡┻━┻ seriously…google search results for gif overlays are pitiful. so here’s some better quality gif overlays! i made these from free resource videos from youtube. ✧ all gifs are 540x540px, 120 frames, and below 10mb ✧ you can either just save these gifs or you can dowload the psds [here] ✧ i don’t care if these get reposted everywhere…i just want stuff like this to be more accessible
