Resincraft - Tumblr Posts


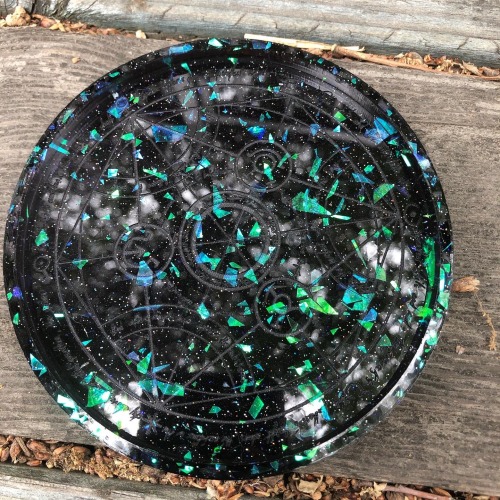


Blackout trays! This is an idea I’ve had going around in my head for months. I wanted to make these specifically for pride month because we wouldn’t have pride without those who fought for it, specifically trans poc. All proceeds from these trays will be donated to the Legal Defense Fund to help fight for racial justice. There will be 4 of these trays going up in total (one had color tests for the circle design and was not photographed) and I hope to continue making this design to continue donations.
I got asked about how I did my resin sharks, and I've had an octopus sitting on my shelf for ages waiting for the same resin treatment, so I figured I'd kill to birds with one stone, and take some pictures explaining the process!

Here I've got the octopus I'll be casting in resin, and a thick cylinder with the same diamater to the base we're using.
I 3d print my bases, so getting this cylinder was simple for me. I just 3d printed a thicker version of the base and called it good. If you're using a store bought base, you can probably just stack a few of them on top of one another and tape them together to make a cylinder. You only need about 2-3cm of thickness.
I've also put just a teeny bit of blutack on the cyilnder, to keep the base from shifting around while I do the next step.

Step 1:
Put the cylinder on the base, and tape them together like so. Make sure that the tape forms a tight seal around the top of the base. This is to stop any leaking resin from getting between the base and the cylinder and sticking them together. If enough gets in there and sets, they won't be coming apart.
(Also, be sure that any basing material or bits of the mini don't extend out over the side of the base, that will also cause problems with making a tight seal).

Step 2:
Now we're going to need a laminating pouch. I use A3 sized pouches, but for something this size you could get away with A4 easily enough. You should be able to find packs these from any office supply store for fairly cheap.
Cut the pouch were it joins together, so you have two sheets of plastic.
There should be a glossy and matte side, take note of which is which. The glossy side needs to end up on the inside of the dam we're making, so that the resin turns out smooth and see through. Be careful while handling these sheets, as any creases or dents will show up in the final product.
Determine how deep you want your resin to be, and mark that depth on the sheet. Don't forget to factor in the depth of the cylinder attatched to the base of the mini for this.
Here, I want this octopus to be the same size as my sharks, so I'm using one as a reference.
Make a quick mark at the height you want (on the non-glossy side of the laminating pouch), then cut the sheet about 1-2 centimetres higher than that. It doesn't have to be particularly neat.

This is the sort of thing we're going for.
(Apologies for the background, its kinda hard to get a good picture of something transparent :p ).
Note that we've got a neat, straight edge along the bottom, unlike the top where it was cut. So long as you have one edge that is neat and straight, you're all good to continue.

Step 3:
Take a small strip of tape, and attatch it to the matte side of the sheet. Then take the base and cylinder, and line the bottom of the base up along the long, straight edge of the sheet.
Carefully roll the base onto the tape, so that the bottom of the cylinder and sheet are flush with one another.
Be careful where you do this on the base, as there will be a small seam in the resin along the edge of the sheet going up from here. I've put mine at the back of my octopus, so it doesn't get in the way of looking at it front-on.

Step 4:
The sheet is long enough to wrap around the base with quite a bit of overlap, which we don't want. So before continuing, quickly wrap the sheet around the base, and find where it will overlap. Cut the sheet so there is only about a centimetre of overlap when it is wrapped around the base.
Then carefully wrap the sheet around the base, keeping the edge of the sheet flush with the bottom of the base. Make sure the sheet is wrapped firmly around the base, and is forming a straight tube, not a funnel. Use a small strip of tape to fix it in place.
Double check now that the glossy side of the laminating sheet is on the interior of this tube. If it isn't, undo all this and start over.

Step 5:
Now take a long strip of tape, and wrap it all the way around the base. Line the top edge of the tape up with the top of the base (not the sand on the base, just the top of the actual base). Keep tension in the tape while you wrap, the goal here is to hold the sheet close to the base, to form a seal that will keep resin in the tube, rather than leaking down the base.

Step 6:
Now put another strip of tape along the outside seam of the sheet. Don't be too woried about getting a really good seal here, the weight of the resin should keep the inner flap of the sheet pressed against the outer one anyway. This is just to stop sheet from moving when resin is poured in, so it stays as a tube, rather than turning into a funnel.

Step 7:
Finally, take a rubber band and wrap it around the base of the mini. Try and line it up with the top of the base (like with the tape from step 5). This just adds a little extra pressure to try and stop resin leaking out.
And thats done! We've now got a cylindrical resin dam ready to pour resin into!
I hope this helps anyone curious about my process for doing this!
I've hit the 10 image limit on this post, so I'll make another one soon showing my resin pours and the finished mini.
Update: post showing the resin pouring process here.

Omigosh look at it! I'm so excited! This is the first one, and it needs a bit of refinement, but it otherwise looks great! I love it.
We'll see how the others do, but let me know what you think!
NO REPOSTING PLEASE. That's rude.