
901 posts
Binderclipping - References! - Tumblr Blog
EVERYONE SHUT THE HELL UP
look at this free pattern:
anyone wanna make this with me?
20 Caretaker Dialogue Prompts
1. “Hold on, we’re coming.”
2. “I won’t let you fall.”
3. “Hey, it’s me, it’s just me.”
4. “Oh god… what did they do to you?”
5. “Can you stay awake for me?”
6. “Who gave you permission to fall asleep?”
7. “I’m going to make that sick bastard suffer for what he did to you.”
8. “Don’t look” / “Look at me”
9. “Here, you might need something to bite on…”
10. “I thought I’d never get to see you again.”
11. “I know you can’t talk, but I just want you to know that I’m not going anywhere.”
12. “I’m not leaving you here!”
13. “Hold my hand.”
14. “You’re so cold…” / “You’re burning up”
15. “I know it hurts, I’m sorry.”
16. “I’ve got you.”
17. “Please be okay.”
18. “I’m sorry I failed you, I should’ve been there.”
19. “Just keep pressure on it.”
20. “Please don’t leave me, I can’t do this without you.”
hot artists don't gatekeep
I've been resource gathering for YEARS so now I am going to share my dragons hoard
Floorplanner. Design and furnish a house for you to use for having a consistent background in your comic or anything! Free, you need an account, easy to use, and you can save multiple houses.
Comparing Heights. Input the heights of characters to see what the different is between them. Great for keeping consistency. Free.
Magma. Draw online with friends in real time. Great for practice or hanging out. Free, paid plan available, account preferred.
Smithsonian Open Access. Loads of free images. Free.
SketchDaily. Lots of pose references, massive library, is set on a timer so you can practice quick figure drawing. Free.
SculptGL. A sculpting tool which I am yet to master, but you should be able to make whatever 3d object you like with it. free.
Pexels. Free stock images. And the search engine is actually pretty good at pulling up what you want.
Figurosity. Great pose references, diverse body types, lots of "how to draw" videos directly on the site, the models are 3d and you can rotate the angle, but you can't make custom poses or edit body proportions. Free, account option, paid plans available.
Line of Action. More drawing references, this one also has a focus on expressions, hands/feet, animals, landscapes. Free.
Animal Photo. You pose a 3d skull model and select an animal species, and they give you a bunch of photo references for that animal at that angle. Super handy. Free.
Height Weight Chart. You ever see an OC listed as having a certain weight but then they look Wildly different than the number suggests? Well here's a site to avoid that! It shows real people at different weights and heights to give you a better idea of what these abstract numbers all look like. Free to use.


I made a Room Building tutorial! Lemme know if it helps! 🧡
Tip me here| Commission info here!
i made a whump wheel
want to beat up a character but don't know how you wanna do it? same here, friend. behold, the whump wheel! it currently has 60 different prompts/tropes on it and is ready for use! 🎉 i...love this thing. it is wonderful for writing exercises. (if you wanna know what's on it before using it, take a peak at the screenshot below)

yknow i never noticed the sheer rareness of images having ids or alt text on this website until i started adding alt text to my art (and trying to remember to add it to any images i post in general, especially text screenshots) and that makes me kinda sad
hey here's a website for downloading any video or image from any website.
works w/ youtube, soundcloud, twitch, twitter (gifs and videos), tumblr (video and audio), and most other websites you're probably lookin to download stuff off of.
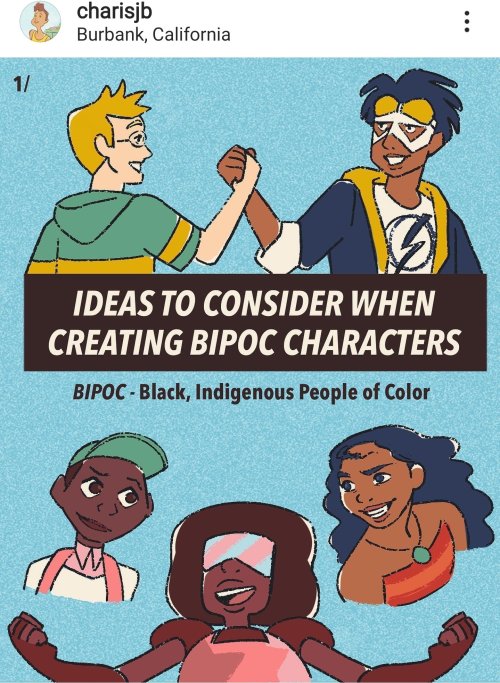
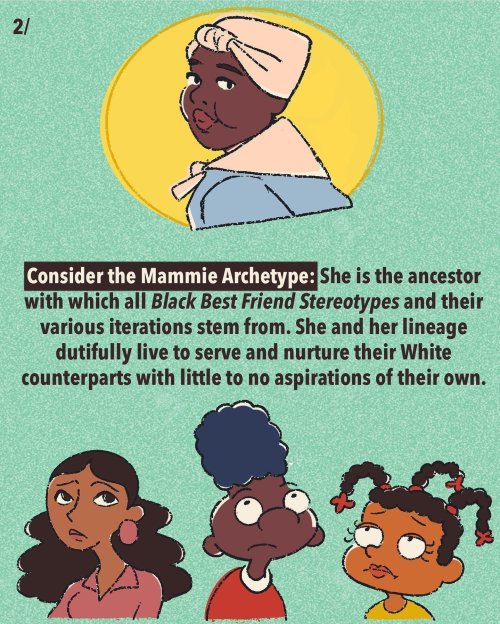
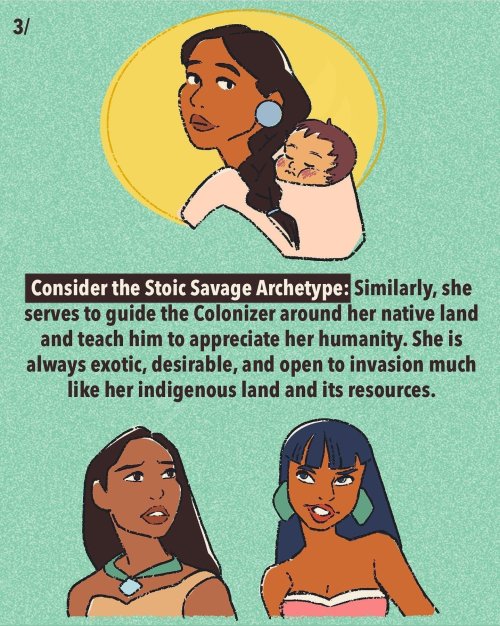
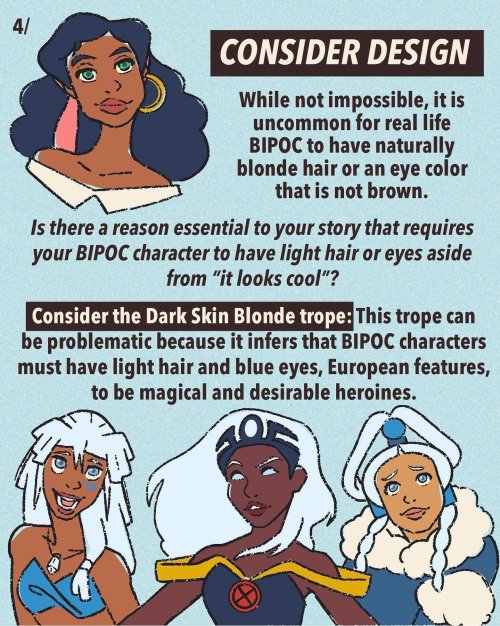
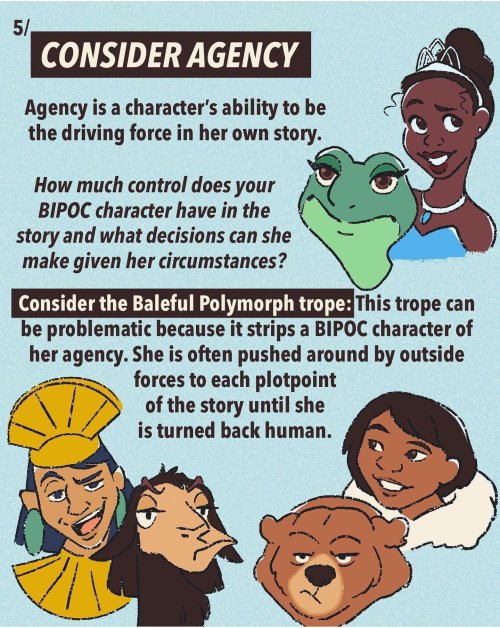

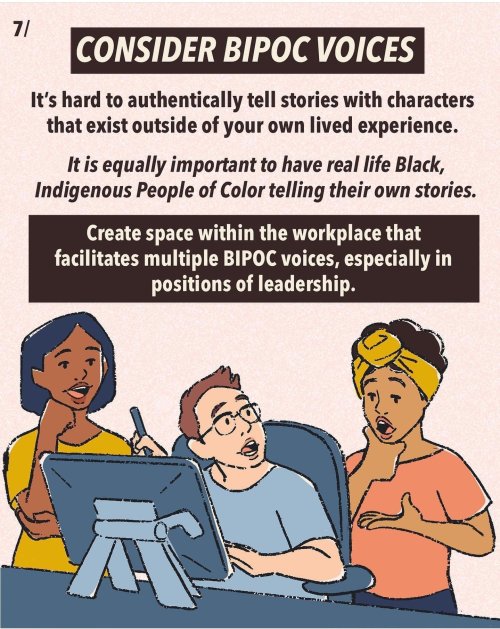
Important ideas to consider when creating characters who are black and indigenous people of color. (x)
⭐ So you want to learn pixel art? ⭐
🔹 Part 1 of ??? - The Basics!
Hello, my name is Tofu and I'm a professional pixel artist. I have been supporting myself with freelance pixel art since 2020, when I was let go from my job during the pandemic.


My progress, from 2017 to 2024. IMO the only thing that really matters is time and effort, not some kind of natural talent for art.
This guide will not be comprehensive, as nobody should be expected to read allat. Instead I will lean heavily on my own experience, and share what worked for me, so take everything with a grain of salt. This is a guide, not a tutorial. Cheers!
🔹 Do I need money?
NO!!! Pixel art is one of the most accessible mediums out there.
I still use a mouse because I prefer it to a tablet! You won't be at any disadvantage here if you can't afford the best hardware or software.
Because our canvases are typically very small, you don't need a good PC to run a good brush engine or anything like that.
✨Did you know? One of the most skilled and beloved pixel artists uses MS PAINT! Wow!!
🔹 What software should I use?
Here are some of the most popular programs I see my friends and peers using. Stars show how much I recommend the software for beginners! ⭐
💰 Paid options:
⭐⭐⭐ Aseprite (for PC) - $19.99
This is what I and many other pixel artists use. You may find when applying to jobs that they require some knowledge of Aseprite. Since it has become so popular, companies like that you can swap raw files between artists.
Aseprite is amazingly customizable, with custom skins, scripts and extensions on Itch.io, both free and paid.
If you have ever used any art software before, it has most of the same features and should feel fairly familiar to use. It features a robust animation suite and a tilemap feature, which have saved me thousands of hours of labour in my work. The software is also being updated all the time, and the developers listen to the users. I really recommend Aseprite!
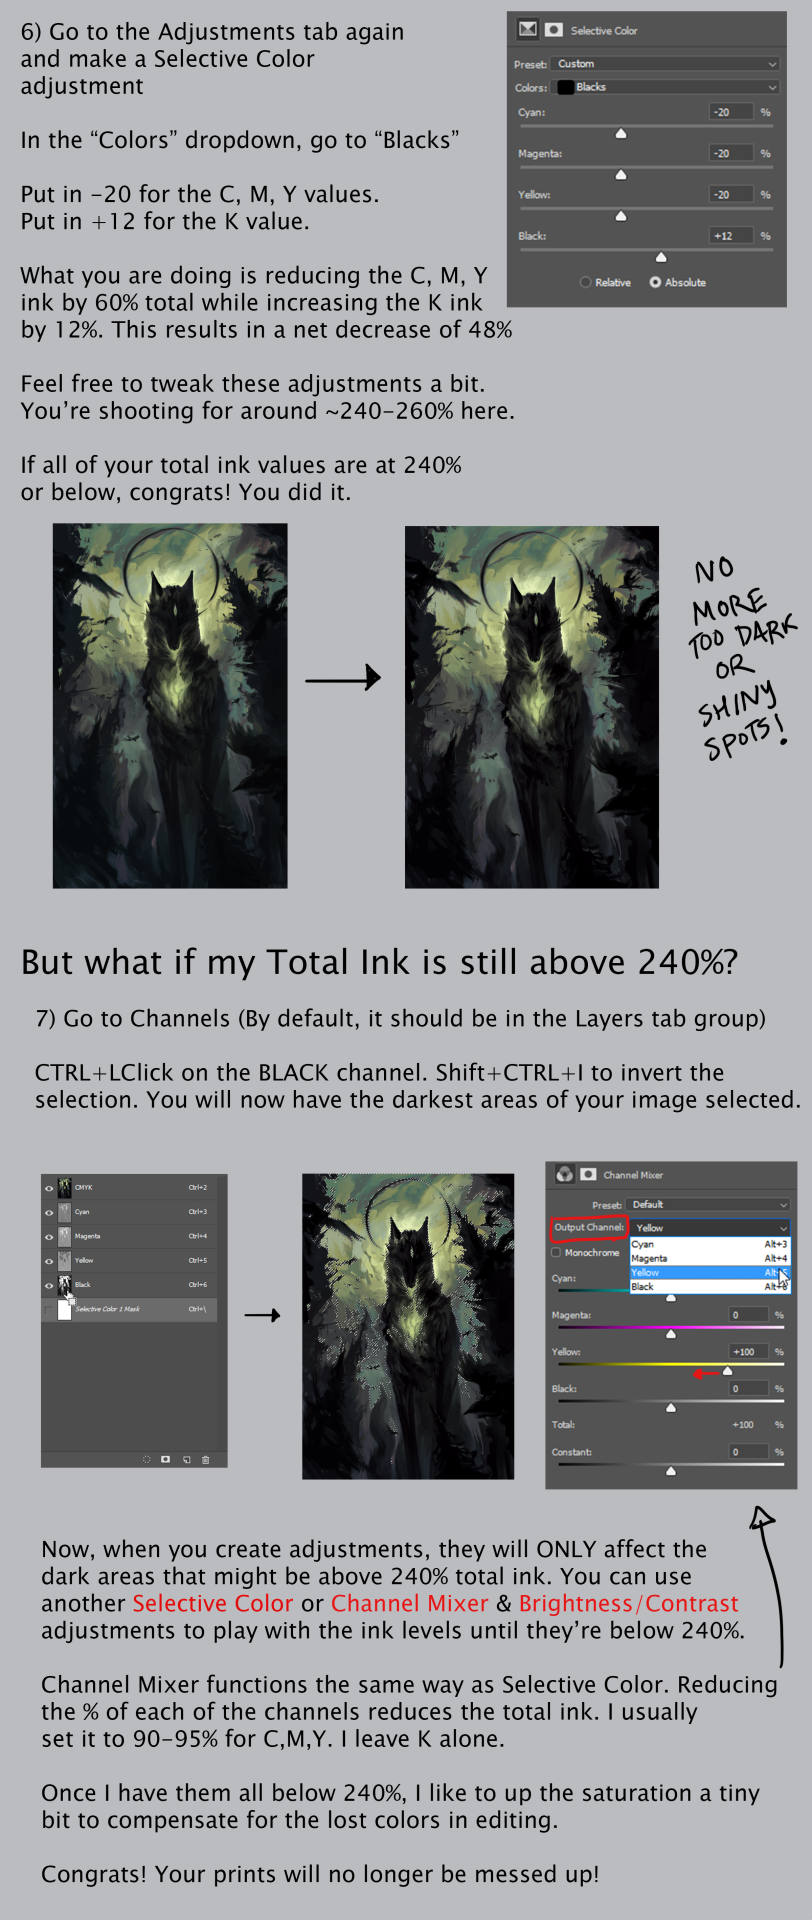
⭐ Photoshop (for PC) - Monthly $$
A decent option for those who already are used to the PS interface. Requires some setup to get it ready for pixel-perfect art, but there are plenty of tutorials for doing so.
Animation is also much more tedious on PS which you may want to consider before investing time!
⭐⭐ ProMotion NG (for PC) - $19.00
An advanced and powerful software which has many features Aseprite does not, including Colour Cycling and animated tiles.
⭐⭐⭐ Pixquare (for iOS) - $7.99 - $19.99
Probably the best app available for iPad users, in active development, with new features added all the time.

Look! My buddy Jon recommends it highly, and uses it often.
One cool thing about Pixquare is that it takes Aseprite raw files! Many of my friends use it to work on the same project, both in their office and on the go.
⭐ Procreate (for iOS) - $12.99
If you have access to Procreate already, it's a decent option to get used to doing pixel art. It does however require some setup. Artist Pixebo is famously using Procreate, and they have tutorials of their own if you want to learn.
🆓 Free options:
⭐⭐⭐ Libresprite (for PC)
Libresprite is an alternative to Aseprite. It is very, very similar, to the point where documentation for Aseprite will be helpful to Libresprite users.
⭐⭐ Pixilart (for PC and mobile)
A free in-browser app, and also a mobile app! It is tied to the website Pixilart, where artists upload and share their work. A good option for those also looking to get involved in a community.
⭐⭐ Dotpict (for mobile)
Dotpict is similar to Pixilart, with a mobile app tied to a website, but it's a Japanese service. Did you know that in Japanese, pixel art is called 'Dot Art'? Dotpict can be a great way to connect with a different community of pixel artists! They also have prompts and challenges often.
🔹 So I got my software, now what?
◽Nice! Now it's time for the basics of pixel art.
❗ WAIT ❗ Before this section, I want to add a little disclaimer. All of these rules/guidelines can be broken at will, and some 'no-nos' can look amazing when done intentionally.
The pixel-art fundamentals can be exceedingly helpful to new artists, who may feel lost or overwhelmed by choice. But if you feel they restrict you too harshly, don't force yourself! At the end of the day it's your art, and you shouldn't try to contort yourself into what people think a pixel artist 'should be'. What matters is your own artistic expression. 💕👍
◽Phew! With that out of the way...
🔸"The Rules"
There are few hard 'rules' of pixel art, mostly about scaling and exporting. Some of these things will frequently trip up newbies if they aren't aware, and are easy to overlook.
🔹Scaling method
There are a couple ways of scaling your art. The default in most art programs, and the entire internet, is Bi-linear scaling, which usually works out fine for most purposes. But as pixel artists, we need a different method.


Both are scaled up x10. See the difference?
On the left is scaled using Bilinear, and on the right is using Nearest-Neighbor. We love seeing those pixels stay crisp and clean, so we use nearest-neighbor.
(Most pixel-art programs have nearest-neighbor enabled by default! So this may not apply to you, but it's important to know.)
🔹Mixels
Mixels are when there are different (mixed) pixel sizes in the same image.

Here I have scaled up my art- the left is 200%, and the right is 150%. Yuck!
As we can see, the "pixel" sizes end up different. We generally try to scale our work by multiples of 100 - 200%, 300% etc. rather than 150%. At larger scales however, the minute differences in pixel sizes are hardly noticeable!
Mixels are also sometimes seen when an artist scales up their work, then continues drawing on it with a 1 pixel brush.

Many would say that this is not great looking! This type of pixels can be indicative of a beginner artist. But there are plenty of creative pixel artists out there who mixels intentionally, making something modern and cool.
🔹Saving Your Files
We usually save our still images as .PNGs as they don’t create any JPEG artifacts or loss of quality. It's a little hard to see here, but there are some artifacts, and it looks a little blurry. It also makes the art very hard to work with if we are importing a JPEG.

For animations .GIF is good, but be careful of the 256 colour limit. Try to avoid using too many blending mode layers or gradients when working with animations. If you aren’t careful, your animation could flash afterwards, as the .GIF tries to reduce colours wherever it can. It doesn’t look great!

Here's an old piece from 2021 where I experienced .GIF lossiness, because I used gradients and transparency, resulting in way too many colours.
🔹Pixel Art Fundamentals - Techniques and Jargon
❗❗Confused about Jaggies? Anti-Aliasing? Banding? Dithering? THIS THREAD is for you❗❗
As far as I'm concerned, this is THE tutorial of all time for understanding pixel art. These are techniques created and named by the community of people who actually put the list together, some of the best pixel artists alive currently. Please read it!!
🔸How To Learn
Okay, so you have your software, and you're all ready to start. But maybe you need some more guidance? Try these tutorials and resources! It can be helpful to work along with a tutorial until you build your confidence up.
⭐⭐ Pixel Logic (A Digital Book) - $10 A very comprehensive visual guide book by a very skilled and established artist in the industry. I own a copy myself.
⭐⭐⭐ StudioMiniBoss - free A collection of visual tutorials, by the artist that worked on Celeste! When starting out, if I got stuck, I would go and scour his tutorials and see how he did it.
⭐ Lospec Tutorials - free A very large collection of various tutorials from all over the internet. There is a lot to sift through here if you have the time.
⭐⭐⭐ Cyangmou's Tutorials - free (tipping optional) Cyangmou is one of the most respected and accomplished modern pixel artists, and he has amassed a HUGE collection of free and incredibly well-educated visual tutorials. He also hosts an educational stream every week on Twitch called 'pixelart for beginners'.
⭐⭐⭐ Youtube Tutorials - free There are hundreds, if not thousands of tutorials on YouTube, but it can be tricky to find the good ones. My personal recommendations are MortMort, Brandon, and AdamCYounis- these guys really know what they're talking about!
🔸Where To Post
Outside of just regular socials, Twitter, Tumblr, Deviantart, Instagram etc, there are a few places that lean more towards pixel art that you might not have heard of.
⭐ Lospec Lospec is a low-res focused art website. Some pieces get given a 'monthly masterpiece' award. Not incredibly active, but I believe there are more features being added often.
⭐⭐ Pixilart Pixilart is a very popular pixel art community, with an app tied to it. The community tends to lean on the young side, so this is a low-pressure place to post with an relaxed vibe.
⭐⭐ Pixeljoint Pixeljoint is one of the big, old-school pixel art websites. You can only upload your art unscaled (1x) because there is a built-in zoom viewer. It has a bit of a reputation for being elitist (back in the 00s it was), but in my experience it's not like that any more. This is a fine place for a pixel artist to post if they are really interested in learning, and the history. The Hall of Fame has some of the most famous / impressive pixel art pieces that paved the way for the work we are doing today.
⭐⭐⭐ Cafe Dot Cafe Dot is my art server so I'm a little biased here. 🍵 It was created during the recent social media turbulence. We wanted a place to post art with no algorithms, and no NFT or AI chuds. We have a heavy no-self-promotion rule, and are more interested in community than skill or exclusivity. The other thing is that we have some kind of verification system- you must apply to be a Creator before you can post in the Art feed, or use voice. This helps combat the people who just want to self-promo and dip, or cause trouble, as well as weed out AI/NFT people. Until then, you are still welcome to post in any of the threads or channels. There is a lot to do in Cafe Dot. I host events weekly, so check the threads!
⭐⭐/r/pixelart The pixel art subreddit is pretty active! I've also heard some of my friends found work through posting here, so it's worth a try if you're looking. However, it is still Reddit- so if you're sensitive to rude people, or criticism you didn't ask for, you may want to avoid this one. Lol
🔸 Where To Find Work
You need money? I got you! As someone who mostly gets scouted on social media, I can share a few tips with you:
Put your email / portfolio in your bio Recruiters don't have all that much time to find artists, make it as easy as possible for someone to find your important information!
Clean up your profile If your profile feed is all full of memes, most people will just tab out rather than sift through. Doesn't apply as much to Tumblr if you have an art tag people can look at.
Post regularly, and repost Activity beats everything in the social media game. It's like rolling the dice, and the more you post the more chances you have. You have to have no shame, it's all business baby
Outside of just posting regularly and hoping people reach out to you, it can be hard to know where to look. Here are a few places you can sign up to and post around on.
/r/INAT INAT (I Need A Team) is a subreddit for finding a team to work with. You can post your portfolio here, or browse for people who need artists.
/r/GameDevClassifieds Same as above, but specifically for game-related projects.
Remote Game Jobs / Work With Indies Like Indeed but for game jobs. Browse them often, or get email notifications.
VGen VGen is a website specifically for commissions. You need a code from another verified artist before you can upgrade your account and sell, so ask around on social media or ask your friends. Once your account is upgraded, you can make a 'menu' of services people can purchase, and they send you an offer which you are able to accept, decline, or counter.
The evil websites of doom: Fiverr and Upwork I don't recommend them!! They take a big cut of your profit, and the sites are teeming with NFT and AI people hoping to make a quick buck. The site is also extremely oversaturated and competitive, resulting in a race to the bottom (the cheapest, the fastest, doing the most for the least). Imagine the kind of clients who go to these websites, looking for the cheapest option. But if you're really desperate...
🔸 Community
I do really recommend getting involved in a community. Finding like-minded friends can help you stay motivated to keep drawing. One day, those friends you met when you were just starting out may become your peers in the industry. Making friends is a game changer!
Discord servers Nowadays, the forums of old are mostly abandoned, and people split off into many different servers. Cafe Dot, Pixel Art Discord (PAD), and if you can stomach scrolling past all the AI slop, you can browse Discord servers here.
Twitch Streams Twitch has kind of a bad reputation for being home to some of the more edgy gamers online, but the pixel art community is extremely welcoming and inclusive. Some of the people I met on Twitch are my friends to this day, and we've even worked together on different projects! Browse pixel art streams here, or follow some I recommend: NickWoz, JDZombi, CupOhJoe, GrayLure, LumpyTouch, FrankiePixelShow, MortMort, Sodor, NateyCakes, NyuraKim, ShinySeabass, I could go on for ever really... There are a lot of good eggs on Pixel Art Twitch.
🔸 Other Helpful Websites
Palettes Lospec has a huge collection of user-made palettes, for any artist who has trouble choosing their colours, or just wants to try something fun. Rejected Palettes is full of palettes that didn't quite make it onto Lospec, ran by people who believe there are no bad colours.
The Spriters Resource TSR is an incredible website where users can upload spritesheets and tilesets from games. You can browse for your favourite childhood game, and see how they made it! This website has helped me so much in understanding how game assets come together in a scene.
VGMaps Similar to the above, except there are entire maps laid out how they would be played. This is incredible if you have to do level design, or for mocking up a scene for fun.
Game UI Database Not pixel-art specific, but UI is a very challenging part of graphics, so this site can be a game-changer for finding good references!
Retronator A digital newspaper for pixel-art lovers! New game releases, tutorials, and artworks!
Itch.io A website where people can upload, games, assets, tools... An amazing hub for game devs and game fans alike. A few of my favourite tools: Tiled, PICO-8, Pixel Composer, Juice FX, Magic Pencil for Aseprite
🔸 The End?
This is just part 1 for now, so please drop me a follow to see any more guides I release in the future. I plan on doing some writeups on how I choose colours, how to practise, and more!
I'm not an expert by any means, but everything I did to get to where I am is outlined in this guide. Pixel art is my passion, my job and my hobby! I want pixel art to be recognized everywhere as an art-form, a medium of its own outside of game-art or computer graphics!
This guide took me a long time, and took a lot of research and experience. Consider following me or supporting me if you are feeling generous.
And good luck to all the fledgling pixel artists, I hope you'll continue and have fun. I hope my guide helped you, and don't hesitate to send me an ask if you have any questions! 💕
pssssst hey. hey. free and expansive database of folk and fairy tales. you can thank me later
oc asks that reveal more than you think
Do they sleep with a stuffed animal? If they have multiple, who’s the favorite?
Can they take care of a plant? What about a pet? What about a child?
Ask them to describe their love interest.
Do they look good in red?
Speech! Speech! Speech! Speech! Will they give one, and what about?
Who will they take advice from, no matter what it is? Who won’t they take advice from, no matter what it is?
Describe them in three words. Now let them describe themself in three words.
Do complex puzzles intrigue or frustrate them?
Do they empathize with non-sentient things (dolls, plants, books…)?
What age do they most want to be right now?
They’ve won the lottery. Spend, or save?
Do they like romance in the books they read (or in the book they’re in)?
Name one thing their parents taught them.
Would they agree with the term ‘guilty pleasure’? Do they have any?
What would they consider a waste of time– other than school or work?
If money wasn’t a limit, what would they wear?
Do they like children?
Kissing: tongue or no tongue?
Do they study before tests? Practice before job interviews?
What do they like that nobody else does?
What would it take for them to break up with someone? What would be the last straw?
Do they like being called pet names? Do they call other people pet names? What’s their go-to?
Stability or novelty?
Honesty or charity?
Safety or possibility?
Talent or effort?
Forgiveness or vengeance (or…)?
Would they date a fixer-upper?
What recurring dreams do they have?
What would they do if they knew it would be forgiven?
Support the author: all writing | book | ko-fi | Patreon
that door!! It's absolutely beautiful! I saw the reblog in which you said it didn't even take you that much time, and now I'm curious how long it took you to learn how to work with the multitool
Thank you so much!
I’m actually all self-taught with the multitool - it’s quite intuitive? The door was one of the first bigger projects I did with it - before that I’d done a few smaller wooden lists and engraved monograms on glasses. I just went with it. :)
I use it much the same way I use a brush, except I remove material instead of spreading paint, I think?
But I happened to have a small project lined up, so I decided to document my process as I went along, to show how I’m usually working with it. Hopefully it will be helpful! :D
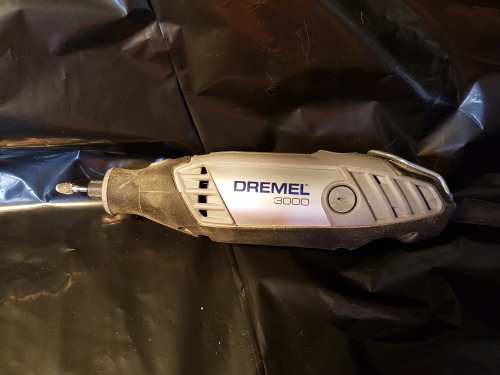
This is the multitool I’m using, the Dremel 3000. I have tried a cheaper brand, but that didn’t hold onto the bits well enough and almost took my eye out when the bit snagged and went flying, sooo. No. Dremel it is. This one was about $70, I think?
The bit shown mounted here is the one I use for the vast majority of my work; a pretty heavy-duty tungsten bit, egg-shaped. The material and roughness means you eat away plenty of wood with every stroke, and the shape means you can alternate between a small precision tip and wider flatter strokes just by tilting the tool. :)

These are my bits. The upper row are diamond tips, they’re for finer work. You can use them on wood, metal, engrave glass, do finer surface detailing on stone etc.
The bottom set are my tungsten bits - these are for more heavy duty work, like removing a lot of material at once, or carving deep. Using these on wood and stone.
You can get bits like these at most hardware stores - I got my tungsten set off ebay years ago and they’re still going strong.
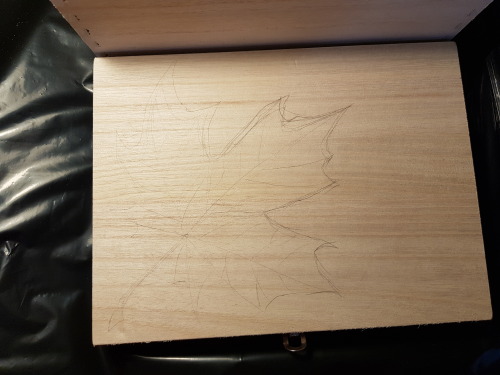
This is my current project - a belated Christmas present for my mom! She loves autumn leaves, so I got this nice wooden box and will engrave it with a maple leaf.
A word on the material you’re engraving - a multitool isn’t always great on pure wood - the grain and difference between hard and soft areas can make the bit jump, leaving you with very squiggly lines. So if working on wood, a very smooth one with minimal grain like this is the best.
(Plywood is no good - it splinters very easily so the edges get messy. I prefer MDF - it’s virtually wood, but ground into sawdust and then glued together into sturdy sheets. So it behaves just like wood, but without the grain. That means you can get nice, sharp edges on it, but it’s still hard enough not to wear or break!)
I also use my multitool on limestone, but the dust is killer. This is a messy process! There will be LOTS of very fine sawdust, and it goes everywhere. Wear a mask and goggles.

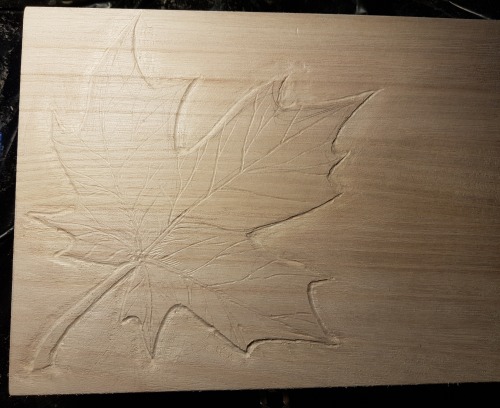
Outlines! I used the tip of the egg-shaped tungsten bit for this. The lid of this box is very thin, so I didn’t dare carve very deep - you can go much deeper in a thicker sheet of wood/MDF.

Once the outlines are in place, I tilt the tool to work with the side of the ‘egg’ instead, to remove the wood outside the leaf-shape in a gentle gradient.
It’s easier to keep the lines steady if you work towards yourself than pushing away. Depending on which is your dominant hand, it may be easier to turn the thing you’re working on around a lot, rather than working in the ‘wrong’ direction.

This is what it looks like with the wood outside removed with the tool at an angle. Trying to always tilt away from the relief shape you’re creating is important, so it really stands out with sharp edges. If you tilt it inward as well, the edges will be blunted and not as crisp.

Went over the outside with sandpaper to smooth the surface down a bit.

Time to switch to one of the finer bits, to go over and sharpen up the contours, as well as engraving the finer details, like the veins of the leaf.
Contours sharpened, veins in place!

A bigger one of the diamon bits, to polish the outer contours a bit deeper where the tungsten bit couldn’t fit and bring out the shape of the leaf a bit more.

I ended up using it to cross-hatch in the narrow gaps, and also working over the surface to give it a bit of texture, so the smoothness of the leaf stands out even more.

Making a fake stain with acrylics and water. My mom likes dark wood, so aiming for a pretty dark brown, but I still watered down the paint a lot - I want the wood grain visible still, not just a flat brown painted rectangle.

Second layer of staining, with a bit of extra dark brown around the contours of the leaf and then faded out in an ombre to make the 3D pop even more.
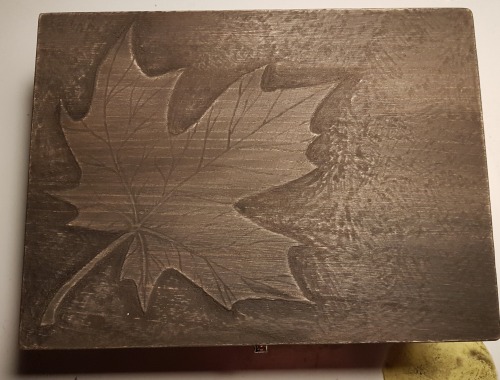
One of my favourite parts of the process - distressing the surface just a bit with very fine sandpaper (going with the grain, not against!) This brings out all the edges by removing the dark paint there and making them brighter, and the 3D of the engraving really comes to life!

Finished result! (My mother loved it. ♥)
The engraving itself took maybe half an hour from start to finish? The most time-consuming bit of the whole process was waiting for the paint to dry between layers. You won’t want to sand damp wood, it goes all mushy.
I hope this was helpful!
Of course it helps that I’m an artist and already have good hand-eye coordination, and skill with making patterns and such, but the process itself isn’t hard - I taught our friends’ 13 year old daughter to work with the dremel, and she made cute name signs for her rabbits’ cages. So don’t be afraid to try! It’s lots of fun. :)

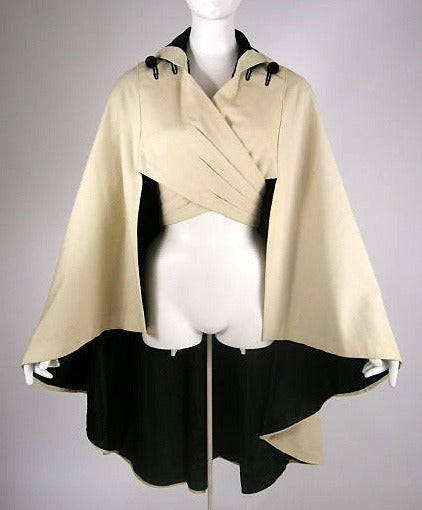
Cashmere Cape, ca. 1912
Reville & Rossiter Ltd.
via Vintage Martini
Angsty Sentence Starters #1
"You're all I could think about."
"I shouldn't have left."
"No, this can't be real!"
"We tried our best."
"I wish it was all over."
"Please, let me in."
"I'm tired and I'm scared."
"Can't you understand why that hurts me?"
"Some people don't want to be saved."
"I asked you not do this, but you did it anyway."
"Please, don't leave me alone."
"Don't touch me!"
"It was all I had left of them."
"We could have died."
"I just can't!"
"You never really knew you."
"I've always been alone."
"It hurts, but I'll live."
"Please, tell me your ok."
"I didn't miss you as much as I thought I would."
If you like my blog and want to support me, you can buy me a coffee! And check out my Instagram!🥰
COUCH POUCH!! Free Pattern & Tutorial

...called thus because they use upholstery-weight leather for the bag body, that in my case was in fact skinned off a couch. 🤣 Turns out they are relatively quick and easy to make, so I tidied up the pattern for printing and took pictures to document the process when I made another five of them.

First off, print your pattern, 100% scale:

The bag shape was a modified version of the pattern I used for the Morpheus sandbag, but sized to fit in the roughly 11" squares that my couch skin came in. It makes a bag that sits very well on a tabletop, thanks to the flat base.
Though it turned out to not be the most efficient use of material, because that plus-shaped pattern tessellates well, if you're cutting them out of a full hide, but makes a lot of waste when you're cutting them out of squares of material. A more efficient design would have a half-rounded front and back, and a gusset between them, like so:

Ah well. It's not like I have any shortage of couch skin, though for the next round I'm going to experiment with a more efficient pattern.
First step, trace and cut out the bag body from your chrome-tan leather:


Like I said, this was upholstery leather, but anything that's flexible and ~1.5 mm thick will do.
The flap and front need to be a stiffer leather though -- I used 7 oz latigo, but veg-tan would work equally well. (And then you could ✨tool it!✨)
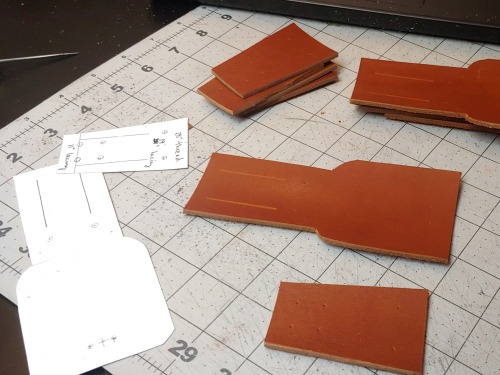
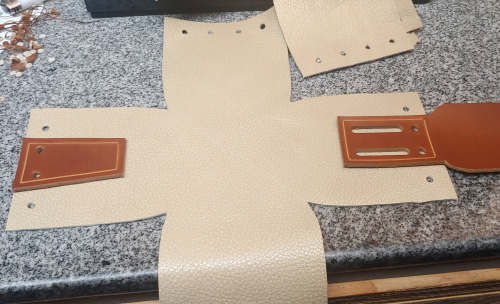
Cut them out, and then use the pattern to mark where your holes are going to be. Mark the holes on your bag body too:

The latigo pieces get hand-stitched to the bag body, so I used a stitching groover to carve out little channels for the thread -- it's not strictly necessary, but it makes your stitches lay a lot more neatly:

Punch the holes shown below:

I used a ~5 mm hole punch for those, and a 1.5" slot punch for the belt loops. Some of the holes on the front piece you're not punching yet, because they need to go through both layers.
I put a dab of contact cement on the pieces (circled in white) to help hold them in place when I go to punch the stitching holes:

(Make sure you're not putting glue between the belt loops)
Wait fifteen minutes for the contact cement to dry until tacky, and then line up the holes and the edges and press the pieces together:
Punch stitching holes:

Saddle-stitch both pieces in place (takes 28" of thread per):

Now you can punch these holes:

(I used a slightly smaller hole punch than for the others, but it doesn't really matter.)
Now press the right sides of the leather together and sew up the seams from the inside:

A regular sewing machine should be able to handle this, though you will need thicker thread, a heavy-duty leather-sewing needle, and a walking foot attachment. (If you don't have a walking foot attachment, it is SO WORTH getting one, even if you don't expect to sew much leather. Seriously, I use it for everything -- once you go walking foot, you don't go back. 💀) Because you can't pin leather without leaving permanent holes in it, tiny binder clips can be helpful for keeping your material lined up.
What they look like when you're finished sewing:

Cut 19" of lacing for the drawstring, and 11" of lacing for the toggle:

I use the 1/8" EcoSoft lace from Tandy, I think it's stronger than real leather would be at that thickness. The only important factor here is that you need something with a bit of texture and friction -- a silk cord isn't going to stay closed, it's going to slip open.
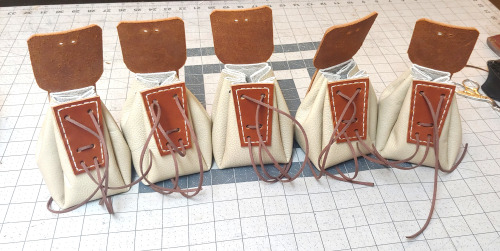
MANY BAGS.
For these I used a wooden toggle -- cut another 8" of lacing, looped it through the toggle twice, and then made a tight square knot on the back:


But another option is putting a concho or a large button on the flap. The bag I copied this design from, in fact, uses a concho toggle:

Thread some beads on the laces to keep the ends from getting lost, and you are DONE! 😁

Happy Bagging!


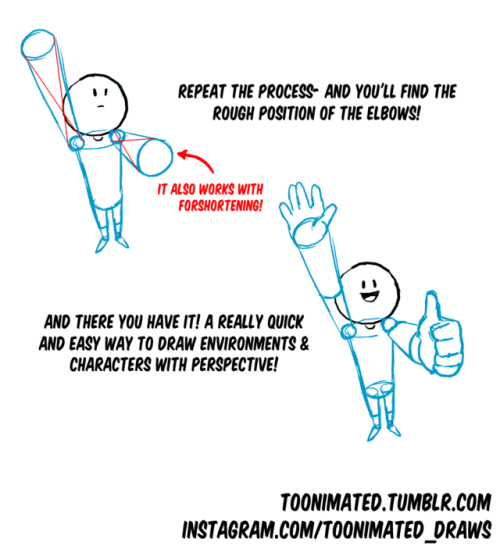
COFFEE QUEST CONTINUES!
Join our coffee adventure!- Or at least check out more Art Goodies here:
[Check out Toonimated’s Coffee Quest] <Take a look!

Do you have any tips on how to come up with plot? I get general ideas for stories but nothing more than a line
It's going to depend on what your goal is when you're writing as well as what your writing style is.
If you sit down to write with the goal of a 100K longfic, then you're going to need multiple plots. A main plotline (that first sentence you come up with) and at least one sideplot, if not more. The main plot generally follows the main characters and the sideplot tends to fall to secondary or tertiary characters.
Then it's kind of a matter of going through your question words:
What's your one sentence idea? What's happening at the same time as that? Who else is involved? Where do they need to go? Why do they need to do this thing? Why in that place? What stops them from doing it? How do they get past that issue?
When I start writing a fic, I have a one-sentence plot that cracks me up and I write the first chapter setting up that situation. Then I post it. Then I think about what logically needs to happen next, what could happen next, what would be funny if it happened next, etc.
I try to have some end goal in mind. For example, the ship gets together or the trip they're on ends or they capture the bad guy etc. Keeping that end goal in mind allows me to write my way to it chapter by chapter as ideas occur to me, and before you know it I've got 12 chapters and the fic is done.
Either that or I think "what would an argument about pickles look like between these characters?" or "what would this bad guy's planner have in its schedule?" and I just write a oneshot.
What about the rest of you? How do you go about taking a small idea and turning it into a story?
This question is also available on Dreamwidth
Angsty Sentence Starters #1
"You're all I could think about."
"I shouldn't have left."
"No, this can't be real!"
"We tried our best."
"I wish it was all over."
"Please, let me in."
"I'm tired and I'm scared."
"Can't you understand why that hurts me?"
"Some people don't want to be saved."
"I asked you not do this, but you did it anyway."
"Please, don't leave me alone."
"Don't touch me!"
"It was all I had left of them."
"We could have died."
"I just can't!"
"You never really knew you."
"I've always been alone."
"It hurts, but I'll live."
"Please, tell me your ok."
"I didn't miss you as much as I thought I would."
If you like my blog and want to support me, you can buy me a coffee! And check out my Instagram!🥰
discord as a filehost will no longer be possible by the end of the year
EDIT: AS IN LINKING TO STUFF ISN'T GOING TO WORK. YOU CAN'T USE IT TO PERMANENTLY EMBED IMAGES IN AO3 OR TOYHOUSE OR WHAT HAVE YOU. THE LINKS THEMSELVES WILL EXPIRE AFTER 24 HOURS, BUT YOUR FILES AREN'T GOING TO BE DELETED FROM YOUR SERVERS
if you haven't noticed, copying a link for a file now appends special parameters to the end. these are a request signature, which indicates a specific request for that file. this request will expires after a few hours, so files will no longer be permanently available through a specific url.
while they are not currently necessary to view the file, they will be by the end of the year, assuming nothing changes.
please check that any websites you rely on are not hosting files through cdn.discordapp.com, and if they are, please archive those files through the IA using web.archive.org/save
thank you for your time
calling all authors!!
i have just stumbled upon the most beautiful public document i have ever laid eyes on. this also goes for anyone whose pastimes include any sort of character creation. may i present, the HOLY GRAIL:
https://www.fbiic.gov/public/2008/nov/Naming_practice_guide_UK_2006.pdf
this wonderful 88-page piece has step by step breakdowns of how names work in different cultures! i needed to know how to name a Muslim character it has already helped me SO MUCH and i’ve known about it for all of 15 minutes!! i am thoroughly amazed and i just needed to share with you guys
Do you know about my free web based sketch app that rotates random pose references? 🤔

It's called AdorkaStock Sketch and you can access it on desktop or mobile. It will adjust to fit your screen! On mobile you can scroll down to see the options.
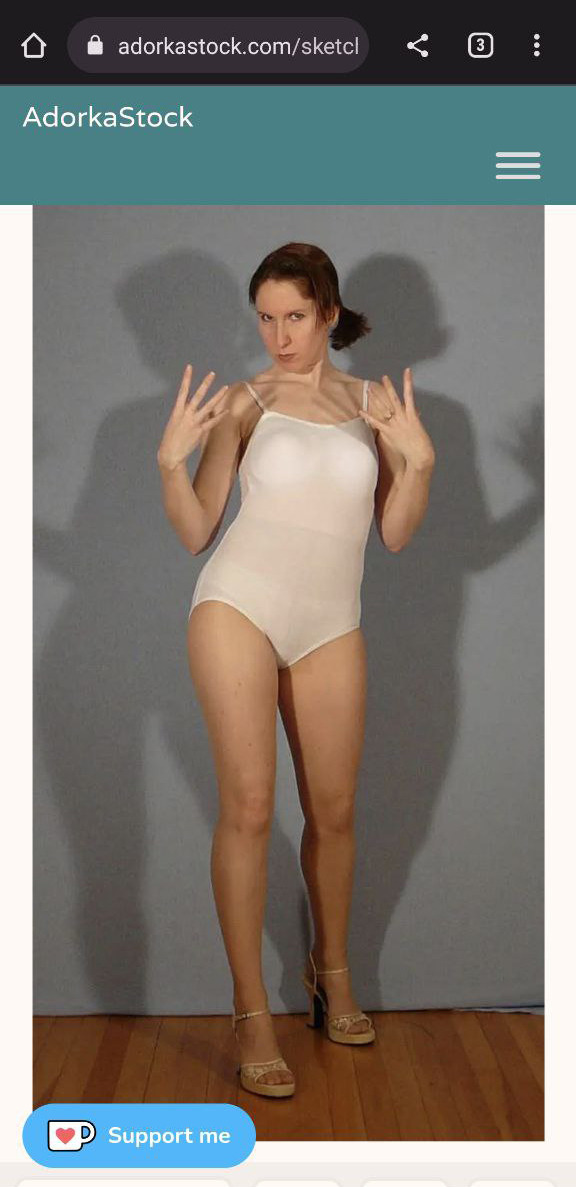

There are currently just over 2,000 poses in rotation with more coming. You can change the timer, skip poses, sort with filters, or try predefined class modes.
The site is completely free and thanks to my Patrons I was recently able to remove third-party ads! If you turn off your ad blockers while using the site you will only see my own ads.
You can also make a free account which will allow you to collect a favorites list and set sketching goals.
Please check it out and use it as often as you need to for pose browsing, gesture warm ups, or long drawing sessions (just hit pause on any pose!) Hope it's super useful for you. Happy drawing! 🎨✨


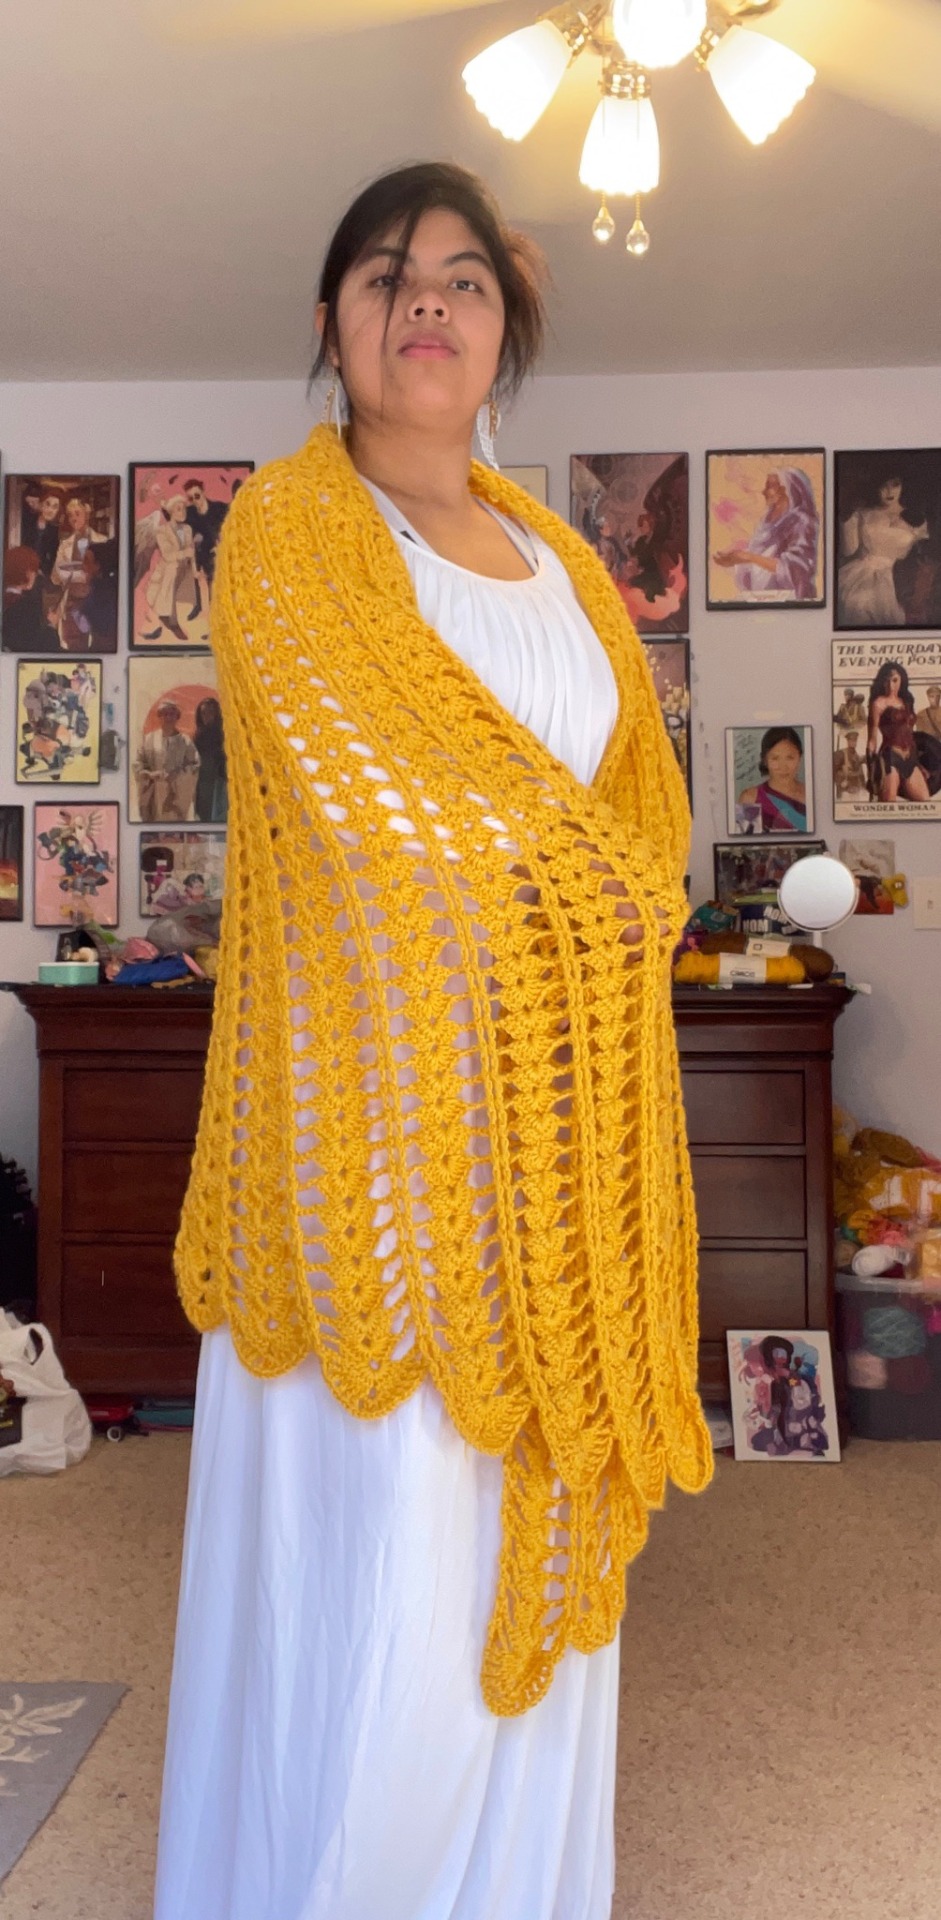


💛 🪽 Extra-Large Golden Crochet Angel Wing Shawl Available On My Shop 🪽 💛
✨ Original Written Pattern By JCDesigns2423 ✨


Welcome back to Whumpcember!
Or if you're new, welcome!
This is the second ever Whumpcember event and I am happy to be running it again! I am so thankful for all the support for last year's Whumpcember and for everyone who filled out the prompt list form! I hope everyone has a wonderful writing Whumpcember, and now, onto the rules!
Prompts should be answered with whump as the main focus
Fanfic! Gif! Text post! Fanart! Fan video! Any piece of media that you can possibly make that has whump counts!
You can use the prompts any time! Don't feel the need to rush
Though, prompts answered during December will most likely be reblogged
Post anywhere! AO3, Wattapad, Tumblr, or even Fanfic.Net! So as long as you make a Tumblr post with a link to the answered prompt it may be reblogged.
When posting onto Tumblr you can either @ the blog or tag with #whumpcember2023 and the day's tag, such as #whumpcember2023 day1
Don't forget to add any warnings necessary, such as NSFW or sexual content
An AO3 Collection will go out on December 1 and close January 1, it's not mandatory, but if you want your works saved in a collection, make sure you get it in on time!
At the end of the month a masterpost will go out to all participants and a badge you can save stating that you are either a participant or completionist. In order to be on the masterpost though, you will have to fill out a google form at the end of month; don't worry it'll take two minutes!
If you have any more questions, send me an ask, but please read the FAQ first!
Written Prompt list below:
-Main Prompts-
Day 1: Fever
Day 2: Sickness
Day 3: Hypothermia
Day 4: Hidden Injury
Day 5: Impaled
Day 6: Nightmares
Day 7: Fainting
Day 8: Isolation
Day 9: Brainwashing
Day 10: Freezing
Day 11: Infection
Day 12: Touch Starved
Day 13: Restraints
Day 14: Cornered
Day 15: Hallucinating
Day 16: Head Injury
Day 17: Fire
Day 18: Chronic Pain
Day 19: Exhaustion
Day 20: Drugged
Day 21: Choking
Day 22: Seizures
Day 23: Nosebleed
Day 24: Bullet
Day 25: Coma
Day 26: Collapse
Day 27: Bleeding Out
Day 28: Abandoned
Day 29: Paralyzed
Day 30: Delirium
Day 31: Homeless
-Alts-
Alt 1. Stabbed
Alt 2. Forced to Watch
Alt 3. Drowning
Alt 4. Ice
Alt 5. Sacrifice
Alt 6. Concussion
Alt 7. Hunger
Alt 8. Tears
Alt 9. Begging
Alt 10. Abused