
901 posts
Shrinky-Dink Charms Tutorial
Shrinky-Dink Charms Tutorial
Charms are a popular item in Artist’s Alleys. They can be used in many ways (key chains, cell phone straps, jewelry) and made from many materials from laminated paper to beautifully embossed metal.
An easy way to make nice plastic charms in your own home is to use inkjet shrink-plastic paper. The most common brand of this is Shrinky-Dink, and you can order their inkjet paper off of their website. (Caution: Bad web design!) Alternately, you can find inkjet shrinky-dink sheets at craftstores such as Michael’s Crafts.
Things you will need to make these charms:
Inkjet Shrinky-Dink Sheets (Regular shrinky-dink sheets are not substitutable.)
An Inkjet Printer (Inkjet only, no laser printers. These sheets shrink when exposed to heat so I’m sure you can see how that could go badly.)
A design you’d like to make charms out of.
Toaster Oven or Conventional Oven (I’ll be using a conventional oven in this tutorial.)
A baking sheet
A hole-punch (Not strictly necessary but makes things a lot easier.)
Scissors
Parchment Paper, Aluminum Foil, or an old grocery bag.
Spray-on Fixative.
Alright, have you gotten everything together? If not, I’ll wait.
…
Okay, let’s get started. First we need the design you’d like to make a charm out of - make it big, these guys shrink a LOT. I’ll be using this picture of the 10th doctor:

First thing you need to do is open the picture in the image editor of your choice and lighten it by about 50%

Don’t worry that it looks washed out, the colours will get appropriately bright again after shrinking. You may find after your first time doing the charms that you want to lighten it a little more or a little less, which is fine. 50% is a good starting point, though. (An important note: If you have heavy black lineart, you may want to keep it pure black and only lighten the rest of the image! While the charms do darken when baked, blacks usually end up looking a bit gray if you lighten them at all.)
Next you need to arrange your newly-lightened image in an 8.5x11 inch document. (Or, slightly smaller if you want to take printing margins into account. My document is 8x10) After some consideration, I decided to also draw myself a small guide to use when cutting out the charms.

Next, we load an inkjet shrinky-dink sheet into our printers and print out the charms. Both sides are printable, so you don’t have to worry about what side is faceup when you’re loading it. (Note: While this does technically mean it is possible to make double-sided charms I don’t recommend trying it unless you’re dead certain that your printer aligns pages in a consistent fashion. Mine certainly doesn’t.)

Perfectly printed! Broadly cut each charm out. It’s easiest to just get them separated before doing any detailed cutting.

Once you have each charm separate, carefully cut around the contours of the image, leaving a small margin. (How small is a matter of personal preference. I’d recommend against leaving no margin at all, though.)

Take out your trusty hole-punch and punch a hole in each charm. If you printed out guides as I did, carefully trim the guides away once the hole has been punched.


Now it’s time to bake our charms! Pre-heat your oven to 275 degrees Fahrenheit. Place a sheet of parchment paper (the cut-out side of a paper grocery bag works just as well) on your baking sheet and place your charms on top of that.

Now for the, uh, “Magic”. Put your charms into the oven for 3-5 minutes, watching them the entire time. It can take a bit longer than that sometimes, don’t worry if it does. The charms will be fine as long as they don’t start to burn. You need to watch them the entire time they’re in the oven, though, and this can get a bit… nerve-wracking. In the process of shrinking, your charms will twist, curl, spasm, and do pretty much every short of an acrobatic somersault.

Oh, this doesn’t look too bad- JESUS FLIPPING SHIT WHAT THE HELL IS HAPPENING!?
Worry not, your charms will flatten themselves out in due course. Occasionally a charm might stick to itself, in which case you need to carefully unstick it and allow it to finish baking normally. None of the charms in the photo wound up sticking to themselves, despite how curled they look.
Once your charms have flattened, let them bake for an additional 30 seconds then take them out of the oven. Sometimes a few of your charms won’t quite flatten perfectly no matter how long you leave them in. If this happens, immediately after you’ve taken them out of the oven put another sheet of paper over the charms and a large, heavy book on top of that. Allow the charms to cool.

Once cooled, you have yourself some neat little charms!

And as mentioned, they shrink one hell of a lot:

Now, as cool as your charms look you’re not done yet. At the moment, these guys aren’t waterproof. A bit of rain and the ink will go melting all over the place. Take the charms and the paper you baked them on into a well-ventilated area and spray several layers of a spray-on fixative to protect them from water.

I tried both a spray-on fixative and a spray-on clear UV-protective varnish. They worked equally well, as far as I’ve been able to observe. Once you’ve allowed your charms to dry, you’re done! You can now freely attach your charms to whatever manner of thing you’d like. :D
-
 lazypanartist liked this · 1 year ago
 -
 slasherz liked this · 1 year ago
 -
 pasfels liked this · 1 year ago
 -
 mooonblooom reblogged this · 1 year ago
 -
 kezcore liked this · 1 year ago
 -
 charmingimmortality liked this · 2 years ago
 -
 pixiedust5959 reblogged this · 2 years ago
 -
pixiedust5959 liked this · 2 years ago
-
 fluffyhales liked this · 2 years ago
 -
 zareblogalogalog reblogged this · 2 years ago
 -
 marshmallowdawn reblogged this · 3 years ago
 -
 criticalqueen liked this · 4 years ago
 -
 nightdye liked this · 4 years ago
 -
 starswirly liked this · 4 years ago
 -
 mazarus-does-stuff liked this · 4 years ago
 -
 deathisnotyourdestinysparrow liked this · 4 years ago
 -
 lunahras liked this · 4 years ago
 -
 yeet-my-soul liked this · 4 years ago
 -
 novae-viking reblogged this · 4 years ago
 -
novae-viking liked this · 4 years ago
-
 renee-f reblogged this · 4 years ago
 -
 glitchgeek liked this · 4 years ago
 -
 ivyprism liked this · 4 years ago
 -
 wolfdrag666on liked this · 4 years ago
 -
 bean-with-a-knife liked this · 4 years ago
 -
 tobifanxd reblogged this · 4 years ago
 -
tobifanxd liked this · 4 years ago
-
 zaltanasworld reblogged this · 4 years ago
 -
zaltanasworld liked this · 4 years ago
-
 black-wolf-spirit reblogged this · 4 years ago
 -
black-wolf-spirit liked this · 4 years ago
-
 dimnomss reblogged this · 4 years ago
 -
dimnomss liked this · 4 years ago
-
 manosaldibujo liked this · 4 years ago
 -
 hxneycake-hxtlines liked this · 4 years ago
 -
 themsource reblogged this · 4 years ago
 -
themsource liked this · 4 years ago
-
 bobateaboo liked this · 4 years ago
 -
 cheddarboye liked this · 4 years ago
 -
 okgotit liked this · 4 years ago
 -
 chilichezdoge liked this · 4 years ago
 -
 nimmmy-the-idiot reblogged this · 4 years ago
 -
nimmmy-the-idiot liked this · 4 years ago
More Posts from Binderclipping
I stumbled upon a website that allows you to blend any colors evenly no matter how opposite on the spectrum they are.
sharing the knowledge
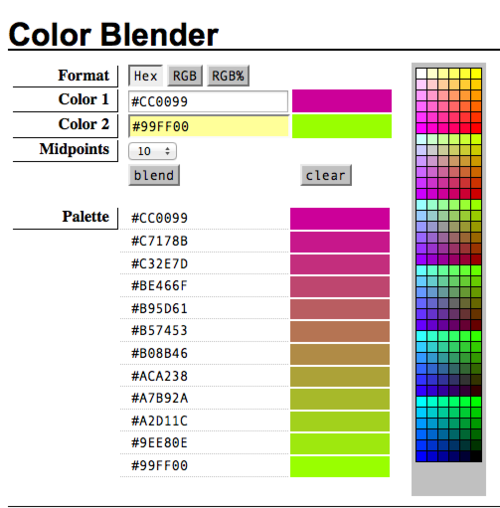
very helpful art resource
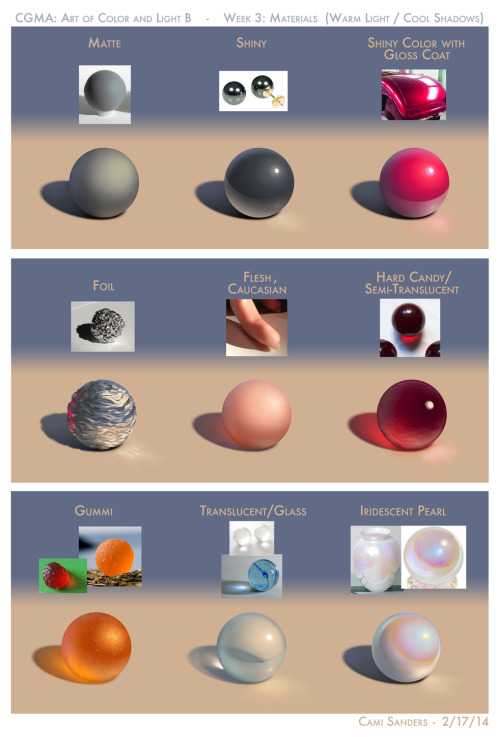
Dunno if anyone’s interested in these, but this was my latest assignment for CGMA’s Art of Color and Light class- this past week focused on how light interacts with different materials.
It’d be cool to try some different skin tones, I just used my own pasty hand for reference. Maybe even an alien species with non-red blood, so the occlusion shadow glows a different color where light passes through? Would it be purple for Namekians and green for Vulcans? (ノ◕ヮ◕)ノ*:・゚✧ possibilities
Also, the iridescent pearl wasn’t a requirement, but I enjoy Sailor Moon and suffering. If anyone’s got pointers on iridescence, I am all ears over here, because I clawed my way through that one screaming

Bartek Gawel, CDPR’s art director, shares some insight on the importance of head construction for successful character design.
The secret to a good character concept is its head. Not to brag about the eyes as the mirrors of the soul or the number of emotions a human face can express let’s just get on with it. Because it’s all in the head – believe me.
Any to-be concept artist will have to learn sooner or later how to draw a good face. I decided to take my time and start this little tutorial and share the knowledge, that was gathered by artists and human body experts (scientists to be precise) throughout the ages.
In this episode I’ll write a little bit about the first principal which defines the look and character of the head you are designing. Today I will write about the facial angle.
The most important element you will need while constructing the head is the middle of the ear. This is represented by the red dot on the illustration above.
A line crossing this point and perpendicular to the horizon helps us find the beginning of the neck i.e. the place where the neck meets the chest (point A). Traditional sculptors use a special pendulum to find the correct line. It’s good if you have an aprentice of any kind to hold it for you, while you’re busy with your work.
The models character is determined by the so called facial angle. This concept was used for the first time in the 18th Century by Petrus Camper, a Dutch anthropologist, scientist and sculptor. He introduced a constant head position based upon a line drawn from the middle of the ear (red dot) to the septum (the red line). The second line needed to create the face angle is drawn from the forehead surface with the jaw (yellow line). This angle can have different rays and be even right.
Determining the facial angle allows you to have a base for further head construction and influences the look of the model on an early stage, before you start outlining other elements (e.g. a nose).
[blog post]
Work progress gif for Leave it Broken :D
I forgot to mention in the gif, but the character, layer overlay, and paint over was done in Paint tool SAI and then edited in Photoshop.
I made a tutorial a while back on how to integrate 3D backgrounds to help speed up the drawing process for comic artists. Check it out if you’re interested. :D

how i go about painting eyes ^^