
I print and paint minis! take a look if you want He/Him
50 posts
Gooseofthevoid - A Goose Paints Minis


Just finished up painting this mini for @yoshikagequeen's character, Sunlil! She's an Air Genasi storm sorcerer, in a game we're both in. My character in that game is the Barbarian Mars, which you can check out here.
This is actually the second time I've painted this mini, the first one was done on my FDM printer, so I couldn't do the swirling air currents around the body, and it ended up being too fragile and breaking apart. (I glued the foot to the base paint on paint, which sure didn't help).
Now that I have a resin printer though, I can do cool minis like this. I printed the air currents and base in transparent resin, and tinted it with a little alchohol ink, which is an effect I'm in love with, and will definitly play with for any future spell effects I need.
I've also pinned sunlil to the base with a piece of wire into the foot, so it should be a lot stronger of a bond.
In terms of painting, I'm pretty happy with how this mini turned out. I like the colours on her outfit and the gradient in the hair. Skin continues to be a bit difficult for me, particularly a tone I'm not particularly used too, but I think it turned out ok. This is also the favourite eye I've done yet, I tend to lean towards painting the pupil/iris too small, and having it look a bit derpy. It sure helps that the other eye is hidden by hair, so I don't have to worry about matching the direction the eyes are looking in.
Overall, I'm looking forward to seeing this mini in play on the table :)
This mini is Ellie the Genasi Mage (Air), by Twin Goddess Miniatures.
-
 sleepyforestbeast reblogged this · 1 year ago
 -
 its-yashas-strong-arms liked this · 3 years ago
 -
 fuck-problems-im-happy-blog liked this · 3 years ago
 -
 leokingxxv liked this · 3 years ago
 -
 drchiropterajones liked this · 3 years ago
 -
 catwithaknife liked this · 3 years ago
 -
 mastermatoyas reblogged this · 3 years ago
 -
mastermatoyas liked this · 3 years ago
-
sleepyforestbeast reblogged this · 3 years ago
-
 zrinboy reblogged this · 3 years ago
More Posts from Gooseofthevoid


New Character, wooo!
This is Frix, my Goblin Alchemist for a Wild beyond the Witchlight game I get to play in soon! (HYPE!)
This is one of those prints that I came across while browsing and just knew I had to print, so its quite lucky that I had a game coming up that I needed a character for!
Frix was really fun to paint, and I love how dynamic the pose is. I'm really proud of how the hair and ear-tips came out, I haven't had a lot of practice with gradients but these just look good!
I'm less happy with how her clothes turned out. I made the mistake of finishing off with a dark wash over them, and then assembling the mini without taking the mini out of my bright work light to check it, so I didn't realise how dark those coveralls were. In the photos, with the bright light from my lightbox they're pretty close to what I was seeing while painting, but in my normal room lights the colour just blends in with the boots.
The base for this mini was also quite fun to paint, having that tankard reacting to the motion of the mini is a really cool detail.
This mini is Knox the Goblin Alchemist by Twin Goddess Miniatures.
Carrying on from my last post, heres some pictures of me pouring resin on my octopus mini!

Got all my materials together. Resin, blue alchohol ink, measuring cup and my mini all set up with its resin dam from my previous post.

I like the patterns the alchohol ink forms when you add it to the resin. I'm doing 3 30 ml pours for this mini. I've found on previous attempts that doing the full 90ml all at once can soften the PLA I print my minis in enough for them to start peeling paint and distorting. This resin sets fast enough that I can pour the next layer after a couple of hours, so its not too annoying to have to wait.

First pour in! Doing these on a plastic plate, just in case any resin manages to get out of the dam. I've gotten pretty confident in making these dams resint tight, but I'd rather be right and waste a 2 dollar plate, than wrong and out a cutting matt and anything else the resin makes it too.
I was a bit incautious mixing this layer, and theres a lot of bubbles that never managed to rise out. I really should get a vacuum chamber if I'm going to keep doing resin stuff, I guess.


second and third pours in. Still a fair few bubbles, but much less than the first layer. I was a bit more careful mixing up these two pours, but I still ended up with a fair amount of bubbles in the end product.
I went back and took a closer look at my sharks, and I think I had the same issue with them, but the darker resin helps hide it. Something to remember the next time I do something like this I guess.


Resin all set, and dam removed! I didn't end up having any resin leak below the base at all, which is always nice.
I did have some marks left behind on the resin unfortunately, you can see them if you look closer. In a couple of places it happened right between resin pour layers, and I suspect those are because I was overzealous popping bubbles with my barbeque lighter, and I think I melted the laminating sheet a little. There are also some marks on the top layer, where the resin was still just a little soft and the sheet stuck to it. That'll teach me to be impatient I guess :/.

Adding some wave effects to the surface. This also has the neat effect of helping to disguise the lip of resin that forms from it clinging to the edge of the dam.
I just use Liquitex gloss gel for this, and shape it with a paddle pop stick. It looks pretty thick now, but as it dries over the next day or two it'll mostly turn transparent. Then it'll just need a quick drybrushing of white to pick out the ridges, and it'll be done! I'll upload a final pic when thats done!
I'm glad I finally got around to getting this guy off my shelf and into resin. He was staring at me judgementally while I painted other things.
I do wish the resin had turned out a bit better, but given that its not something I've used a lot, I'm not too upset about it, and I've got some ideas on how to improve with it next time so it wasn't a wasted effort.


Another Figurine!
I really love this one, it's just got such a dynamic pose, and it's pretty different to what I normally paint. It's good to shake things up now and then. I probably could've done a bit more work on the details of this one, but I was working on a time limit to get it done, and I'm pretty happy with where I got it all things considered.
I wasn't sure at first what sort of detailing I should do on the metal armour parts. I was considering just leaving it all silver at one point, but I thought it'd be just a bit too boring like that. I think the few gold details really help keep it all interesting, without being gaudy or overwhelming.
The panel lining isn't quite as crisp as I'd like, but it's not something I normally have to do on a lot of what I paint, so I'm ok with that. It really helps make things pop having that separation between panels. It was kind of hard getting wash into just the cracks though, since I wanted to avoid toning down the silver and gold. It's got me thinking that I should try oil washes though. Being able to put wash all over something, then clean it up off anything you don't want to be toned down seems pretty cool. I've just got to get over that anxiety of trying out something new without knowing how it'll turn out.
This figure is Mecha Knight Odessa by Dinamuuu3D.

So I got a resin printer this weekend (Elegoo Mars 2 Pro), and the upgrade in quality just has me gobsmacked.
I reprinted Mars, my Elf barbarian in the game I'm playing in at the moment. Which is fortunate because she recently grew Antlers due to the somewhat questionable decision to eat some Fae moss found in a wizards basement.
Here are some comparisons between my new mars, and the original printed in FDM:


It was actually because of the resin I noticed that what I'd originally painted as shorts was actually her leg and the top of her boot.
I used to think I wasn't missing out on too much with just an my FDM printer, aside from having to steer away from some minis with lots of thin details, but even sections where I thought my FDM machine was handling quite well are just so much nicer in the Resin print.
I still think you can get decent table ready minis with just an FDM machine, but my new preference is definitely for Resin minis.
I keep just spending time turning this model around looking closely, because the quality is such an improvement. I'd never manage to get the antlers so crisp and clean with an FDM print. I also don't have to struggle with thin paint wikking away into layer lines, which makes the painting process much easier.
My Mars mini is Sony Jona from Artisan Guild, with some edits made in Blender to turn her from a Sorceress into a Barbarian. My limited Blender skill means I decided she just really likes apples, since I needed to put something round in that hand.

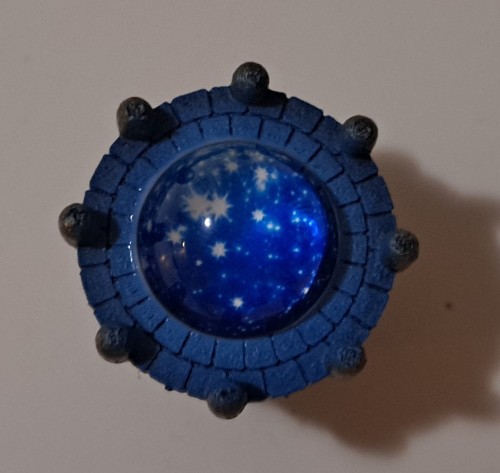

I was playing with a cheap necklace I got off wish a while back, and managed to break this starry cabachon off it (I threw it into a fan on accident, no further questions).
I thought it was a cool little piece, so I went ahead and put together a wizardy table for it in fusion360, printed it out, slapped some paint on it, and here it is! Just a quick little scatter piece. I guess the ruined portal from my last post has me in a wizardy mood.
I like using fusion360, I'm still fairly inexperienced with it, but that just means I can learn new things each time! This time I figured out how to use the sweep tool to create the swoopy tubes running up the sides of the table.
Also pictured, Edwin, my sorcerer PC from a Curse of Strahd game I'm in! He was the most wizardly character I had on my shelf. I should fix that at some point.
If you want to get the file for this, you can find it here.