Printed Miniature - Tumblr Posts

As promised, the finished Octopus, waves all dried and painted. Those bubbles are definitely in the way, but you can still make out theres an octopus in there, so its not a complete loss :).


Different angles, and next to one of my sharks. Tried doing the waves slightly different for the octopus, but I think I prefer the ones on the shark in the end. Oh well, still looks pretty nifty anyway :)
Making the resin dam: Here.
Pouring the resin: Here.

So I got a resin printer this weekend (Elegoo Mars 2 Pro), and the upgrade in quality just has me gobsmacked.
I reprinted Mars, my Elf barbarian in the game I'm playing in at the moment. Which is fortunate because she recently grew Antlers due to the somewhat questionable decision to eat some Fae moss found in a wizards basement.
Here are some comparisons between my new mars, and the original printed in FDM:


It was actually because of the resin I noticed that what I'd originally painted as shorts was actually her leg and the top of her boot.
I used to think I wasn't missing out on too much with just an my FDM printer, aside from having to steer away from some minis with lots of thin details, but even sections where I thought my FDM machine was handling quite well are just so much nicer in the Resin print.
I still think you can get decent table ready minis with just an FDM machine, but my new preference is definitely for Resin minis.
I keep just spending time turning this model around looking closely, because the quality is such an improvement. I'd never manage to get the antlers so crisp and clean with an FDM print. I also don't have to struggle with thin paint wikking away into layer lines, which makes the painting process much easier.
My Mars mini is Sony Jona from Artisan Guild, with some edits made in Blender to turn her from a Sorceress into a Barbarian. My limited Blender skill means I decided she just really likes apples, since I needed to put something round in that hand.


I put these in my drafts and forgot them! Red and Blue fire elementals. They were super fun to paint, lots of drybrushing which is always fun to do with a lot of sculpted detail.
This is my first time trying to paint fire effects, and I think it turned out fairly well! Room for improvement certainly, but it does read as fire when you look at it I think, and thats the main thing.
I tried making some sort of obsidian-gravel looking bases to put these on, but they didn't really work out, so I just tried painting a sort of gradiant like they're glowing from the elementals on them. It sorta worked? IDK, its fine ¯\_(ツ)_/¯.
This model is Armour-bound fire elemental by Rocket Pig Games.
They've got a great patreon that has a bunch of awesome minis like this every month: https://www.patreon.com/rocketpiggames/posts


Just finished up painting this mini for @yoshikagequeen's character, Sunlil! She's an Air Genasi storm sorcerer, in a game we're both in. My character in that game is the Barbarian Mars, which you can check out here.
This is actually the second time I've painted this mini, the first one was done on my FDM printer, so I couldn't do the swirling air currents around the body, and it ended up being too fragile and breaking apart. (I glued the foot to the base paint on paint, which sure didn't help).
Now that I have a resin printer though, I can do cool minis like this. I printed the air currents and base in transparent resin, and tinted it with a little alchohol ink, which is an effect I'm in love with, and will definitly play with for any future spell effects I need.
I've also pinned sunlil to the base with a piece of wire into the foot, so it should be a lot stronger of a bond.
In terms of painting, I'm pretty happy with how this mini turned out. I like the colours on her outfit and the gradient in the hair. Skin continues to be a bit difficult for me, particularly a tone I'm not particularly used too, but I think it turned out ok. This is also the favourite eye I've done yet, I tend to lean towards painting the pupil/iris too small, and having it look a bit derpy. It sure helps that the other eye is hidden by hair, so I don't have to worry about matching the direction the eyes are looking in.
Overall, I'm looking forward to seeing this mini in play on the table :)
This mini is Ellie the Genasi Mage (Air), by Twin Goddess Miniatures.
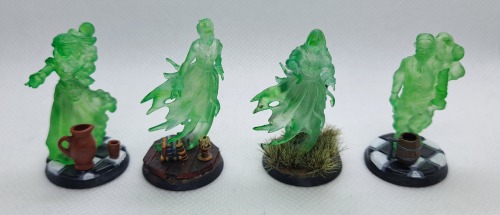


BOO! Spooked yah, right? Don't worry, these ghosts aren't real, just miniatures. :P
I mentioned in a previous post that I found I could dye clear resin prints colours with alchohol inks, and these ghosts are actually what I figured that out on!
I did these quite a while back, but then I left them for a few weeks until I made some bases, and then I left them sitting in my light box for a couple more weeks before actually taking these photos, because for some reason I really just didn't want to. ¯\_(ツ)_/¯
the transparent ghostly effect is cool, but I also really like the bases I did for them too. This was me trying out adding little extra bits to them, going for a bit of a haunted manor theme. I'm pretty happy with it on the whole, although I think the beer mug and the pot are just a bit too big and attention grabbing. I really want the focus to be on the mini, with the base elements blending in more. I am quite happy with how the kitchen tile bases came out too. I started out trying to freehand sculpt them out of greenstuff, then when I figured out that I am not by any means a compenent enough sculptor to make that work, I quickly designed and printed a little tile impression jig to make clean, straight tiles for me. I made and printed it fast enough that I didn't waste my greenstuff, so thats pretty cool I think.
On the whole, I'm happy to have these translucent spooky ghosts in my collection.
Miniatures in this post are made by:
Townfolks ghost male and Townfolks ghost female by Titan Forge Miniatures.
Ghost by Great Grimoire.
Base in this post are made by:
Gothic Tombstones by Medusa Miniatures.
Table Scatter, Extra Dining Items, Books, Piles & Rows by Darkest Desire.
Candle Holders by Pellinor.


Finished painting this neat sculpt of Samus the other day!
I just did a fairly simple paint job on this one. Partly because I think it works well for the video game kinda look, and partly because I'd forgotten how poorly my orange and yellow paints cover, and I decided I wanted to deal with that as little as possible. I think it turned out pretty well though, the dark wash I put in the seams of the armour panels really helps make up for the lack of highlighting.
Theres a bit of an attempt at a glow effect in the barrel of her arm cannon, and on the bits of her armour mid-assembly. Its not amazing or anything, but I think you can kind of see what I was going for with it. Having lighting effects beyond just highlighting from above is something I've mostly avoided in my painting so far, but its somethign I want to start playing with. Its a bit daunting, but I think it will be rewarding if I can get it down.
I also realised as I was painting this that I've never actually played a metroid game. The most direct exposure I think I've ever had was watching one of my cousins play one of the games on his Gameboy at christmas. I feel like this is something I should rectify at some point.
This neat model is Samus Aran - Metroid - 25cm model by Printed Obsession. (The print pictured above is scaled down from 25cm to fit with my other prints).


Double post! I realised I never actually made a post about this halfling smith I painted last week, which is a travesty, because she's cool as heck! Also, she's a four fingered smith now, because I'm a clutz and dropped her while carrying her over to take pictures ¯\_(ツ)_/¯
One of the great things about 3d printing, is that when I want to paint a mini like this to display on a shelf rather than use on a table, I can just scale it up a bit before printing, rather than having an oddly sized mini on a shelf next to a bunch of larger figurines!
I really like how all the different colours and materials came together on this paint job, I think I managed to keep everything cohesive but distinct.
I'm also pretty happy with how the skin tone came out. I tried something a bit different to what I usually do, by mixing my favourite light skin tone paint with a little bit of reddish brown paint to get a slightly more tan colour as a base I could work up from. I think it turned out great, and really suits this halfling smith!
This print is Helen, the Blacksmith Halfling by Bite The Bullet


Yarrr!
I've been painting this awesome pirate figure over the past week. I've been trying to get myself back into the habit of painting consistently over the week, rather than waiting for 'the perfect time' (which never comes), because my pile of shame is growing at a concerning rate.
This was a really fun model to paint, with some great details. Though I did get slowed down a bit trying to figure out how to navigate the tip of my brush into some areas. Theres a lot of semi enclosed spaces with awkward positioning, and in the end I left a few spots unpainted. You can't see them without turning the model upside down and at odd angles anyway, so I've decided to just not care, and save myself the hand cramps.
Besides just being a fun model to paint, it was also a chance to play around with how I paint metalics a bit. Theres so much dark metal involved in the cannon that I didn't want to just paint it all with a solid metal colour. And while I do want to try my hand at painting non-metalic metal at some point, I don't quite have the confidence and patience for it just yet. So instead I tried out painting the bits I wanted in a dark-steel/iron colour with straight black paint, and then just drybrushing dark silver metalic paint over it, and it worked beautifully. It really helps the metal look a bit more beaten and dull, its only shining on the edges and ridges, where its maybe been polished a bit by rubbing against its environment. This is a technique I'm going to try and remember in the future.
For all the other metals on this piece I just did straight metalic paint, and I just love how the gold contrasts with the reds and browns its up against!
I'm also really happy with the skin. It wasn't that long ago that I dreaded painting skin and always hated how I made it look, but now its one of my favourite things to paint! Getting to play with skin tones and highlighting them is just fun! I've still got room for improvement with where I place my highlights, but I can see progress in every mini I paint, which is really rewarding!
This figure is Miss V. Gomez , by Cast n Play.


New mini!
This is Atropos, a half elf (?) bard, painted for Yoshikagequeens' character in an upcoming campaign! Atropos will be in the same party as Frix! I'm looking forward to it.
I'm weirdly chuffed with my choice of dark red for his pants, and I think the highlights along the creases look really good. I also got the opportunity to finally properly use some of the colour shift paint I got like half a year ago, to put some glitter in his hair, so that's neat. I put the colour shift just in the parts and underside of his hair, to kind of make it looks like some sort of underlayer shining through. I really like the effect in person, seeing the glitter shift as you move your viewpoint is quite cool! Photos don't really do it justice.
My least favourite bit of this mini is the base. I shoved a generic column into a generic base, rather than using the desk base that comes with the stl for this mini. I wanted to push the character more into bard territory, rather than the professor character it's originally meant to be. I think it works for that, and I like the column he's leaning on, but the ground of the base is just a bit too plain. I put some cracks in it with an Exacto blade and added some cut up grass tufts to give it a bit of texture, but it's still not quite right. In the end, I just had to stop fiddling with it before I made it worse.
It's a learning experience to remember next time I try and make a custom base though, gotta remember to have texture or something on there.
The mini used here is Professor Syiva, by Twin Goddess Miniatures.
The column used on the base is Socket Pillar, by Phillip Meys.


A Y'shtola figurine I painted for @yoshikagequeen as a Christmas gift.
I don't know much about FF14, but this was a pretty cool model to paint. Especially since that orb in the staff gave me an excuse to play with the gloss varnish I've had banging around for a while.
Its kind of fun to paint stuff using a reference for the colours, though sometimes finding a good angle to work out what colour a specific thing is can be frustrating. The model was very accurate to the references I found though, which was very helpful.
This model was made by EllaArt.
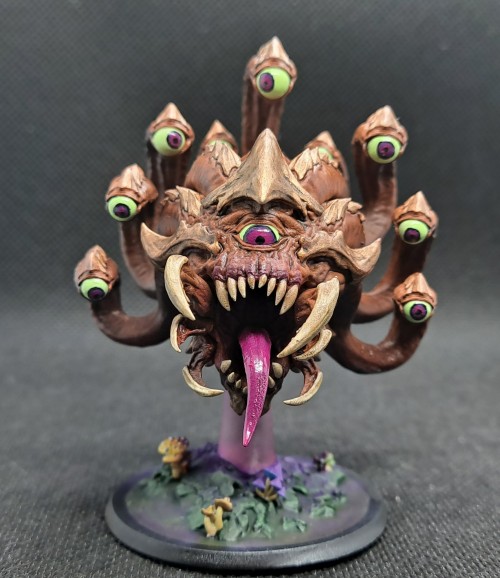


This is the third beholder I've painted.
I might have a problem :T
I just really like them. Maybe its because each gets to be unique and different.
Maybe it's because they're such iconic monsters.
Maybe it's because, unlike regular minis, the eyes aren't tiny little specks that require perfect pinpoint precision to paint.
Anyway, I really like how this one came out. I played around a bit with the airbrush on this one, and tried out doing a little bit of purple undershading in which I think turned out quite well, though it could've been maybe just a touch lighter in retrospect.
I printed the support piece separate from the mini and base, so I could do it in transparent resin and give it a purple stain. My thought is it's meant to be a sort of psionic pillar of anti-gravity or something. (because psionics are purple, as we all know).
I also had a go at making a glow effect on the base around the support, something I've been nervous to experiment with so far. I'm always worried about ruining a paint job I spent hours on, but since this base is a simple and quick paint job it was the perfect bit of low-stakes practice.
This model is Beholder by Lord Of The Print.


Another figure down from my pile of shame!
Never really watched Hellboy, but he looks really cool, so now he's on my shelf :D
Also, he was an excuse to try and get a process for leather down, which I've been playing with for a bit. I really like how it turned out, though I could definitely work on making it a bit smoother.
This model is Hellboy - 30 CM model by Printed Obsession.


Another print that's been in my backlog for far too long, is now on my shelf!
I printed this, I think a year ago? And I've been really excited to paint it the whole time, but just never got around to it.
I am really happy with how it turned out though, especially the base! Funnily enough, I hadn't even considered the base at all until I'd finished painting the model, and I wanted to have something a bit more interesting than just a plain base. I'm pretty happy with what I came up with! I little bit of messing around in blender to get the bamboo too look cut was well worth it!
I also originally thought I'd try learning non-mettalic metal on the sword, only to start and realise that trying to do it for my first time on such a large, flat surface was maybe not the best plan XD. Its still something I want to figure out at some point, but maybe on something a bit less intense.
I did have some minor printing issues with the bottom section of the base, and I'm just now seeing in that first picture how poor my attempt at smoothing that out with green stuff went. I promise it doesn't look that noticeable on the shelf XD.
This model is Samurai - Professionally pre-supported! by Greg Kourakos on My Mini Factory.


I'm holidaying at the beach, so of course I painted something in a snowy theme XD.
Pretty happy with this result! Probably could be a little cleaner in spots, but for a one day paint job I'm not complaining.
In particular the icy base turned out way better than I expected.
Big thanks to @dropattackbear for sharing his paints when I forgot to pack my metallics XD.
This model is Skadi the Barbarian by Twin Goddess Miniatures


BEEG undead dragon! (I gotta stop painting dragons, I only have so much shelf space 😭)
The model is Undead Dragon by Clynche Art on MMF.
I ended up painting this one one and a half times since I started doing a black base and working up with reddish purples for the flesh. It looked ok, but a bit too cartoony for what I wanted.
So I started over with a dark red base, added brown, green and blue splotches, and then dry brushed black all over, which I think looks a lot more like rotting flesh! It was a lot of fun working on those colours though!
I just did a mix of an off-white, bright green and brown for the bony sections, followed up by a burnt umber ink to get that old bone look, and to help blend between flesh and bone.
The horns, teeth and claws I struggled with a bit, before deciding to do dark silver+dirty down rust+drybrushed dark silver. I really like the effect of rusting horns for an undead dragon, but I do worry that it is a tad lacking in contrast, with all the other dark reds and blacks going on here. I considered redoing it with a tarnished bronze look, but tbh after having already had this on my desk for over a month, I was ready to just get it out of the way so I could move on to other minis.
I'm also still messing around with camera settings, trying to get nicer pictures, but it's a bit of a process since I don't super know what I'm doing. Getting everything I want in focus, especially on a mini this big, is hard and I didn't really manage it in the end. It's fun to play around though, even if there's a lot of "is it better with setting A or setting B? hmmmmmm" repetition.

Can't be bothered to take proper pictures.
Painted a super quick and easy mini to chill after the undead dragon. Just a red base, metallic copper drybrush, and a couple of derails.
Model is FREE Flamehorn Wyrmling by Dragon Trappers Lodge.


Painted a cute little goblin squire :3
Not much to say about this one, just a quick fun paintjob I did in a night. Trying to get back to painting more regularly, and this is a good step in that direction!
One note for myself is that I think I went a little too dark with the darkest green. Or possibly didn't shade lighter tones across enough of the mini. Particularly the tail I think is a tad too dark for a lot of its surface. I was trying to push my dark/light contrast a bit more, but I think I overcorrected. Something to experiment more with though, because I do love some places with that darker green.
This mini is Goblin Squire by Twin Goddess Miniatures


Cool dragonborn wizard!
This was a great mini, I got to play with drybrushing metallics which is always fun, and I've been looking for a chance to play with layering red on robes a bit.
That coat trim was kind of a pain to paint, especially since it was a yellow going over the dark red I'd already painted the robe with. I like how it came out in the end tho, worth the effort!
I tried out using some colourshift paint for the orb on the staff, with a painted gradient under it. It worked ok, but the overall colour is a lot less striking then if I'd just painted it with a bright, regular paint. Still, its got a kind of cool effect, I might play with that more in other minis I think.
I'm also really happy with how the base turned out, only for it to mostly get covered by the mini. Tried out painting the cobblestones a variety of colours and tying it together with a wash and drybrush in the end.
This mini is Zuldikis DragonBorn Mage by Miniatures Blueprint


Ok, one day I will see a cool beholder mini and not be consumed by the need to paint it.
That day clearly isn't today though, and I'm not sorry.
Really happy with how this guy turned out, especially the eyes. Doing a sort of fade from the pupil rather than a hard edge to the iris worked really well with the black I think.
I took two tries to get the base colours of the skin down, my first attempt was more purple than pink/red in the recesses. I think the red version makes it much more fleshy in all the worst (best) ways.
This mini is Eye Tyrant 02 by Daybreak Miniatures


Latest mini: Big Snail!
Super fun to paint this one, I did the snaily flesh by airbrushing a greeny-yellow-grey from the top, and a grey-blue from the bottom, then layered some different colour shift paints over that. I think it turned out really good for that glistening snail-skin lood.
I also experimented a bit with some goopy effects, with UV resin, not as happy with those, but I think they work alright, and for my first time using UV resin that way I think I'm happy.
This mini is Slug. the Snail God by Witchsong Miniatures. (I scaled the print down to about 55%, just to print it in one run).