
I print and paint minis! take a look if you want He/Him
50 posts
Another Figurine!


Another Figurine!
I really love this one, it's just got such a dynamic pose, and it's pretty different to what I normally paint. It's good to shake things up now and then. I probably could've done a bit more work on the details of this one, but I was working on a time limit to get it done, and I'm pretty happy with where I got it all things considered.
I wasn't sure at first what sort of detailing I should do on the metal armour parts. I was considering just leaving it all silver at one point, but I thought it'd be just a bit too boring like that. I think the few gold details really help keep it all interesting, without being gaudy or overwhelming.
The panel lining isn't quite as crisp as I'd like, but it's not something I normally have to do on a lot of what I paint, so I'm ok with that. It really helps make things pop having that separation between panels. It was kind of hard getting wash into just the cracks though, since I wanted to avoid toning down the silver and gold. It's got me thinking that I should try oil washes though. Being able to put wash all over something, then clean it up off anything you don't want to be toned down seems pretty cool. I've just got to get over that anxiety of trying out something new without knowing how it'll turn out.
This figure is Mecha Knight Odessa by Dinamuuu3D.
-
 mellowstrangereagle liked this · 2 years ago
 -
 azoart liked this · 3 years ago
 -
 solfinch liked this · 3 years ago
 -
 enbygnome liked this · 3 years ago
 -
 firegenasib1tch liked this · 3 years ago
 -
 jntk liked this · 3 years ago
 -
 mx-maddmcgeeky liked this · 3 years ago
 -
 mastermatoyas reblogged this · 3 years ago
 -
mastermatoyas liked this · 3 years ago
-
 jjmanfred liked this · 3 years ago
 -
 dropattackbear liked this · 3 years ago
 -
 sleepyforestbeast reblogged this · 3 years ago
 -
sleepyforestbeast liked this · 3 years ago
More Posts from Gooseofthevoid

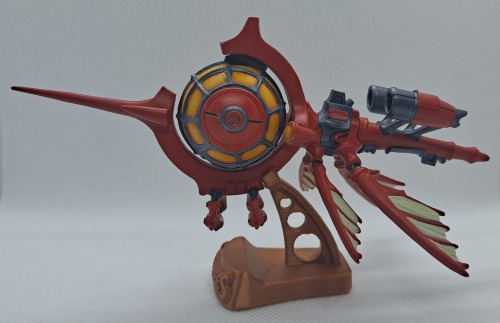


Something a bit different to what I usually paint, but I saw this model and I just really wanted to paint it! Its just such a neat little model, especially that spherical cockpit.
The model is printed in resin on my Mars 2 Pro, and the stand was done on my Prusa in a copper silk filament. I love that copper silk for decorative things, it just looks so good.
It is a bit messy in some points, mostly because painting the cockpit wrecked me, it wasn't until I actually started painting it until I realised how fiddly it was to do. My metallic covers way better than my yellow does, so every little mistake took quite a few careful coats to fix.
That said, I really like how it turned out all the same! Most of my messy points fade away once its a on a shelf rather than right up in my face at painting distance.
The model is Red Stinger by Heriberto Valle Martínez.

As promised, the finished Octopus, waves all dried and painted. Those bubbles are definitely in the way, but you can still make out theres an octopus in there, so its not a complete loss :).


Different angles, and next to one of my sharks. Tried doing the waves slightly different for the octopus, but I think I prefer the ones on the shark in the end. Oh well, still looks pretty nifty anyway :)
Making the resin dam: Here.
Pouring the resin: Here.

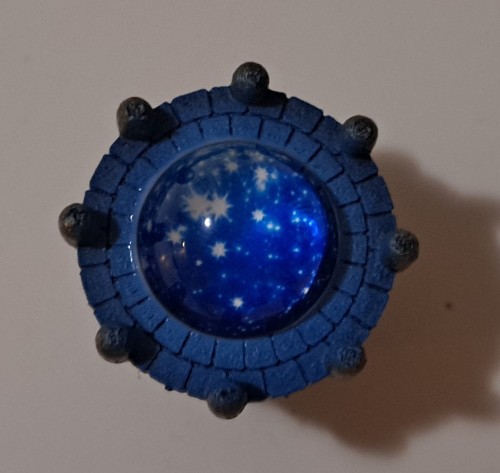

I was playing with a cheap necklace I got off wish a while back, and managed to break this starry cabachon off it (I threw it into a fan on accident, no further questions).
I thought it was a cool little piece, so I went ahead and put together a wizardy table for it in fusion360, printed it out, slapped some paint on it, and here it is! Just a quick little scatter piece. I guess the ruined portal from my last post has me in a wizardy mood.
I like using fusion360, I'm still fairly inexperienced with it, but that just means I can learn new things each time! This time I figured out how to use the sweep tool to create the swoopy tubes running up the sides of the table.
Also pictured, Edwin, my sorcerer PC from a Curse of Strahd game I'm in! He was the most wizardly character I had on my shelf. I should fix that at some point.
If you want to get the file for this, you can find it here.
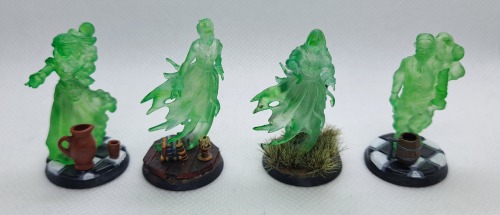


BOO! Spooked yah, right? Don't worry, these ghosts aren't real, just miniatures. :P
I mentioned in a previous post that I found I could dye clear resin prints colours with alchohol inks, and these ghosts are actually what I figured that out on!
I did these quite a while back, but then I left them for a few weeks until I made some bases, and then I left them sitting in my light box for a couple more weeks before actually taking these photos, because for some reason I really just didn't want to. ¯\_(ツ)_/¯
the transparent ghostly effect is cool, but I also really like the bases I did for them too. This was me trying out adding little extra bits to them, going for a bit of a haunted manor theme. I'm pretty happy with it on the whole, although I think the beer mug and the pot are just a bit too big and attention grabbing. I really want the focus to be on the mini, with the base elements blending in more. I am quite happy with how the kitchen tile bases came out too. I started out trying to freehand sculpt them out of greenstuff, then when I figured out that I am not by any means a compenent enough sculptor to make that work, I quickly designed and printed a little tile impression jig to make clean, straight tiles for me. I made and printed it fast enough that I didn't waste my greenstuff, so thats pretty cool I think.
On the whole, I'm happy to have these translucent spooky ghosts in my collection.
Miniatures in this post are made by:
Townfolks ghost male and Townfolks ghost female by Titan Forge Miniatures.
Ghost by Great Grimoire.
Base in this post are made by:
Gothic Tombstones by Medusa Miniatures.
Table Scatter, Extra Dining Items, Books, Piles & Rows by Darkest Desire.
Candle Holders by Pellinor.


Yarrr!
I've been painting this awesome pirate figure over the past week. I've been trying to get myself back into the habit of painting consistently over the week, rather than waiting for 'the perfect time' (which never comes), because my pile of shame is growing at a concerning rate.
This was a really fun model to paint, with some great details. Though I did get slowed down a bit trying to figure out how to navigate the tip of my brush into some areas. Theres a lot of semi enclosed spaces with awkward positioning, and in the end I left a few spots unpainted. You can't see them without turning the model upside down and at odd angles anyway, so I've decided to just not care, and save myself the hand cramps.
Besides just being a fun model to paint, it was also a chance to play around with how I paint metalics a bit. Theres so much dark metal involved in the cannon that I didn't want to just paint it all with a solid metal colour. And while I do want to try my hand at painting non-metalic metal at some point, I don't quite have the confidence and patience for it just yet. So instead I tried out painting the bits I wanted in a dark-steel/iron colour with straight black paint, and then just drybrushing dark silver metalic paint over it, and it worked beautifully. It really helps the metal look a bit more beaten and dull, its only shining on the edges and ridges, where its maybe been polished a bit by rubbing against its environment. This is a technique I'm going to try and remember in the future.
For all the other metals on this piece I just did straight metalic paint, and I just love how the gold contrasts with the reds and browns its up against!
I'm also really happy with the skin. It wasn't that long ago that I dreaded painting skin and always hated how I made it look, but now its one of my favourite things to paint! Getting to play with skin tones and highlighting them is just fun! I've still got room for improvement with where I place my highlights, but I can see progress in every mini I paint, which is really rewarding!
This figure is Miss V. Gomez , by Cast n Play.