
I print and paint minis! take a look if you want He/Him
50 posts
BOO! Spooked Yah, Right? Don't Worry, These Ghosts Aren't Real, Just Miniatures. :P
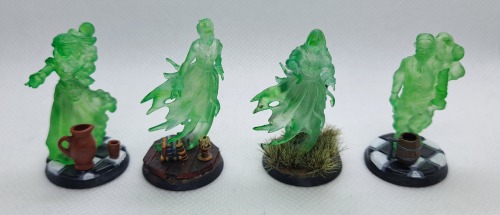


BOO! Spooked yah, right? Don't worry, these ghosts aren't real, just miniatures. :P
I mentioned in a previous post that I found I could dye clear resin prints colours with alchohol inks, and these ghosts are actually what I figured that out on!
I did these quite a while back, but then I left them for a few weeks until I made some bases, and then I left them sitting in my light box for a couple more weeks before actually taking these photos, because for some reason I really just didn't want to. ¯\_(ツ)_/¯
the transparent ghostly effect is cool, but I also really like the bases I did for them too. This was me trying out adding little extra bits to them, going for a bit of a haunted manor theme. I'm pretty happy with it on the whole, although I think the beer mug and the pot are just a bit too big and attention grabbing. I really want the focus to be on the mini, with the base elements blending in more. I am quite happy with how the kitchen tile bases came out too. I started out trying to freehand sculpt them out of greenstuff, then when I figured out that I am not by any means a compenent enough sculptor to make that work, I quickly designed and printed a little tile impression jig to make clean, straight tiles for me. I made and printed it fast enough that I didn't waste my greenstuff, so thats pretty cool I think.
On the whole, I'm happy to have these translucent spooky ghosts in my collection.
Miniatures in this post are made by:
Townfolks ghost male and Townfolks ghost female by Titan Forge Miniatures.
Ghost by Great Grimoire.
Base in this post are made by:
Gothic Tombstones by Medusa Miniatures.
Table Scatter, Extra Dining Items, Books, Piles & Rows by Darkest Desire.
Candle Holders by Pellinor.
-
 forwhomtheyeastrolls liked this · 2 years ago
 -
 babadell liked this · 2 years ago
 -
 leviabeat liked this · 2 years ago
 -
 catdemonkaid reblogged this · 3 years ago
 -
 kealaxx liked this · 3 years ago
 -
 the-god-of-hellfire liked this · 3 years ago
 -
 zrinboy reblogged this · 3 years ago
 -
zrinboy reblogged this · 3 years ago
-
zrinboy liked this · 3 years ago
-
 drchiropterajones reblogged this · 3 years ago
 -
 machinedemon reblogged this · 3 years ago
 -
 mastermatoyas reblogged this · 3 years ago
 -
mastermatoyas liked this · 3 years ago
-
drchiropterajones liked this · 3 years ago
-
 sleepyforestbeast reblogged this · 3 years ago
 -
sleepyforestbeast liked this · 3 years ago
More Posts from Gooseofthevoid


While I'm posting things, I just painted this neat little ruined portal terrain piece! Just a real simple paintjob on this one, took me about an hour total, including waiting for paint to dry.
I had fun freehanding the little runes, and I really enjoy how the metallic paint lets the blend in most of the time, and show really strongly if the light is just right.
I did end up only putting them on one side of the portal. Because uh... it shows which side of the portal you're meant to stand on... yeah... not at all because my hand was getting tired, and i was starting to run out of ideas for runes.
:T
This is Ancient Stone Structure - Portal Gate 3D print model by Odgardian
I got asked about how I did my resin sharks, and I've had an octopus sitting on my shelf for ages waiting for the same resin treatment, so I figured I'd kill to birds with one stone, and take some pictures explaining the process!

Here I've got the octopus I'll be casting in resin, and a thick cylinder with the same diamater to the base we're using.
I 3d print my bases, so getting this cylinder was simple for me. I just 3d printed a thicker version of the base and called it good. If you're using a store bought base, you can probably just stack a few of them on top of one another and tape them together to make a cylinder. You only need about 2-3cm of thickness.
I've also put just a teeny bit of blutack on the cyilnder, to keep the base from shifting around while I do the next step.

Step 1:
Put the cylinder on the base, and tape them together like so. Make sure that the tape forms a tight seal around the top of the base. This is to stop any leaking resin from getting between the base and the cylinder and sticking them together. If enough gets in there and sets, they won't be coming apart.
(Also, be sure that any basing material or bits of the mini don't extend out over the side of the base, that will also cause problems with making a tight seal).

Step 2:
Now we're going to need a laminating pouch. I use A3 sized pouches, but for something this size you could get away with A4 easily enough. You should be able to find packs these from any office supply store for fairly cheap.
Cut the pouch were it joins together, so you have two sheets of plastic.
There should be a glossy and matte side, take note of which is which. The glossy side needs to end up on the inside of the dam we're making, so that the resin turns out smooth and see through. Be careful while handling these sheets, as any creases or dents will show up in the final product.
Determine how deep you want your resin to be, and mark that depth on the sheet. Don't forget to factor in the depth of the cylinder attatched to the base of the mini for this.
Here, I want this octopus to be the same size as my sharks, so I'm using one as a reference.
Make a quick mark at the height you want (on the non-glossy side of the laminating pouch), then cut the sheet about 1-2 centimetres higher than that. It doesn't have to be particularly neat.

This is the sort of thing we're going for.
(Apologies for the background, its kinda hard to get a good picture of something transparent :p ).
Note that we've got a neat, straight edge along the bottom, unlike the top where it was cut. So long as you have one edge that is neat and straight, you're all good to continue.

Step 3:
Take a small strip of tape, and attatch it to the matte side of the sheet. Then take the base and cylinder, and line the bottom of the base up along the long, straight edge of the sheet.
Carefully roll the base onto the tape, so that the bottom of the cylinder and sheet are flush with one another.
Be careful where you do this on the base, as there will be a small seam in the resin along the edge of the sheet going up from here. I've put mine at the back of my octopus, so it doesn't get in the way of looking at it front-on.

Step 4:
The sheet is long enough to wrap around the base with quite a bit of overlap, which we don't want. So before continuing, quickly wrap the sheet around the base, and find where it will overlap. Cut the sheet so there is only about a centimetre of overlap when it is wrapped around the base.
Then carefully wrap the sheet around the base, keeping the edge of the sheet flush with the bottom of the base. Make sure the sheet is wrapped firmly around the base, and is forming a straight tube, not a funnel. Use a small strip of tape to fix it in place.
Double check now that the glossy side of the laminating sheet is on the interior of this tube. If it isn't, undo all this and start over.

Step 5:
Now take a long strip of tape, and wrap it all the way around the base. Line the top edge of the tape up with the top of the base (not the sand on the base, just the top of the actual base). Keep tension in the tape while you wrap, the goal here is to hold the sheet close to the base, to form a seal that will keep resin in the tube, rather than leaking down the base.

Step 6:
Now put another strip of tape along the outside seam of the sheet. Don't be too woried about getting a really good seal here, the weight of the resin should keep the inner flap of the sheet pressed against the outer one anyway. This is just to stop sheet from moving when resin is poured in, so it stays as a tube, rather than turning into a funnel.

Step 7:
Finally, take a rubber band and wrap it around the base of the mini. Try and line it up with the top of the base (like with the tape from step 5). This just adds a little extra pressure to try and stop resin leaking out.
And thats done! We've now got a cylindrical resin dam ready to pour resin into!
I hope this helps anyone curious about my process for doing this!
I've hit the 10 image limit on this post, so I'll make another one soon showing my resin pours and the finished mini.
Update: post showing the resin pouring process here.


Finished off my blue dragon today! Painted its perch, applied some washes to the wings and horns, and of course what dragon doesn't have its hoard?
This is definitely my favourite mini in my collection now. Its hard to not love a dragon, and this guy was tonnes of fun to paint!


Finished painting this neat sculpt of Samus the other day!
I just did a fairly simple paint job on this one. Partly because I think it works well for the video game kinda look, and partly because I'd forgotten how poorly my orange and yellow paints cover, and I decided I wanted to deal with that as little as possible. I think it turned out pretty well though, the dark wash I put in the seams of the armour panels really helps make up for the lack of highlighting.
Theres a bit of an attempt at a glow effect in the barrel of her arm cannon, and on the bits of her armour mid-assembly. Its not amazing or anything, but I think you can kind of see what I was going for with it. Having lighting effects beyond just highlighting from above is something I've mostly avoided in my painting so far, but its somethign I want to start playing with. Its a bit daunting, but I think it will be rewarding if I can get it down.
I also realised as I was painting this that I've never actually played a metroid game. The most direct exposure I think I've ever had was watching one of my cousins play one of the games on his Gameboy at christmas. I feel like this is something I should rectify at some point.
This neat model is Samus Aran - Metroid - 25cm model by Printed Obsession. (The print pictured above is scaled down from 25cm to fit with my other prints).
I'm going to post a whole bunch of my minis, all at once because no one can stop me, so there. :)
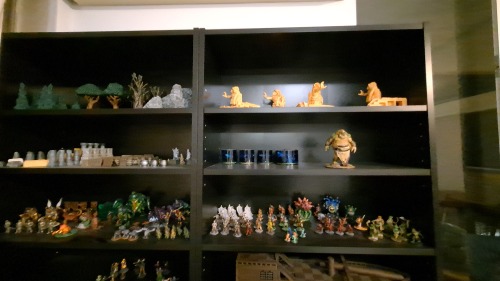
Here are all my minis, nicely sorted onto my ikea shelves that I love, but also are very annoying because they don't sell extra shelves for these ones seperately >:(
All the minatures on these shelves are 3d printed.

Froghemoth! This is one of my older models, and I kinda want to redo this one at some point with what I've learnt since, but I still like him! printing him was a real pain, becaue I kept having clogs on large prints at the time. I ended up with like 3 or 4 froghemoth butts before I got a success.


Sharks! Embedded in resin cylinders with reef bases. These are some of my favourites, mostly because resin embeds are cool :D. It took me a couple of tries to figure out how to get these to work, between having to figure out how to make a smooth, cylindrical resin cast, and the first attempt melting the mini when I tried pouring all the resin at once.
If I could change one thing on these, I'd probably use just a little less dye on them. They're just a tad too opaque to really see whats going on inside.


More resin! A gelatenous cube this time, with some random bits embeded in it.
This one was simpler than the sharks, I just 3d printed a gelatenous cube mini, covered it in resin to smooth out the layer lines, and used it to make a sillicone mold I could just pour resin into. The hardest part was trying to get all the bits floating throughout, rather than just sinking to the bottom.


Kobold gang! not pictured: the 9 or so other kobolds I still need to get around to painting.
I've only fairly recently started trying to make more interesting bases for my minis, and I'm pretty happy with how these simple rocky/gravelly terrain bases turned out.


A muscly troll! Painting all the muscles on this guy was a lot of fun. It was my first attempt at highlighting shapes rather than just edge highlighting or drybrushing, and I'm pretty happy with how it went overall. Lots of room to practice the technique on this guy :D.