
I print and paint minis! take a look if you want He/Him
50 posts
I Painted This Wyvern Like Two Weeks Ago, But My Brain Didn't Let Me Take Pictures Of It Until Today


I painted this wyvern like two weeks ago, but my brain didn't let me take pictures of it until today for some reason ¯\_(ツ)_/¯
Which is weird, because I'm pretty happy with how it turned out in the end. Painting a well detailed sculpt like this is a lot of fun, because I can mostly just dry brush all those scales to get a really nice result. Of course, knowing that made me decide to paint this up as a 'quick' project on a sunday night. Which it was, until I realised I also had to paint all those spines. With my bone white that doesn't cover very well. Yeeeaaah, I didn't get this done in one night.
Anyway, despite my questionable project timing decisions, this is done now and I have a sweet wyvern for my collection!
This print is Wyvern by Lord Of The Print.
-
 lachlandddd liked this · 11 months ago
 -
 artandotherprettystuff reblogged this · 3 years ago
 -
 theamberarchive reblogged this · 3 years ago
 -
 sirce-ap liked this · 3 years ago
 -
 theload reblogged this · 3 years ago
 -
 rusty-spoons-in-de-eyes liked this · 3 years ago
 -
 kliesen22 liked this · 3 years ago
 -
 watergubby liked this · 3 years ago
 -
 hdawg1995 reblogged this · 3 years ago
 -
 40001-goblins liked this · 3 years ago
 -
 hollowstepsdontleavefootprints liked this · 3 years ago
 -
 professormishap liked this · 3 years ago
 -
 coolhelderus liked this · 3 years ago
 -
 pokedead liked this · 3 years ago
 -
 thyroyalclowness liked this · 3 years ago
 -
 hancill liked this · 3 years ago
 -
 vip3rpilot liked this · 3 years ago
 -
 the-sad-catgirl-diary reblogged this · 3 years ago
 -
 bisexualcharmanderenergy liked this · 3 years ago
 -
 maggi-harmony liked this · 3 years ago
 -
 lovelypurpletyphoon liked this · 3 years ago
 -
 grumpy-reincarnated-moth reblogged this · 3 years ago
 -
grumpy-reincarnated-moth liked this · 3 years ago
-
 aquilacalvitium reblogged this · 3 years ago
 -
aquilacalvitium liked this · 3 years ago
-
 the-trans-dragon reblogged this · 3 years ago
 -
 stevangarcronox liked this · 3 years ago
 -
 superfaggot liked this · 3 years ago
 -
 dulciecollins liked this · 3 years ago
 -
 zukana13731 reblogged this · 3 years ago
 -
zukana13731 liked this · 3 years ago
-
 bloodrat liked this · 3 years ago
 -
 dragoonemiku liked this · 3 years ago
 -
 m0nsterwife liked this · 3 years ago
 -
 atomic-crusader liked this · 3 years ago
 -
 lovingstarfishsandwich reblogged this · 3 years ago
 -
lovingstarfishsandwich liked this · 3 years ago
-
 mastermatoyas reblogged this · 3 years ago
 -
mastermatoyas liked this · 3 years ago
-
 dropattackbear liked this · 3 years ago
 -
 dingobait liked this · 3 years ago
 -
 sleepyforestbeast reblogged this · 3 years ago
More Posts from Gooseofthevoid


Hey look, I finally got around to making a tumblr account (/finding I already had an old one I’d never used), and I finished off painting my blue dragon (aside from the base)!
Clearly the universe is telling me to start sharing my painted minis.
(this is a print of the Drake model from Rocket Pig Games https://rocketpiggames.com/Drake-p165097258)


New Character, wooo!
This is Frix, my Goblin Alchemist for a Wild beyond the Witchlight game I get to play in soon! (HYPE!)
This is one of those prints that I came across while browsing and just knew I had to print, so its quite lucky that I had a game coming up that I needed a character for!
Frix was really fun to paint, and I love how dynamic the pose is. I'm really proud of how the hair and ear-tips came out, I haven't had a lot of practice with gradients but these just look good!
I'm less happy with how her clothes turned out. I made the mistake of finishing off with a dark wash over them, and then assembling the mini without taking the mini out of my bright work light to check it, so I didn't realise how dark those coveralls were. In the photos, with the bright light from my lightbox they're pretty close to what I was seeing while painting, but in my normal room lights the colour just blends in with the boots.
The base for this mini was also quite fun to paint, having that tankard reacting to the motion of the mini is a really cool detail.
This mini is Knox the Goblin Alchemist by Twin Goddess Miniatures.


Clockwork minotaur and shield golem! Metallic paints are a lot of fun to play with.
The clockwork minotaur was a lot of fun both to paint, and to design a base for. I imagined this guy as being some sort of gladiatorial arenas trump card, for cocky fighters to get wrecked by. Its my first attempt at a base that tells a bit of a story about the mini, rather than just being an attempt at a terrain it might be found in.


Beholders! And an old gazer, because he makes me laugh. The beholders were the first thing I painted once I got my hands on an airbrush, and they made playing around with it super fun. The blue one got significantly less fun once I realised I'd commited myself to painting half a million tiny spikes though.
I also really enjoyed painting the big central eyes, particularly on the green beholder. You might recognise that eye if you look closely ;) .
The lump on the gazers tongue over on the right is from where I managed to snap it in two while painting, followed by hasty and poorly thought out superglue+baking soda repairs. I like to imagine he maybe got stung by a bee on it right there. Serves him right for licking the floor like that, the gross little eyeball :P


This hill giant was a bit of an experiment with the airbrush. I tried doing his skin by doing a zenythal prime, then spraying over it with transparent ink to get easy highlights and shadows. It sorta worked, but I'm not convinced by the skin tone and I kept having to start over because I'd try adding a wash before the ink had fully set. After the third time I had to start over completely on him I just couldn't be bothered to take another shot at it and left the skin tone as it was.
I also tried making his fur look a bit like grass, I thought it might be a cool idea if when sitting down he could be mistaken for a hill. It doesn't quite look right to me though in the end.
IDK, I'm just not totally sold on this guy overall.

A whole collection of buggy minis. Most of these are from earlier on in my attempts at painting, since the bases are all pretty plain.
It was when I was painting all those spider thingos at the back that I realised how boring it was having just a whole bunch of minis all in the same pose. Since then, I've made a concious effort to find multiple poses when I'm printing more than just 1 or 2 of a creature. It makes finding minis a bit harder, but I think its worth it for a more interesting end result.

And finally for tonight, this is either the first or second mini I ever painted, I'm not entirely sure. I've definitely come a long way since then, but I like keeping him around as a reminder of how much I've improved for when I get frustrated at a mini not turning out quite how I hoped :)


A Y'shtola figurine I painted for @yoshikagequeen as a Christmas gift.
I don't know much about FF14, but this was a pretty cool model to paint. Especially since that orb in the staff gave me an excuse to play with the gloss varnish I've had banging around for a while.
Its kind of fun to paint stuff using a reference for the colours, though sometimes finding a good angle to work out what colour a specific thing is can be frustrating. The model was very accurate to the references I found though, which was very helpful.
This model was made by EllaArt.
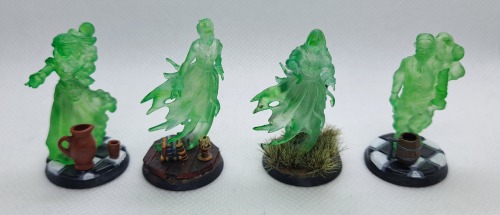


BOO! Spooked yah, right? Don't worry, these ghosts aren't real, just miniatures. :P
I mentioned in a previous post that I found I could dye clear resin prints colours with alchohol inks, and these ghosts are actually what I figured that out on!
I did these quite a while back, but then I left them for a few weeks until I made some bases, and then I left them sitting in my light box for a couple more weeks before actually taking these photos, because for some reason I really just didn't want to. ¯\_(ツ)_/¯
the transparent ghostly effect is cool, but I also really like the bases I did for them too. This was me trying out adding little extra bits to them, going for a bit of a haunted manor theme. I'm pretty happy with it on the whole, although I think the beer mug and the pot are just a bit too big and attention grabbing. I really want the focus to be on the mini, with the base elements blending in more. I am quite happy with how the kitchen tile bases came out too. I started out trying to freehand sculpt them out of greenstuff, then when I figured out that I am not by any means a compenent enough sculptor to make that work, I quickly designed and printed a little tile impression jig to make clean, straight tiles for me. I made and printed it fast enough that I didn't waste my greenstuff, so thats pretty cool I think.
On the whole, I'm happy to have these translucent spooky ghosts in my collection.
Miniatures in this post are made by:
Townfolks ghost male and Townfolks ghost female by Titan Forge Miniatures.
Ghost by Great Grimoire.
Base in this post are made by:
Gothic Tombstones by Medusa Miniatures.
Table Scatter, Extra Dining Items, Books, Piles & Rows by Darkest Desire.
Candle Holders by Pellinor.