
21 posts
Shanelleartresources - Resources For Art - Tumblr Blog
30 Day Art Challenge: Draw all the things
My first challenge, Improvement Hell, was a way to inspire people to draw different things different ways, drawing outside their comfort zone, and most of all to draw every day. I had a few people ask for a follow up. Ladies and Gentlemen, I give you the sequel: Draw All The Things
Each day has three prompts. Some are specifics, others are vague, but all are geared to spark your imagination and inspiration. Take from them whatever you want. Design a character, an illustration, a collage. Singular or plural. Literal or symbolic.
Casual Mode: Pick and draw one prompt each day
Normal Mode: Combine and draw two prompts each day
Hard Mode: Combine and draw all three prompts each day
Tag your artwork #Draw All The Things for others to follow and be inspired!
Wild animal, Thief, Winter
Jewel, Water, Contrast
Garden, Teeth, Bright
Old book, Pangolin, Clutter
Deep, Earth, Curse
Greed, Glass, Temple
Three, Rain, Shadow
Wire, Bottle, Pale
Sunshine, Track, Abandon
Cliff, Tattoo, Journey
Bone, Laughing, Free
Corner, Scripture, Dusk
Stairs, Amber, Guard
Vast, Alien, Glow,
Jazz, Pen, Urban
Sand, Royal, Red
Child, Fur, Cookie
Tree, Crime, Lizard
Tech, Tank, Silver
Scales, Vibrant, Smile
Naga, Knowing, Tribe
Witch, Jacket, Pattern
Secret, Melanism, Wings
Rogue, Bat, Dysfunctional
Passage, Fox, Chime
Star, Bridge, Mask
Observer, Forest, Unique
Degrade, End, Iron
Vivarium, Gradient, Mix
Imagination, Pencil, Borderless
Good Luck!
(alternately, this can be a writing challenge too, if that is your preference!)
30 Days of Art Improvement Challenge
Are you tired of feeling like your art just isn’t improving? Do you want to do a 30-day challenge that’s actually useful? Welcome to 30 Days of Improvement Hell. >:D
I made this because I’ve been feeling super ‘blah’ about my art these days, and I needed something to kick-start myself. Who wants to do this with me!? Start now or whenever you can (now you procrastinators!). Challenge yourself and have fun at the same time!
Tag your posts with #Improvement Hell so everyone can follow along and see each other’s awesome artwork. I may even create a blog and reblog them! :D
What are you waiting for? START!
Self-Portrait - Introduce yourself
Draw a figure using a reference - link to reference
Draw a figure that’s in action, using a reference - link to reference
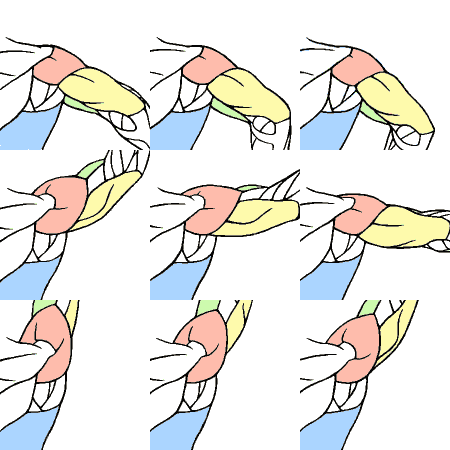
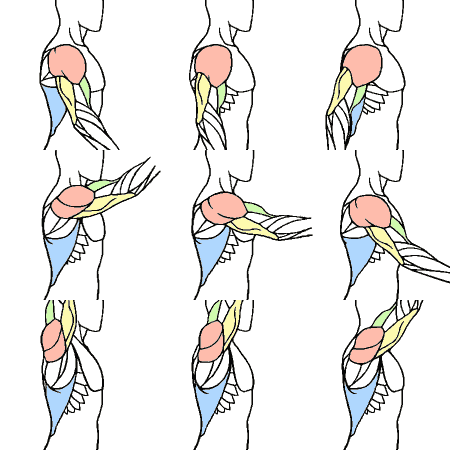
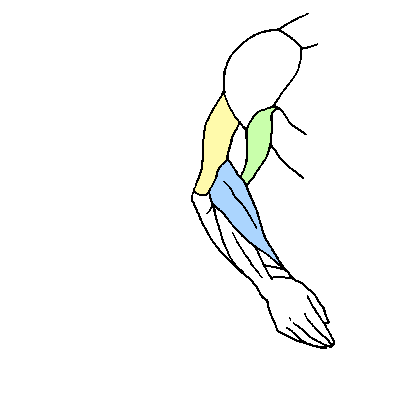
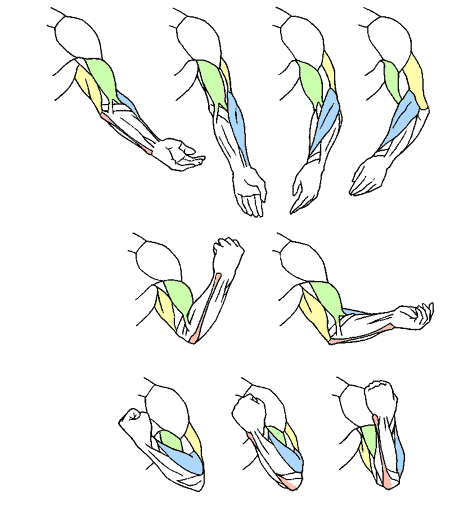
Draw a part of the human anatomy you have trouble with. x20, with atleast 5 being skeletal/musculature studies.
Draw more figures. Quick gestures and silhouettes. x20, with atleast 10 different body shapes
Let’s have some fun. Design a character from either This or This character generator! Be creative and bring something to life!
Pick the weirdest object in your house/room. Draw it. Shadows and Highlights.
Find 2-3 objects, make a scene with them. Draw it. Bonus points for creativity. Double points for dramatic lighting.
Draw a landscape of a place you’ve never been or drawn.
Draw a BG with 1pt Perspective. Negative points if it’s a railroad or an empty street.
Draw a BG with 2pt Perspective.
Look out a window. Draw what you see. Bonus points for adding something interesting.
Draw an interior setting with the character you designed on Day #6 in it.
BG with either bird’s eye or worm’s eye view.
Halfway there! Draw three ‘action’ scenes with different compositions in each. Quick sketches are fine, just make them interesting and understandable! Bonus points if it’s the same scene, but different composition.
Draw a single page comic with 5-7 panels (the story begins and ends on one page).
Draw an animal you’ve never drawn before. x10 Link references.
Draw a car. Negative points for whining. Hint: Use a perspective grid.
Think of the thing you hate drawing the most. Guess what? Draw it! Negative points for lying to yourself.
Pick an object in your house/room. Now design a character from it, using the shapes, forms, textures, purpose and colors as inspiration. Also link/post the object you used. Negative points for using a humanoid action figure.
Draw a character/object/scene, and shade them using ONLY solid blacks and whites. Bonus points for good use of lights/shadows
Draw a different object/scene/character. Shade using hatching, crosshatcing, and/or pointillism. Bonus points for lights/shadows and textures.
Colors! Pick a color palette, and paint a scene/character/object using only those colors (some blending allowed). Bonus points for good use of lights/shadows.
Draw and color a scene/object/character - no lines allowed! (aka - lineless art). Don’t forget light and shadows!
Draw a scene/character in a style you’ve never drawn before. If emulating an artist, credit+link. Bonus for color style.
Draw a character. Draw 10 emotions/expressions. Bonus points for 'uncommon’ emotions. (i.e. anxiety, guilt, despair, loneliness etc.)
Draw three random shapes using your opposite hand (or your foot). Now design characters from those shapes.
Turn on the tv (or load your illegally downloaded movies). Pick an actor and draw them.
Almost done! Let’s have some fun. Draw some fanart. Bonus points if it’s super obscure and unknown. Make people guess what it’s from.
Last day! Find a drawing you did within the last year. Now draw it again using what you’ve learned! Link it for comparison!
Look at all that amazing improvement! Congrats!
[Update] There is now a sequel challenge, Draw All The Things!


Here is a round-up of all eight of the free digital brush packs that I’ve released so far for Photoshop CC, Clip Studio Paint, and Procreate!
You can download them on this page (click) Type in “0″ for a free download or tip any amount you so desire!
All my brush packs are totally free (tips optional but always very appreciated!) and can be used freely in any work, including commercial work that you profit off of, with no license or credit required. My goal with these brush packs is to make digital painting feel more achievable and accessible - especially painting environments, something I now LOVE but that used to intimidate me, & felt much more approachable with the right tools! Many of the packs also come with tutorial video content. I hope you enjoy!
Sketchbook Original: How to Draw from Imagination

Part 1, Part 2, Part 3, Why is Hard to Draw from Imagination by the lovely https://monikazagrobelna.com
These articles are each long, thought out, and wonderful. Definitely go check them out along with her other amazing resources.
Thanks for reading! If this post helped, please consider reblogging it or sharing it with your friends! ❤️
More useful articles and resources / support Art-Res | my art tumblr | Idea Generator | Check out the Art-Res Anatomy Ebook!
Top 12 alternatives to Photoshop for digital painters and illustrators
Hello there!
Yes, we haven’t done this in a while… but our inbox and chat are swamped with questions on the subject, so this article was very much needed.
it’s a simple list of art apps, but we know you love those :D
Enough with the intro, here it is, a list of twelve art apps you may want to check out.

ArtRage is an art program for beginners and professionals. With its minimal interface, it’s easy to keep the essential tools at hand without stealing space from the canvas. Panels can be moved around and tools can be customised. We all know how important it is for digital artists to be able to modify brushes!
Pros: easy to use; friendly interface; essential tools from professional apps available; available for iOS, Android, Windows and Mac
Cons: it may get sluggish with big files and when using big brushes, but performances also depend on the running machine; limited selection of editing tools if compared to Photoshop - ArtRage is more of a painting program rather than an editing one.
Paid
ArtRage Lite is a different version at a cheaper price, mostly for beginners, but also for professionals if they need the essential.

Now free, Sketchbook is the famous app created by Autodesk for various platforms.
Pros: clean, friendly interface; easy to use; professional features; autosave feature
Cons: lack of official tutorials; doesn’t offer as many tools as other apps (it’s down to the essential); paid subscription in Adobe style for Enterprise License
Free and paid

Black Ink is a powerful little program few actually know, but there’s a reason: this isn’t your classing drawing app. What’s cool about it is the vast selection of special brushes, completely non-realistic, and definitely able to boost your creativity.
Pros: vast selection of customisable brushes; excellent performance
Cons: not very easy to use; non-intuitive interface
Paid

This is probably the most complete software for painting, drawing and animation. It was originally known as Manga Studio, but with its updates and addition of features, it became Clip Studio Paint.
This doesn’t say much about the quality of the features themselves considering the affordable price (if you haven’t used the app yet, that is), but among graphic apps, this one is the top seller.
Pros: professional features for illustrators; layout tools for comic/manga artists; 3D reference models; customisable tools; various sales with special prices
Cons: the interface may not appear intuitive at first; the program may lag (again, performance also depends on the running machine)
Paid

GIMP is the famous open source image editor originally created for GNU/Linux and available for OS X and Windows.
Best known as Photoshop’s main competition, this is a manipulation program for both beginners and professionals who love design.
It offers many professional features, making the program a powerful tool.
Pros: professional editing tools; supports different formats; supported by different platforms; active community
Cons: in spite of the simple design, many options are hidden and it takes time to discover all the features; slow startup
Free

Krita is an open source painting app created by artists for artists.
Pros: easy to use; intuitive interface; great brush workflow; brush stabilizer; customisable brushes; general good performance; very enthusiastic, although small, community
Cons: it may be slow or even crash depending on the running computer and the app’s version; very few editing tools compared to Photoshop
Free

MediBang Paint is a free and light app for drawing and painting, perfect for manga and comic creation.
Pros: vast selection of brushes; cloud sharing; friendly, minimal interface (non-desktop app); also available for iPad, iPhone and Android
Cons: requires an account to use all features; non-intuitive interface (desktop version)
Free

Mischief is a sketching app with essential tools, useful for brainstorming and ideation.
Pros: infinite drawing canvas; friendly interface; easy to use; cheap pro version
Cons: few updates; offers only the essential (but that’s the point); no editing/adjustment tools
Free and paid

Corel’s jewel, Painter is the most famous software that offers digital tools able to give a traditional feel to brushes and canvas.
Pros: different selection of media; many professional features; PS-friendly
Cons: certain brushes may work slow; not easy to use at first; the software may crash (this is the most common report); pricey
Paid

Paintstorm Studio is a professional software for digital painting. It’s focused on the use of brushes and blending, which makes the software a little gem in the digital painting field.
Pros: good brush workflow; brush stabilizer; “close gap” feature; customisable interface and tools; professional features; affordable price
Cons: non-intuitive interface (desktop version)
Paid

Procreate is the powerful drawing app for iOS.
With the very sensitive Apple Pencil, Procreate is so easy to use that many artists chose the iPad over the most famous graphic tablets.
Pros: friendly interface; makes it easy to organise files; excellent brush workflow; customisable brushes; video recording; affordable price
Cons: hidden features; only available for iPad
Paid

SAI is a simple app for artists who want to focus on painting and drawing.
It’s well known for its good pressure support and its essential tools for manga artists, but SAI can be used by any kind of artist who wants to paint.
Pros: easy to use; friendly interface; light software; customisable brushes; tons of (non-official) tutorials
Cons: limited selection of tools, even basic ones; limited canvas sizes and uses; it might crash from intensive work, especially with big canvases and brushes; supports only RGB colour mode; lack of support
Paid
HONOURABLE MENTION

Many call this app an advanced PaintTool SAI, and for a reason. FireAlpaca offers almost everything PTS has and more.
Pros: friendly interface; brush stabilizer; lineart selection; customisable brushes
Cons: no colour slider; limited brush control; although more advanced compared to PTS, the features are quite basic.
Free
We hope you’ll find this list useful.
If you think there are other apps that should have made this list, don’t hesitate to let us know!
Thank you and peace out,
G&M
Other articles:
10 inspiring and helpful YouTube channels for digital artists
6 inspiring Art Podcasts for digital artists
7 amazing Photoshop extensions and tools for digital artists
Hey folks! Paul here, with one more TUTOR TUESDAY goodie: For ease of downloading, I’ve taken all the PDFs and compiled them into a…
COMPLETE .ZIP OF TUTOR TUESDAY COLLECTIONS! (~120MB)
And once again, here are the links to individual collections:
TutorTues_PDF_01_Fundamentals1.pdf
TutorTues_PDF_02_Fundamentals2.pdf
TutorTues_PDF_03_Environments.pdf
TutorTues_PDF_04_Scenery_&_Props.pdf
TutorTues_PDF_05_Positivity.pdf
TutorTues_PDF_06_Color_Theory.pdf
TutorTues_PDF_07_Digital_Color.pdf
TutorTues_PDF_08_Digital_Tools.pdf
TutorTues_PDF_09_Human_Anatomy.pdf
TutorTues_PDF_10_Specific_Anatomy.pdf
TutorTues_PDF_11_Facial_Features.pdf
TutorTues_PDF_12_Faces_&_Expressions.pdf
TutorTues_PDF_13_Hair.pdf
TutorTues_PDF_14_Clothing_&_Accessories.pdf
TutorTues_PDF_15_Animal_Features
If you enjoy these, please send your love to Meg’s personal, @rawranansi. And stay tuned for news on where Tutor Tuesday might go next!
Paul

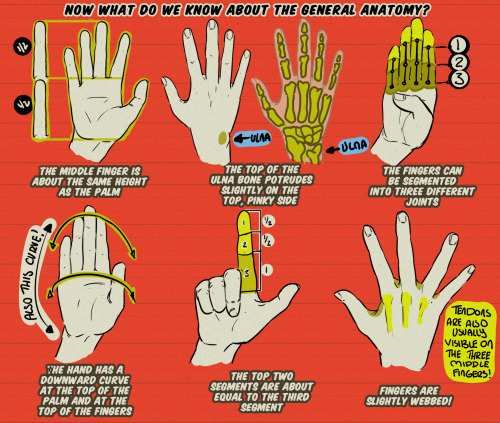
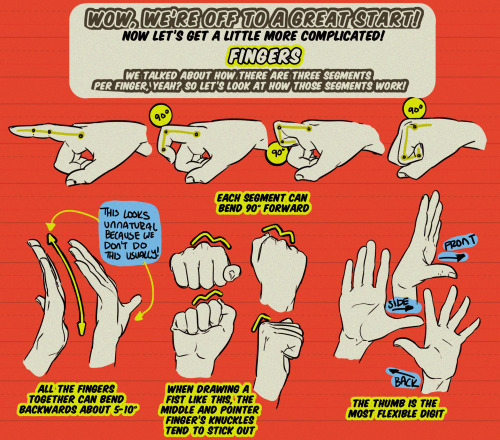
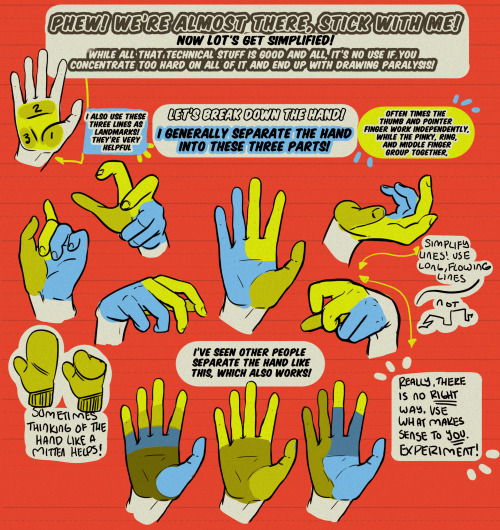
Hey, friends! It’s Meg with another TUTOR TUESDAY!, I’ve finally bit the bullet and tried out a hand tutorial! Hopefully there’s something new that will help you along with hands! If you have any tutorial recommendations for next week, lemme know! As always, keep practicing, have fun, and I’ll see you next week!


Hey friends, it’s Meg!
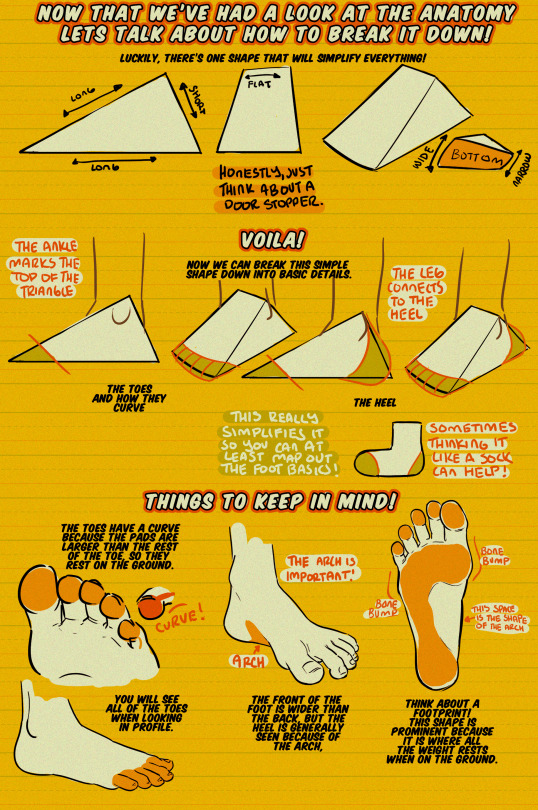
Back for another TUTOR TUESDAY! Today we take a look at feet and how they work! I’m always looking for recommendations, so if you have anything you’d like help with feel free to send it in here or on my personal blog. Keep practicing, have fun, and I’ll see you next Tuesday!

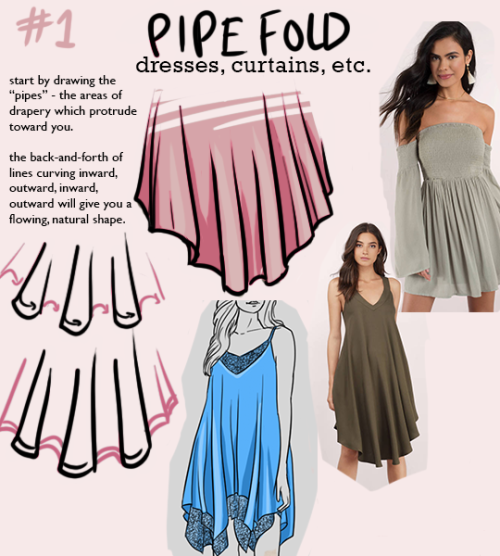
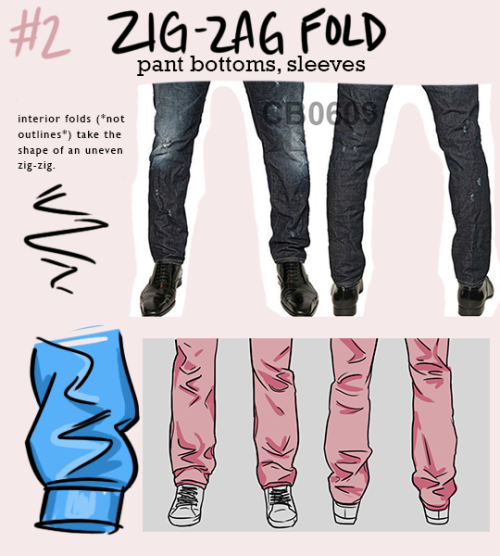

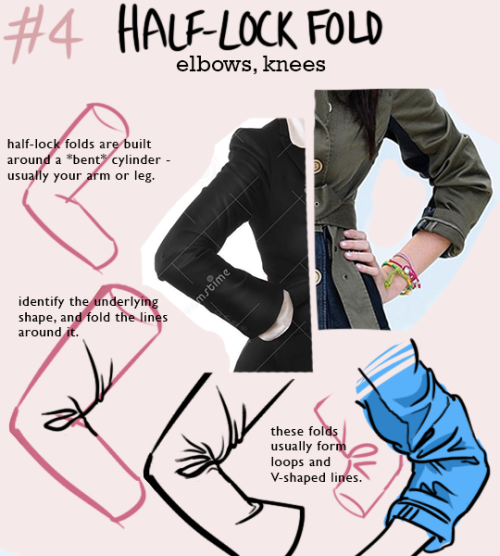
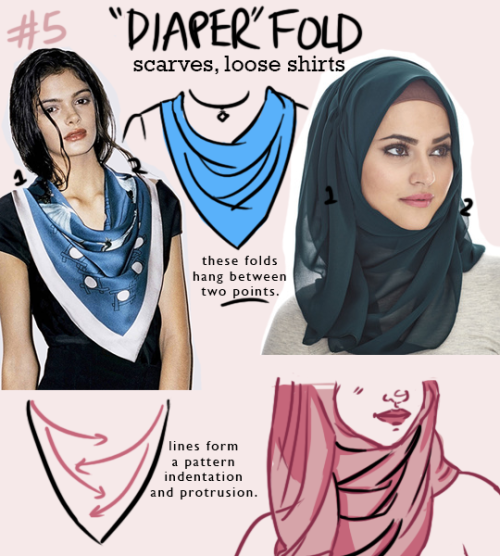
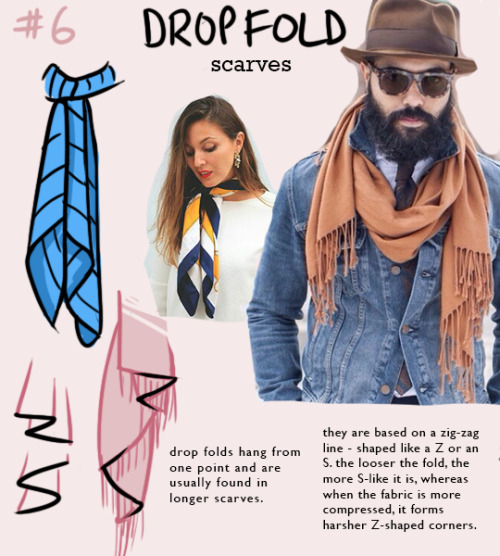
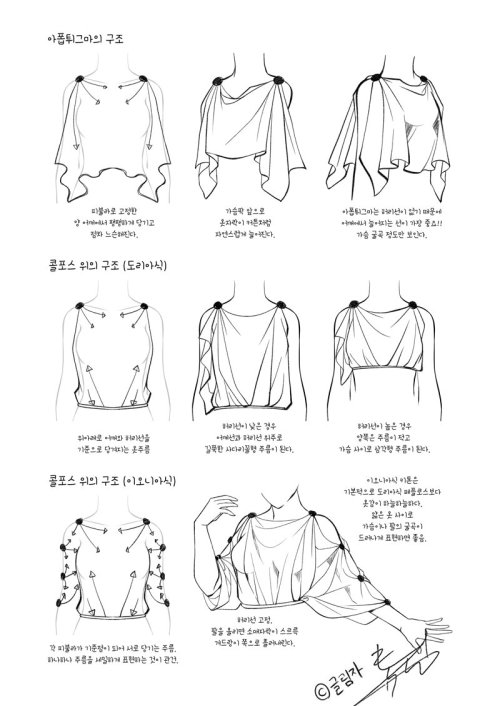
NOTE: one type of fold will rarely appear on its own - they interact with each other quite a bit! for example, spiral folds might define the outline of a pant leg, while the interior folds might be zig-zag folds.
i’m trying to re-learn how to draw clothing, so i made this little guide to the most common shapes of folds that appear. hope it helps someone else too!


My first shot at creating a sort of tutorial/guide, telling how I do things. On this initial chapter we’re going over the handy matter of Hands. Not meaning to be an encyclopedic explanation, only showing my own methods and self-taught clues. Hoping somebody finds it useful! :3 I’ll do more if this one is received well. So let me know~
My thanks also to the supporters in my Patreon campaign, who helped me decide which themes to focus on for a start. And are actually allowing this to happen. :D Cheers!
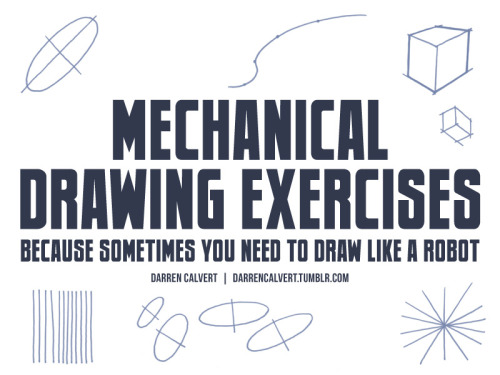
Precision Excercises
I’d like to tell you a little bit about the warm-up process I do when I’m getting ready to start for the day or settle into a long drawing session. These mini-exercises loosen up my arm and help me identify posture problems and other issues before I start drawing. They work for digital as well as traditional drawing.
Stage 1- Just Scribbles
For a few minutes just doddle fluid loops and curves on your drawing surface. Close your eyes and meditate on what it feels like to be there right that very moment. Feel your pen/pencil on the surface you’re using and think about what makes that medium unique. Get reacquainted with the feeling of drawing without burdening yourself with expectations.

Stage 2- Parallel Lines
In this mini-exercise you’ll draw four sets of parallel lines: vertical, horizontal, diagonal up-left to down-right, diagonal down-left to up-right. It doesn’t matter what order you do them in, but I like to go clockwise in the order that I’ve shown them here, starting with vertical. In each set, draw one series of lines from one direction, then between them draw another from the opposite direction. Do not use the rotation tool for this if you are working digitally, as this defeats the purpose.


Stage 3- Lines & Curves
Start by drawing a constellation of dots or x’s on your drawing surface. For the first part of this stage, connect the marks you’ve made with straight lines. Make them as smooth and even as possible. Don’t feel the need to start and stop your line exactly on the marks. In fact, it’s better to start and stop a bit beyond each mark. Try to strike each mark directly through the middle and focus on minimizing hand shakiness.
For the second part, make another set of marks. Now, instead of connecting two marks with straight lines, connect three marks with a curved line, once again taking care to draw in an unbroken smooth sweep.


Stage 4- Segmented Circles
Sometimes I skip this stage if I’m pressed for time or already feel confident about my precision control for the day. This exercise is a little more free-form than the others. Basically just draw circles as evenly as you can without using a template or digital tools to help, and divide them in various ways with lines and smaller circles. Feel free to throw in other varieties of geometric shapes, ellipses, and whatever else.


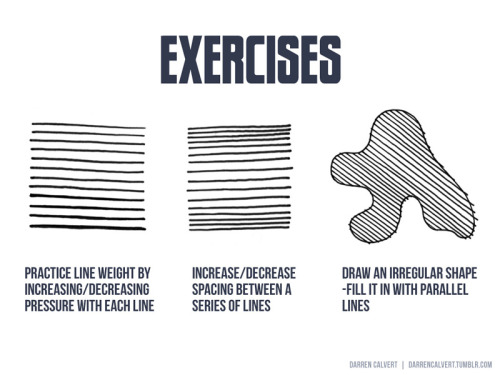


People often say to me: “You draw like some kind of inhuman machine. If I eat your brain, will I gain your power?” The answer is yes, but there is another way. The key to precise drawing is building up muscle memory so that your arm/hand/fingers do the things you want them to do when you want them to do them. Teaching yourself to draw a straight line or to make sweet curves is just a matter of practice and there are some exercises you can do to help improve. If you’re going to be doodling in class or during meetings anyway, why not put that time to good use?


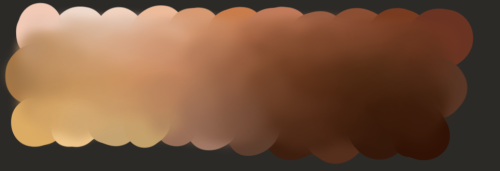
It is not the prettiest but here is a little chart I made of skin tones.
The idea is to eye-drop anywhere on the chart to get a unique skin tone instead of getting stuck in the loop of “white, tan, dark”.


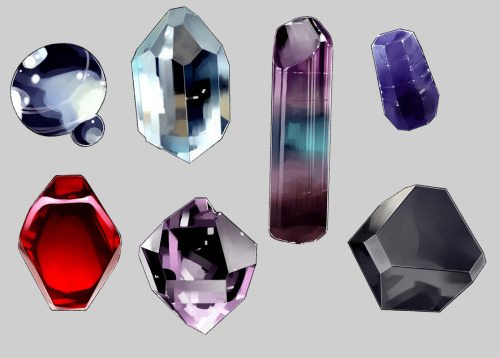
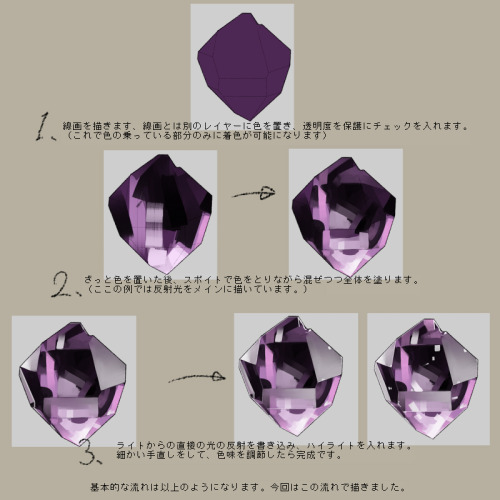
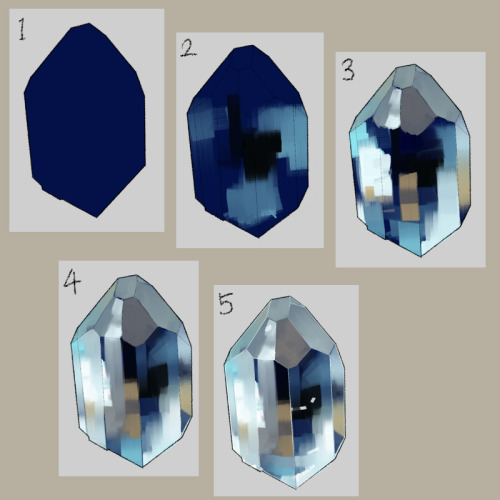
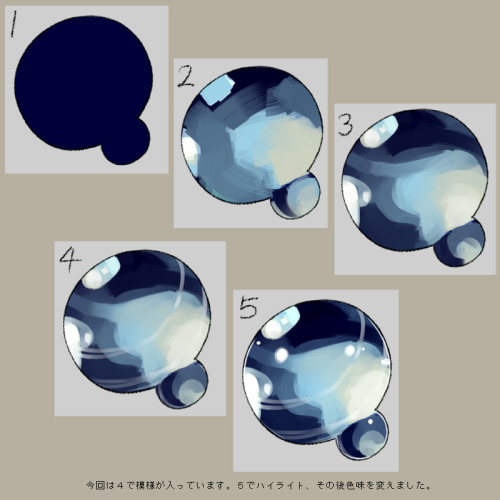
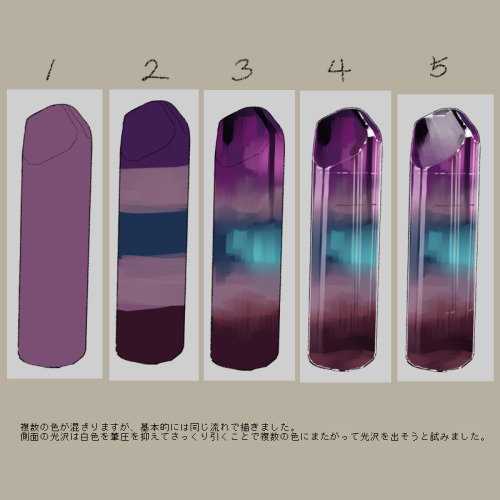
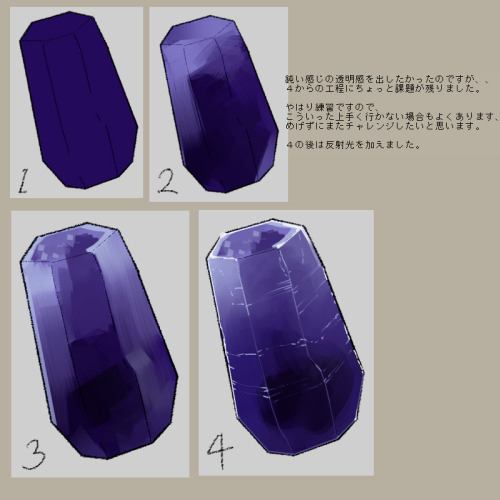
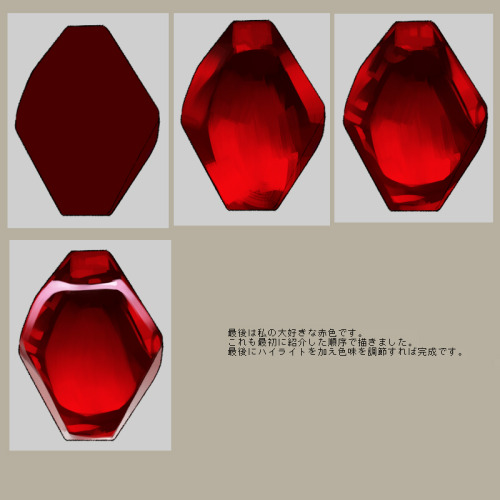
Found this set of cool tutorials on how to draw crystals Text is in what I assume to be chinese but you get the idea!


Super Bokeh Brushes are up now!
These are free and compatible with Clip Studio only. Follow the link and grab the attachment at the bottom of the post. Instructions for use & uploading are included, too. Good luck!
These are a real thing, too:
Rainbow Burst Brushes | Shiny Sparkly Jewelry Pack | Shiny Sparkly Jewelry Pack Plus (+Only) | Grunge Brushes (Krita) | Valentines Lace | Twiggy Patterns & Brushes | Grunge Brushes (Support+ Only) | The Pack With Cracks | 2022 Brushes & Patterns Master List | And the freebies tag is right over there.

Tag drop
『tutorials.』 『references.』 『programs.』 『resources.』 『anatomy.』 『clothing.』 『exercises.』 『challenges.』
Sideblog for all sorts of art resources!