Tutorials - Tumblr Posts

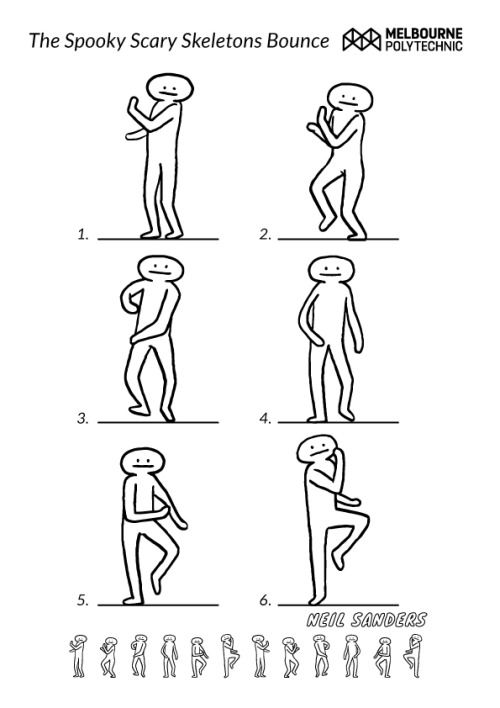
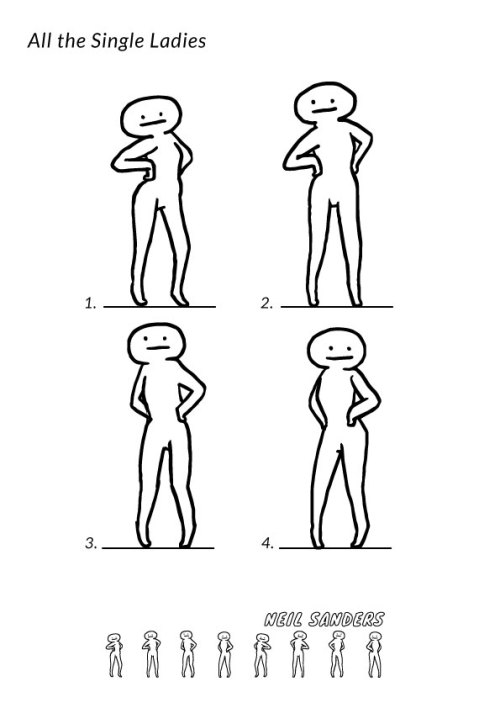
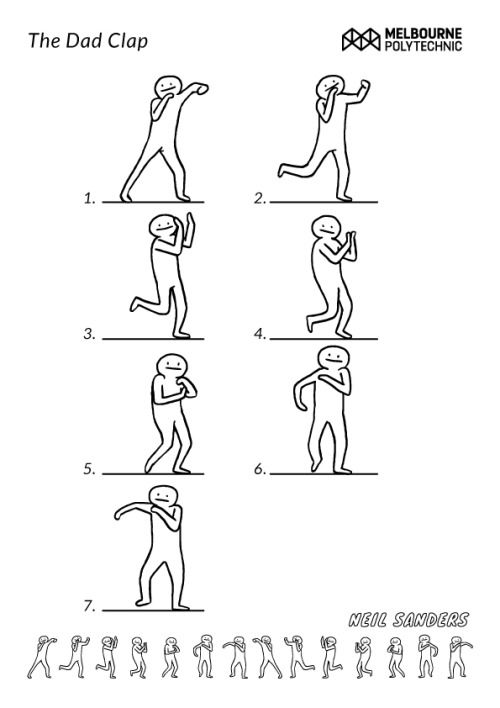
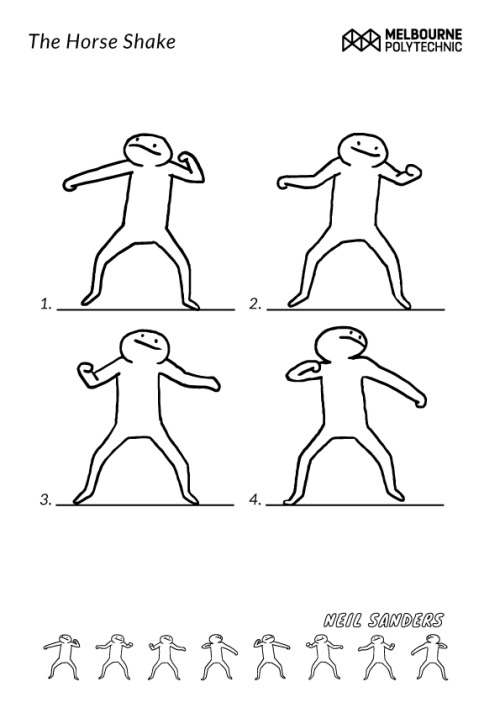
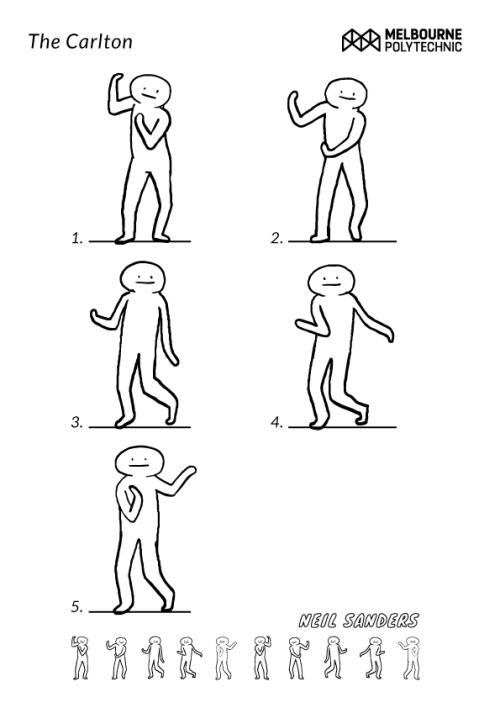
I’m running an Introductory Animation Workshop with creative arts students this Saturday (August 20, 2016) for The School of Creative Arts Open Day at Melbourne Polytechnic’s Prahran Campus. I’ve rotoscoped and broken down some of the greatest dance gifs to their basic poses and we’re going to collaboratively design characters then MAKE THEM DANCE!!
Come down, check out the campus and say HI!
I can’t wait to see the weird animated goofs that result from this workshop, I’ll post them in a couple of days so we can all be in awe of their hilarious spontaneity!

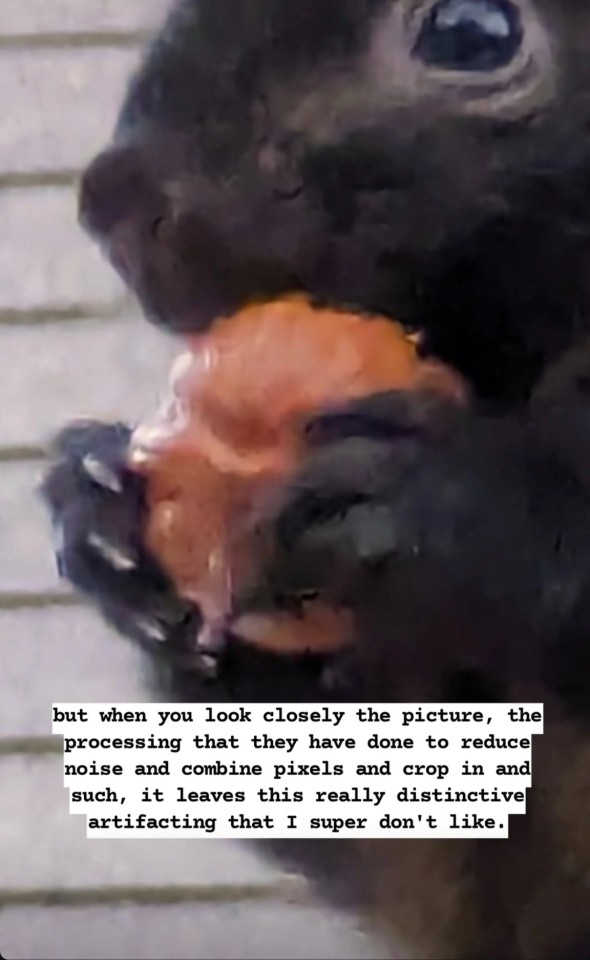
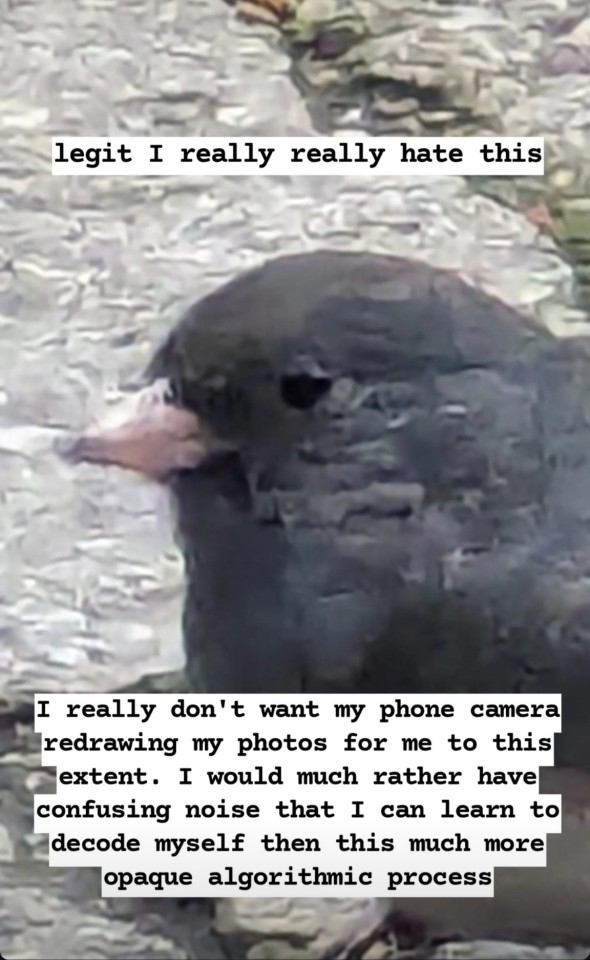
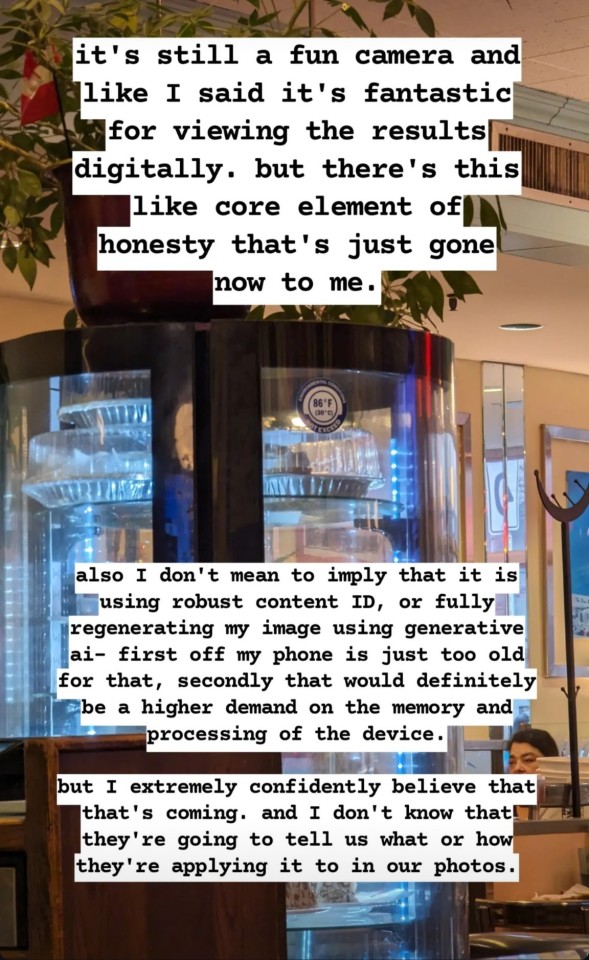
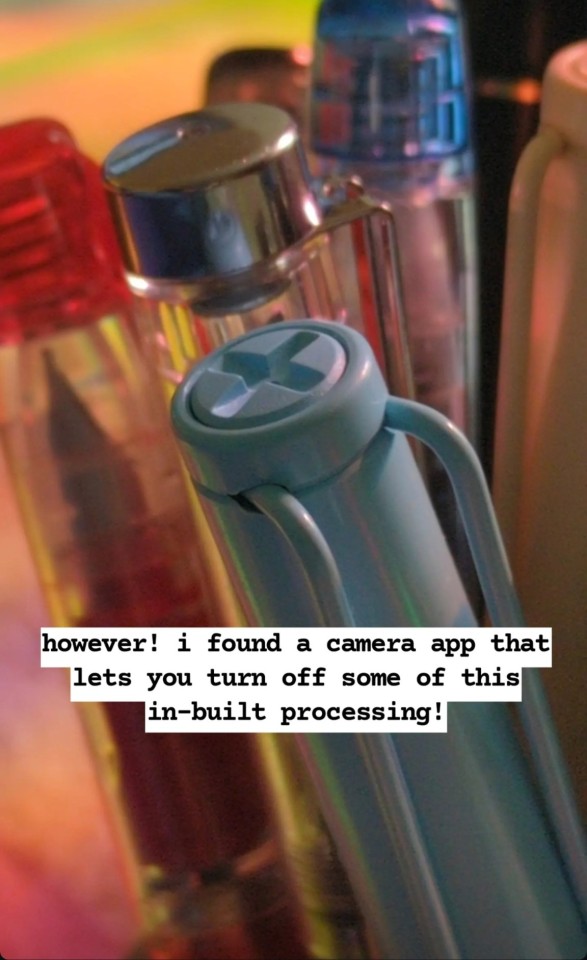
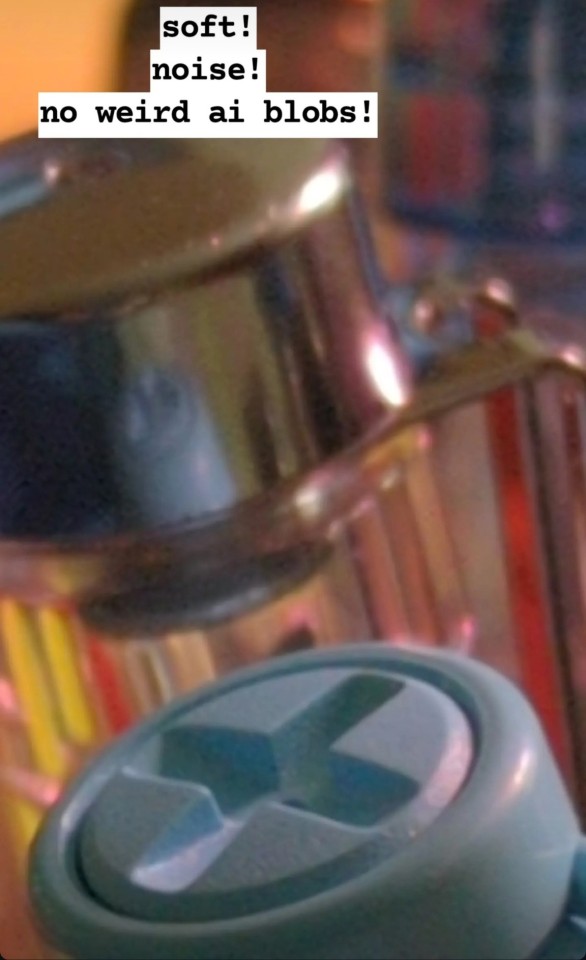
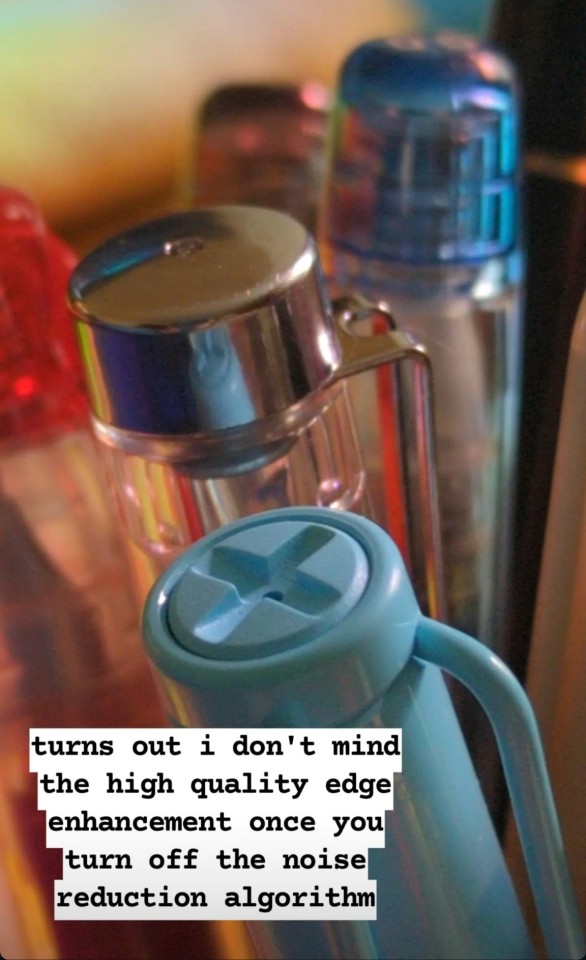
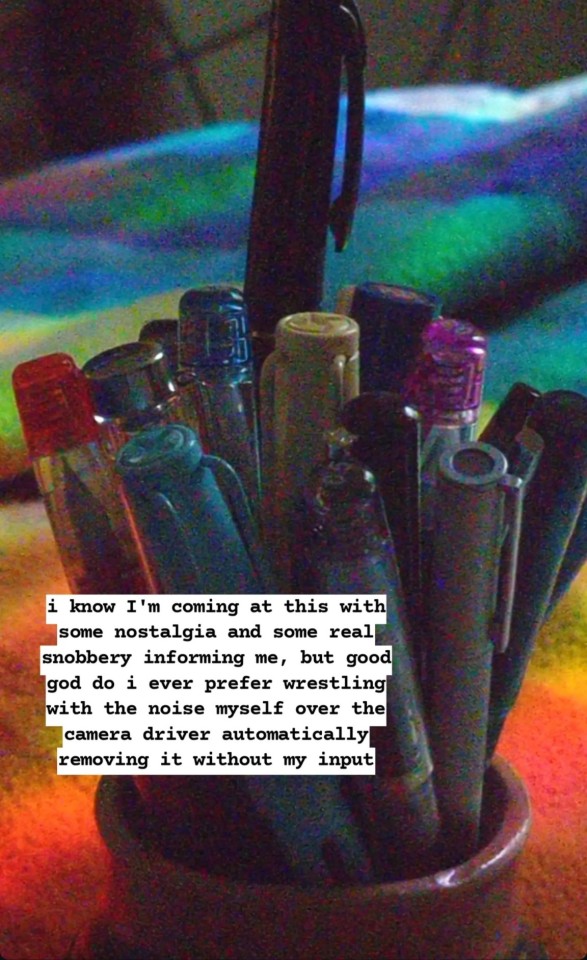
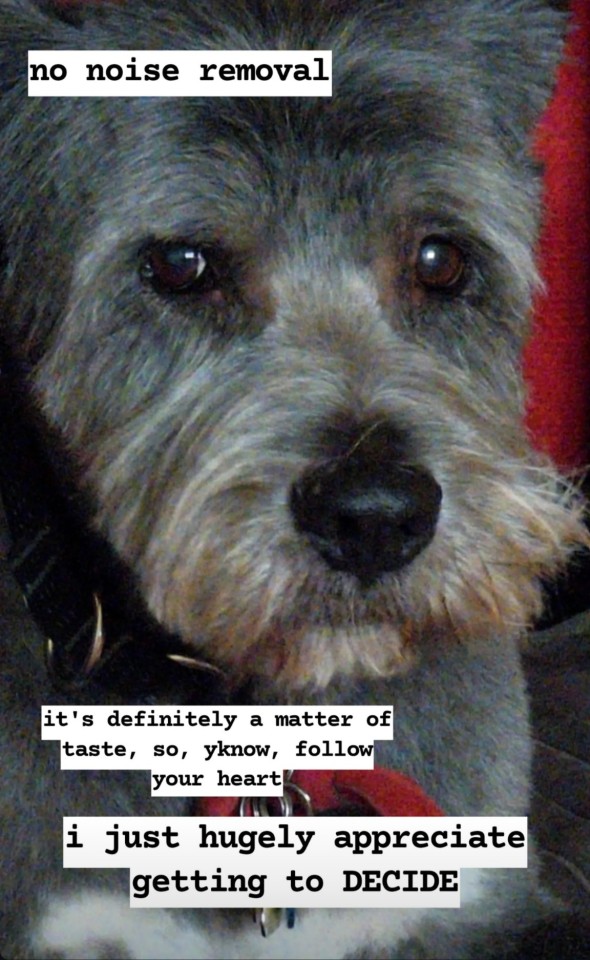
I am mad about cellphone cameras hiding the processing they do, and I am glad about software that lets me control it and opt in and out, and I dictated this rant on insta so I am resharing the images here and will attempt to turn this into a useful text post on my blog in future, when my hand is working better 🤘👍


i decided to make a masterlist of photoshop resources, for those who want to start making graphics or are looking for new ways to create graphics! there’s download links, tutorials, textures, psds, and other helpful resources.
DOWNLOADS (PLEASE MESSAGE ME IF LINKS ARE BROKEN)
for windows:
photoshop cs5 (malikmanips)
photoshop cs5 extended (birdysources)
masterpost with tons of ps links/resources (sistaroundpsds)
TUTORIALS
getting started with photoshop (sorrydearie)
learning photoshop’s interface
the ultimate photoshop tutorial (rresources)
how to color without whitewashing
how to make a coloring psd (yeahps)
guide to gradient maps
texture tutorial
how to use textures
a guide to textures
sharpening workshop
how to add makeup to a picture
lenaofrp’s graphic tutorial
masterlist of gif tutorials
moving pattern tutorial
how to make gifs
how to isolate a color
coloring black and white pictures
colorful gifs tutorial
pixelated effect tutorial
overlay gif tutorial
how to clip mask an image
border tutorial
how to make flower crown edits
how to make manips
how to make hq pictures
sharpness & grain tutorial
moving text tutorial
typing effect tutorial
how to make a circle edit
how to use actions
what are templates and do you use them?
how to make icons
more tutorials in this tag
TEXTURES
25 textures by plaschka
daenso’s texture pack
18 textures by plaschka
watercolor textures
polaroid texture pack
flicker & fade: 50 textures by plaschka
retro feel textures
daenso’s texture pack 3
watercolor textures
20 large textures by talbots
light leaks texture pack
25 textures by dartagnans
60 nature textures by queencoloring
texture pack by jhnwattson
moonofrp’s texture pack
hayleyofrph’s mega texture pack
texture pack by myungin
all emojis download
this and that textures by plaschka
PSDS
gif psd pack by shycolors
psd by prettycolorspsds
psd 422 by lawynterpsds
jasperhelps manip psd #1
animated movies psd by addictionps
psd 42 gallifreypsd
psd for candids by sistaroundpsds
psd 28 by hipstaps
icon psd by baepreviews
psd 4 by psalpha
psd 33 by gallifreypsd
psd 006 by kwonbaes
psd 1645 by wasirauhlpsds
psd 325 by lawynterpsds
adorkablelena’s psd 3
pswonderland’s tag
psd 10 by quinncoloring
psd 151 by pridecoloring
dirrtylady psds
OTHER RESOURCES
resource pack by whatphotoshop
screencap gallery masterlist
photoshop reference
cs6 shortcuts
photos to use in roleplay graphics
color blender
gryffnsdor resource pack
psbright resource pack
landofmerlin resource pack
psd for text on gifs
font pack by yeahps
font pack by aladdin-s
font pack by whatphotoshop
cursive font pack by yeahps
gallifreypsds favorite fonts
78 different font styles download
pack of 530 pngs
png & brush pack by twiangelz
png pack by daretochase
resource pack by editslovers
template 02 by awfulpsds
template by mixsoucers
simple smart sharpen action by lovotopsds
action #3 by flatinepsds
action #2 by louderps
action #4 by hollypsds
celebrity hq galleries masterpost by fassyy
resource pack by championselenapsds
30 striped pattern overlays from cyrusassists
What people think why i became a bookbinder: Oh she wants to explore her artistic horizon with those pretty leather bound books of hers. She even gives them out as gifts to her friends. It most likely helps her with anxiety or maybe she just wanted a more special costume made notebook.
Why I actually became a bookbinder: I just illegally downloaded and printed out several of my favourite fanfics and books and started binding them into books cuz I love reading them but looking at screens for too long gives me headaches.
How do you make your gifs?
Hello hello! I love talking about gifmaking, so thank you for giving me the chance to ramble.
Instead of a detailed step-by-step walkthrough, I will link tutorials and resources written by the wonderful Tumblr creators on here along the way. Everyone has their method and preferences, and there’s no right or wrong way to make gifs. I’m going to share techniques and resources I picked up along the way that work best for me—they may or may not be suited to your preferences, but I hope you’ll find some helpful things here.
(Warning: screenshot/image heavy)
USEFUL TUTORIALS AND RESOURCES
Here are some tutorials and resources that I found very useful when I got back into gifmaking:
Gifmaking tutorial using video timeline by @hope-mikaelson is identical to my own process
Gifmaking and coloring tutorial by @kitty-forman, whose process is very similar to my own
Giffing 101 by @cillianmurphy, an incredibly detailed tutorial that covers everything you need, including a step-by-step guide to using HandBrake
Gifmaking and coloring tutorial with 4K HDR footage by @sith-maul, another incredibly detailed tutorial with many useful tips
Gifmaking tutorial by @jeonwonwoo, incredibly comprehensive and covers so many aspects of gifmaking from basics, sharpening, captioning, and text effects
Gifmaking/PS tips and tricks by @payidaresque
Action pack by @anyataylorjoy, the Save action is especially a true life-saver
@usergif and @clubgif are amazing source blogs with many tutorials on gifmaking, color grading, and gif effects, can’t be thankful enough for the members for their work curating and creating for these blog!
TOOLS
Adobe Photoshop CS6 or higher, any version that supports video timeline. @completeresources has many links to download Photoshop, have a look!
Photopea is a free alternative to Photoshop, but it has a slightly different UI, check out these tutorials for gifmaking with Photopea
HandBrake or any other video encoder, especially if you’re working with .MKV formats
4Kvideodownloader for downloading from YouTube, Vimeo, Instagram, etc.
OBS Studio or any other similar screen capturing software. To prevent duplicate frames in gifs that prevents your gifs from looking smooth, try to match the recording frame rate (FPS) with the source.
IMPORTING FOOTAGE AND WORKING IN VIDEO TIMELINE
I work exclusively in video timeline instead of importing video frames to layers or loading files into stack. For videos that don’t require converting/encoding using HandBrake, especially ones that are already in .MP4 format, I tend to open the video directly on Photoshop, and trim the videos around directly.
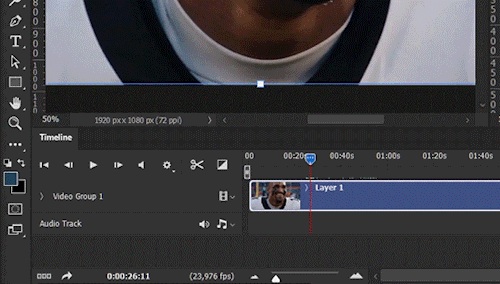
As mentioned above, this gifmaking tutorial using video timeline is exactly how I make gifs. I find it more efficient, especially if you’re making multiple gifs from the same video/the same scene with little to no change in lighting conditions You can simply slide around sections of gifs you want to save, and they will all be the same length.
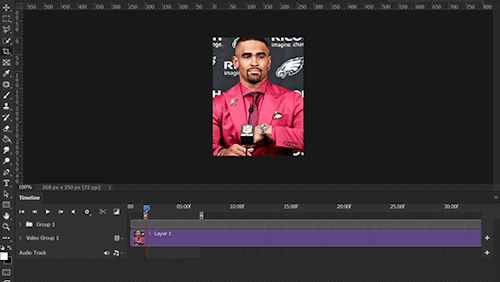
Another thing also covered in the tutorial linked is the ability to change video speed in video timeline mode. Right click on the video and set the speed before proceeding with cropping/resizing. This is also very useful when you’re making blended gifs where you need the footage to have the same length.
Slowing footage down.
As mentioned in this post, changing the FPS before slowing down the gif results in smoother gifs. Doubling the frame rate before slowing down your gifs usually yields the best result.
Speeding footage up.
I love using this to speed up slow motion B-rolls to make the speed slightly more natural. It will result in nice, smooth gifs:


(B-roll footage, normal broadcast speed)
(200% speed)
Subject won’t stay in frame?
Another feature of the video timeline mode. Keyframes are your best friend. This tutorial by @kangyeosaang covers everything you need to know about panning gifs. I use this technique regularly, it’s a life-saver.
COLORING
Here are some coloring tutorials I found very useful:
Coloring tutorial by @brawn-gp beloved, their coloring style is second to none
Mega coloring tutorial by @yenvengerberg, for stylized /vibrant coloring
Understanding Channel Mixer by @zoyanazyalensky
Coloring rainbow gifs by @steveroger, which delves deep into Channel Mixer
I tend to go for neutral-saturated coloring in general, especially for minimalist gifsets with no effects (blending/isolated coloring/overlays etc.), but the possibility is endless for stylized coloring. Here’s what my adjustment layers look like for the example gifs above.

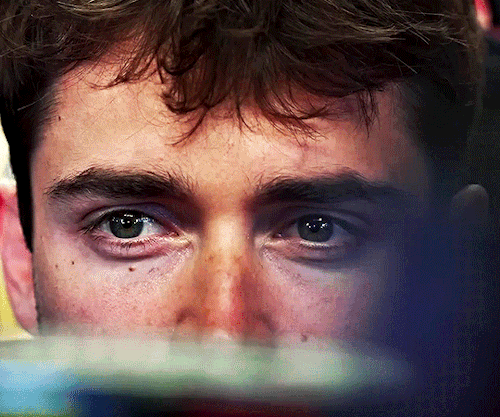
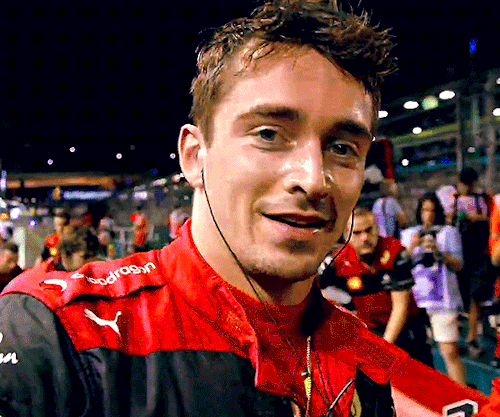
The base footage for this Charles gifset is incredibly desaturated. I started with a Curves layer to bring contrast to the gif, as well as do some color-correcting to bring the base footage to a more neutral tone. To bump contrast, I also like to add a black and white Gradient Map layer with a Soft Light blending mode at 10%-30% opacity:

The Vibrance layer is then used to lift the saturation of the base footage, with the Selective Color, Hue/Saturation, and Channel Mixer layers to help remove the green/yellow tint to his skintone.
An underrated adjustment layer/preset in my opinion is the Color Lookup. You can layer in pre-loaded .LUT color grading presets to help speed up your process. For this gif, it’s simply a base preset Soft Warming Look to achieve a warm, pink-tinted tone.
In hindsight I feel like this gifset is too saturated, his skintone is skewing very red/pink, I could’ve bumped down the lightness of the reds with a Selective Color layer or a Hue/Saturation layer. Try to err on the side of neutral for skintones. Experiment with layer orders—there’s no right or wrong! Remember that each layer build up on the one before it.
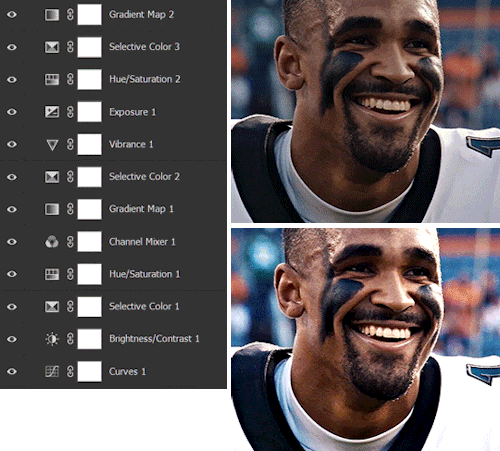
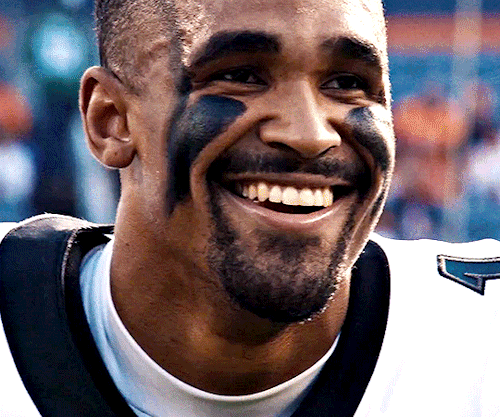
The base footage of the Jalen gif is already quite nicely color-graded, but it’s still muddy and underexposed. As with the Charles gif, I started with a Curves layer to bring the gif to a better baseline contrast. Then I focus on brightening the gif with the Brightness/Contrast and Exposure layers.
The Hue/Saturation and Selective Color layers are to color-correct Jalen’s skin tone—it’s something I spend most of my time coloring gifs and focus a lot on, especially when color grading BIPOC skintones. Putting a Vibrance layer, upping the Vibrance and Saturation, and calling it a day would make his skintone skew very, very yellow/orange.

Focus on the reds and yellow for skintone, play around with the Saturation and Lightness sliders, use the Hue slider with caution.
It can be tricky to achieve the right skin tone when working with sports footage vs the higher quality, higher dynamic range footage of films or TV shows, but I try to keep it as close to the subject’s natural skintone as possible.
Here are some of tutorials with tips and tricks on coloring BIPOC:
How to fix orange-washed characters by @zoyanazyalensky
How to prevent pink-washing and yellow-washing by @jeonwonwoo
Coloring tutorial by @captain-hen
Changing lighting conditions?
Fret not—this is why I love working in video timeline. I’ll take this gifset as an example: it’s a deceptively difficult one to color. The footage is 720p and the sunlight shifts throughout the video, so matching across gifs was tricky.
My solution was to split the clips in sections with consistent lighting, and apply adjustment layers to the individual sections before applying general color grading layers on top of everything.
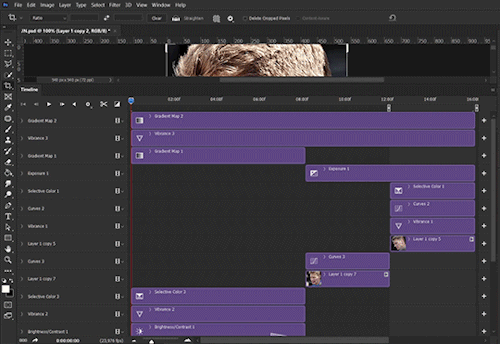
We can make use of the Fade Transition effect for sections where the lighting changes within the gif section we want to color.

(without vs with Fade on the Brightness/Contrast layer)
The difference is subtle in this example, but the brightness in the right gif is noticeably more consistent throughout. You can also add the Fade Transition effect to the beginning for a fade in, of course.
SHARPENING AND OPTIMIZING GIF QUALITY
This tutorial by @anya-chalotra covers everything you need to know about optimizing gifs for Tumblr.
Sharpening.
Sharpening is essential to making crisp gif images. Here’s another ask I answered re: my own sharpening settings and maximizing gif quality.
(base footage, unsharpened)

(color graded, unsharpened)

(color graded, sharpened)
The final gif is sharpened with Smart Sharpen, 500% at 0.3px and 10% at 10px (my standard sharpening settings).
Here are some tutorials and resources on sharpening:
Sharpening process by @anya-chalotra
Sharpening tutorial with added gaussian blur by @haleths
Sharpening action by @daenerys-stormborn
Size your gifs for Tumblr correctly.
This is essential: full width gifs are 540px wide.Two side-by-side gifs should be 268px wide. Here’s a handy post on gif size guide for Tumblr.
Incorrectly sizing your gifs will take away the quality of your gifs: undersizing your gifs will especially make them grainy, blurry, and /or pixelated, and won’t display correctly on many people’s desktop theme. Oversizing usually isn't as dramatic as undersizing, but it will make the gifset glitch when displayed, and the file size will be unnecessarily bloated.
Work with HD footage if possible.
Media fandoms (films/TV shows) are luckier than us in the sports trenches—we have to work with what we have. Broadcast footage is usually subpar: lacks contrast, pixelated, very desaturated, the list goes on. But it’s possible to still make high quality gifs from subpar footage. Here are a couple of tutorials to mask low source footage quality:
low quality video ➜ “HD” gifs tutorial by @nickoffermen
Sharpening low quality footage by @everglow-ing
(This gifset I made is from a 480p footage with horrendous lighting conditions and colors, and the end result is decent I’d say)
Save for Web (File > Export > Save for Web (Legacy) or Ctrl + Alt + Shift + S) settings.
I default to Adaptive + Diffusion but also use Adaptive + Pattern from time to time. Any combination of Adaptive or Selective + Diffusion or Pattern will give you a good result. In my experience some gifs will need the Selective color table for the colors to display correctly.
Here are my default settings:

SAVING AND EXPORTING FOR TUMBLR
Converting to frames and adjusting the gif speed.
If possible, avoid exporting your gif and reopening it to adjust the frame speed. I used to do this sometimes when I’m lazy, I have to admit, but this is where this Action as mentioned at the beginning comes in very handy. It converts all visible layer into smart object, then converts it back to frame animation.
Step-by-step:
1. Select all layers
2. Right click > Convert to Smart Object
3. Go to the Timeline menu (≡) > Convert Frames > Flatten Frames into Clips
4. Go to the Timeline menu again (≡) > Convert Frames > Convert to Frame Animation
5. In the same menu (≡), select Make Frames from Layers
6. Delete the first frame (it’s a duplicate) then set your frame speed

Now you can adjust the frame speed before exporting it (Save for Web).

Pay attention to the source framerate.
The frame delay of 0.05 s is usually the default to make gifs for TV shows and films, and it is preferred by most gifmakers. This stems from the fact that most movies and TV shows are 24 or 25 FPS. This may not be the case for all source videos: you might get 30 FPS footage, and sports or gaming footage can be 50 or 60 FPS. Gif speed also depends on the FPS of your original file. Play around with gif speed and see what feels most natural to you.
My rule of thumb is the frame delay Photoshop gives you + 0.01 s. For example, 50 FPS footage will give you 0.02 s frame delay (25 FPS gives you 0.04, 30 FPS gives you 0.03, etc.), so set it to 0.03 s. I usually err on the side of a faster frame delay for smoothness in in-game sports footage, anything else (interviews, press conferences, B-rolls) can get away with being slowed down. Again, experiment and see what you think looks best!
Keep gifs under the Tumblr file size limit (10 MB).
Cut down the number of frames. My gifs are usually around 60-70 frames for 540px full-width gifs, but depending on the coloring, sometimes you can get away with more. 268px gifs can go up to 200+ frames.
Crop your gifs. Remember to keep full-width gifs at 540px wide, but if necessary, you can crop the height. My go-to sizes are 540x540, 540x500, 540x450, and 540x400.
Amp up the contrast of your gifs. Flat colors like black cut down gif size.
The Grain filter or Noise filter, though beautiful for aesthetics or simply necessary sometimes to mask low source footage quality/pixelating, may bloat your gif size.
Play your gifs back before exporting.
Pay attention to duplicate frames or glitches, you might need to get rid of them!
Hope this is helpful! Don’t hesitate to send an Ask or DM if you need any help, I will happily answer all your questions and send over PSDs. (I’m also on Discord—just shoot me a message if you need my tag!) Happy creating :]
HOW TO GIF USING TIMELINE INSTEAD OF FRAMES

I’m coming to change your life and teach you how to make gifs using timeline animation and screen recording. This is an update of a previous tutorial I made that used Quicktime Player but we’re going to bypass quicktime player in this one since I don’t find it works as well anymore. The benefit to this method in my opinion is that it’s fast, requires little set up per gif, and gets rid of any mess regarding frame skipping and glitching.
what you’ll need: photoshop, basic photoshop knowledge, an HD video, VLC player.
Keep reading

☆ UPSCALING LOW QUALITY FOOTAGE
what i used: • 2021 macbook pro with m1 chip (390/500gb storage used she's hanging in there) • photoshop 2020 • mpv (for screencaps but this isn't needed!) • handbrake (available for linux, mac and windows here) • video source to gif
what is handbrake? basically its a software that helps you change the format of videos, such as for certain devices or screens, or in the case that we're going to utilise, quality and frame rate!
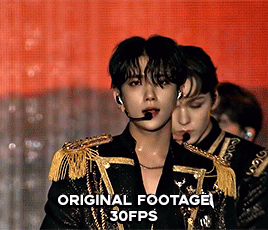
disclaimer: handbrake is super easy to use and very beginner friendly for this procedure and it can make a video go from 30fps to 60fps however it does not replace the quality of true 4k/blue/master-pro res files. in the gif below, this is the level of detail in a master pro-res file.

getting started it's easiest first to note the timestamps of the video you want to encode, and keep in mind that unless your computer is incredibly powerful, i wouldn't try to encode an hour worth of footage in one run! my laptop could handle about 30 seconds in one go before she started toasting.
using handbrake: once you've downloaded the software, open the software and it will come up with a pop up window asking you to open the video source (that is presumably saved within your folders) and go ahead and do so!
in the range section, use the drop down button to navigate to seconds and enter your timestamp. the duration on the side will show how long of the footage you're gonna encode is!

then go down to the save as, and give your footage 'to be snipped' a name. this isn't necessary but useful because if you're planning to say, encode 3 or 4 small parts of footage in one sitting, each encoding instance will overwrite the previous one. so i just call mine 'cut 1', 'cut 2' and so on.

next go to preset, and there you'll see such a wide variety of options that you can play around with, with differing qualities, frame rates, sound options, and so on. for the sake of this tutorial, i'm using 'superhq 2160p60 4k av1 surround' and i've used the drop down menu to select it! then go ahead and press start! the time taken to complete depends on the duration of footage that you sent to encode! you'll find your encoded video as an .mp4 file in your designated folder (which you can change via browse at the bottom)

what next? • if you prefer to open footage directly into photoshop (my ps can't handle it), then go for it! • if you screencap as i do, then just use mpv or whatever screencapping program you prefer to make the screencaps and open in ps in your usual manner. • you can use the timestamps to further process the video through vapoursynth to denoise, but i've yet to try that!
the results for this first set of example footage, i used footage from the be the sun concert file, which is almost 2 hours in length and 4gb in file size.


you can see the difference in the smooth frame rate of the footage, as well as the quality of the sharpening!
and to utilise the bane of gifmaking, a gose episode, notorious for dodgy pixelated frames and less hd quality in 1080p on youtube, i ran it through the same settings!


these are the exact same files, downloaded using 4k video downloader and with the same sharpening, but see how on the original file, the sharpening looks a bit more harsh and 'outlined' while it seems to sit softer on the encoded 4k version!
so i mainly use handbrake for dvd files, or not-so-hd 1080p youtube videos or videos that seem a bit clunkier but i had never tried them on a tv/film file so take a look below! i used a 1gb (so not very good quality) of a show (as compared to its 4gb files).

as i said at the start in the disclaimer, handbrake can't replicate true file quality, as you'd expect to see in a proper hd bluray/t*rrent file of a show but there's an interesting difference in the frame rate. personally it's not something i would utilise much there but its all up to individual preference on how someone prefers to have their gifs <3
this is a very basic run-through of how i used handbrake, as i haven't really explored all its features and i use this as a quick process when i'm running through seventeen dvd/dl files but i feel like it would work well on general youtube videos (such as interviews, episodes, behind the scenes) and feel free to send an ask/message for any help/clarification! <33
GIFFING 101 - YOUR ULTIMATE GUIDE ON HOW TO GIF
I have gotten many, many asks before about how I gif and I finally decided to make a tutorial. This is going to be very long, very image heavy and with a lot of details and examples. I mean it, I’m going through every, single aspect of giffing that I can possibly think of. From start to finish. And please read the disclaimer at the very start.
* I use a macbook pro but this should probably work on windows too!
I hate doing this but if this helped and you want to, please consider donating to my ko-fi or if you want, commission a theme or page from me at @amaanat <3
tutorial under cut, I hope it helps!
Keep reading
How do you colour your gifs so well??!! A gif tutorial pls🥺🥺
hey anonie! thanks for your ask and I’m so sorry it took me so long to answer ♡ firstly, thank you for your words, it really means a lot since I struggle with coloring quite a lot 🍓 And I’d like to say don’t look at this response as a coloring or giffing tutorial.. Just look at it as a way that I make my gifs the way they are (and I’m still trying to improve!) There already are a lot of amazing giffing tutorials out there, I don’t have any links atm since I did find a way for myself how to color and gif, but here’s mine I guess 😉
this is also based on a great tutorial I saw a few days ago, you can find it here for more detailed info with all the basics and everything you need to know when giffing. my old and not so detailed tutorial (? lol) can be found here ♡
Keep in mind I’m not the best at explaining as english isn’t my first language, but I’ll try my best!
1. Resources & Downloading videos
Quality, quality & quality! The better quality the video, the better outcome (for the most part, at least). Firstly it depends from where you download the video and so on. Instagram and Twitter are usually sources of lq videos and I it’s a literally the only option left if there are no videos uploaded elsewhere. To download Instagram and Twitter videos I use Savieo. For Youtube videos I use 4K Video Downloader. If you want 4k files, adjust so that it downloads not mp4 files, but .mkv files. For Vlives, I use this site since Savieo keeps crashing on me for most of the time. You can also use .tp and .ts files since they’re high quality, esp for performances, I get them on kpop24hrs.com where you have to be a member. I also find a lot of files on Twitter, here’s a really good post about resources there.
2. Cutting the video & Programs to use!
So this is kind of interesting because I know people who only use Photoshop to cut the video and color it and nothing else. I don’t know why, but it only ruins the quality for me and I have a lot of patience, so I use Avisynth. I know others use Vapoursynth and KM Player, which.. I don’t know how to use so I can’t really explain, because both of them crash for me.
Since I use avisynth, everything about it can be found here. Installing it, using it, examples, differences, really anything and everything you need to know. I use it a bit differently tho.. When I have a .ts or any kind of file (it doesn’t really matter what format the file is if you’re using my way of cutting), but I don’t resize with avisynth. To show how I do it, I’ll download this fancam in 2k (2k makes me the same result as 4k, so I usually use this instead of 4k. It can make a difference if you’re not using Topaz tho!).
When the file is downloaded and ready in your computer, open the “video” folder in avisynth and drag your file to “x264 lossless”. It looks like this:

By dragging it here, the file won’t open in a resizer in your browser as it’s supposed to. It will open in a black window where you enter the timing you wish to gif. Mine was 00:02:21. Then simply press “Enter” and then only the white window like this will pop up

Since this is the only window available, you’ll need to press on the 8th line before doing anything. The time stamp will appear there when you cut the video. I usually press there and then open the video by clicking on the triangle arrow in the bottom left corner

This will open your video for you. Then you simply follow the avisynth tutorial where it says to use “home” and “end” to cut out the part you wish to gif. Apply it, close the window and your video is cut! The next step for me would be to upload it to Photoshop (mine’s CC 2017, I don’t have any download links).
3. Cropping!
Firstly, as I’ve mentioned previously, you’ll need to upload your gif to Photoshop. This means open PS, select “File” -> ”Import” -> “Video Frames to Layers”. From there, you’ll need to go to your “temp” folder in avisynth and choose the cropped video:

From there, press nothing else and just click okay!

Depending on the file, it will either load a little slower or faster, it’s all about frames and the format. 2k and 4k loads slower than simple HD .mp4 or .ts files. But if you want quality - it’s worth the wait. Now that we have our file open and ready, I usually start off by Selecting all frames (press on the first frame, press “Shift”, select the last frame, do the same with the layers) and Converting it to timeline animation, which can be done by clicking this little button on the bottom left corner next to your frames:

Don’t press anywhere yet. I immediately after selecting everything and Converting it to timeline animation make the layers into Smart objects. While all the layers are still selected, press in PS’s menu “Filter” -> “Convert for smart filters”. You’ll get this result:

If the timeline or frames don’t appear at first, refer to this as to what should be turned on. You can find it in the PS’s menu by pressing on “Window”:

Once you have everything ready, it’s time to crop the frames! There’s not much that goes into this, but still.. it’s important to make sure the measurements of the gifs are all good and fitting so tumblr won’t make your gifs look weird or enlarge them and ruin the quality. You can find them here:

So for this gifset I’ve decided to make my gif 268px x 450px. I go with this size for all live performances (or mostly, it looks better for me eprsonally). In photoshop, the gifs can be cropped with “Rectangular marquee tool”:

Once you click on it, make sure to add the size of the gif in here (yes, look up :D)

Now that we have all the measurements, just click anywhere on the gif you have open. This size will be applied automatically and you won’t be able to change it when dragging it. So I selected it like this:

Once this is selected, you’ll need to go to PS’s menu. Select “Image” -> “Crop”. Then, select the “Image” again and select “Image Size”. From there you’ll want to resize the gif by changing width to 268px. Height will change automatically. Then press “Ok”.

We now have the cut gif without anything, it’s purely from the video! Congrats if you made it to here with my bad explanations :D
4. Coloring!
Now’s the most fun and exciting part! Even tho sometimes it becomes too much and.. yeah, I can’t color, but I’ll try my best to explain how I do it. So I basically had a base coloring which means that it’d fix all the colors a bit as well as the skintone and shadows/highlights. Now I’ve changed it up a bit and I have the “top” coloring (if you can call it). This means that I work more on my base than anything and just adjust the top layers which is weird, but it’s more fun for me to edit, because you never know how your gif will turn out. But coloring is pretty simple - it’s just playing around and wasting your time to make the gifs look good! 😌
Main adjustments/properties you need when coloring your gifs in Photoshop: CURVES, Levels, Brightness and Contrast, Photo Filter, Selective Color and Channel Mixer. I like to start of by adding the curves layer as my base. Mark the lightest and the darkest spots in one layer with these

The first one usually is for darkest spots. It’s up to you to select where the darkest part will be. The 3rd one is for highlights. I usually use the first one only unless I need a bit more of a contrast. Only a layer of Curves added this much to a gif:
From the Curves layer I usually add a bit more of Brightness and contrast (both at 20) since it looks better like this for me lol:

Now it’s literally play time. Any colors, anything you want to do with your gif!!! After this I added Channel Mixer. Play around with blues a lot, it really helps you find a contrast, you can find it here:

Just literally what looks good, idk I sometimes make the gif all blue to have those tones, and then fix it later with Selective Color. I then add Vibrance to the gif (+100 just go for it and see if it looks good!). To not make the gif look like a pink or blue mess, I always add Photo Filter on top like this! Helps balance out the coloring and just in general, helps a lot if you want to change the tones.

I then repeat a layer for curves (copy paste it and adjust the dark parts a bit if needed). Add a bit of Vibrance again and on top of everything - Levels. Yes, Levels! Makes the gif smoother and more beautiful in general (I like adding it, but as everything in coloring part so far it’s optional). With levels I go for 20-30 depending on the gif:

After that, I have a colored gif!
5. Topaz, speed & Exporting!
This gif is wihtout topaz, but once you add it, it looks waaaay better and has better quality. You can find my topaz settings here. Once you add Topaz, you’ll need to select all layers of your gif. Then select this and wait:

Topaz is slow af and loads like crap but still.. worth it since the gifs do come out with a really good quality! Once Topaz loads, if you’ve selected all the layers before pressing on “Flatten Frames Into Layers”, simply press “Delete” on your keyboard. It will eliminate the unused layers of coloring since it was applied to the gif.After that, select this:

and then this to make frames!

Then again, select all the frames with the “Shift” as I’ve said before. You’ll then need to change the speed of your gif (I always go for 0,05). Youcan change it by selecting all the frames and clicking on one of the frames here:

After you open “Other”, just type in 0,05 and press “Ok”. After that’s done, you’ll need to export it. Exporting means another bunch of settings needed to adjust. Here’s mine:

In this window, you’ll need to select “Save”, save your gif by naming it however you want and voila! The finished gif!

Ofc it’s not as good as it should be because ya girl rushed the coloring when it usually takes up to a few hours to color all the set but I tried my best and this is how I make my gifs. I hope this helps those who wish to make gifs and content, ccs always appreciate those who want to learn! ♡ If you have any questions, let me know by dropping a message, my inbox is always open ♡
Now this just shows how much work goes into making gifs and how much time it takes to make 1 gif. People who justify stealing of work like this are crazy, because we do put a lot of effort and time into this. I’m happier than ever to help and explain as much as I know (even though I’m not good at coloring) rather than fighting for stolen gifs and people who are ignorant about this. Thanks for the ask again, anonie, I really hope you’ll make gifs and find your style eventually when coloring them! Makes me happy when people want to learn and find themselves a little happy place when making cool stuff like gifs and edits ❤️

hello and welcome! this is my spin on a comprehensive giffing tutorial that not only covers the basic mechanics of how to gif, but also goes into the tips, tricks, and general photoshop information i’ve learned since i started giffing and now wish i could beam into my past self’s brain. this tutorial will walk you through everything from start to finish, help explain what not to do and why, and hopefully give even experienced gifmakers some new information!
note: this tutorial is very long and image-heavy, and is best viewed on dash
WHAT YOU’LL FIND IN THIS GUIDE
software needed
sourcing + storing footage
giffing: methods + step by step process
actions
coloring
text: subtitles, fonts, etc.
saving: timing, settings, exporting
posting: captions, tags, scheduling
resources
Keep reading


Another simple tutorial! <3
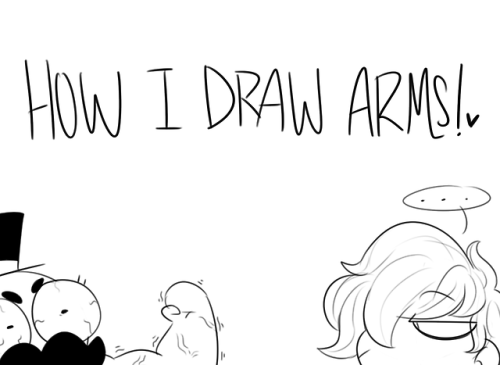
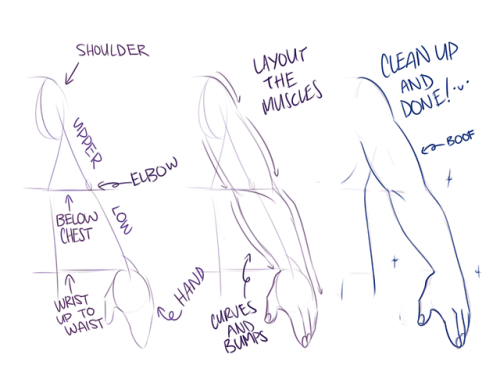
It took me a bit of time to explain some details and things to take of, but as always I hope this helps you on your art journey. How I Draw Bodies will cover up how you draw each part first! Then we’ll get into poses soon :)
|| Youtube || Patreon || Ko-fi || Teespring || Redbubble || My Blog || The Kleinman Bros ||
I have two questions! First: have you ever thought of doing a tarot card suit for your characters? I think it'd work really well for them! And two: help me how do I draw legs
@gravitality
Hi!! I’ve absolutely been thinking about that, yeah, in fact I recently talked about that to my boyfriend just recently. It’ll likely happen after october! And to answer your second question! I made a thing on legs that i hope you’ll find useful!!
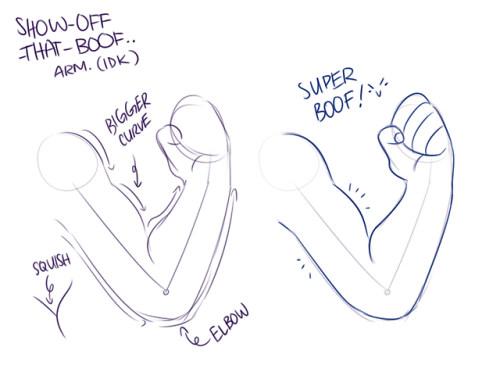
So. I’ve already explained basics on legs here, but I don’t think it hurts to go through some extra details to help you understand legs some more.

The very basic thing is to imagine legs as teardrops. Again, this has already been covered in said tutorial above, but I figured it’s still good to mention even the most basic thing that I know of. I still highly recommend you check it out to get in more detail and to see some other examples and practices that you do. But basically, think of legs in the shapes of teardrops, when it comes to shape. If you need a simple stick-figure to connect the legs in the first place, make sure that they bend at the knees a bit so that the legs don’t come off as stiff and unnatural.

As you can see, this method works perfectly for realistic legs as it does for stylistic ones. Remember to use these as a guideline, never to be the exact base of the legs you will be drawing. If you draw traditionally, remember not to draw these guides too hard, or they will be hard to erase/do freestyle!

But how do you actually draw out the legs without drawing them perfectly straight, as shown to the left? The trick is to add volume to them, and how you do that can be winged to your own liking. The idea is to think in curves. As no leg is perfectly straight. You may make these curves minimal if you don’t want them to be curvy, but keep in mind, still, that not even your own bones are perfectly straight, so it is highly recommended that you make them bend, at least a little.

It all depends on how you draw them as well. Say you put your legs together, as shown in this picture, what happens to the fat and muscle? Naturally, they press together, much like how thighs squish on the surface when you sit down (I’m sure most people know what I’m talking about). Make sure this shows in your art! This is very important to keep in mind, because it makes it all look more natural and believable. Try to cross your legs or stand up and sit down again for real-life examples!


The same applies for stretching your legs, more or less, except they appear to become more ‘hollow’ and slimmer. They become less soft to the touch, too, and might show. Try stretching your legs and feel where the muscles tense and where it feels ‘hollow’. This is very helpful with your art.

Many leg tutorials talk about legs without mentioning the behind. It requires a tutorial on it’s own, in all honesty, but this is the most simplest way to draw it connecting to the legs. Remember that it comes in many different shapes, and this is just a super basic guide! Two circles overlapping, while following the line and flow of the legs. Remember the muscle/fat as mentioned above!

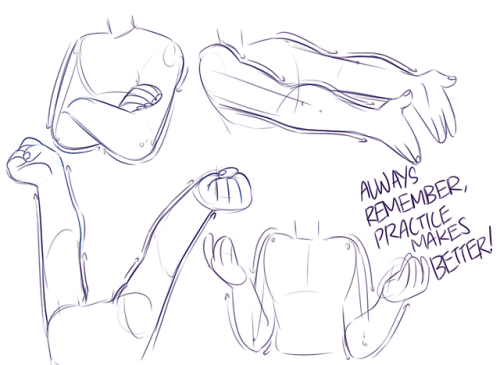
Okay, so we got the basics of leg shapes figured out? What if you want o draw them in a certain pose, or with a certain silhouette, but perhaps do not have the reference for it? Or you want to blend your style into it? The key is to not shy away from doodling the form. Make mess, draw lightly and don’t care about the anatomy. That way you’ll get everything down without it appearing stiff. You can clean up the sketch later, always, and if you can, use a reference after you have drawn your pose, to correct your drawing.

Remember that the hips do a lot to the pose of the legs! Make sure they are in flow with your legs, so that it can look more natural. Remembers that hips ‘rotate’ with the spine.

I’ve talked about this method before when it comes to posing, and the same applies for the legs. One way to make legs appear ‘steady’ is to picture them standing in a line, and one of those legs need not to stray from the lines too much, making it steady. If you want a dynamic pose despite the steady pose, you can always have the other leg stray from the line, since it only matters that one leg is steady. This method can create good, casual poses without making them appear boring. (also notice how the teardrop shapes are used here, despite the highly stylized legs)

Do you want a highly dynamic pose, or them to appear unsteady, then skip the line entirely and make both legs aim away from it completely. As you can see, the legs appear more moving, in action, as if they’re fighting, falling, or dancing. As you can imagine, this is not a pose that one could stay steady on, suggesting that it’s taken mid-movement. More about posing and this ‘line’ method is talked about in this tutorial.
Hope this helped you, if you have any questions let me know, and if you’d like to check out all my tutorials they can be found here!


How I draw eyes
This is the thing I get asked about the most so here’s an honest try.