Side-blog managed by someone who tends to stack resource and tutorial posts under her blogs' drafts as future references for anything useful in life. Circa 2014. REOPENED.
230 posts
My Art Tutorial On How To Get The Sparkle Effect On FireAlpaca! You Can Also Use Different Shapes And


My art tutorial on how to get the sparkle effect on FireAlpaca! You can also use different shapes and different colours!
Let me know if this is helpful and feel free to send me links on the art you made!
-
 mooniphany liked this · 1 year ago
 -
 hannahmariaart123 liked this · 1 year ago
 -
 ms-anne-xia liked this · 1 year ago
 -
 katiewolfgirl7 liked this · 1 year ago
 -
 toxiemind liked this · 1 year ago
 -
 a-stardusted-sky reblogged this · 1 year ago
 -
a-stardusted-sky liked this · 1 year ago
-
 einamoh liked this · 1 year ago
 -
 yeloo777 liked this · 1 year ago
 -
 foulbeasts liked this · 1 year ago
 -
 starrylibraryofresources reblogged this · 1 year ago
 -
 captivegrimoiredev liked this · 2 years ago
 -
 conflagrationkid liked this · 2 years ago
 -
 spodiddly liked this · 2 years ago
 -
 darkness-star-draws liked this · 2 years ago
 -
 1bitmochi reblogged this · 3 years ago
 -
1bitmochi liked this · 3 years ago
-
 mythgraven liked this · 3 years ago
 -
 achromic-rat liked this · 3 years ago
 -
 izumi-yami liked this · 3 years ago
 -
 shanisteel82arts reblogged this · 3 years ago
 -
 skiwidiwi liked this · 3 years ago
 -
 yellowhoneyjar reblogged this · 4 years ago
 -
 rainbow-grilled-cheese liked this · 4 years ago
 -
 reirajustrei liked this · 4 years ago
 -
 dcuniversai liked this · 4 years ago
 -
 tarocandy liked this · 4 years ago
 -
 tails-of-a-dragon-rider liked this · 4 years ago
 -
 hoshilotus liked this · 4 years ago
 -
 appbeljuice liked this · 4 years ago
 -
 person-of-many-names reblogged this · 4 years ago
 -
 a-little-chai liked this · 4 years ago
 -
person-of-many-names liked this · 4 years ago
-
 hxbiashes liked this · 4 years ago
 -
 heatofthedesert liked this · 4 years ago
 -
 asocial-event liked this · 5 years ago
 -
 sketch-ee liked this · 5 years ago
 -
 sudisaris reblogged this · 5 years ago
 -
sudisaris liked this · 5 years ago
-
 moontail13butallthereblogsever reblogged this · 5 years ago
 -
 moontail13 liked this · 5 years ago
 -
 chibi-pix liked this · 5 years ago
More Posts from Starrylibraryofresources
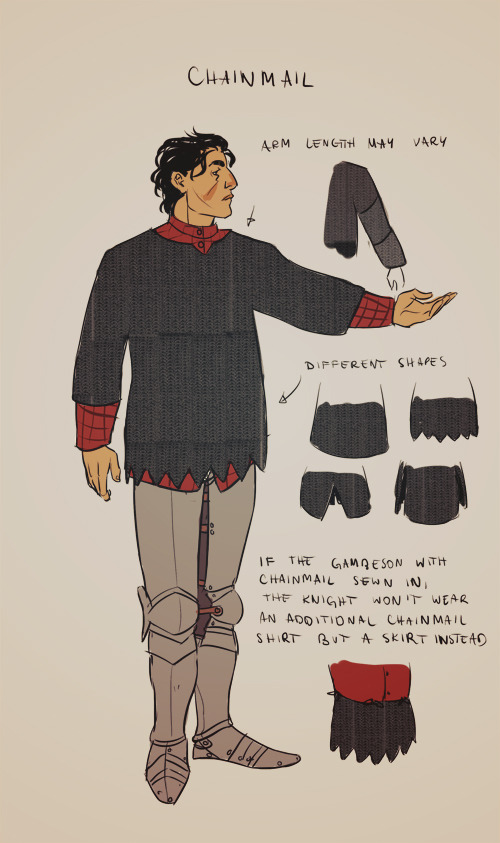
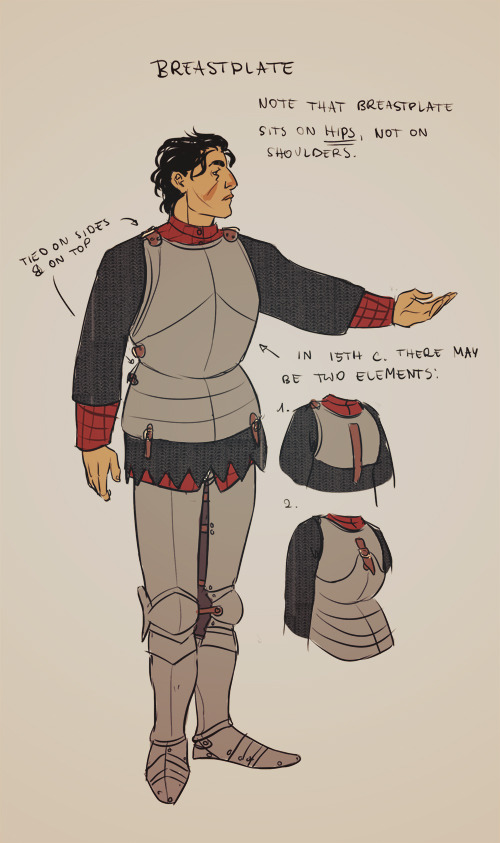
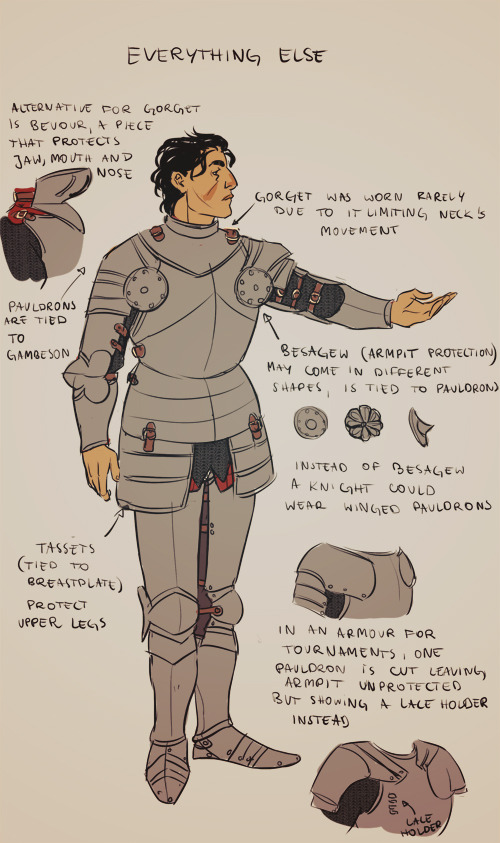
There’s always space for yet another armor tutorial, right? (ノ´ヮ´)ノ*:・゚✧
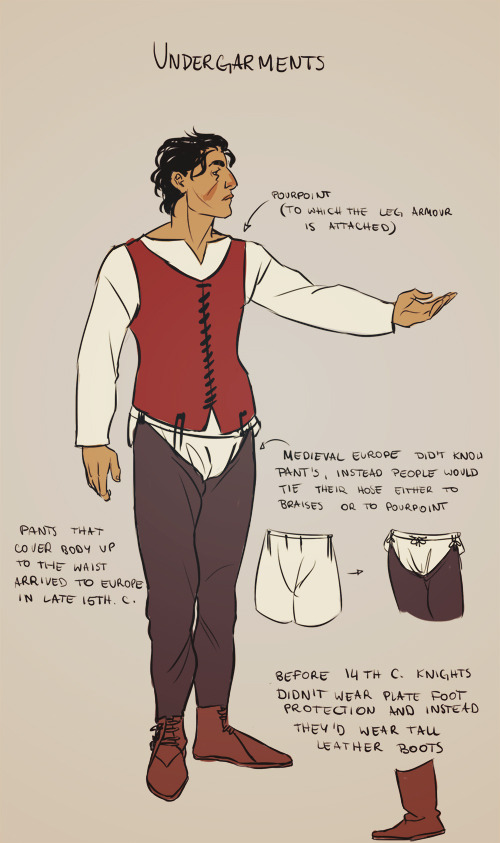
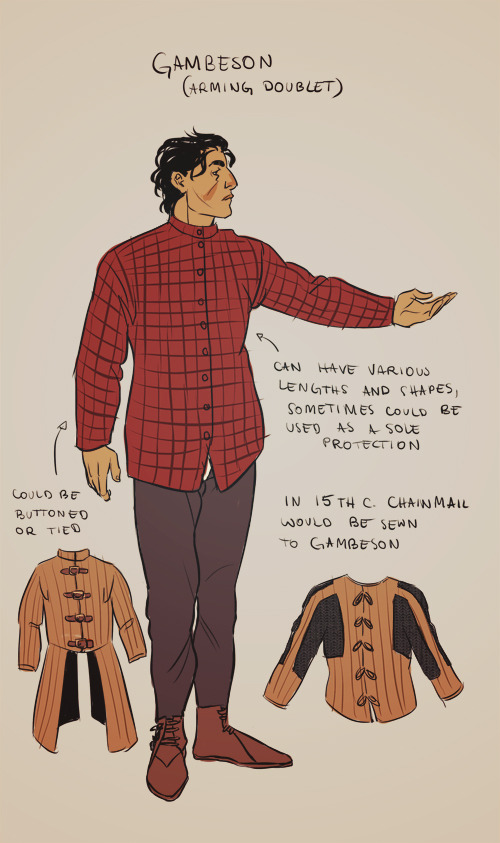
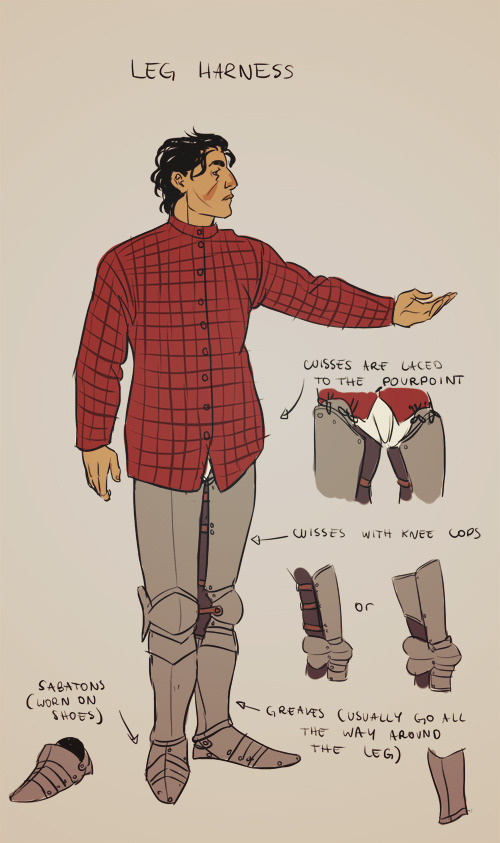
Note that the armor I drew would be worn around 15th century, the more into the future the less and less components knight’s armor had (i. e. in early 14th century instead of greaves a knight would wear long boots only; in 12th century knights didn’t wear plate breastplates and instead a chain mail only). Also the design of armor pattern changed by year and was different in every country (i.e. in eastern Europe armors, while still looking European, were heavily influenced by Turkey). so just make sure you always do research whenever drawing an armor. And one more thing to keep in mind is that armors were expensive, knights wearing a full plate armor weren’t an often sight.
Some links that may be useful:
Armour Archive (I strongly suggest to browse its forum, there is no country or period of which armor wouldn’t be discussed)
Therion Arms (armorer’s page; each accessory is photographed in big resolution and several time so it’s a nice page to use as reference for drawing)
Revival Clothing (another store, but both with medieval clothing and armors; I suggest to read the articles, they’re often supported with pictures)
Basic Armouring:A Practical Introduction to Armour Making (pdf)
Educational Charts (pdf, shows how armors and weapons changed over the years)
Medieval & Renaissance Material Culture (actual medieval resources, mostly paintings. And my favourite subpage - women in armor)
Dressing in Steel (youtube; a demonstration how to dress in armor)
How shall a man be armed? (youtube; another demonstration but with 4 different knights from different periods)
41 Emotions as Expressed through Body Language
Found Here x
41 Emotions as Expressed through Body Language unique This list, while exhausting, is soooo not exhaustive; it barely scratches the surface. And each entry could easily become cliché (if it isn’t already). But, it should be enough to get you started. Want more? Start watching people (not in a creepy way), and take notes of what they seem to do when expressing different emotions. Your repertoire of expression will double in no time. PS—do not use these for actual, real-life body language reading; you will fail. These are strictly novelistic.
Awed -Slack -jawed, raised eyebrows, staring -Frozen, slack body language (Self? What self? There is only Zuul.) -Take a step back and put a hand to his heart
Amused -Smiling and throwing back her head laughing -Slapping her thighs, stamping her feet, clapping her hands -Shaking her head (That’s so wrong!)
Angry/Aggressive -Sharp movements, like shaking a fist, pointing, slashing, or slamming a fist on a table -Flushed face, patchy red blotches -Tension in neck—chords standing out, veins throbbing—and jutting or tucked chin -Arms akimbo, or clenching fists -Entering someone else’s space and forcing them out -Poofing up with a wide stance (I am big! Very big!), arms wide (Bring it!) -Lowered eyebrows, squinting eyes -Teeth bared, jaw clenched, snarling
Annoyed -Pressing lips together into a thin line -Narrowing eyes sometimes with slight head tilt (Why do you still exist?) -Rolling eyes, often paired with a long-suffering sigh
Anxious -Fidgeting, such as tearing grass into little pieces, playing with a ring, or chewing on a pencil -Biting lower lip, swallowing unnecessarily -Quickened breathing or holding breath -Darting eyes -Pallor, sweating, clammy palms -Unusually high-pitched, “nervous” laughter -Hunched shoulders -Pacing
Attentive -Slow head nodding with a furrowed brow -Leaning forward, toward the speaker, and sitting up -Taking notes -Looking over the top of her glasses
Bored -Resting his head on his palm, peeking out between the fingers, maybe even slipping so his head “accidentally” hits the table -Tapping toes, twirling pencil, doodling, and otherwise fidgeting -Staring out a window, or at anything remotely more interesting (Which is everything …)
Confident -Arms clasped behind body -Head lifted, chest out, standing tall -Walking briskly and making firm, precise movements
Confused -Tilting head with narrowed eyes -A furrowed brow -Shrugging
Contempt/Superiority -Lifted chin (The better to look down the nose.) -Pursed lips, sneering, slight frown -Circling a shoulder, stretching her neck, turning away—anything to indicate she doesn’t see the person as a threat or worthy of her attention -Grabbing her lapels, or tucking her thumbs in her waistcoat (See this clothing? It is much nicer than yours.) -Dismissive hand-waving
Cynical/Sarcastic/Bitter -Twisted lips or a half-smile -Sneering, sometimes with shaking the head and other defensive body language -Pressed lips with a slight frown -Eye rolling
Defensive -Crossed arms, legs, crossed anything, really (Well, maybe not fingers … or eyes …) -Arms out, palms forward (Stop!) -Placing anything (sword, shield, book, backpack) in front of her body
Disgusted -Crinkling his nose -Curling his lip and/or showing the tip of his tongue briefly -Flinching back and interposing a shoulder or turning away -Covering his nose, gagging, and squinting his eyes shut—hard—for a moment. (It assaults all the senses.)
Displeased -A plastered-on fake smile (You suck; but I can’t tell you that. So here: a fake smile! Enjoy.) -Pouting or frowning (I’ll cry if you don’t give me what I want—don’t test me, I will!) -Crossed arms and other defensive/frustrated body language (I will not let that terrible idea influence me!)
Distressed -Wide eyes and shallow, rapid breathing -Beating the walls, or huddling into a corner -Clasping hands over his head protectively -Rocking himself -Handwringing -Running his hands through his hair
Earnest/Passionate -Leaning forward, nodding, wide eyes with strong eye contact and raised eyebrows -Hand on heart, or presented palms-up, or otherwise visible -A double-handed handshake (I really want to make sure you understand me!)
Embarrassment -Blushing -Stammering -Covering her face with her hands or bowing her head (I’m so embarrassed, I can’t look!) -Difficulty maintaining eye contact, looking down and away
Excited/Anticipation -Rubbing hands together (I can’t wait to get my hands on it!) -Licking lips (It’s so close I can taste it!) -A vigorous, pumping handshake (I can’t wait to get started!) -Jumping up and down (Look at me being literal here! I am jumping for joy.) -A wide and easy grin
Flirty -Eye play, like winking, looking up through the lashes, over the shoulder glances, and eye catching -Preening, like hair flipping or smooth, clothing straightening, spine straightening, etc. -Striking a cowboy pose, with his thumbs gripping his belt tight
Frustrated -Shaking his head (You are so wrong!) -Massaging temples (My brain—it hurts.) -Clasping his wrist in his opposite hand, behind his back (Bad arm! No biscuit.) -Running his hands through his hair (All this frustration is making my hair mussy. I can feel it.) -Grabbing onto something like armrests, or white-knuckled interdigitation (Restrain yourself!)
Happy -Smiling and laughing -Eyes and nose crinkling -Swinging her arms, spinning loosely, dancing, jumping
Impatience -Quick head nodding (Get on with it!) -Toe/finger tapping (Hear this? These are seconds. Wasted. Listening to you.) -Sighing, checking the clock/sundial/freckles (Time. It is moving so slowly.)
Jealous -Tight lips, or a sour expression -Narrow eyes locked on the perpetrator, to the point of a stare down -Crossed arms, and additional frustrated, angry, possessive, or bitter body language
Lying -Scratching their nose, ear, neck, miscellaneous part of face -Sudden change in behavior or demeanor, including shifty eye contact, lots of long blinking, shrugging -Ill-timed smiles or laughter (This is how I normally smile, right? Right???) -Additional anxiety body language -Shaking head no while saying “yes” (I can’t believe I just lied.) -Licking lips, covering mouth, touching mouth, etc.
Overwhelmed -Both palms to forehead, fingers splayed (This gives me a headache.) -Covering eyes with one hand (If I can’t see the world, it can’t see me …) -Eyes wide and staring into space, hands gripping the table in front of her (… Woah.)
Playful/Friendly -Winking -Waggling eyebrows -Tiny shoves or nudge
Pleasure -Head tilted back, lips parted slightly, eyes wide or closed -Slow, languorous movements, stretching (such as arching her neck or back) -Slight flush, quickened breath and pulse
Possessive -Handshake with arm clasp -Putting hands on or around someone’s shoulders, neck, waist, back, or even just the wall near them -Standing in someone’s personal space, body positioned toward that person -Any one-sided act of intimacy, like running a knuckle down someone’s cheek -Staring down any who get too close
Proud/Dominant -Chin up, chest out, shoulders back -A painfully hard handshake that not only squishes the bones, but also forces his hand on top -Leaning back with his hands behind his head, and his feet up -Strong, unblinking, focused eye contact
Reluctance/Resistance -Arms crossed, sometimes with fists (Not happening.) -Dragging feet (But I don’t wanna!) -Pinching nose (You want me to do what now?) -Clamping hands over ears (La la la la!)
Sad/Upset -Droopy body (and anything held, like a sword), bowed in shoulders, wrapping arms around self -Slow movements with hesitation -Bottom lip jutting out and/or quivering -Crying, sobbing, body shaking, sniffling, wet eyes
Secretive -A tight-lipped smile (My lips are zipped.) -Hiding her hands in her pockets (What has it got in its nasty little pocket?) -Looking away
Scared -Hunched shoulders, shrinking back from others (Don’t hurt me!) -Wide eyes and lifted eyebrows (The better to see them coming.) -Shaking, trembling, or freezing -Rocking from side to side, sometimes holding self (It’ll all be okay, self, it’ll all be okay.)
Shame -Slumped shoulders (Don’t look at me.) -Trouble meeting your gaze, looking down and away -Burying her face in her hands or bowing her head (I can’t face the world right now.)
Shocked -Hands covering her mouth, or mouth hanging open, sometimes with a gasp (If I had words, I would be saying them.) -Freezing and staring with wide eyes and eyebrows raised (Diverting all resources toward staring.) -Smacking a palm into his forehead (Clearly, my head isn’t working right, or I wouldn’t have seen that)
Shy -Avoids eye contact, or has only fleeting eye contact (Eye contact means you might speak to me.) -Keeps a fair distance from everyone, and will back away if someone steps closer (Space invaders!) -Folded arms, head down, and other defensive body language (If I make myself small, they can’t see me.)
Smug -Slight, close-lipped smile (occasionally one-sided) and sometimes one raised eyebrow (I know something you don’t know.) -Chin slightly tucked, Mona Lisa smile, raised eyebrows (I know better.) -Finger steepling (I am so smaaaht.)
Suspicious/Skeptical/Disbelief -Narrowed eyes, sometimes with a sidelong glance or raised eyebrow (Perhaps if I look at it out of the corner of my eye, I will catch it unawares.) -Rubbing his eyes (I can’t believe what I’m metaphorically or literally seeing!) -Shaking his head (I—I don’t believe it.) -Blowing out cheeks (Well , I don’t know …)
Tired -Rubbing his eyes, eyes staring into space, raised eyebrows (Raising my eyebrows helps keep my eyes open.) -Yawning and/or stretching (I am tired—see? Tired! Too tired to care!) -Almost nodding off and jerking awake (Cannot. Stay. Awa—snnnnurzzzz.) -Gritting teeth to stay awake (Cannot—yawn—dang it!)
Thoughtfulness/Thinking -Steepling fingers (I will think better if I center myself and focus.) -Pinching nose, sometimes with closed eyes (Focus, focus—I just need to focus.) -Tugging on an ear (This will help me remember!) -Stroking a real or imaginary beard (People with beards look smart.) -Furrowed brow, narrowed eyes, sometimes tilted head and pressing lips together (I can’t see it—I will try harder!) -Resting his chin on his hand (Thinking makes my head heavy.)
Triumphant -Hands clenched and held above head while grimacing (She is invincible!) -Head tilted back with a yell (She is fierce!) -Arm pumping in the air, jumping (Woohoo!)
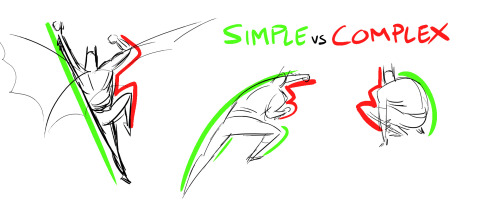
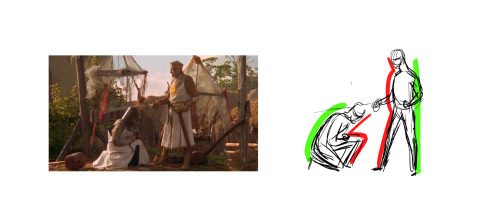
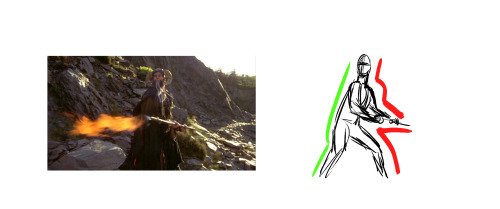
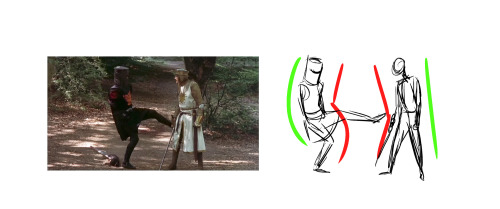
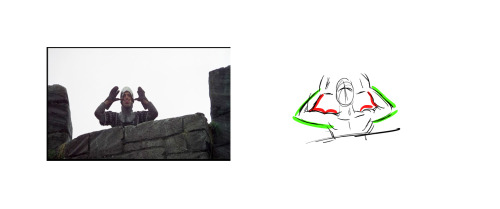
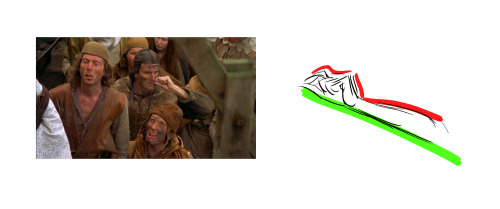
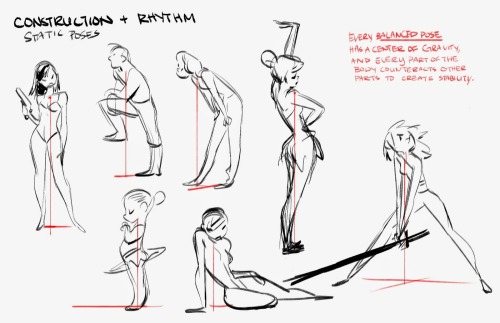
Last night, Paul Mendoza and I spoke to our animation class about the concept of “Simple vs Complex,” and I thought some of you might find this useful. The idea is to balance a strong pose by contrasting simple and contrast forms. The simple (stretching) side of a pose is usually your main line of action, while the complex (squashing) side is where you get most of the interest and the focal points of the pose. “Simple vs Complex” also works for individual parts like a flexing arm or a hand pose. This concept enhances clarity, appeal, and energy in any pose.
Bruce Timm’s style illustrates this concept best, but great actors (like the Python troupe) display this kind of posing all the time.
Have at it!
Tips for learning Japanese
I’ve gotten quite a few questions about how I learnt Japanese or whether I have any tips to share. Every time I reply to an ask I type up a new answer, but when I do I tend to forget certain things here and there. So I thought it best to just do up a comprehensive post. I will also add to this post as I discover new ways to learn and practice Japanese.
Learning a new language isn’t easy so the best way to learn Japanese is of course to go for proper lessons if you’re able to afford it or if it’s available(as in there’s a school module for it or something). Having a teacher and classmates to practice with will help a lot. If that’s not an option due to time/cost then purchase some Japanese textbooks and self-study.

This post will be the most helpful for beginners who are unsure how to start or practice. It’s mainly for those who want to self study, and especially so if the end goal is, like me, to play Japanese games or listen to drama CDs lol.
It’s by no means a professional approach and everything I share is just from my own personal experience.
How fluent is my Japanese?
Not completely. Japanese is my 3rd language. I self studied all the way and have never taken JLPT so I don’t know what level I am at. It’s at a level where I’m able to play games in Japanese, read novels, listen to drama CDs, and have no issues in my day to day life (am living in Japan atm). My comprehension and listening are a lot better than my speaking.
If you are still interested, read on.
Keep reading
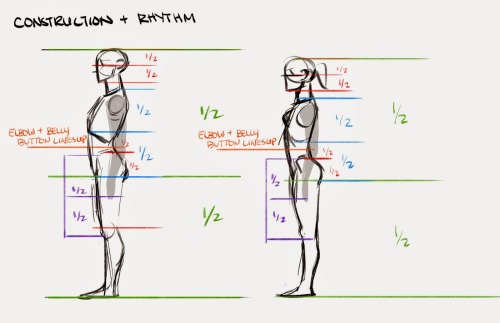
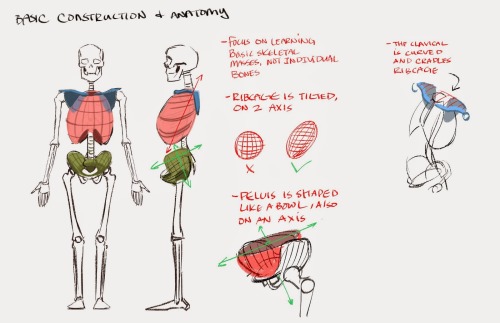
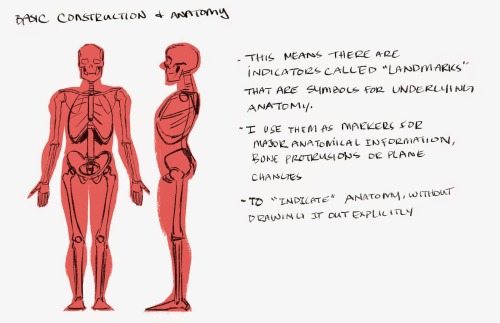
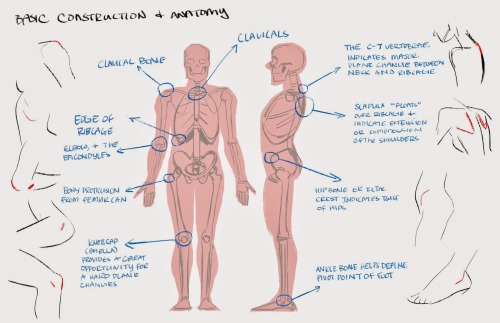
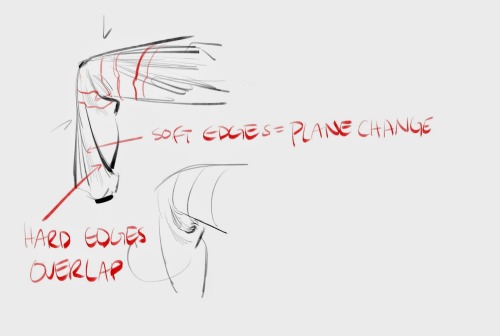
Some notes I put together for my CDA Class. Just stuff that I use. Take with grain of salt.