Digital Coloring Reference - Tumblr Posts


Support >> http://www.patreon.com/doxydoo Guest >> http://www.patreon.com/seel
VISIT http://groundlion.tumblr.com

I made a basic color theory chart for my friend and i figured id put it here too if it helps anyone i guess


Made this because my friend didn’t know this was a thing, so I thought maybe others don’t either? Hope it helps someone out!


part11: http://i.imgur.com/5Br1j.jpg
part12: http://i.imgur.com/Ff46c.jpg
you can get the lineart here if you want to use it: http://fav.me/d5awm0r


OK SO i get asked about colors a lot and i’m really sorry i am so lame at giving detailed answers SO I’M GONNA ATTEMPT TO FORMULATE SOME„, BASIC TIPS I GUESS LET ME JUST START OUT BY SAYING i’m not really a very skilled or fancy or formally educated artist (shocking i know) and i don’t take drawing very seriously, BUT I HOPE A FEW THINGS I HAVE SAY WILL HELP YOU
(extra commentary in case anything is hard to read, here is the whole thing in one pic and not an obnoxious photoset)
1. HAVE FUN WHEN YOU ARE COLORING JEEZ don’t loose hair over trying really hard to study and adsorb shading and lighting ‘ruuuules’!! and while enough basic understanding is obviously important and necessary in creating believable and realistic pieces, being creative is also really important as well!! the bottom line of art is that there ARE no rules, and if you really do want to be happy with your work, i find a lot of satisfaction arises in knowing i made something only /I/ could make!! and besides, if i didn’t have fun making art, then i wouldn’t do it, frankly
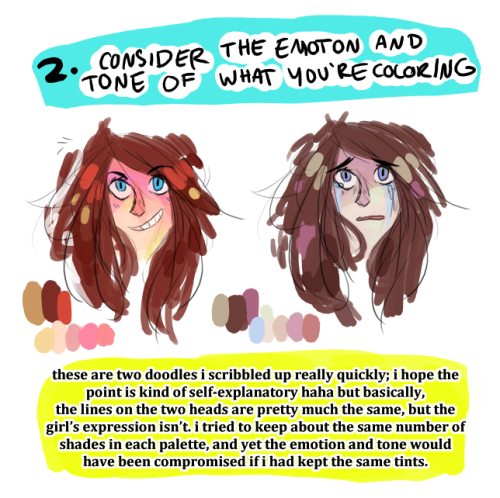
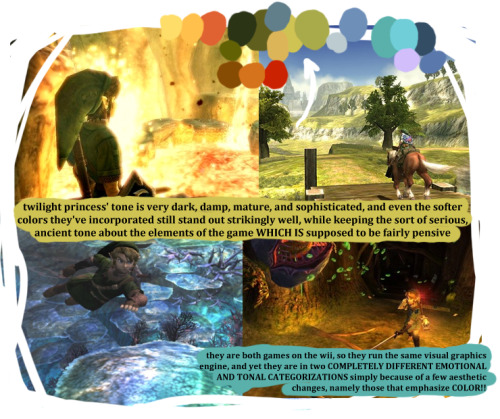
2. PAY ATTENTION TO WHAT TONE YOUR COLORS PORTRAY this is especially true for people and expressions and setting
since color is such a big part of a piece, it also plays a big role in setting the tone of your work!! take a minute to evaluate the context of whatever you’re drawing and then try to see what colors would best parrallel that! and especially don’t be afraid to venture into palettes you don’t normally use!! but once you choose a palette that matches the tone of your work BE SURE TO STICK WITH IT so it is contiguous in both the background and foreground
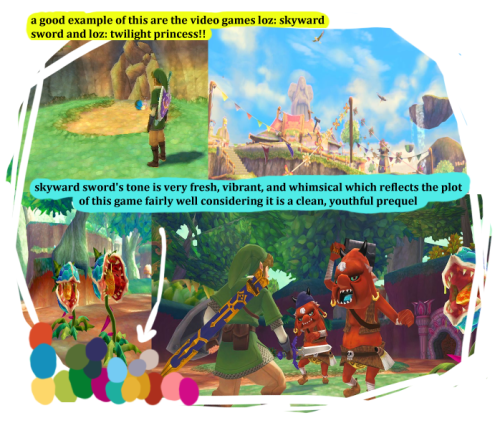
(i used twilight princess and skyward sword as an example, i hope my analysis makes sense)
3. be sure to scribble with and test how colors look together BEFORE you take them to your lines!! and finally HAVE FUN WITH YOUR COLORING i know i already said this but it’s simply tragic when an artist becomes bored/uninterested/frustrated with colors ahhh!!! remember that every artist has different coloring styles so try you best to observe others’ techniques!! pay attention to what you like about them, but ALSO pay attention to what you dislike!!
practice a lot of styles, and ask around which programs/brush settings artists use if you find yourself interested in them!! i’m sorry i can’t help you with more technicalities, but learning for yourself is also half the fun!! plus i’m a lazy motherfucker and i’m bad a tutorials anyway
OKKKKAAY THANKS FOR READING OLLIE OUT

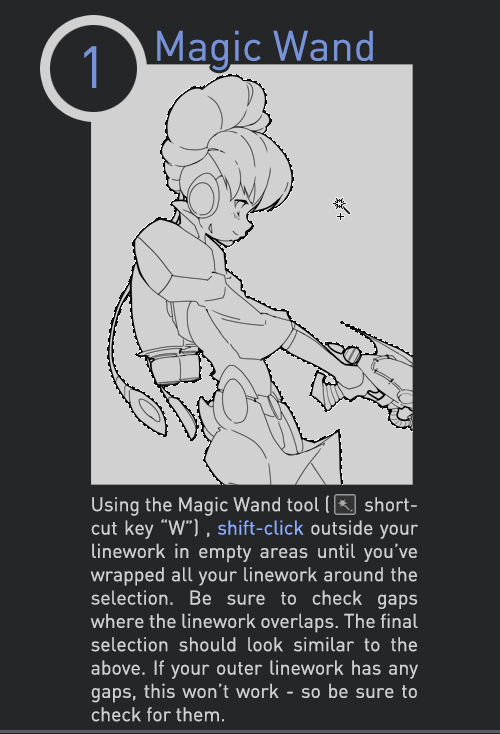
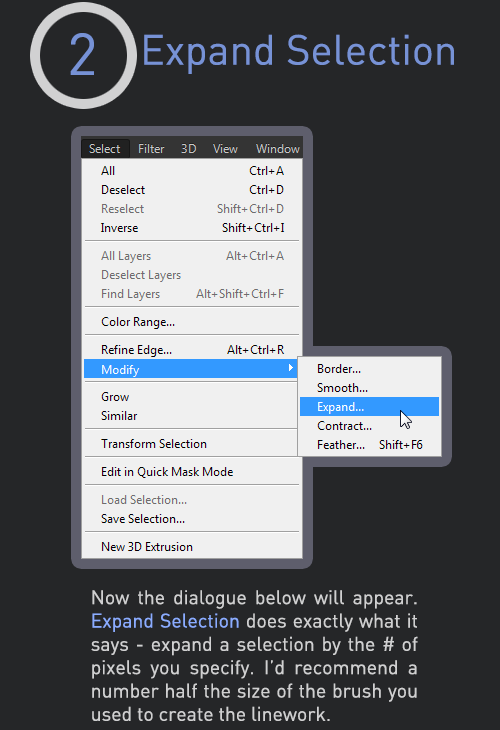
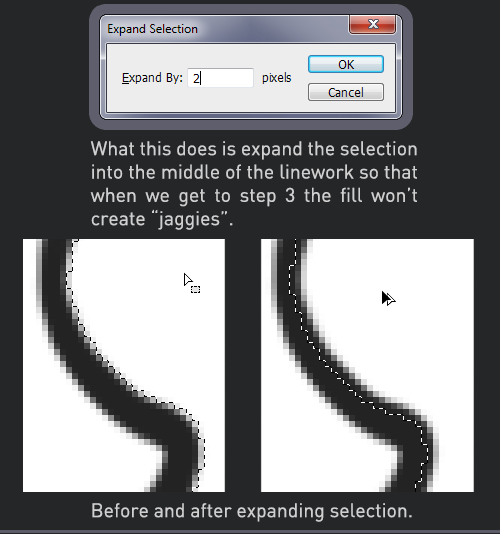

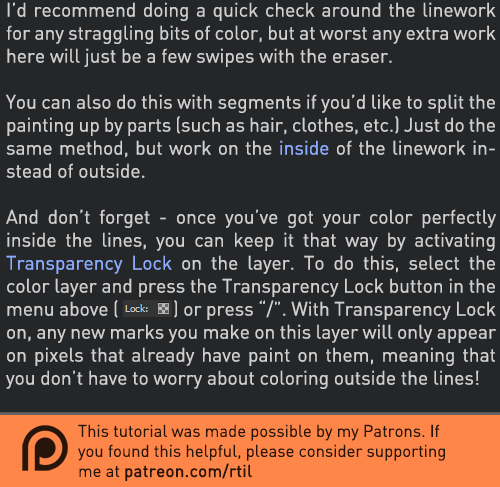
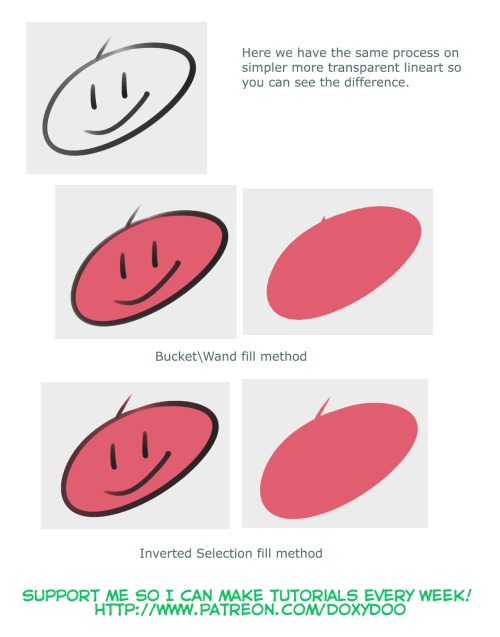
Late last year I wanted to start a series of short tutorials called Tip Jar, as a way of saying thanks to my fans and giving back to my patrons. This is the first of the series I have made, showing my technique on quickly filling in lineart so you can get to painting without coloring outside the lines faster.
Someday I hope to turn these into video tutorials when I have the income and the time, but for now I hope that I will be able to share useful tips in this infographic format.
Full tutorial image
Support me on Patreon


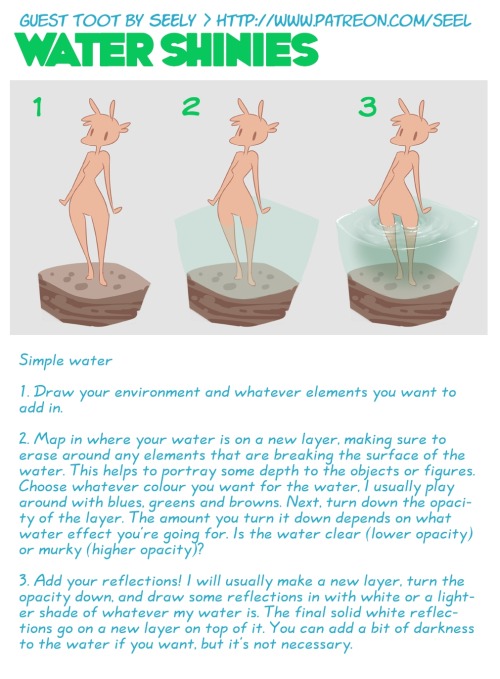
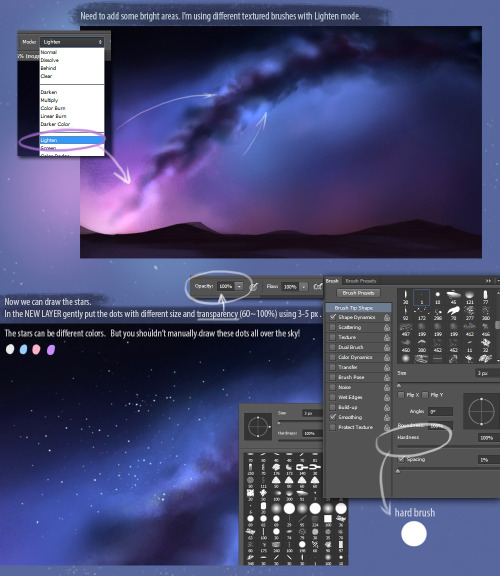
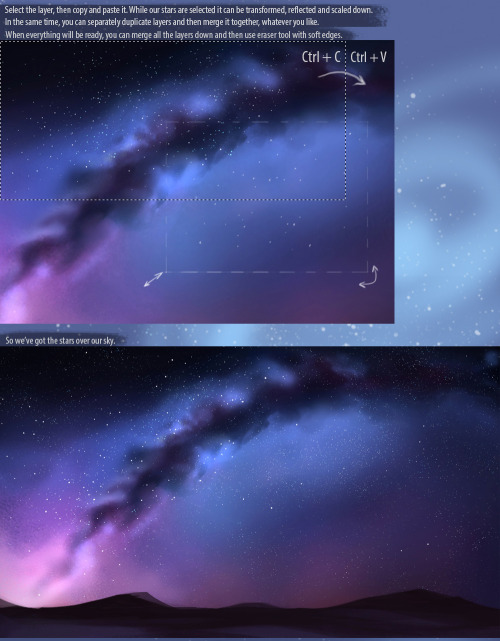
Because a lot of people asked for it after the last few pages of Clockwork, I thought I’d throw together a quick cloud tutorial for you guys! The brushes are yuumei’s.


A friend wanted to know how to do grass, whipped this up super quick, decided to turn it into a tutorial!
If you would like to request a personal little tutorial for yourself, please consider taking a look at my Patreon!


My art tutorial on how to get the sparkle effect on FireAlpaca! You can also use different shapes and different colours!
Let me know if this is helpful and feel free to send me links on the art you made!
will you upload progress pics of your art? e.g. from rough sketches till you colour it
I always use Overlay layer for my art.

Tone Layer + Overlay Layer


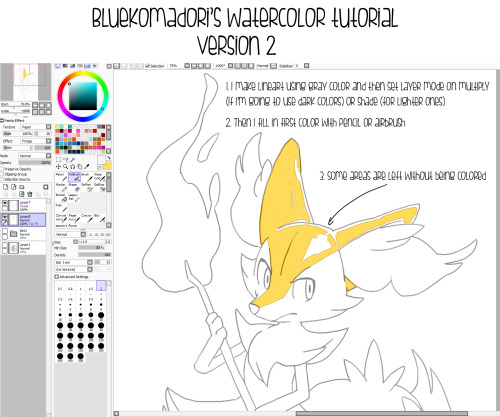

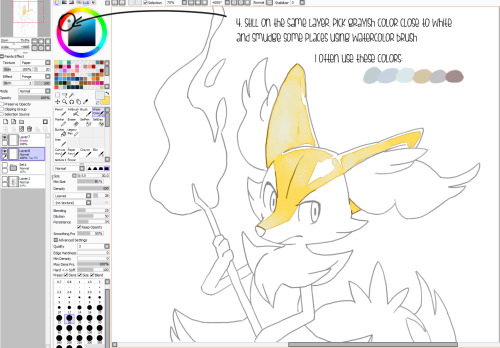
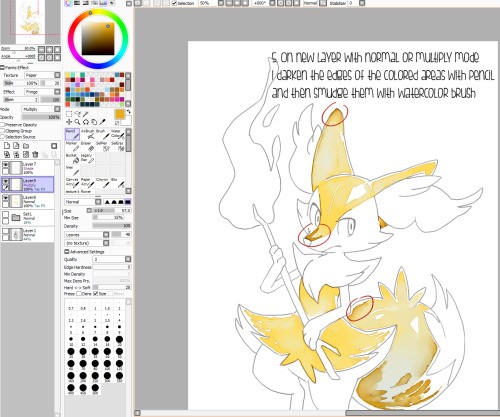
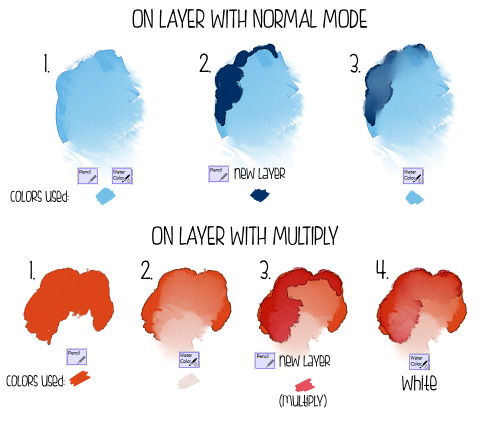

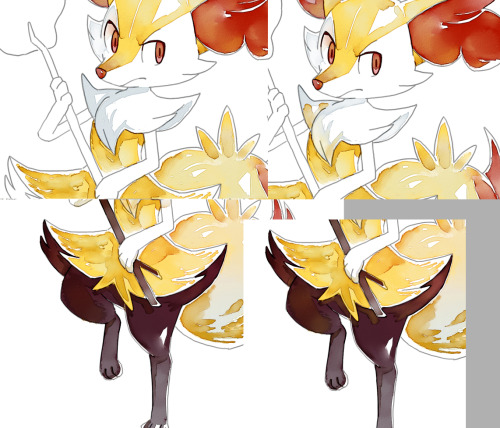
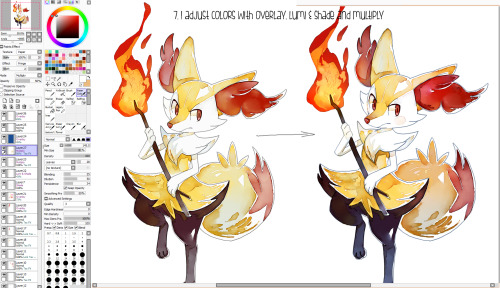
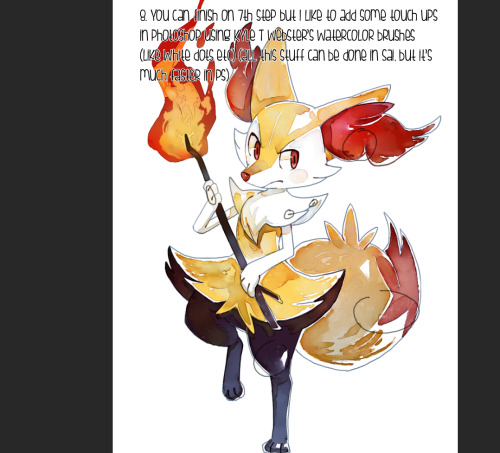
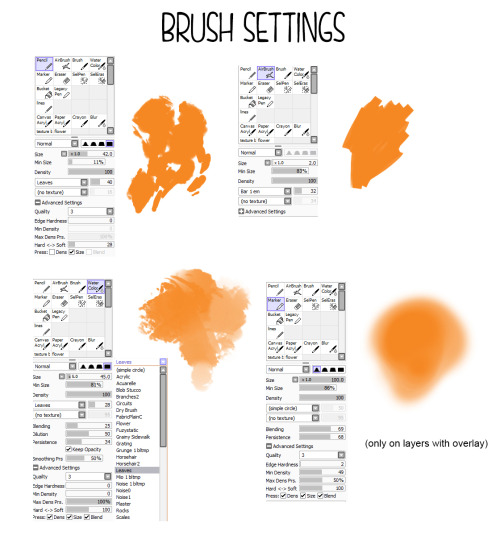
The tutorial of how I achieve watercolor effect in Sai! :) I highly recommend using real watercolor paintings (your own or ones found on the internet) as reference.
And here you can find a few useful links:
You can download the Sai file of this picture here: link
Video process of painting another picture: link
The old watercolor tutorial: link
Sai brushes (none of them is made by me) link + file you need to open them in Sai: link
Awesome watercolor brushes made by Kyle T Webster: link
Here’s the finished painting: link


Are you willing to show any tutorials on your editing like the lighting in your overhaul pic because it looks so cool! If not, it's okay too~~!
TBH I’m kinda iffy on how I do it because I’m kinda new at doing it too;;but here’s my process on how I do it(?):


(The bottom pic/info is the way I did the effect on my Overhaul speedpaint!)Hope this helps!


Stumbled across your art recently, and I totally admire your work! As a complete noob to the digital art scene, I'd just like to ask whether you have any tips on colour picking (like for skin tones, under varied/dramatic lighting and such!). I have a ton of other things I want to ask, but I'll limit myself to one question and then try to google the rest, haha/ Thanks for sharing your art with us! ^^
ahh thank you so much! ♥ welcome to the digial art scene friend, i hope you enjoy your stay and ctrl + z
now onto your question! (if you don’t know what layer and layer modes are and how they generally work you should probably google that before you continue reading)
we all perceive colour differently (thx science) and i trust my intuition a lot when it comes to colour picking because of that, and also because i feel like you can make pretty much every colour combination work within the right context. context is key! but still, remember that all of this is about how i perceive colour, so you might not agree with everything i say.

here’s a quick rundown of terms you’ll see around a lot in reference to colours and shading: the hue, which is the ‘colour’ itself, the saturation aka the intensity, and the brightness [or value] which describes how dark or bright we perceive a colour to be.
rule of thumb: when you shade don’t just add black (or white) to your base colours, that will make your drawings boring and lifeless. use different hues and saturation!
now first things first: which skin colour does the character have?

you’ll mostly be navigating in the red to yellow spectrum for the skin tone. so when i pick the base colours i usually start with the skin and adjust the rest of the colours accordingly. if you’re not sure where to begin it might help if you first determine the values (brightness) of the base colours in grayscale.
and here are a few colour variations—i stuck to the approximate values but played around with a lot of different hues and levels of saturation.
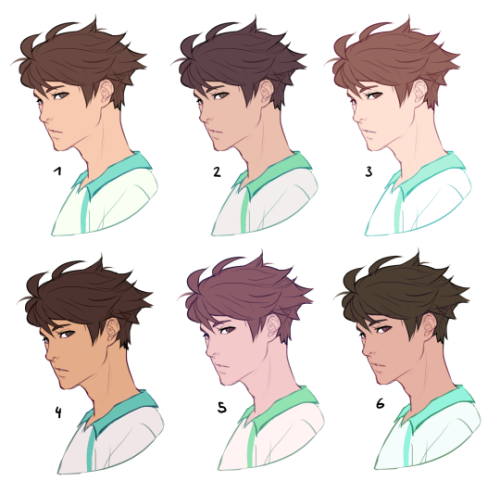
now compare 3 and 5: you’ll notice that 3 is very bright and leans towards orange hues, whereas 5 has a pinkish tint.

on the left i gave 5 the hair colour of 3 and in my opinion the pink hue of the skin doesn’t go well with the orange undertone of the hair. you’ll have to experiment a lot to find out which combinations work for you.
ctrl + u is your biggest friend (or image >> adjustments >> hue/saturation in photoshop, the shortcut works in sai and clip studio paint too). play with the sliders and see what happens. i do that a lot myself, because it’s easier to coordinate the colours like that afterwards instead of trying to manually pick perfectly matching ones right away.
for further adjustments i like to use an extra semi-transparent layer on top of everything with just a single colour to add atmospheric light. this unifies the colours and makes them more harmonious, if that’s what you’re looking for. this is about as far as i’d go if i didn’t want to shade the drawing.

if i do want to shade, especially with high contrasts and dramatic light, i darken the base by just adding an additional black layer, here set to 40% opacity. of course you could add a colour layer like the ones i mentioned previously too.


to create an impression of dramatic light you need a high contrast between light and dark areas (1). if i want additional visual intrest i often add secondary light which falls onto the main shadow areas. here i picked a faint greenish blue to balance out the yellow (2). and since light is at least partially reflected when it hits a surface you should add a faint glow that goes across the shadow/light border. i uses a mid-brown with a very soft brush on a layer set to overlay here (3).
for this shading style i like to use the layer mode colour dodge with lowered opacity + fill settings. for some layer modes opacity and fill do the exact same thing (e.g. for multiply or screen). however for colour dodge there’s a big difference:

a lowered opacity merely alters the transparency of the entire layer. that looks pretty awful sometimes, because the bright orange affects the dark of the hair much more intensely than the already brighter skin. but when you lower the fill percentage you primarily lower the amount of light that falls onto darker colours. so the layer’s opacity setting treats every colour equally whereas the fill setting takes their values into consideration. it might be hard to understand if you don’t try it out yourself, so just play around to get a feel for how it works!
and to summarise, here’s a process gif:

colour is an extremely big topic and i’ve only barely scratched the surface but i hope that still helped you out a little! the fastest way to learn is always to try things yourself, so grab a sketch and experiment. 👍
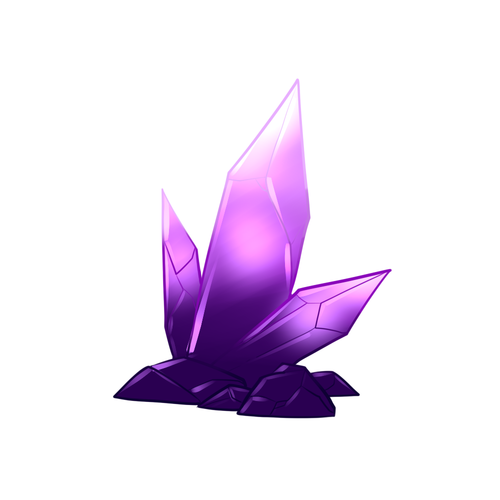
Do you think you could make a tutorial on how you made the gems in your Steven Universe background?
Here’s a quick thing I put together, I’m not great at in depth explaining so this tutorial assumes you have basic knowledge of layers and clipping groups and layer modes and all that mess.
HERE WE GO
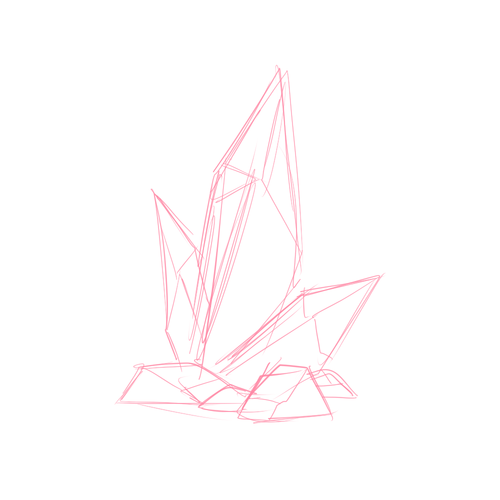
If you need to grab a ref do so, but sketch a common shape of whateves of your choosing.
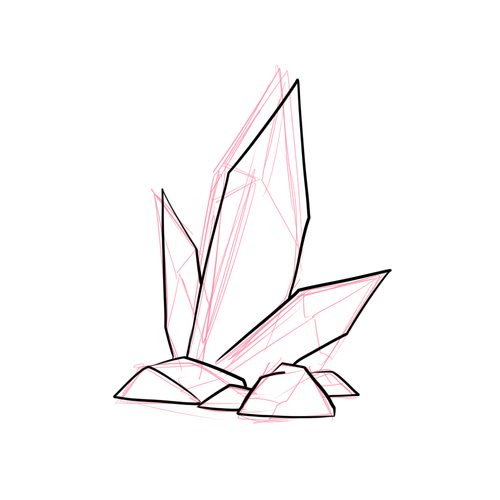

Grab your favorite inking brush or pen and get the outline going, thinner lines for the inside. Then kick your sketch layer to the curb. We don’t need it any longer.
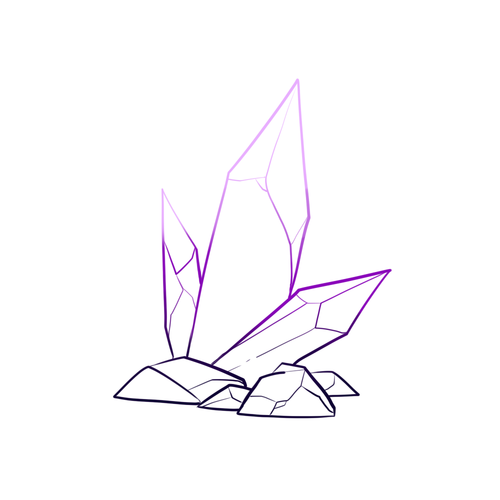
Preserve the opacity of your ink layers and add colors if you want, maybe a few and blend them a bit for sparkle.

Make a new layer for your base color then just like your lines add a few likely colors and smudge things around blend them really nicely to your heart’s greatest desire.
Make another layer over everything but your inks and set it to luminosity or what ever your program’s name for it is. Grab a marker brush or something painterly like and make highlights.
You can either use the same layer or make a new lumi layer, get a soft brush and make soft light shade within for that magical feeling. Adjust opacity as desired.
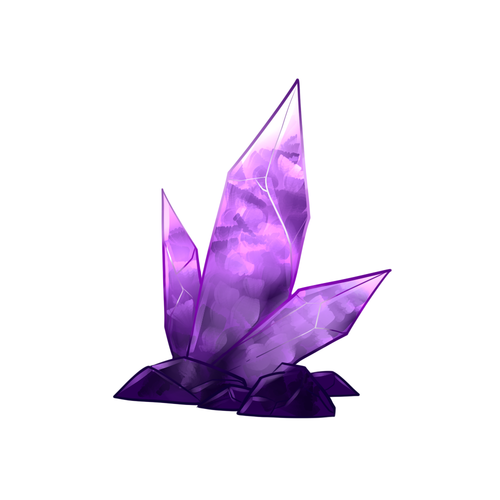
Make a multiply layer under your lumi layer and grab a painterly brush, maybe one with bristles/flat middle/ whatever you like and make a kinda broken/fractured effect inside with a darker color, do the same in one of your lumi layers or make a new one with the same brush and a lighter color, be sure to blend stuff around to make it look nice.
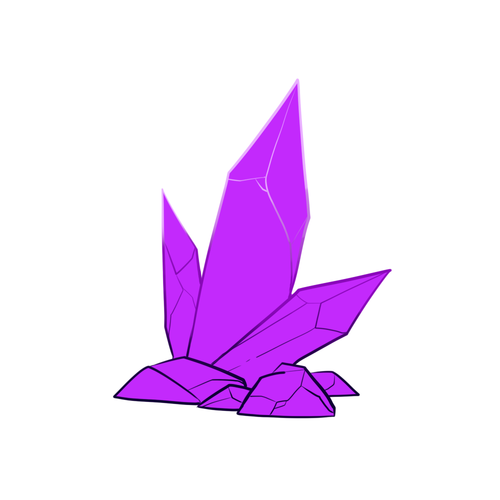
Add more highlights, preferably over the line work so more LUMI LAYERS. make sure your inner lines can be seen somehow.
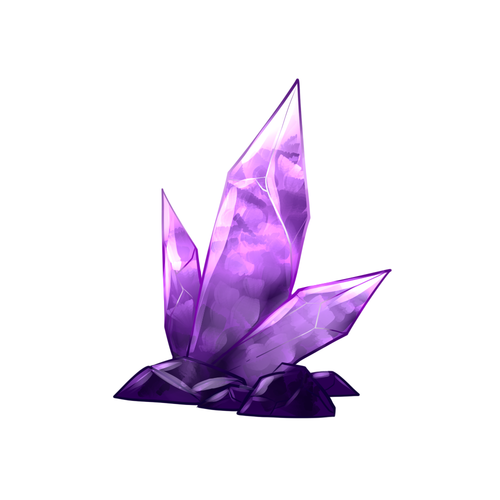
This is the part where I switched programs (was using Sai) you can do this in Photoshop or whatever you have that enables custom brushes.
I’m using Clip Studio Paint now and here I discovered that it has a broken glass like brush, they are very easy to find for PS users as well and THEY ARE NOT REQUIRED you can make them all by hand if you want, I just added a few strokes on top of my half assed ones to make it look great. Make sure you do a little blending as well.
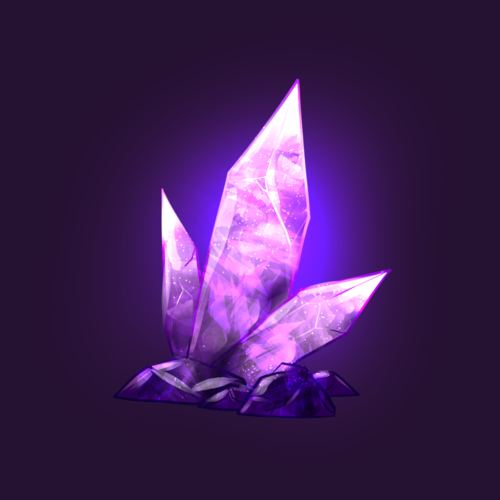
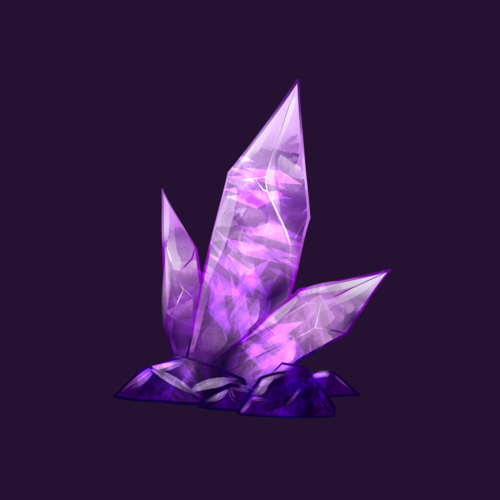
Add some nice glow behind the crystal and sparkles within the crystal.
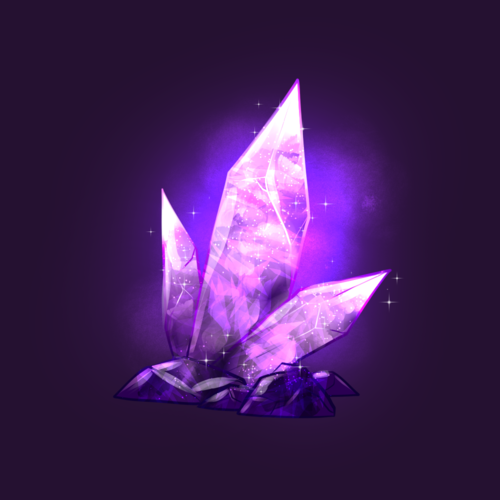
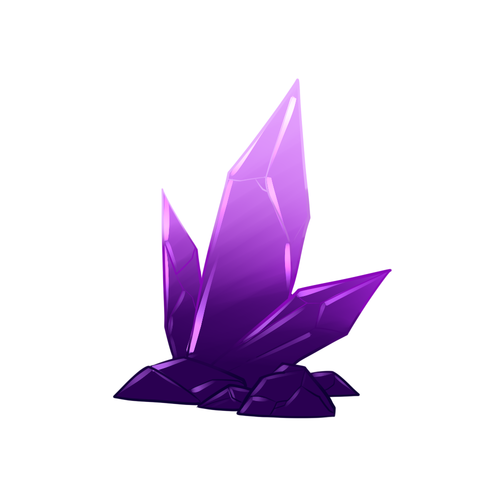
Optional but maybe texture your light a bit with a texture brush of your choosing, add more sparkles and you’re done.
I’m a bad teacher but this is how I make my crystals for the time being as I’m always finding new ways to do something better. But this is how I do it and you can always find your own way that works for you. c: Play around with your settings, do what works for you.


Hey friends, it’s Meg!
Glad to be back at TUTOR TUESDAY, and a big thanks to Paul for taking over for two weeks! Big thanks to @wr3h for todays topic! I’m hoping to branch out more into styles/techniques in photoshop if y’all enjoy how this one went! I’m always open to recommendations, feel free to send them here or to my personal. Keep practicing, have fun, and I’ll see you next Tuesday!