Drawing References - Tumblr Posts


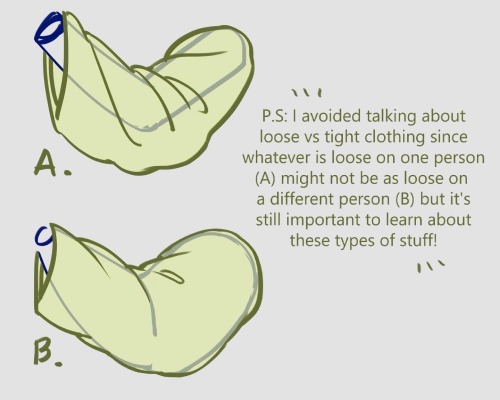
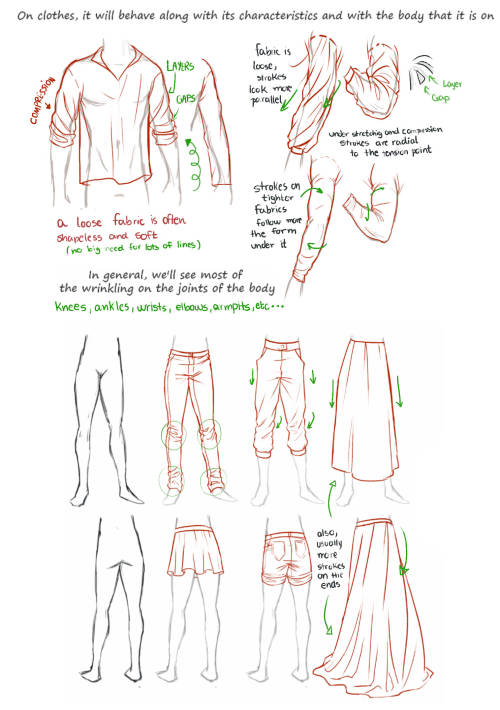
I forgot I have to be active here so here’s my Twitter tutorial on how to draw folds I made a while back to help a friend!


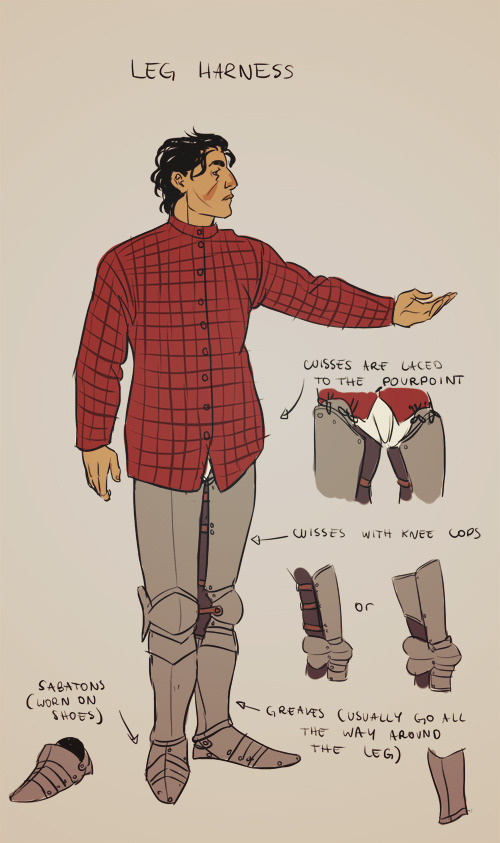
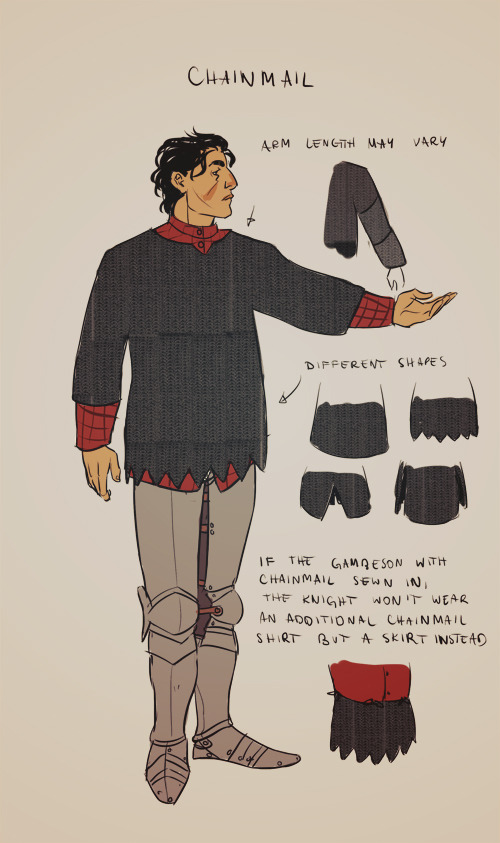
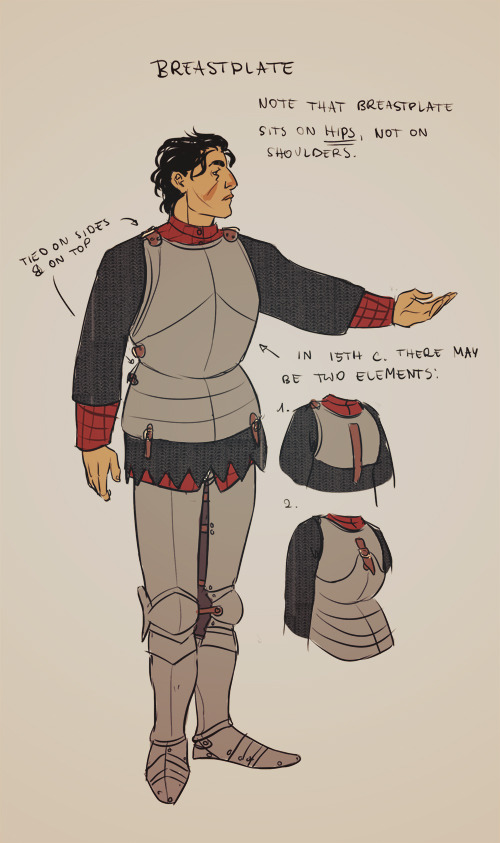
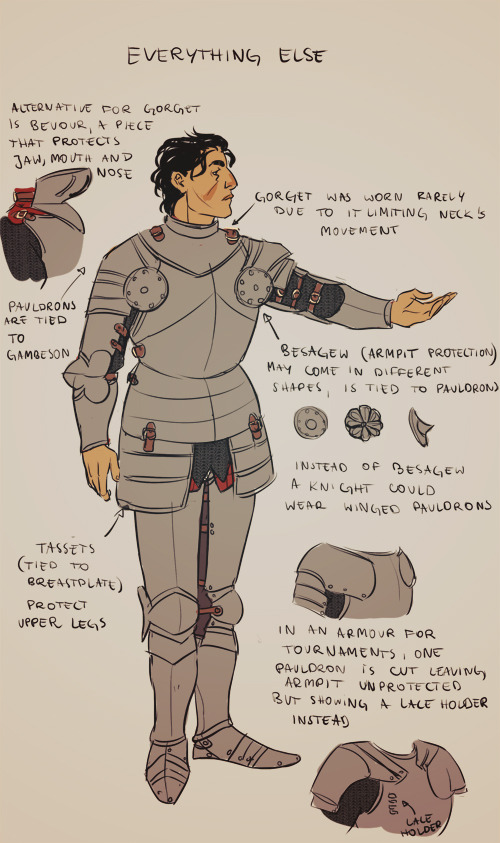
There’s always space for yet another armor tutorial, right? (ノ´ヮ´)ノ*:・゚✧
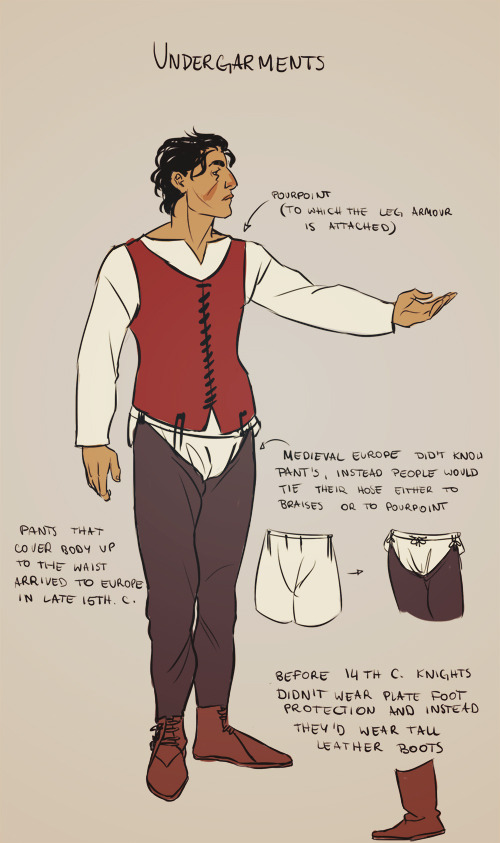
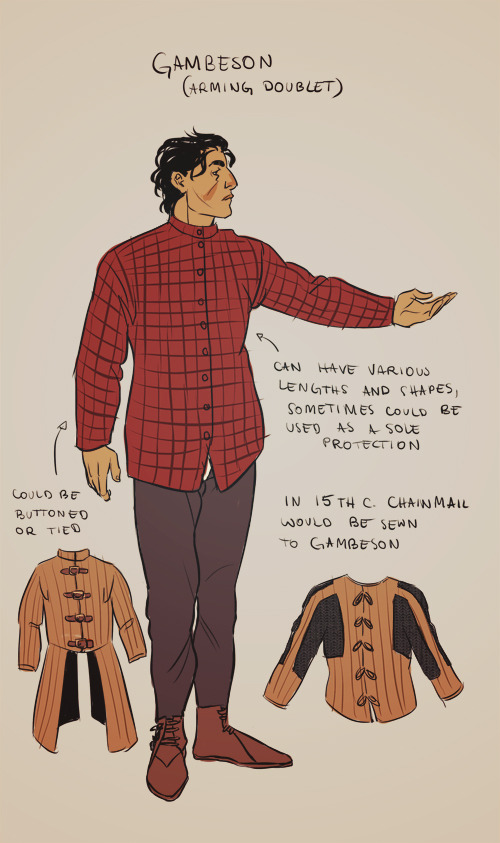
Note that the armor I drew would be worn around 15th century, the more into the future the less and less components knight’s armor had (i. e. in early 14th century instead of greaves a knight would wear long boots only; in 12th century knights didn’t wear plate breastplates and instead a chain mail only). Also the design of armor pattern changed by year and was different in every country (i.e. in eastern Europe armors, while still looking European, were heavily influenced by Turkey). so just make sure you always do research whenever drawing an armor. And one more thing to keep in mind is that armors were expensive, knights wearing a full plate armor weren’t an often sight.
Some links that may be useful:
Armour Archive (I strongly suggest to browse its forum, there is no country or period of which armor wouldn’t be discussed)
Therion Arms (armorer’s page; each accessory is photographed in big resolution and several time so it’s a nice page to use as reference for drawing)
Revival Clothing (another store, but both with medieval clothing and armors; I suggest to read the articles, they’re often supported with pictures)
Basic Armouring:A Practical Introduction to Armour Making (pdf)
Educational Charts (pdf, shows how armors and weapons changed over the years)
Medieval & Renaissance Material Culture (actual medieval resources, mostly paintings. And my favourite subpage - women in armor)
Dressing in Steel (youtube; a demonstration how to dress in armor)
How shall a man be armed? (youtube; another demonstration but with 4 different knights from different periods)
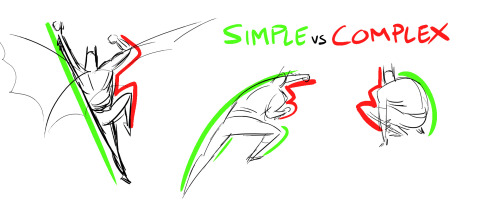
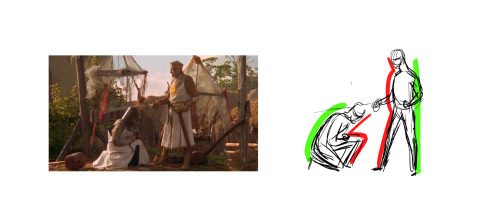
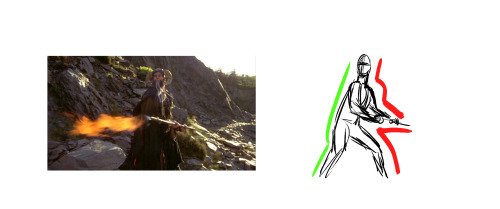
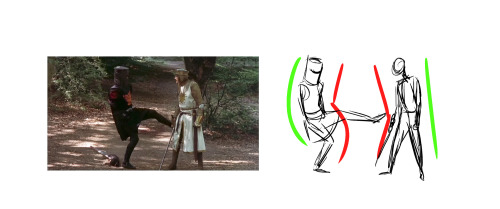
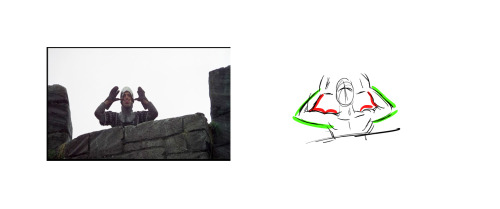
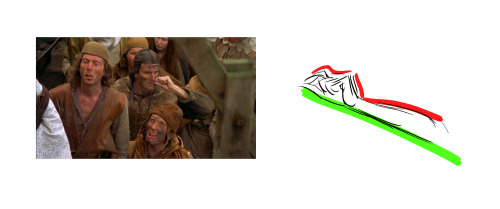
Last night, Paul Mendoza and I spoke to our animation class about the concept of “Simple vs Complex,” and I thought some of you might find this useful. The idea is to balance a strong pose by contrasting simple and contrast forms. The simple (stretching) side of a pose is usually your main line of action, while the complex (squashing) side is where you get most of the interest and the focal points of the pose. “Simple vs Complex” also works for individual parts like a flexing arm or a hand pose. This concept enhances clarity, appeal, and energy in any pose.
Bruce Timm’s style illustrates this concept best, but great actors (like the Python troupe) display this kind of posing all the time.
Have at it!


i just found myself using this random trick that one of my art professors taught me and i thought other people might like it!
other tips: -at rest, the elbow hits the bottom of the ribcage, and the wrist hits the bottom of the crotch -the distance from your inner elbow to your wrist is about the same length as your foot -the length of your hand (from wrist to the tip of your middle finger) is about the same length as the distance between the bottom of your chin and your hairline
so, if you have a feeling that proportions are wrong on something, those work as quick gauges. like, if a character’s forearm looks too long, try to visualize their foot being the same size and see if that works. if the hands look too big, look at their size in relation to the face.
hope this helps someone!
should i be trying to master like each feature before i try drawing a face? like should i be able to draw eyes really well, then move to the nose, mouth etc? i dont know when i should be moving on to the next step. right now, mouths are a frustrating thing but i also try to draw the whole face because proportions practice, so its all very over whelming and then i get discouraged cause drawing lips is so hard and putting everything to make a face is hard ;-;
I think if you’re having trouble with a feature you should definitely do some studies of it! I practiced the face all at once so I don’t really think there are any rules to this haha. The downside to trying to master one feature at a time is, like you said, not being sure when to move on. You might end up drawing amazing eyes but the rest of the face will always be a little off because you haven’t put enough time into studying the other features. I’m sure you’ve also come across artists who draw nice heads and it all falls apart when they try to draw a fullbody. Personally I’d just tackle the face all at once, take time to study the separate features but try not to neglect any of them and don’t think you can’t draw a face because you aren’t a master of a particular feature! You can do it * V * Here are some quick notes on lips, I hope they help a little.

Hello gamers, local disabled cane user is gonna teach you how to design a cane.
Tl:dr: design a cane based on comfortability and the disability of the character
First things first, you need to know why you’re character needs a cane. Do they have chronic pain? Unhealed injury? Muscle or joint issues? Do they have poor blood circulation which makes them dizzy? Do they need the cane all the time or does their disability fluctuate? Do they use a wheelchair or a walker sometimes?
There’s a lot you should know about a characters ability/disability in order to find what type of mobility aid they should be using.
There are a bunch of different kinds of canes/crutches. The 4 on the left are crutches. The difference between canes and crutches are, crutches are meant to keep weight off your legs as much as possible, and generally you use a crutch on each arm. Canes are used for stability and you usually only use one. Folding canes are great for people who only use their cane sometimes

Great! You’ve picked either a cane or crutches for your character. I’m done right? WRONG. Cane handles.
This is probably the most important part of canes because if you have the wrong handle your wrist will die.

I gently kiss all the canes on the left, they are all very good for grip and wrist, although the middle left is designed for left or right hand so you cannot switch hands with it.
The ones on the right are also pretty good, they wouldn’t be my first choice but they are still great. The top one is also very good as it has a wristband so you can’t drop it as easily. (Trust me when I say I DROP MY CANE SO MUCH)
Sigh. The middle cane handles… the bottom one I have never actually seen but it looks like it would kill my wrist. The top one is uncomfortable for long period uses, but it is good for if you’re a shepherd. And the pimp cane… the knob cane… it’s awful. Just no. It’s hard to grip, it is unstable it’s bad it’s awful I throw it into a fire. Please don’t give your character, they don’t deserve that pain
Now you know the basic ergonomic things, there are different shafts for canes and crutches

You can really get creative with this type of thing, just as long as it looks stable enough.
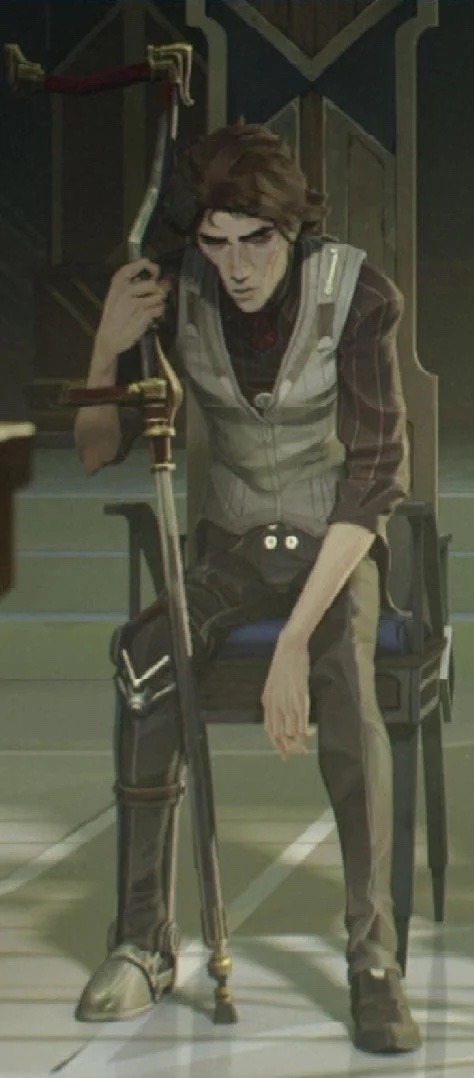
Here are some good examples of pretty canes that are ergonomic and good to use! (featuring victor arcane who i adore)


Add some cute details to the cane if you want! You can add stickers, colours, grip support. And while I love the concept of cane swords those are very unstable, if you want a cane weapon you can make it lead weighted, put knives in it. A poison vile in the shaft. Be creative.
Just some of these components are important to consider with a disabled character. There’s a lot more to consider with wheelchairs and walkers which I don’t have the experience with.
If you do have any questions my asks are always open to questions about this stuff! I’d love to help if you’re making a disabled character.
Tutorial: Expressions~
First off, I gotta start off with the typical Disclaimer.
*ahem*
This is a tutorial based off of MY knowledge and MY experience. My advice is just that, advice, and is not is anyway, shape or form, absolute. I am still learning and do not consider myself a professional or expert. Look at other sources, look at other materials, expand your inspiration, don’t just look at this tutorial and call it good. And most importantly have fun~
Alright, with that out of the way, before I can get to the actual expressions, we need to discuss an important concept known as “Squash and Stretch.” You’ve probably heard of it before. Squash and Stretch was a method that was invented (I use this term a bit loosely) by Freddie Moore, a Disney animator from the 1930s to 1940s. He was the animator for the Dwarves in Snow White and he gave these characters a spongy flexibility that made them feel more real and gave pliability to the face that made them come more alive.

Even outside the world of animation, Squash and Stretch is essential and you’re going to squeeze much more life out of your characters if you understand and are willing to push the weight and flexibility of their faces. This also doesn’t only apply to cartoons, look in the mirror and make funny faces and strange expressions and you’ll notice how squishy your face is.
The next concept to be aware of is the Acting Elements of the Face. This is a concept I never really thought about until I read Tom Bancroft’s Character Mentor, a book I have recommended many times. The Acting Elements are the basics of character expression and focuses on breaking down the elements of the face in order of importance to properly communicate an expression to the audience. These are not set in stone and a lot of times their order can be switched around depending on the expression. This is the default order Bancroft uses in his book:
1) The eyes
2) The eyebrows
3) The mouth
4) The neck
5) The nose
I’m not going to go into much detail about this; otherwise this tutorial will run on forever, so DEFINITELY give Character Mentor a look for a better understanding.
Here are some expressions I whipped up, notice the different ways each of the above elements contributes to the overall expression. Try to identify which element is strongest in each one. Also notice how some elements repeat (such as the use of the eyebrows in the bottom two) but they’re still different expressions.

I personally find that I always build from the eyes out when building an expression. Ever heard the phrase “The eyes are the windows to the soul?” well guess what? THE EYES ARE THE WINDOWS TO THE SOUL! This is why people look away when their embarrassed, why their gaze shifts when they’re lying, why their eyes grow wide in awe. It’s what makes a hero seem cold when they hold their gaze at the display of heartless behavior or gives a villain a moment of redemption when they turn away from a cruelty.
Part of the reason why Glen Keane’s characters are so incredible is the way he expresses a character through their eyes. He says “If you’re going to make a mistake, don’t make it in the eyes. Because everybody’s looking at the eyes.” He creates these characters that are filled with passion and before that passion translates into body language or into an expression, if bursts out through the eyes.


Remember when I brought up that the order of the Acting Elements is flexible? As I said, I tend to start with the eyes when expressing and character but sometimes that just doesn’t “work” with the character. Take a look a Max, from Cats Don’t Dance (if you haven’t seen the film, I highly recommend it, even if just for the animation). His face is almost ALWAYS in the same position, with the same expression, completely stiff. The only thing that moves is his mouth and it’s animated in a way that is both comical and intimidating! This is a common theme with his character, fluid motion against unmoving bulk. It contrasts and guess what? Contrast creates interest! <——Remember this phrase, because it applies to everything!

Next, pushing your expressions. Don’t be afraid to add that extra “umph” to a characters expression. Unless you’re animating, you don’t have the luxury of constant motion and steady frames, so make the most of a scene, make it clear to your audience what your character is feeling. Check out some of these simple examples below.

Now some of you probably thought the first expression was better than the second. And you know, you may be right! Sometimes a subtler expression speaks volumes more than a more obvious one. It’s important, however, to understand to how to make the most use of your character’s face. But in the end it all boils down to the character. Which leads me to my final segment of this tutorial…
A character should express themselves through their emotions. Just like costumes, colors, body language, etc. expressions are ultimately a tool used describe a character, to visually tell a story about them. When dealing with different characters, try to avoid “recycling” expressions, ESPECIALLY in the same scene/picture/moment. A good exercise is to draw two or three different characters with the same emotion but give them different expressions.
Or better yet, draw them reacting to the same situation.

Your goal should be to make each expression true to the character. Their expressions should tell the audience something about them. The same way you might bold a word or phrase to emphasize its meaning, a character should express themselves in ways that emphasize who they are.
hhhhh your art is so beautiful u v u. I'm wondering if you could do some references on backs? Of course only if you have time and feel like doing so o v o;;;


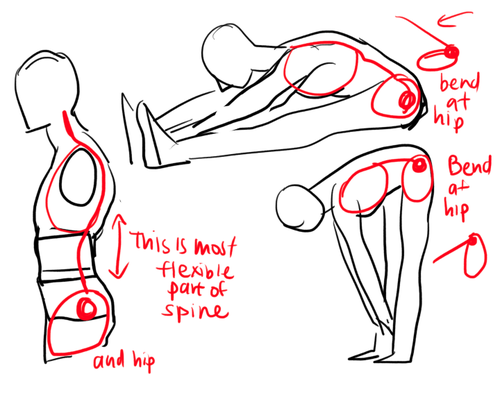

forgive my handwriting I HOPE THIS HELPS A LITTLE BC IM NOT RLY SURE IF IT MAKES SENSE also here are some pics of rl backs which you can also locate via google 1,2,3,4,5(nsfw bc butt)
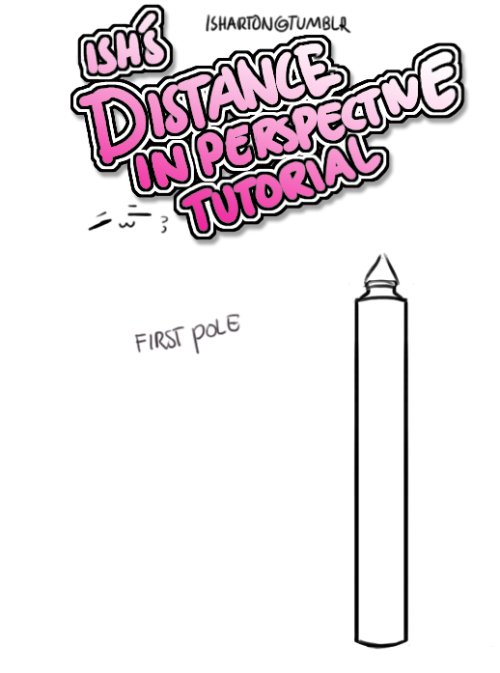

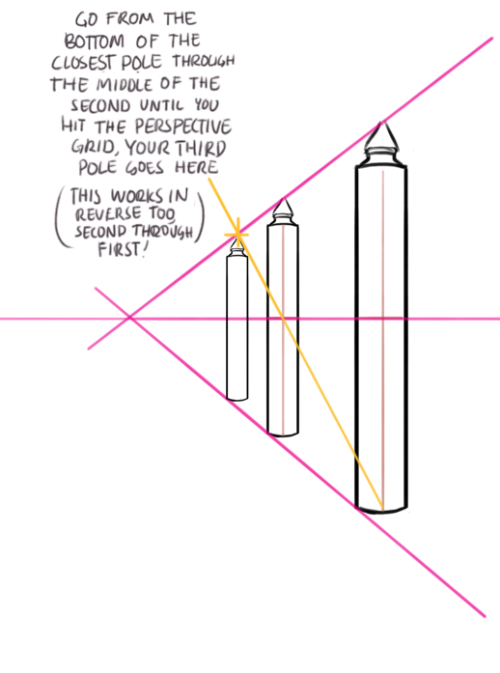

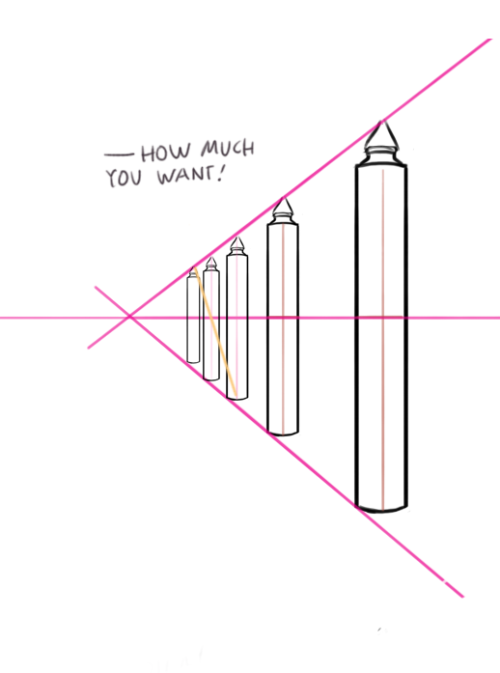

Thing i learned some time ago! hope you all find it helpful ( perspective grids can be your friend!)


sorry for any grammar mistakes
long time without a tutorial… I tried to explain my general process of working here, hope someone will find it useful :)
How to other eye
ALRIGHT, so, I know a lot of people have trouble making eyes match. Yesterday I found out a way to make it significantly easier! Here’s a small guide.

Well, first of all, you have your face. mark where the eyes should be on it.

Then mark the corners of the eyes and go over the middle again, to make the next step easier

Alright, I know it sounds a bit crazy, but draw this shape, trying to make it as symmetrical as you can.

Draw the eyes using that shape as a guide and TA-DA! They match! For different eye shapes you tweak the angle of the two guide lines.

And it also helps with angles where the size and shape of the eye is distorted, you just put it in perspective.

I think the theory behind it is that the thing that makes it hard to make the eyes match is the angle of the corners, and this type of guideline helps make them even, which makes the eyes look symmetrical. Welp, here it is! I hope it helps someone!


I made a Room Building tutorial! Lemme know if it helps! 🧡
Tip me here| Commission info here!
Hey friends!
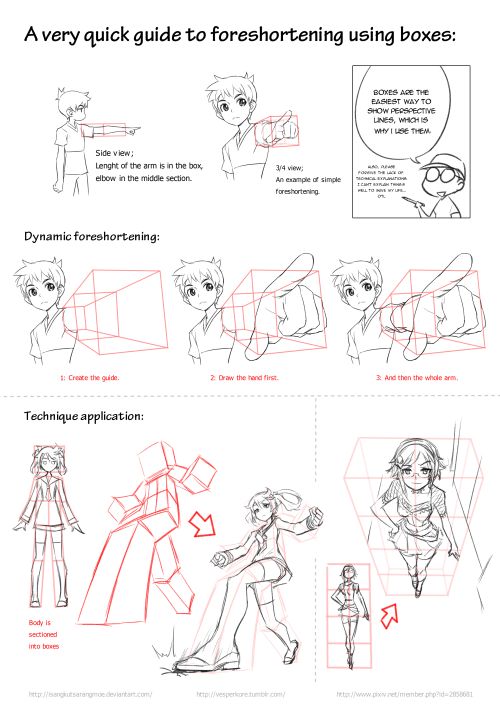
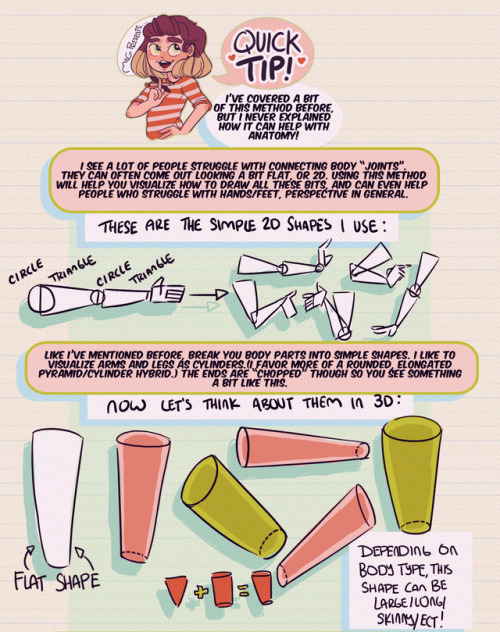
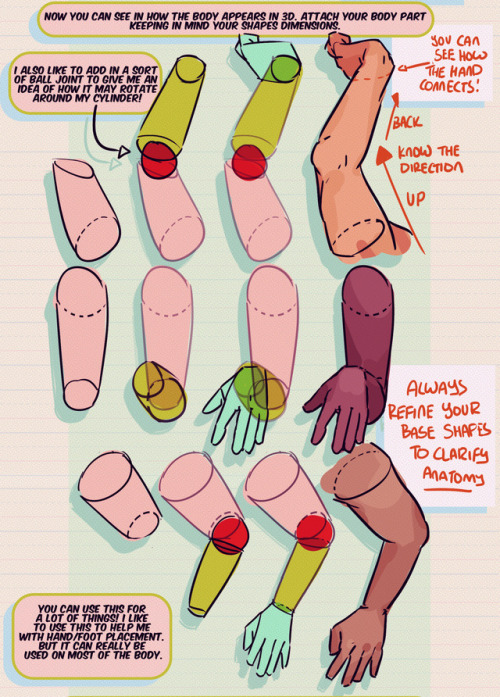
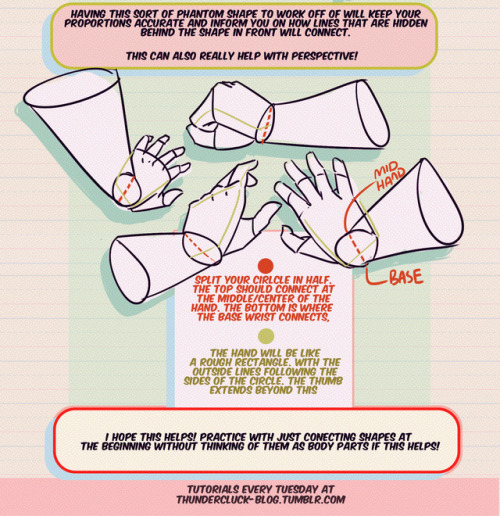
Meg here for this week’s TUTOR TUESDAY! This week I go over just a little trick that I like to use when drawing and connecting arms/hands/legs/feet ect. This helps me with foreshortening as well. I hope it helps you folks as well! I have tutorials that talk more specifically about hand/foot/leg anatomy here. If you have any tutorial recommendations send ‘em in here or my personal. Now go forth and I’ll see you next week!
fat bodies tutorial!
ALRIGHT SO my pal @kalreyno wanted help with drawing fat characters and as a fat artist i felt like i could give a bit of helpful insight on that. there’s also been a lot of complaining about “boo hoo fat characters are hard to draw so i can’t include them in my work Ever” goin on lately so if that’s your case then this is for you too!! and also just for anyone who would like help with fat bodies in general, ofc. anyway, let’s get this show on the road!!

let’s start with some common misconceptions. these are the two main attempts at chubby bodies i run into, so i’ll focus on them.
the Anime Chubby i see everywhere, and it’s just……so wrong in many ways. first of all, there is almost no additional body fat compared to your average thin character - except for where it’s added in “attractive” places (breasts, hips, thighs). the breasts are way too perky, and don’t have the realistic shape fat would give them (though how to draw accurate breasts is another tutorial all on its own lmao). there is still a thigh gap, which usually only happens in very thin people, and bones are still visible on the surface of the skin, which also rarely happens in fat people.
the Michelin Man is better in some ways, but still not that great. it’s a slightly better attempt, but basically all that’s done there is taking a thin character and blowing them up, while giving no thought to fat distribution. the thigh gap is usually still present, and they look a lot more hard than soft - and fat is very soft and pliable.
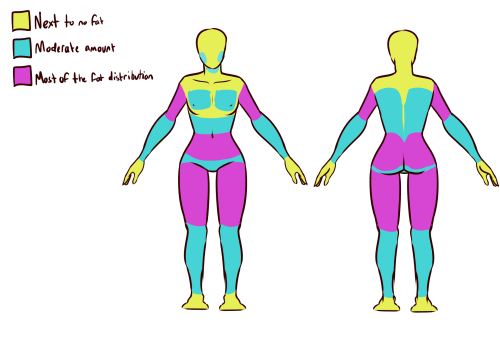
here’s a chart on how fat usually distributes (if you can’t read my messy writing, “1. next to no fat, 2. moderate amount, 3. most of the fat distribution”). basically, the more muscle an area has, the more prone it is to develop fat, such as the abdomen, thighs, and upper arms. it’s important to note that fat sits on top of muscle, and that it does distribute in different levels, and not evenly across the body as shown in the Michelin Man.
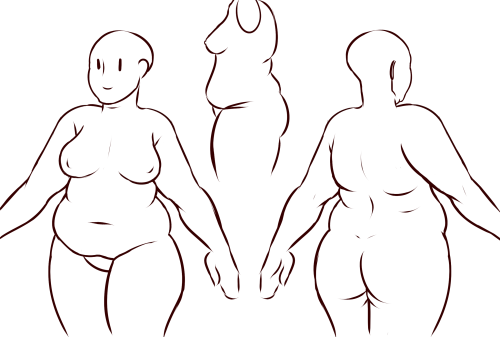
now, here’s an accurate fat body with all of that kept in mind!! notice how the fat isn’t only kept to aesthetically pleasing areas, and how it sits realistically on the character’s body. their breasts sag a lot more, which happens even in thin people with larger breasts, and the nipples are pointing more downwards than straight out. there is no thigh gap in sight, there are no bones in sight, and most importantly, they have fat rolls, which are very important in drawing a convincing fat character!! as far as i know i’ve never met a single person with no rolls at all, and everyone has them, whether thin or fat - they’re just more prominent and more consistently present in fat people. pay close attention to where they are and how they’re shaped.

here are a couple of drawings showing how fat is affected when sitting vs stretching. as seen in the first, the fat specifically on the stomach is distributed a lot more evenly and stretched out, so it becomes “flatter”. the love handles are still pretty visible, though, as well as the fat on the thighs and arms. the breasts are raised with the shoulders, and the fat on the shoulders and near the neck forms rolls as it’s being pushed together.
in the second, there is a lot less room for distribution, so the fat is all pushed together. the breasts sag and the stomach forms rolls and spills into the lap. a good analogy for the way fat works is to liken it to a water balloon, and thinking of how its shape would change when resting flat on a surface, hanging off of a ledge, held upright, etc.

here are a few extra tips i find a lot of people miss!
first on the top is the hip/pubic region. the first circle is showing the way the bellybutton is folded in fat people, as opposed to stretched out in thinner people. the second is the stomach fat spilling over onto the pubic region and creating a separation in the two areas, which is something that’s missing in a lot of art. in addition, the pubic mound also gains fat, making it round as seen in the profile drawing i did up there (i’ve heard people refer to it as fupa?). the last in the hip region is the lack of a thigh gap. i can’t stress this enough!!!! if you’re trying to draw a convincing fat character, make sure their thighs are pretty much always touching!! for reference, mine literally don’t separate until my feet are about 2ft from each other.
the bottom right is showing the double chin, which a lot of people are afraid to draw!! fat does distribute itself here too, and there’s nothing wrong with it, so don’t feel like you shouldn’t give fat characters a double chin in your work for fear of it looking like a caricature.
in the bottom middle, it’s showing how fat affects different types of breasts with the presence of more or less breast tissue.
lastly, at the very right are stretch marks with their usual locations and directions, which i also can’t stress enough!!!!! i sometimes forget to add them honestly, but they’re so important in accurately portraying fat characters, as they literally come from the skin being stretched from fat being gained (and they’re also just rlly neat lookin like why wouldn’t you lmao). some people have less and some people have more, feel free to experiment with them!

the last thing is body types!! there isn’t one single way for a person to be fat, so feel free to experiment with shapes once you’ve learned the basics!!
so there you have it, a tutorial on how to draw chubs!! now go forth and make some accurate fanart or some rad fat characters, because the world could always use more of both. hmu if you have any questions or concerns, and thanks for reading!!
EDIT: someone pointed out the bad wording in the tutorial. thank you for bringing it to my attention and sorry for offending anybody. i’ve updated the tut, so please reblog this one!


somepony asked how i draw shoes & here is my thought process :)
i watched one (1) video on how to draw hands that changed my life forever. like. i can suddenly draw hands again

these were all drawn without reference btw. i can just. Understand Hands now (for the most part, im sure theres definitely inaccuracies). im a little baffled