Side-blog managed by someone who tends to stack resource and tutorial posts under her blogs' drafts as future references for anything useful in life. Circa 2014. REOPENED.
230 posts
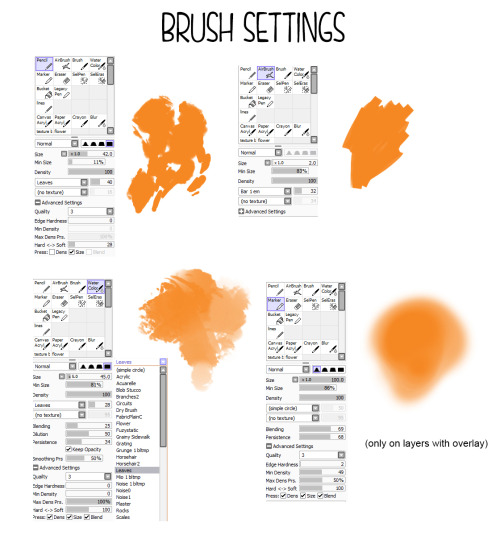
My Brush Settings On FireAlpaca
my brush settings on FireAlpaca
A type:


type: bitmap brush min width: 0% brush spacing: 90 check: size by pressure opacity by pressure rotate apply fore grand color brush control opacity: 85%
——————————————————————————
B type


type: bitmap brush min width: 0% brush spacing: 25 check: size by pressure opacity by pressure rotate apply fore grand color brush control opacity: 50%
——————————————————————————
I used default pen brush, default watercolor brush and A type brush in this picture.
firsrt, I drew the outline with default pen brush. I painted the color of skin and hair with default watercolor brush. and then I used A type brush after flatten image.

-
 starrylibraryofresources reblogged this · 1 year ago
 -
 pinkasketch liked this · 3 years ago
 -
 ladycaitlin0429 liked this · 5 years ago
 -
 ss82arts-movin-accounts liked this · 5 years ago
 -
 kaoarika liked this · 5 years ago
 -
 strawberrysimby liked this · 5 years ago
 -
 shadowqueen1220 liked this · 5 years ago
 -
 vexe1ius liked this · 6 years ago
 -
 f1nn-03e liked this · 6 years ago
 -
 kaicono-blog liked this · 7 years ago
 -
 paraciti liked this · 7 years ago
 -
 karamicrabbit liked this · 7 years ago
 -
 d1n0p1ll0wz liked this · 7 years ago
 -
karamicrabbit reblogged this · 7 years ago
-
 agentdogs-blog liked this · 7 years ago
 -
 tokyoharlot reblogged this · 8 years ago
 -
 thyrusprime liked this · 8 years ago
 -
 heavenpucci liked this · 8 years ago
 -
 sylfrfax liked this · 8 years ago
 -
 apodictic-twinkle liked this · 8 years ago
 -
 bootywitch liked this · 8 years ago
 -
 princessphiine liked this · 9 years ago
 -
 brisna liked this · 9 years ago
 -
 cacophobic liked this · 9 years ago
 -
 bananeyyy reblogged this · 9 years ago
 -
 shashmi liked this · 9 years ago
 -
 vvacks reblogged this · 9 years ago
 -
 altheathephantom reblogged this · 10 years ago
 -
 gluecksstreber liked this · 10 years ago
 -
 keolle liked this · 10 years ago
 -
 mokatonta liked this · 10 years ago
 -
 super-robotto liked this · 10 years ago
 -
 geecrat liked this · 10 years ago
 -
 biozones liked this · 10 years ago
 -
 daemonjpeg liked this · 10 years ago
 -
 kaori-kuroda liked this · 10 years ago
 -
 fpacatuto reblogged this · 10 years ago
 -
 numisrefs reblogged this · 10 years ago
More Posts from Starrylibraryofresources


An artist : Aw man! I saw my arts were reposted on Instagram. I’ve asked them to take my arts down but they ignored me.
Me : Say no more! Click this link, then click ‘fill out this form’. Fill the form and wait for about 1-2 days, the staffs will remove the image you were reporting from the reposter’s account :^)

How to Bejewel Your Tights
Shine on, you crazy diamond-legs.
will you upload progress pics of your art? e.g. from rough sketches till you colour it
I always use Overlay layer for my art.

Tone Layer + Overlay Layer


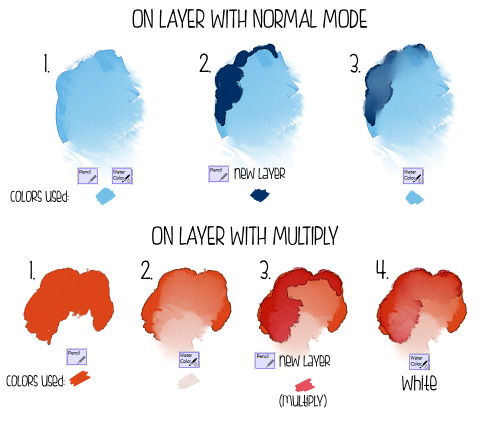

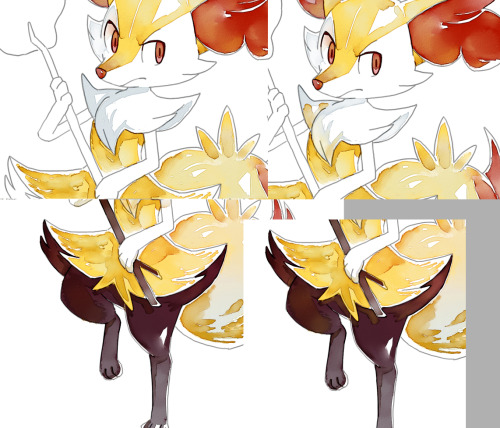
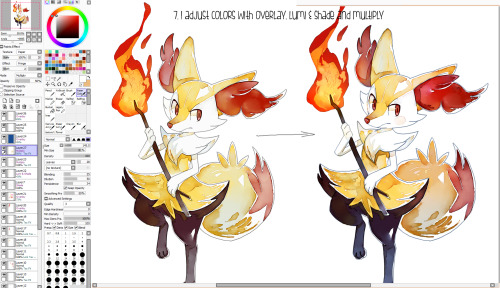
The tutorial of how I achieve watercolor effect in Sai! :) I highly recommend using real watercolor paintings (your own or ones found on the internet) as reference.
And here you can find a few useful links:
You can download the Sai file of this picture here: link
Video process of painting another picture: link
The old watercolor tutorial: link
Sai brushes (none of them is made by me) link + file you need to open them in Sai: link
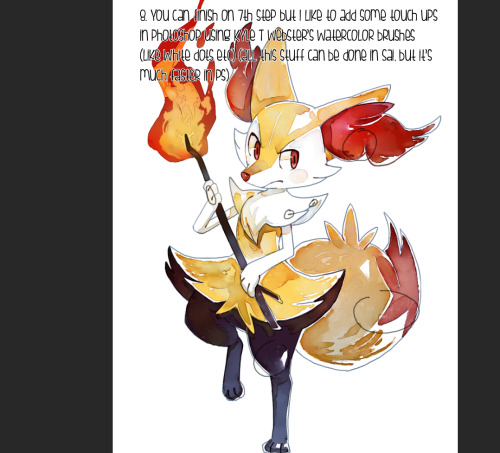
Awesome watercolor brushes made by Kyle T Webster: link
Here’s the finished painting: link