
Blouse Collars, 1940s-50s - ByCharlotte Dymock.
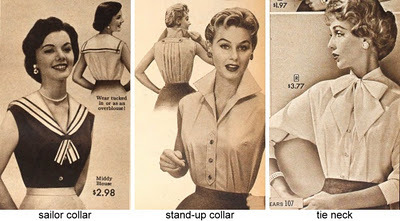
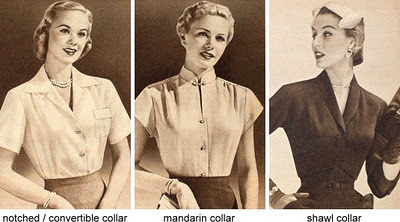
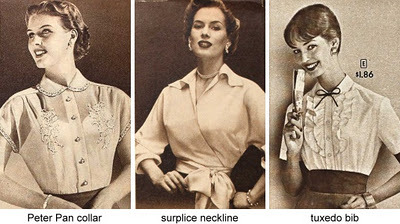
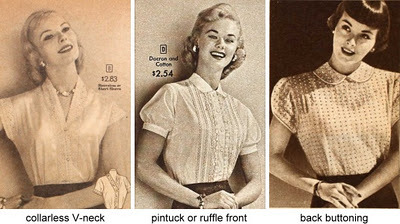
Blouse Collars, 1940s-50s - By Charlotte Dymock.
-
 artrefo reblogged this · 8 months ago
 -
 averyintrovertedfangirl reblogged this · 9 months ago
 -
averyintrovertedfangirl liked this · 9 months ago
-
 davelleparallel liked this · 10 months ago
 -
 whistlingonthewind reblogged this · 10 months ago
 -
 hollowcportcresources reblogged this · 11 months ago
 -
hollowcportcresources reblogged this · 11 months ago
-
 ironthingdeangiant liked this · 1 year ago
 -
 idontknowok1 liked this · 1 year ago
 -
 nerd-chocolate liked this · 1 year ago
 -
 sweetcherrystarlet reblogged this · 1 year ago
 -
 seaxdevil reblogged this · 1 year ago
 -
 raspberrycrepe liked this · 1 year ago
 -
 shakychameleon reblogged this · 1 year ago
 -
 blueboxbeagle reblogged this · 1 year ago
 -
 lostandyearning liked this · 1 year ago
 -
hollowcportcresources reblogged this · 1 year ago
-
 hollow-port liked this · 1 year ago
 -
 voidref reblogged this · 1 year ago
 -
 losmiaus reblogged this · 1 year ago
 -
shakychameleon reblogged this · 1 year ago
-
 noriyucko liked this · 1 year ago
 -
 spiltpencilink reblogged this · 1 year ago
 -
spiltpencilink liked this · 1 year ago
-
 idrawstuffidk liked this · 1 year ago
 -
 enigma-the-anomaly liked this · 1 year ago
 -
 pixelchaos00 reblogged this · 1 year ago
 -
pixelchaos00 liked this · 1 year ago
-
 7yd1a liked this · 1 year ago
 -
 girlwiththegreenhat reblogged this · 1 year ago
 -
girlwiththegreenhat liked this · 1 year ago
-
 st-dionysus liked this · 1 year ago
 -
 hobnob-moth liked this · 1 year ago
 -
 frankforested reblogged this · 1 year ago
 -
 blackdragonflower reblogged this · 1 year ago
 -
blackdragonflower liked this · 1 year ago
-
 shinas-spicy-chicken-leg reblogged this · 1 year ago
 -
 villaimouse liked this · 1 year ago
 -
 tronoya liked this · 1 year ago
 -
 youkilledthecar reblogged this · 1 year ago
 -
 riot2011frontlines liked this · 1 year ago
 -
 mattlauzon liked this · 1 year ago
 -
 bitsubshocorsi liked this · 1 year ago
 -
 hanobe8 liked this · 1 year ago
 -
 ohgodpleasenoaaaaahh liked this · 1 year ago
More Posts from Voidref
Every artist who sees this post should do the following:
- Watch the video.
- Follow the instructions
- Reblog
I can’t stress you enough about how important these exercises are for your drawing hand. You don’t wanna get CTS of Tendonitis and similar stuff that will prevent you from making art or even hold a pencil.
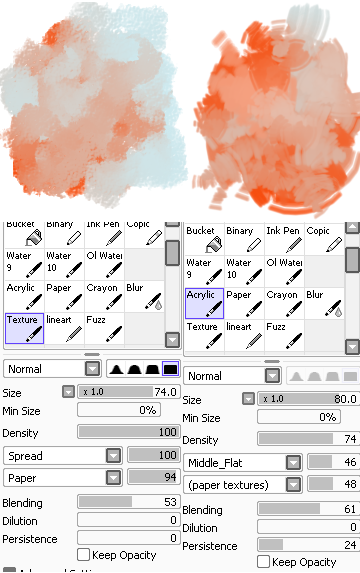
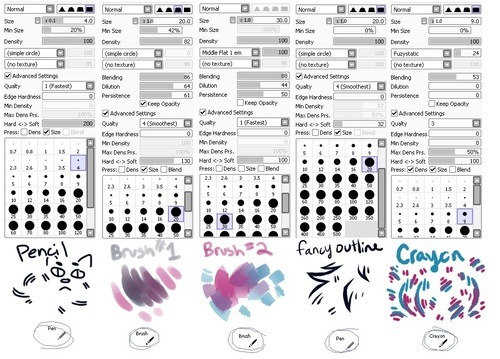
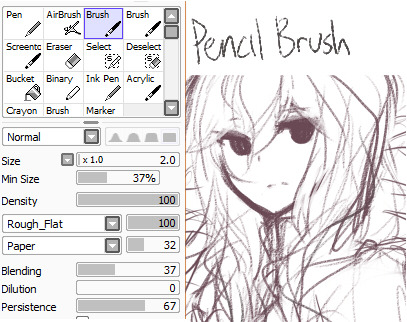
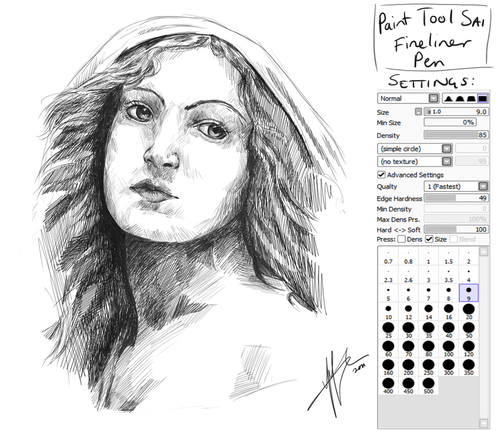
Paint tool SAI Masterpost
Okay so someone i follow lost all of her custom brushes so i made a masterpost for anybody who needed it

First i have some links:
link 1
link 2
link 3
link 4
link 5
And now full pictures i found in google a looong time ago:

And last a blog with a bunch of these:
http://ptsbrushes.tumblr.com/ (though it doesn’t update much)
erhmm…yep that’s about it
enjoy!

your position on your high horse regarding creature designs was well earned. since you seem to have extensive knowledge on how animal bodies work, do you have any advice for someone who knows literally nothing about non-human anatomy and wants to start designing their own critters?
Oh man, what a question! I get asked this a lot, so I’m gonna take the opportunity to lay out some guidelines I follow when making my own beasties. It’s gonna be long, but I hope it helps a few people!The biggest, best tip I can give you is to reference from life - all great fantasy creature designs have basis in things that actually exist, no matter how whacky they are. Studying the anatomy of animals hands-on - be it a dog, cat, bird, or even a horse - can give you loads of inspiration for making your own monsters! I’ll go through my own process for emphasis, it usually starts like this:1. What do I want to make?2. Where does it live?3. Is this environment similar to something on our world?4. What do animals that already exist in that environment look like?5. Reference-gathering6. Construction7. Tweaks and edits8. FinishThis SEEMS like a really intensive and time-consuming thing, but I promise it’s not! Steps 1-4 get knocked out really quick, usually all at the same time. Say I wanna make a sea dragon. Okay, what is it? A dragon, obviously. Where’s it live? The ocean. Are there any animals that live in the ocean we can use for inspiration?

NICE!!
At this point, it helps if you narrow down what kind of creature you’re making a little bit further. What does it eat? Is it an herbivore? Is it a predator? Is it an apex predator? Is it a scavenger? All these questions can help you streamline the creative process. Let’s say our sea dragon is a carnivore.

Cool! So now we’ve got a couple great animals to work from. Mostly sharks, seals, barracudas, dolphins, there are all sorts of things to pick and choose from. Now, if you’re making an ocean carnivore, but you want it to have traits of something that isn’t an ocean carnivore, that is absolutely fine. That’s the beauty of creature design! As long as the overall aesthetic of the animal fits what it does and how it lives, you are golden. Check out this rad dinosaur skull:

Shark teeth are awesome, but let’s switch up our dragon a bit and use these instead!By the time you’ve hit this point, you’re at Step 5, which is getting references. I figure I should take a second to tell everyone that references are not cheating. References never will be cheating, and without them, we would not be able to do what we do artistically. References are the backbone of creature design, there is no shame in needing to spend some time finding the perfect reference photo. “Photo” is an important word here though - unless you’re using anatomical diagrams (which I’ll mention later), copying another artist’s work is not a good reference. When you do this, you also copy the mistakes that artist makes, as well as the tips and tricks they use to render their subject matter. The issue is, you’re not becoming privy to what those tips and tricks are. So you can copy how your favourite artist draws paws, but if you don’t actually know how paws work, you’re both cheating yourself out of important info AND drawing something you don’t understand. Don’t do that to yourself! Referenced and informed work will always look better than cheap impersonations.Off my soapbox and back to that sea dragon though! Here’s some nice critter anatomy bits I put together that I wanna use:

I decided I wanted to create something that used large fins to move itself, like a sting or manta ray. Sharks are the ultimate ocean predator, so I’m basing a lot of the beast on them, but I want something with legs - something that can go on and off land - so I’ve got references of otters and crocs to see what limbs will work best. Since it’s a dragon, I’m gonna try and make the big fins look like wings, so I’ve got a little flying fish up there for reference/inspiration. The skull is, obviously, all for toothy aesthetic, and the nudibranch has a colour palette I really think will look nice. Once you’ve got your references in order and an idea of what you want, you’ve hit Step 6 - Construction! The most fun and frustrating part of the whole deal. It may take a couple tries to sketch something that looks balanced and functional, but keep at it. I can almost guarantee most of your ideas will need to be tweaked and revised - the creatures I’m most well-known for have been through five or six revisions, and are still being updated after creating them years ago! Don’t fault yourself if you can’t get everything right on the first try - keep pushing and keep challenging yourself to work hard, and if you make something you don’t like, just remember it’s all part of the learning process!In order to make the most realistic creature possible, I would recommend checking out some of the internal anatomy of the animals you’re referencing. Teaching yourself how a dog’s legs move, or a bird’s wing folds, can really add that extra level of realism to any fantasy beast you make.The only issue is that this can get a little gnarly - I have several go-to reference photos of flayed animals I use to help me out when I draw, but I understand not everyone has the stomach to look at such subject matter. Thankfully, artists far more patient than I have put together tons of drawn references for just about any animal. The Cyclopedia Anatomicae is a godsend for this, I would highly recommend it to anyone who wants to get real down-n-dirty with anatomy and creature design, but without the mess.
As for the sea dragon, it is looking fabulous!

For me, Step 6′s Tweaks and Edits goes hand-in-hand with Step 6′s Construction, since I usually end up tweaking-and-editing while I’m working. Check out the wings:

(Thanks to Paul Mirocha for the anatomical graphics)I realized that simple fins wouldn’t be enough to propel the dragon through the water (plus they looked a little silly just sticking out of the dragon’s shoulders), so I approached them as if they were a bird or bat’s wings. The structure is tweaked for an underwater creature, but this is the importance of learning proper anatomy - because I know how something works on the inside, I can add it to what I’m creating and edit it to appear believable. This way, the entire animal looks and feels like it could exist in real life, even though it’s basically just stolen parts:


After this, you’re pretty much done! This is the final step, Step 8 - Finishing Touches. Since it’s something you made, you’re more than able to go back and fix up anything about it that bothers you, or even add on new features you may think up! One thing I like to check is if the creature has a strong silhouette - if I can’t differentiate it from another animal when it’s a black blob, the design probably could use some stronger elements.

Very nice! While the spread wings and triangular shape harken back to a manta-ray aesthetic, the points on the wings and long, thick tail bring the creature away from its inspirations, and into its own category. All in all, I consider this dragon to be one of the favourites I’ve made, and a big success!
And there you have it! From start to finish, this is pretty much how I go about making the monsters you see in my galleries. I want to point out that this definitely isn’t the only way to go about doing this; if there’s another method you prefer, it’s certainly just as valid. Trust me though - if you’re confused how to start, or stuck and don’t know where to go, just browsing through the incredible flora and fauna of this world is more than enough to get those inspiration-gears cranking.I also want to emphasize that the only way to get better at creature design is to keep doing it. I’ve made some hideous and implausible looking things, believe me, and it can sometimes be frustrating when you can’t figure out just what elements a design needs, but I promise that if you keep trying, and keep making an effort, you will make things you will be proud to show off. And if constantly hunting for references feels like it’ll be daunting and tedious, there is a secret to this: the more you draw something, and the more things you draw, the more stuff you’ll have in your visual memory to pull from. I don’t need references for wings or legs any more, because I’ve studied how they work, understand their anatomy, and know how they move and what limits I can stretch them to. I cannot stress the importance of this enough: in order to be able to draw something well, you gotta know how it works. And the easiest way to learn that is references!If you wanna tell me how you make creatures, or ask for details on any other steps I may use in my process, you’re more than welcome to send me a message! I love creature creation, but what I love more is sharing tips with others to help them create more effectively. There’s more than one than one way to skin a cat, but there’s twice as many ways to make a cat-monster.Cheers, and happy drawing!-Nhy


Watercolour Skin Tones

Hi there! Thanks for your question. I don’t have these down to an exact science, but there are just a few colours I tend to use for skin tones with different ratios for each. I’ve tried to break it down according to how I think about them - I’ll first figure out whether the person is cool or warm-based. Cooler skintones have more blues in their undertone, and warmer have pink/yellow undertones, and there’s also the occasional neutral skin tone that almost reads as a green (sometimes found in olive-skin types). I always start with a very, VERY light wash of a colour, and this could be either a pale version of their final skintone or the undertone - usually a blue, yellow, or red. Afterwards I’ll start layering colours on top of that, to finally reach the darkness of colour I want. The colours used for the images below are lemon yellow (cool yellow), new gamboge (warmer yellow), quinacridone red (warmer red), quinacridone magenta (cool red), phthalo blue, and burnt umber in Daniel Smith watercolours. Sorry for the wonky face drawings, but here we go:

A very, very watered down mix for those who pretty much burn if they go out in the sun, new gamboge & quin. red. These types are very pale and tend to be bright pink-based. I’d say you could get away with the skin base being the white of the paper and just use straight-up watered down red for the very porcelain.

A darker version of above - starting to use more yellows in the mix. New gamboge & quin red. Still pink-based.

Starting to use more yellows here, with lemon yellow coming into the mix alongside new gamboge & quin red.

This is the same exact mix as above, except I layered down lemon yellow first, and then the mix of new gamboge and quin red on top of it later. It’s similar but reads more yellow.

Getting into the more olive-skinned territory with the addition of phthalo blue.

More blue, with new gamboge and quin red, and darker make a tanner skin tone.

Started using burnt umber into the mix for a richer colour, leaning red here with new gamboge and quin red.

A darker almost brick-coloured skin tone, with new gamboge, quin red, phthalo blue, and quin magenta coming into the mix.

Reddish undertone with new gamboge, quin red & magenta, phthalo blue.

Gold-based undertone - this one’s just new gamboge and burnt umber.

More neutral undertone with new gamboge, burnt umber, and phthalo blue.

Dark skin with blue undertones - burnt umber and phthalo blue with the smallest smidge of quin magenta.
I’ll usually put a bit more saturation into the skin tone mix for blush and lips, and some blue into the shadows. Again, definitely start light and layer layer layer until you find the colours you like. Experiment with what you have and see what works for you. Hope this helps!