Clip Studio Paint Tutorial - Tumblr Posts
how to center things in clip studio paint
a guide
ok so clip studio doesnt have a center feature which is genuinely insane but there is a way to center your stuff and its actually pretty easy

alright so this is your drawing. first, press ctrl+t

awesome. now go to the tool properties window. it should look like this:
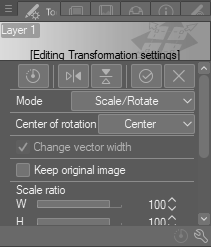
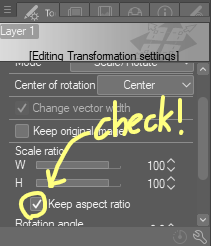
all of the centering magic happens in this window. so first, you have to check the box that says "keep aspect ratio", like this:
then, you go to the "adjust position" label and switch from "free position" to "canvas"

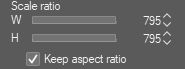
your drawing should now fill up the canvas while retaining its original proportions:

so big! last step: change the scale ratio to 100:
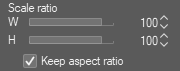

and voila! your layer has been centered. hope this helps!
aid’s collection of neat art tricks
aka I wanted to compile all the neat things I’ve learned and picked up over the years across various sources; I wish I knew some of these, but they’re scattered across a variety of social medias and some from conversations.
of course, these are not a must and just have helped me! I just wanted to put them all in one place in hopes that maybe it’ll click something in someone like it has for me. c: I’m not the best at explaining, but I hope it makes sense!
some may use Clip Studio assets but can be replicated through other methods (or done by hand in the case of how I do my lineart colouring), but do keep in mind all of these are written with CSP in mind.
this is pretty heavy in images and gifs, and is quite long.
Keep reading
felt like making a random csp obscure tips post here we go
1. a huge feature a lot of people don’t use is modifier keys! you can find modifier key settings by right clicking on a brush/tool
you actually do use this feature, but most people don’t customize them. a lot of the more obscure shortcuts are actually modifier keys, such as Alt being the eyedropper

if you want your brushes/tools to do something specific when you press a key.. theres a good chance you can set it up like that! the different shortcuts are allowed to only do certain things but its still pretty powerful, like you can make ctrl alt switch your pencil brush to a lineart brush, but that shortcut wouldn’t work on other brushes

a REALLY helpful use for modifier keys i figured out recently is making shortcuts to switch to different selection modes on my lasso tool instead of having to click the buttons to change them every time

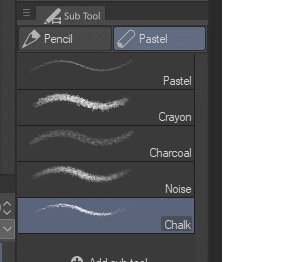
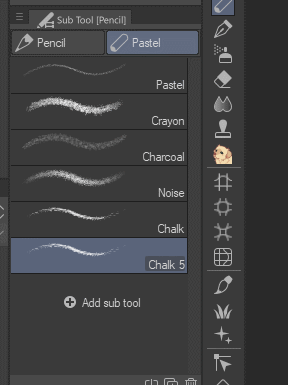
2. you can make custom brush groups and organize your brushes on that toolbar really easily. brushes are insanely customizable actually
Something important to understand is that CSP treats all brushes and tools as Sub Tools, and Sub Tools can go into Sub Tool Groups, and then those groups can have their Own sub tool groups. This is how you make groups within groups (I’m calling them mini groups for clarity from now on)
However you can drag these mini groups into the tool bar to make your own sub tool groups

You can also drag individual sub tools into the side bar to make a new sub tool group, if you drag them over one of the divider lines it will make its own section
3. You can set shortcuts for any sub tool group
If you go into shortcut settings, there’s options for your custom sub tool groups on the toolbar

Hi there! Your pieces often have this hazy, glowy quality and it’s beautiful! Do you use any overlays? I love your art!!
Oh yes I actually use a filter!
So here is how I add that slight glow to my drawings:

(This is for Clip studio paint users)
Easy version: Have your art as a png. Duplicate your only layer so you'll have two layers (the two same pictures). Select the upper layer
Go to:
Filter > Blur > Gaussian blur
Choose how much blur you want (not too much) and....BOOM!
You have a nice glow!
For CSP folks who know about Auto actions and want to be able to do it in one simple shortcut (with other cool effects):
So first you need to download the auto action retro effect v2:
(bear with me because everything is in french for me so I'm roughly guessing what it must be in english)

(Number: 1953549)
Then you are going to check your downloaded assets for that effect and click on this small thing at the bottom of your screen

This will add your effect into your automatic actions. To reach it, you need to click: File > shortcuts settings > Auto action
(this is for any auto action you might download so remember to do that each time)
This will open and you'll have your effect:

You'll have several actions available (which I invite you to test), but the one that's important is retro blur with a little bit of the others (sometimes I only use that blur)

Choose a shortcut of your choice (click on it and just tap it down) then click on "ok".
NOW you should have the blur effect. What I advise you is that once you finish a drawing, you make it into a png, jpeg, whatever file you want to post and use the effect on it (that way all the drawing is affected)

This will appear and you can play with it if you want more or less blur. If you don't want to hurt your eyes too much I would advise not put too much of blur. I also add a little bit of overlay (pink or purple, very little opacity)
And here you go!

Hope this helps ∠( ᐛ 」∠)_

A combination tutorial for character design stylization and digital coloring by tokyolondon