Hair Tutorial - Tumblr Posts
had a friend ask my for a hair tutorial :3

Here ya go pookie schmoo ☺️

A combination tutorial for character design stylization and digital coloring by tokyolondon
@passing-out-p1eces this one's for you :D (but be warned i'm a self taught artist and i didn't take any actual coures and i only watched/read a few tutorials and most of the things i do are purelly based on vibes)
(aNd bY tHe WaY sorry for my english, its not my first language and i dont really put apostrophes where they need to be etc.)
IMPORTANT INFO!!! Im soooo sorry but tumblr touined the image order; there were supposed to be always a picture of mine and alices next to each other with the same commentary written on them and i little box of text beneath them

heres the reference and what i made (i used a newer charlie [well that came out totally wrong])
and please pardon his face on my drawing i speedran it (and in my art style i draw faces a little different)

here i marked "mid points" (its where i make the hair part) charlies hair usually doesn't look parted so i just find the point that looks like it could have hair come out in 2 directions
with bangs there usually is a parting point (or more) so i just mark the one thats the most in the middle

and from there i just follow the hair flow with one stroke per curl (idk how to describe it) and i always start with the basic shape and only after add thee hair thats not like the other girls (like i said everything i do is purelly based on vibes)


and i continue like this all the way to the neck, than start the other side and then bangs the same way
aaaaand i cant add any more images so follow for part 2 if you liked this one :D /hj
(if this helps someone) i also plan on making one for irl photos where the strokes and stuff arent so obvious
and if you want to ask follow up questions feel free to ask :D :D
(also if you'd like to see how i do the whole hair i could post a speed paint)
byeeeeeeeeee

and i always end strokes when theres a point


bro someone needs to tell me how y’all be getting your wigs/straitened hair to do that; I’ve worn wigs and tried to do that look but the curling rods I used never gave those pretty waves 😫
Is this too much to ask😔🎀?///


Voltaire Hair Tutorial
I said this as a joke a little while back but just now I was supposed to do something sensible which meant I had to do it instead of the sensible thing. 😝


Hey! I love your art style and was wondering if you had any tips for drawing braids? Any techniques you found useful?
Hello! And thank you very much!
There may be easier ways of building braids than what I do, but this is just my process for drawing them, so take it with a grain of salt.
I’ll start with a line for whatever direction I want the braid to go in, if I don’t do a line and I have any kind of motion to the hair, boy do I mess it up lol

Next I’ll do wide half triangles, the line being my center, the right side or the left side always dropped lower than the other. If both sides meet in the center at the same level it’s not going to look very braid-like or have the illusion of being tangled with itself.

Afterwards you can remove the middle line if you want to take it further and connect each one with an alternating pattern like this one, giving it more of a braided look in the center.

Once the center is solid, you can add all the details you want in any style you like, curving inwards towards the center. I tend to like the more stained glass-ish appearance for hair so I’ll do very choppy, squared off lines to detail.


This works for whatever position you want to put the braid into using the wide triangles to build it up. It works for tightly woven or loose and messy braids depending on how wide/long you make the original half triangles.


I hope this helps!


Natural Black Hair Tutorial! Usually Black hair is excluded in the hair tutorials which I have seen so I have gone through it in depth because it’s really not enough to tell someone simply, “Black hair is really curly, draw it really curly.“
The next part of Black Hair In Depth will feature styles and ideas for designing characters and I will release it around February. If you would like to see certain styles, please shoot me a message!
[Patreon]
tutorial on how I (personally) draw fluffy/curly hair!!
(this does not include hair with very tight curled, or hair with high texture or "coil" curls! i can however attempt a tutorial on that as well :) )


for longer hair styles, or hair that is more wavy or more curly, simply make the bump-slope longer and more loose, or shorter and more tight depending on how you want!
I wish I could explain it better, but this is pretty much what I do! I tend to make fluffy hair at least a decent amount away from the "head", so that it looks less flat and has more volume, as well as having more upward facing "slopes" then down!
please let me know if you have any questions!
I CANT- BrOoo!!HOw dO YoU drAw a hAlOoooo??!!! AND NOW DO YOU MAKE IT GLOOWWWOWOOW?!?!🔥🔥

edit i misread cuz im dumb and sleep deprived just draw a circle and follow the light part
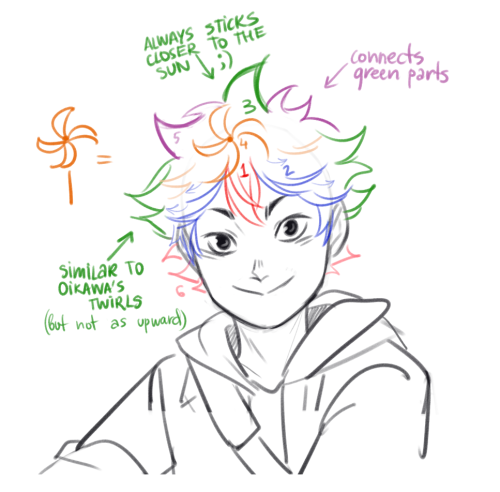
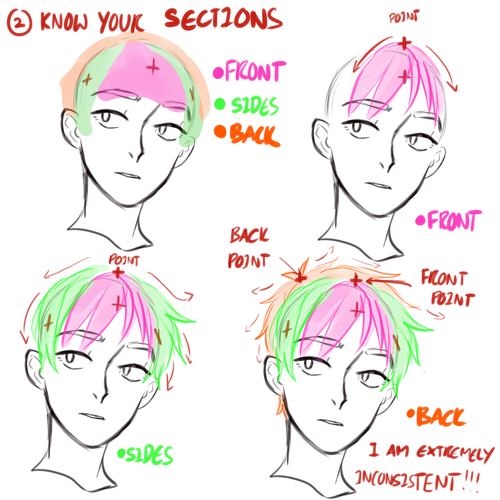
first, you need to know where your hair is coming from in the first place. i like to divide it in lenght so here we have bangs (pink outline), side hair (green outline) and back hair (blue outline).
in most front facing works the attention will be on the face so our priority is bangs, side hair then back hair. you can divide all of them into smaller subsections too but its most commonly done with the bangs, such as how i showed with the different bisexual colors.
think of hair flowing like the wind, despite there being imperfections, overlaps, strong and weak areas it all follows a general flow.
know what your hair is like in 3d and see how strands would overlap and interact like strangely shaped ribbons, which you can mostly do just by feel but still follow the wind rule
feel free to twist and turn them like ribbons too
for longer hair, strands might pop out just to loop back in as shown on her back hair (shes wearing loose twintails), those most often show ribbon-like behavior
make sure their thickness doesnt decrease too abruptly and that the lenght of the stray hairs is the same as the section they come from
now light:

know where your light source is coming from, here its useful to think in 3D instead of just picking a side of the canvas. Here, the light source is above and slightly in front of the character.
Those ball-shading exercises your art teachers made you do will come in handy here, so map out how light would fall on your characters mostly round head
now just think about which strands stick out enough to catch more light than the others, and carve shadows into sections that wouldnt catch light like that

you also just follow the general flow here, its all about that flow
pro tip: use a low opacity big size airbrush to erase the lower part of the bangs that cover ur characters face to make them ~glow~
and remember, dont be shy with the aggressiveness of your lighting