Mobility Aid References - Tumblr Posts
a guide to white canes for sighted authors/artists
happy white cane safety day everyone!
most people who don’t use white canes themselves tend to not understand how they work, and so, when portraying blind characters who use them, tend to get it very wrong. so, i thought i’d write up a small informative post about white canes, how they’re designed, and how they’re used.
most of these misconceptions seem to be based around the mistake of thinking a white cane and a cane meant for mobility are more similar than they actually are. which makes sense - most people know at least one person who uses a cane for mobility, while relatively few people interact with the blind. so, because they’re both canes, they must be the same, right? the answer: nope.
purpose
mobility canes are meant to provide additional support for people who, for whatever reason, have difficulty walking without more support.
meanwhile, the main purposes of a white cane are to:
detect obstacles
give the user detailed info about the texture of the ground
detect ledges, steps, and curbs
identify them as blind to the people around them
these things and the things mobility canes are meant to do, beyond the incredibly general “Help user get around”, don’t really overlap at all. so of course, they’re different to suit their different uses.
design
first things first: canes for the blind don’t come in any other colors, they’re always white. thus white cane is synonymous with cane for the blind - it is a color meant to identify the user as a person with a vision disability.
one thing about white canes is, because they are not meant to support weight, they don’t need to be particularly strong. it’s not like you could easily grab one and break it, of course, but they simply do not need to be the same kind of solid and sturdy that a mobility cane is.
strength isn’t a priority here. thus, their design is based around convenience instead.
white canes are hollow, making them more lightweight. also, most of them fold up so it’s easier to hold them while sitting down. if i’m on the train or the bus, i typically fold down the top section, and when i’m in class, i fold it up, pull the loop over to hold it together, and keep it by my feet.

[image: a white cane partially folded]
another thing about white canes is that they’re long. generally, they’re meant to reach to around a little bit under your shoulder. for example, im 5'3"/160cm tall, and my cane is 4'5"/132cm long. that’s a huge portion of my height!

[image: a person holding a white cane in an inactive position, while to their left is a person walking white holding a white cane.]
looooooooong
one more thing! tips.
white canes have removable tips, and this is pretty important for several reasons.
the tip of a cane will get VERY dirty. personally, when i get home, i remove the tip before i use my cane indoors; this helps keep dirty and water off my floor!
and because white canes are used by either dragging or tapping them across the ground, the tip wears down. tips can be bought separately, meaning you don’t need to replace your cane entirely every time it’s worn down too much.
and that opens up some possibility for different tips!

[image: white cane tips, from left to right: a standard tip, a teardrop tip, a metal tip, and a roller tip.]
standard tips are the ordinary kind, and come with the cane.
teardrop/marshmallow tips (different names for the same thing) are fatter. the thing is, white canes dragging across the ground will get caught in a LOT of things. listen. when my cane gets stuck in a crack in the sidewalk, the inevitable thing is that it gets jammed into my thigh and a giant bruise forms. because of their shape, marshmallow/teardrop tips get caught less often.
metal tips are very narrow and made of metal. they’ll make a louder sound when tapped, and they last way longer than nylon tips. using them outside is guaranteed to get caught even more frequently than a standard tip, but they’re quite useful in large indoor areas like a mall or a school.
roller tips are basically like a ball - they roll straight over cracks and stuff, and are the least likely to get caught. they’re also the most expensive type to get.
use
there’s several ways to use a white cane.
these two methods are the most common, and both serve the purpose of letting the user know about obstacles in their path and notifying them of curbs and steps. in both cases, the cane is swiped from 2in/5cm out from their shoulder on one side, to 2in/5cm out from the other:
method 1: tap a point on the ground out from one side and to the other repeatedly. this involves lifting the cane off the ground.
method 2: swipe the cane out from one side to the other without lifting it, keeping it in constant contact with the ground.
when standing, typically the user will hold the cane upright to take up less space and decrease the likelihood of tripping someone. so yeah they’re not gonna just keep it out stretched.
end
that’s pretty much it! if you have any questions, feel free to ask, and please tell me if my word choice is unclear/there’s some place that’s too confusing.
all of this information is stuff i learned while being trained to use a cane, as well as my experience using one.
websites where you can get more info about blindness:
National Federation of the Blind
American Foundation for the Blind
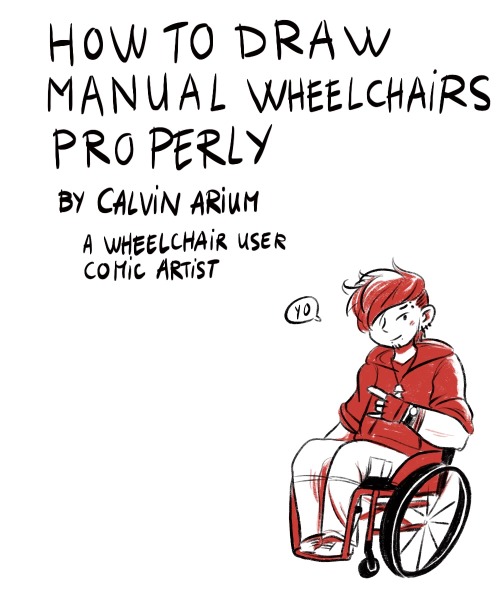


It’s here !! The guide for two-legged people who don’t know how to draw wheelchairs !!! 7 pages of infodump ! Disclaimer : I don’t know everything, I have one (1) experience of wheelchair user who used both bad and good chairs, and I share what I learned.
Image description :
1) Calvin in his wheelchair saying “yo” under a huge title “how to draw manual wheelchairs properly by Calvin Arium, a wheelchair user comic artist”.
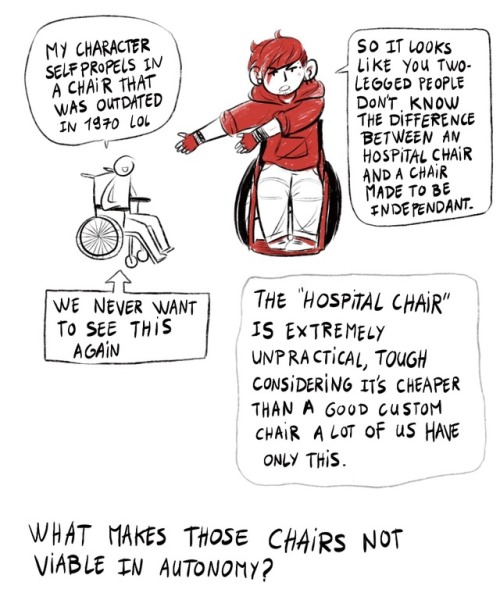
2) A character says “my character self propels in a chair that was outdated in 1970 lol” Calvin says “so it looks like you two legged people don’t know the difference between an hospital chair and a chair made to be independant” an arrow point the crapppy chair, saying “we never want to see this again”
a bubble says “the hospital chair is extremely unpractical, tough considering it’s cheaper than a good custom chair a lot of us have only this”
3) a character hurt himself trying to reach the wheels of the hospital chair. Several arrows point why the chair is unpractical : “high backrest restrain shoulders movement” “huge armrest restrains wheel access” “separated footrest : amovible, cheap, bulky” “x structure, foldable but heavy” “huge front casters for stability” “heavy wheels”
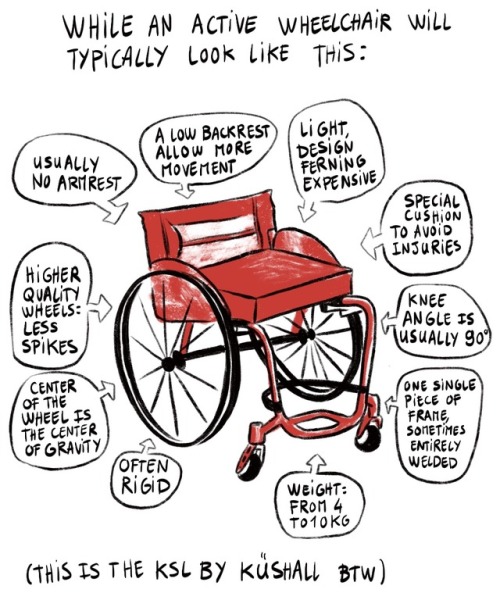
4) Several arrows point an active wheelchair (the KSL by Küshall) : “usually no armrest” “a low backrest allow more movement” “light, design, ferning expersive” “special cushion to avoind injuries” “knee angle is usually 90°” “one single piece of frame, sometimes entirely welded” “weight : from 4 to 10kg” “often rigid” “center of the wheel is the center of gravity” “higher quality wheels : less spikes”
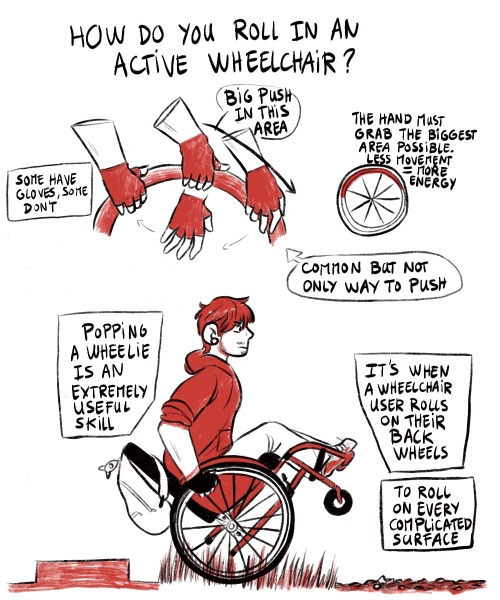
5) A hand grab different parts of the wheel, pushing harder in the second half. Bubbles says “some have gloves, some don’t. The hand must grab the biggest area possible. Less movement = more energy. This is a common but not only way to push.Calvin is on his back wheels, rolling on grass and dirt bubble says “popping a wheelie is when a wheelchair user rolls on their back wheels to roll on every complicated surface.
6) several drawings illustrate the folding frame, the ergonomic but rigid and expensive backrest, the separated footrest (only for folding frame), the handles, the folding handles, athe amovibles handles, or no handles, the cool fancy loopwheels, the pretty custom colors
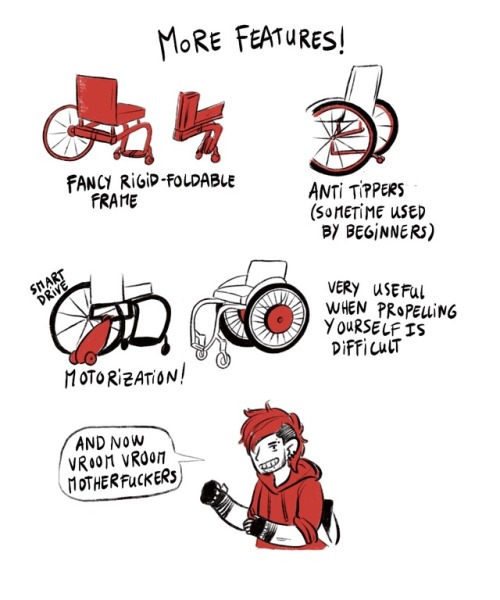
7) More Features ! The fancy rigid-foldable frame, the anti tippers (sometimes used by beginners), the motorization (wheels, smart drive) when propelling yourself is difficult Calvin says “and now vroom vroom motherfuckers”
Consider also supporting me by buying me a coffee on ko-fi : ko-fi.com/calvinarium
Thanks !
EDIT : Here is a youtube playlist about choosing, cleaning and using active manual wheelchairs in the public space, I learned a lot from those videos when I was a wheelie newbie. (Not sure they’re all captionned tho) https://www.youtube.com/playlist?list=PL3j9XB2x5HYmZqgLakRCNt_fjsVZjDAkJ


Manual Wheelchair Tutorial by Fade31415
So... I technically drew this 3 years ago but forgot to post it. I think I was going to clean up the end and make a nice recap, but I ran out of steam and then just left it as a wip for years. I got reminded of it because I was talking to a friend about how to draw wheelchairs today.
This covers most of what I view as the most common errors when it comes to drawing characters who use manual wheelchairs. I hope it helps you a lot.
Image description is in alt text, but there is a back up image description under the cut in case that does not work for some reason
[image description: a 4 picture long wheelchair tutorial. the background is white and the text, when it appears, is black and in calibri. each step will be labeled with "Step #" and a description of the drawing next to it, and "text" and then the text that is written to explain it to follow.
Step one text: So, you want to draw a character who uses a manual wheelchair? Awesome! I can't approve more. Drawing characters who use wheelchairs is a bit different than drawing standing characters, because of obvious posing differences. But to start, you need to know what parts of a wheelchair you will draw. So, without further ado, here are 3 wheelchairs!
Step one image: a simplified drawing of a chubby woman sitting in a quickie GPV manual wheelchair and resting her hand on the handrim of one of the wheels. this is labeled "the artist"
step two: next there is a lineart drawing of three wheelchairs. one is a tilite TR series 3. this is an ultralight wheelchair with a bucket seat (the back is lower than the front), a big cushion and a short backrest that kind of contours to the back of the person who would sit in it. the caster wheels (front wheels) are very small and the footrest is just two little metal bars. next image is a quickie GPV. this is also an ultralight wheelchair with a low back, but its caster wheels are slightly larger, the back has regular upholstery (it does not look like it was made to conform to the back of the person who sits there) and the frame is boxier -- there is no bar underneath the seat where the wheels would attach, rather each wheel is attached to the side of the chair. the next wheelchair is an invacare tracer. it is how most people imagine wheelchairs when they hear 'wheelchair'. it has no cushion and it has a high backrest with handles. it has high armrests that would be comfortable to rest your elbows on if you were just sitting. the wheels are not bicycle wheels like the previous two but are rather plastic. it has big footrests and big caster wheels.
text: the wheelchairs on the left are the ultralight, sporty kind. I have one of them (the quickie). the one on the right is a more standard one you might find in hospitals or as the public wheelchair in grocery stores or the mall.
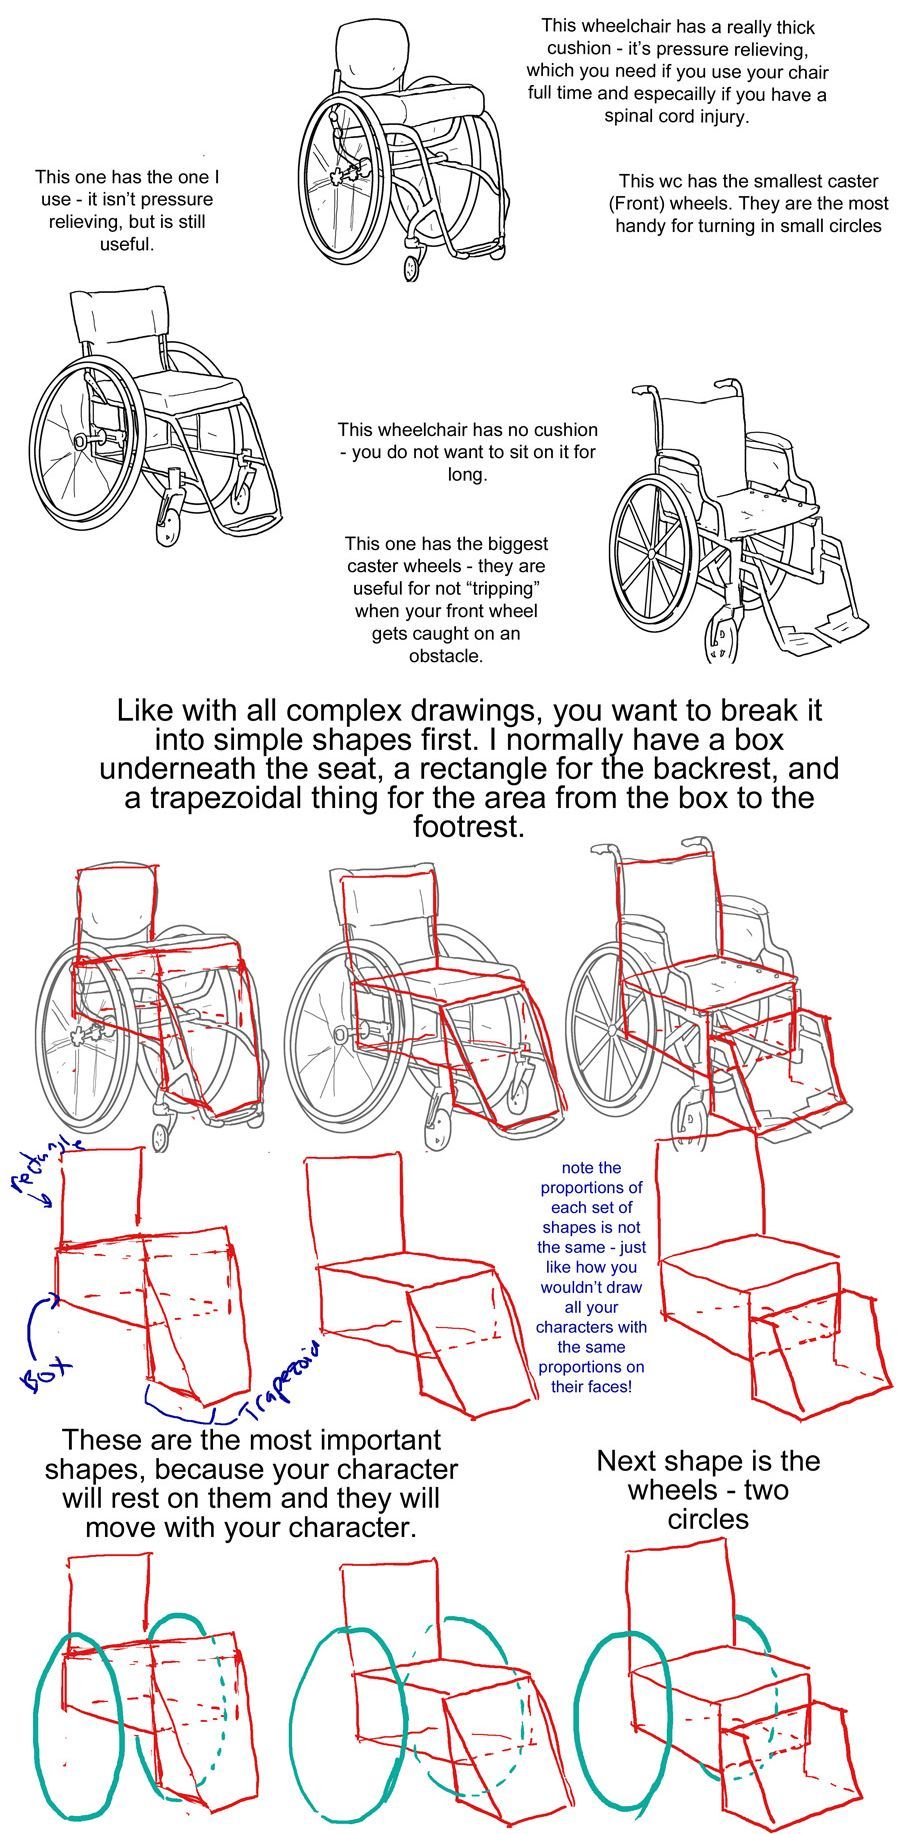
step three: first is text to accompany the tilite. "This wheelchair has a really thick cushion - it's pressure relieving, which you need if you use your chair ufll tiem and especially if you have a spinal cord injury. This wc has the smallest caster (front) wheels. They are hte most handy for turning in small circles." next there is text to accompany the quickie gpv: "This one has the one I use -- it isn't pressure relieving, but is still useful." next is text to accompany the invacare: "this wheelchair has no cushion - you do not want to sit on it for long. This one has the biggest caster wheels - they are useful for not 'tripping' when your front wheel gets caught on an obstacle.”
step four text: like with all complex drawings, you want to break it into simple shapes first. I normally have a box underneath the seat, a rectangle for the backrest, and a trapezoidal thing for hte area from the box to the footrest. these are the most important shapes, because your character will rest on them and they will move with your character.
step four image: the lineart of each wheelchair has been put on reduced opacity, so we can see the square representing the backrest of each seat (the square is the smallest for the tilite and biggest for the invacare), the box for each seat and area underneath it, and the trapezoid for the footrests. the next step labels the images of these simplified shapes as the lineart is removed. "Note the proportions of each set of shapes is not the same - just like how you wouldn't draw all your characters with the same proportions on their faces!"
step 5: we see the same shapes to form the wheelchair, but now with blue circles drawn where the back wheels would be.
text: next shape is the wheels - two circles
step six: next we see the wheels and shapes have been reduced in opacity and the basic structure of everything about each wheelchair: footrests, caster wheels, upholstery details, axles has been drawn on in orange.
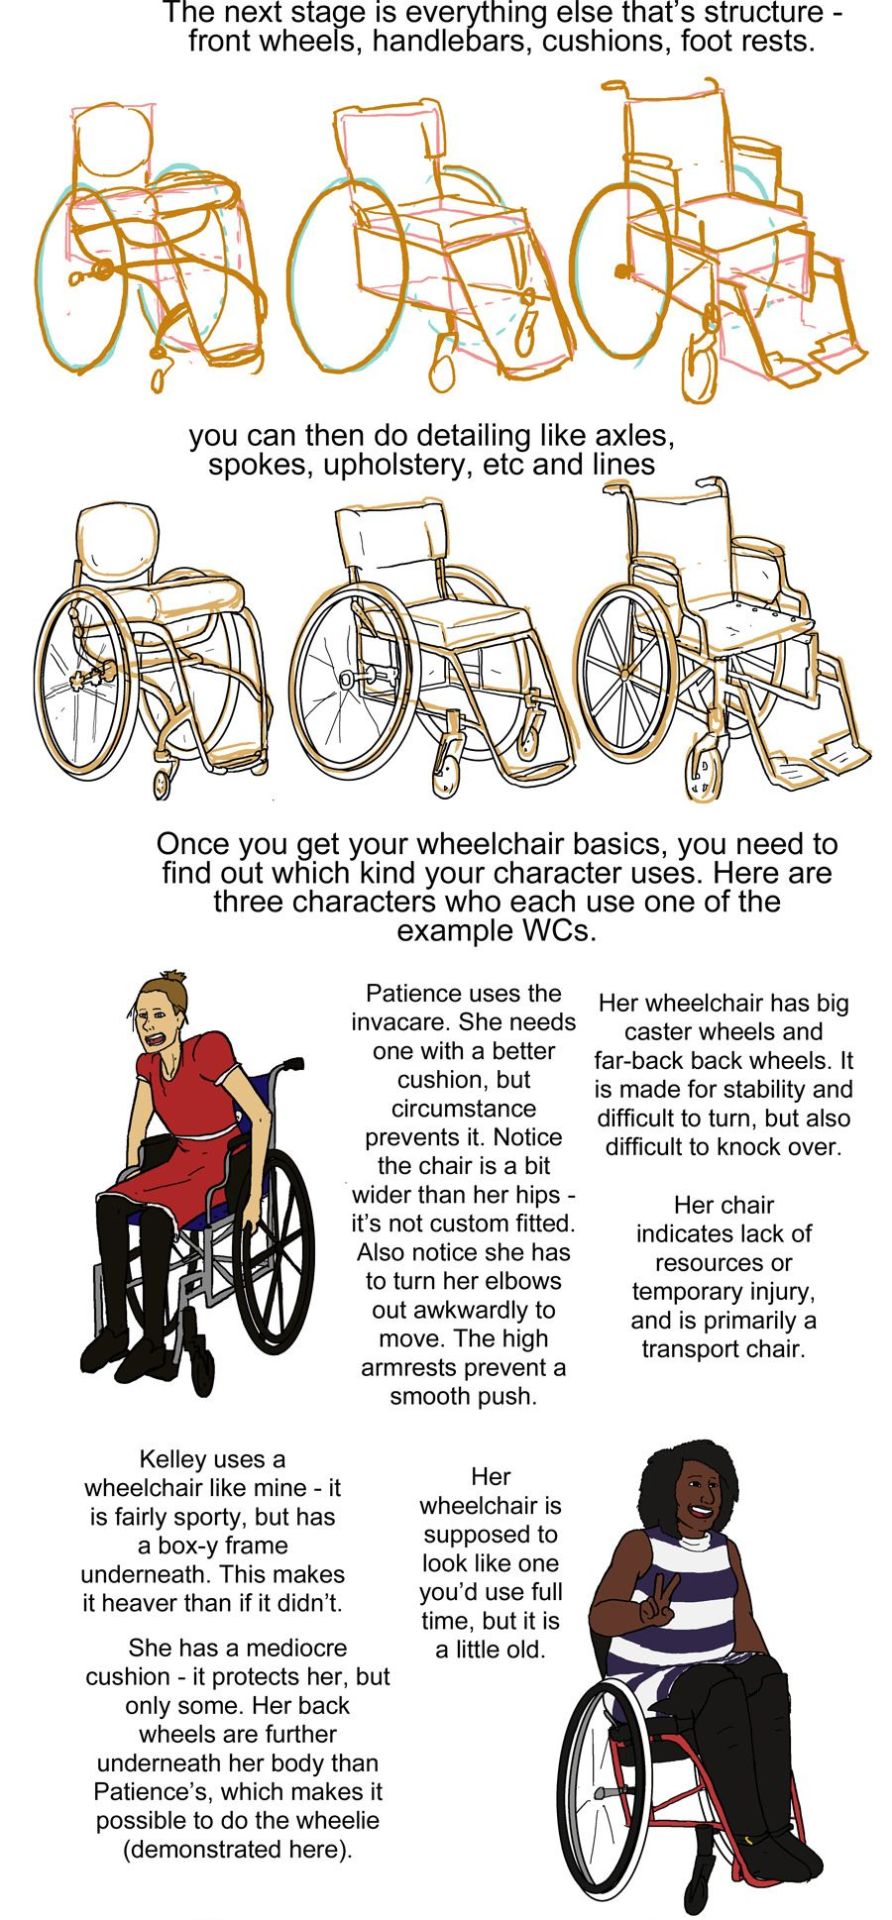
text: the next stage is everything else that's structure - front wheels, handlebars, cushions, footrests.
Step seven: we see the lineart on top of the lowered opacity sketch.
text: you can then do detailing like axles, spokes, upholstery, etc and lines
step eight: next we see three drawings of different characters. there is patience, a skinny white woman sitting in a blue invacare wheelchair. kelley, a slightly chubby black woman wearing a stripey dress sitting in a red quickie gpv wheelchair and doing a wheelie while smiling. then luke, a white man with short blond hair wearing khaki pants. he is sitting in a tilite chair.
text: once you get your wheelchair basics, you need to find out which kind your character uses. here are three characters who each use one of the example WCs. patience uses the invacare. she needs one with a better cushion, but circumstance prevents it. Notice the chair is a bit wider than her hips - it's not custom fitted. Also notice she has to turn her elbows out awkwardly to move. the high armrests prevent a smooth push. her wheelchair has big caster wheels and far-back back wheels. it is made for stability and difficult to turn,but also difficult to knock over. Her chair indicates a lack of resources or temporary injury, and is primarily a transport chair
kelley uses a wheelchair like mine - it is fairly sporty, but has a box-y frame underneath. this makes it heaver than if it didn't.she has a mediocre cushion - it protects her, but only some. her back wheels are further underneath her body than Patience's, which makes it possible to do the wheelie (demonstrated here). her wheelchair is supposed to look line one you'd use full time, but it is a little old.
luke has a spinal cord injury. he has a very thick pressure relieving cushion for medical reasons. his chair is also ultralight, with no boxyness under the frame. his chair is the newest and lightest - it indicates his wealth/resources, but also that he needs to use on full time.
step nine: just a drawing of me sitting in my wheelchair holding my hands up to show fingerless wheelchair gloves. we're looking at me from above.
text: when you're choosing what wheelchair to give your character, think of both their disability and their resources and go from there. questions to ask yourself: is it made specifically for them or is it mass-produced or a hand-me-down (if it's custom, the seat will not be too wide or narrow in comparison to their body and their feet will rest on the footplate naturally). do they want more stability (further back back wheels, big caster wheels) or maneuverability (the inverse). do they need a pressure relieving cushion? how long are they using their wheelchair per day? how long have they needed a wheelchair? Do they have health insurance? do they have access to a lot of spending money? How much can they spend on their wheelchair? are they athletic etc etc
posing steps:
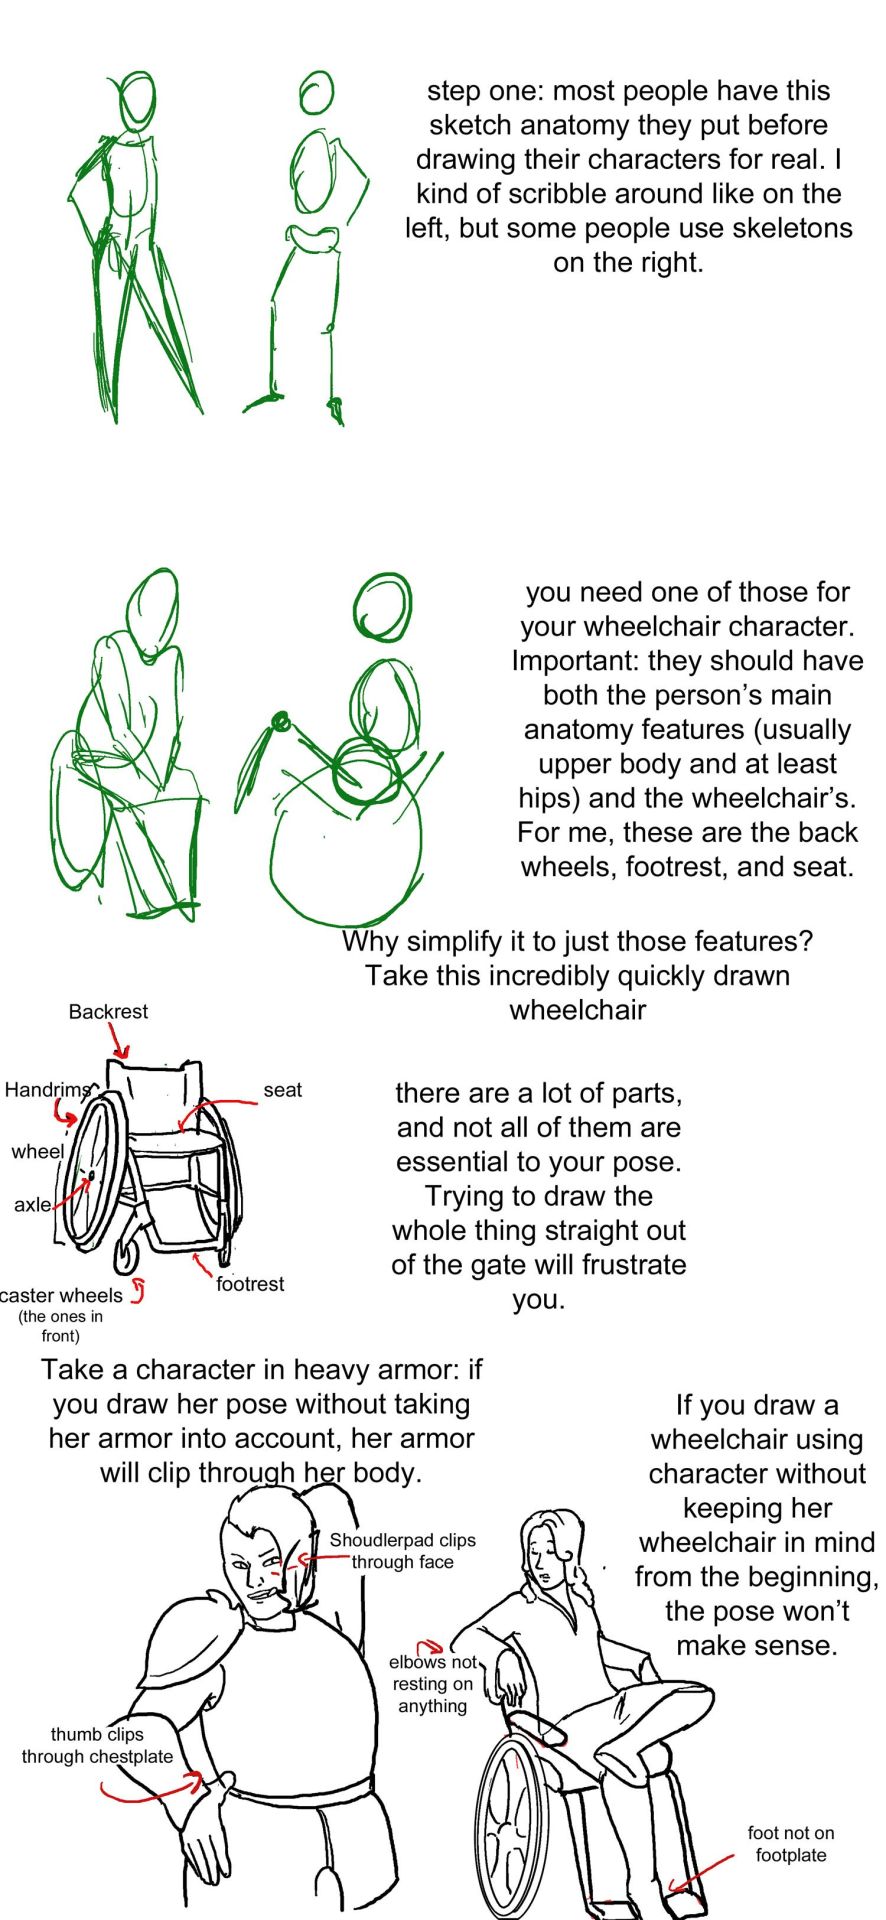
step one: a sketch of two people standing up. one just shows the outline of a person's body, with legs that are ind of triangle shaped, the other shows a sketched pelvis and rib cage to go along with the bones of the legs and arm. text: step one: Most people have this sketch anatomy they put before drawing their characters for real. I kind of scribble around like on the left, but some people use skeletons on the right.
step two: there are now too sketched pictures of people in wheelchairs. one shows lightly traced human form (arms articulated, curve for a stomach, legs that are kind of triangle shaped and pointing down) sitting in a wheelchair that is just the sketch of footrests and wheels. the other sketch shows the sketch of a body with a circle for hips and an oval for a rib cage and the person doing a wheelie (lifting the front end of the wheelchair off the ground and leaning back). their wheelchair is also sketched out and defined by a circle for their wheels and 2 lines, 1 of the seat and 1 for the backrest. text: you need one of those for your wheelchair character. important: they should have both the person's main anatomy features (Usually upper body and at least hips) and the wheelchair's. for me, these are the back wheels, footrest, and seat. why simplify to just those features? Take a look at this incredibly quickly drawn wheelchair.
step three: there is a lineart drawing of a manual wheelchair with slightly cambered (angled towards the seat) wheels, a backrest, and a footrest. the frame is light and there are no handlebars. there are labels pointing to different parts of the wheelchair: Backrest, handrims, wheel, axle, seat, footrest, and caster wheels (the ones in front). text: there are a lot of parts, and not all of them are essential to your pose. trying to draw the whole thing straight out of the gate will frustrate you.'
step four text: take a character in heavy armor: if you draw her pose without taking her armor into account, her armor will clip through her body. if you draw a wheelchair using character without keeping her wheelchair in mind from the beginning, the pose won't make sense.
step four image: next we see two lineart drawings of different characters. one is a bulky woman wearing plate armor. her hand is on her hip and she is trying to scratch her back with the other hand. there is the label "shoudlerpad clips through face" and "thumb clips through chestplate." the next drawing shows a woman in a wheelchair with one foot rested on her knee and her arms rested back, such that they would be rested on the back of a regular chair, but the back of her wheelchair is not wide enough for them to actually be resting on anything. the text here reads "elbows not resting on anything" and "foot not on footplate"
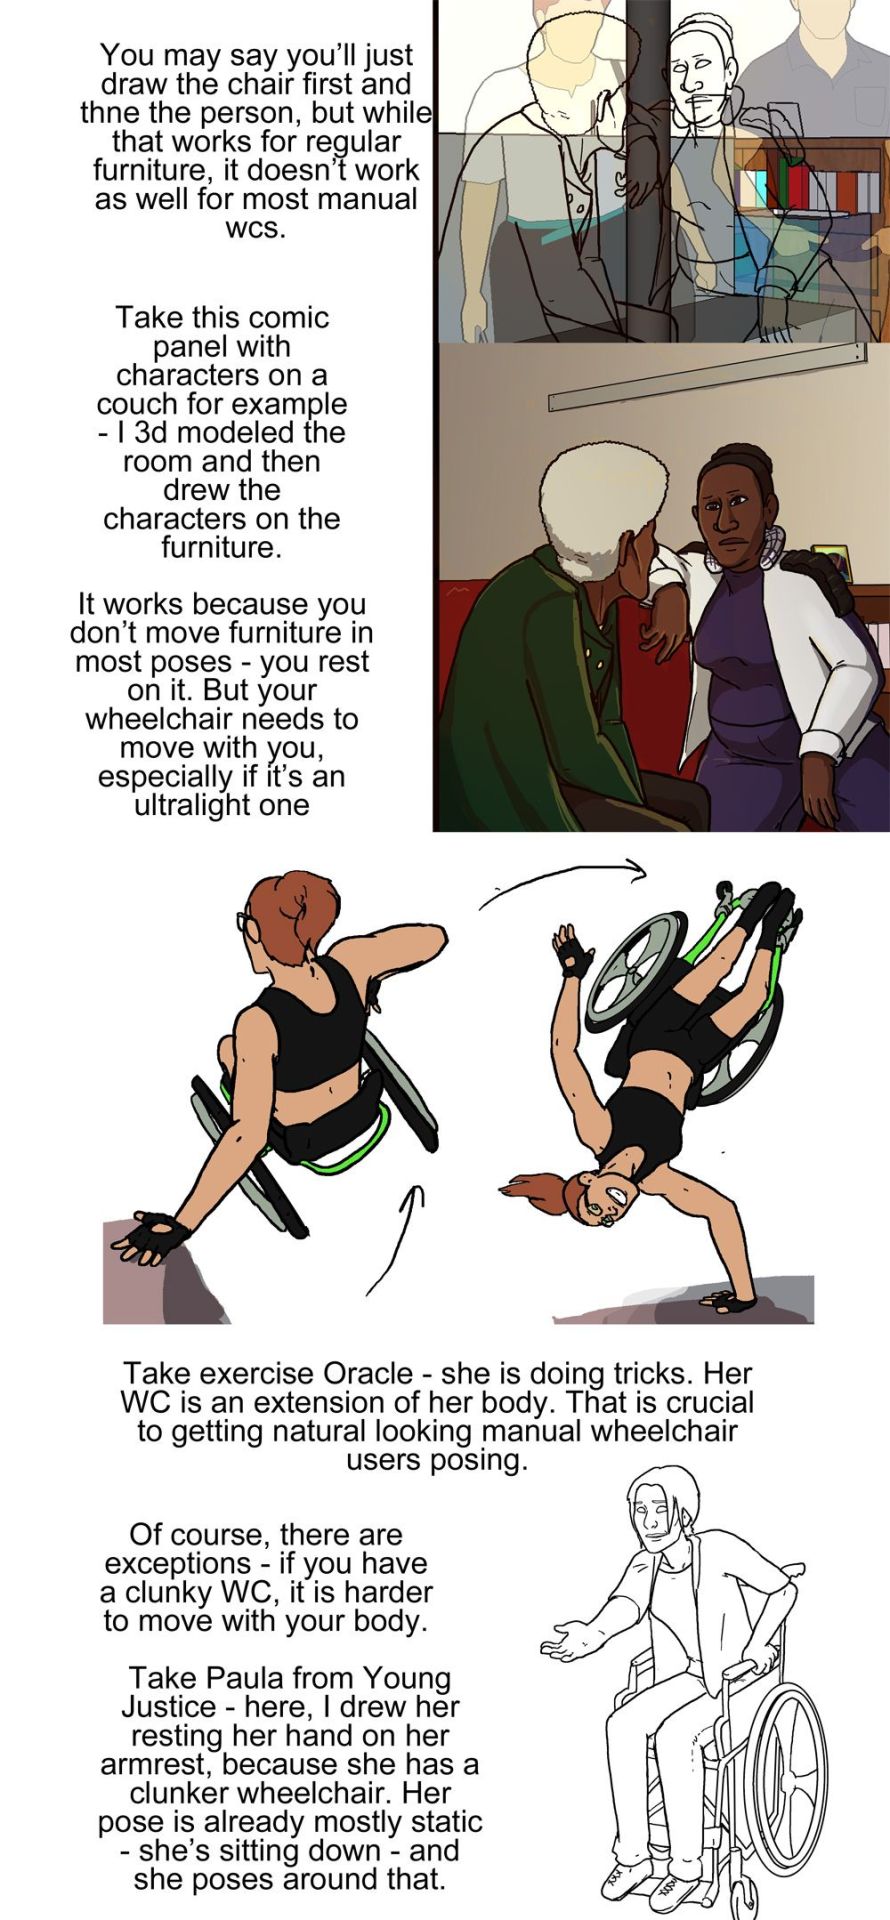
step five: there are two images, one is lineart on top of a 3d modelled apartment with sketchup, the other is a colored in version of that lineart with the background also colored in and no longer a 3d modelled screencap two characters, one old woman wearing a green jacket and one younger woman wearing a white shirt and blue undershirt, are sitting on a couch. the old woman is leaning forward and the young woman is resting her arm on the couch. behind the young woman is a bookshelf.
step five text: you may say you'll just draw the chair first and then the person, but while that works for regular furniture, it doesn't work as well for most manual wcs. take this comic panel with characters on a couch for example - I 3d modeled the room and then drew the characters on the furniture. it works because you don't move furniture in most poses - you rest on it. but your wheelchair needs to move with you, especially if it's an ultralight one.
step six image: there is a flat color drawing of barbara gordon in her wheelchair. she is wearing a black sportsbra and black shorts. in the first image we see she is doing tricks in her chair, zooming through the air (as if she has just launched herself off the ground in a skater park or somethign) while her left hand is resting on a structure and her right hand is heading towards the right handrim. the next image shows her right hand planted on the ground and her chair and body above her, such that she is briefly doing a one-handed handstand, but the motion line indicates that she is moving and this will not last. her left arm is near the handrim of her left wheel.
text: take exercise Oracle - she is doing tricks. Her WC is an extension of her body. That is crucial to getting natural looking manual wheelchair users after posing.
step seven: we see a lineart drawing of paula from young justice. she is sitting in a standard manual wheelchair with high armrests (goes up to the bottom of her ribs probably) and a high backrest (goes up to just below her shoulderblades). she is setting her hand on the armrest, leaning forward, and holding her other hand out.
text: of course, there are exceptions - if you have a clunky WC, it is harder to move with your body. Take Paula from young Justice - here, i drew her resting her hand on her armrest, because she has a clunker wheelchair. her pose is already mostly static - she's sitting down - and she poses around that.
I've had a disability setback, and I'm going to adapt some of my favorite clothes. Do you have a tag or any tips for adaptive clothes?
Adaptive clothes for disabilities
I'm sorry to hear about your setback. Disabilities can be frustrating.
I have a disability tag, but most posts in it are about sewing aids and my patella braces adventures. As for adaptive clothes, it depends on your specific needs.
Pretty Sick Supply has a few tutorials on this topic. I also found this Pinterest board with various adaptive clothes tutorials. There's also plenty of ideas on adaptive clothes and wheelchair-friendly clothing to be found there. Cripplepunk's also a good tag to look through.
If you struggle with fine motor skills, things like replacing buttons with velcro or magnetic closures or adding larger pulls to zippers can also help a lot.
I also have a post about fidget hoodies which can be fun if you enjoy stimming.
Your best source will probably be the community that's formed around your specific disability. The biggest experts on being disabled are disabled people, after all. If you don't have access to a local community, you'll often find groups on social media like Tumblr, Facebook, Discord, or Reddit.
Whatever adaptations you end up making: remember it's all about you! Do whatever works best for you, and don't feel forced to follow advice just because it worked for everyone else if it doesn't feel right.
Also know that you have the right to feel good about yourself and what you wear or what aids you use. Pretty up those adaptive clothes. Spray paint your mobility aids. Put stickers on your medical supplies. As long as you don't interfere with their functioning, you can do whatever you want with them (unless insurance says otherwise).
A general cane guide for writers and artists (from a cane user, writer, and artist!)
Disclaimer: Though I have been using a cane for 6 years, I am not a doctor, nor am I by any means an expert. This guide is true to my experience, but there are as many ways to use a cane as there are cane users!
This guide will not include: White canes for blindness, crutches, walkers, or wheelchairs as I have no personal experience with these.
This is meant to be a general guide to get you started and avoid some common mishaps/misconceptions, but you absolutely should continue to do your own research outside of this guide!
![[Image text] Arm bends a little. Cane height at hip joint. Many canes have adjustable height. Cane sits within the natural center of balance. Causes stress on: Triceps, upper back, wrist (pressure) fingers (grip). Helps with: Joints (lower back, hip, knee, ankle, foot), weakness, balance, pain.](https://64.media.tumblr.com/0c8731401f496885dc8d4309a7dbe7ee/f831b3159e1d7635-e7/s500x750/6e5fe00081a6ce3b64cbe1a648f0c967f9f601e9.jpg)
The biggest recurring problem I've seen is using the cane on the wrong side. The cane goes on the opposite side of the pain! If your character has even-sided pain or needs it for balance/weakness, then use the cane in the non-dominant hand to keep the dominant hand free. Some cane users also switch sides to give their arm a rest!
A cane takes about 20% of your weight off the opposite leg. It should fit within your natural gait and become something of an extension of your body. If you need more weight off than 20%, then crutches, a walker, or a wheelchair is needed.
Putting more pressure on the cane, using it on the wrong side, or having it at the wrong height will make it less effective, and can cause long term damage to your body from improper pressure and posture. (Hugh Laurie genuinely hurt his body from years of using a cane wrong on House!)
(an animated GIF of a cane matching the natural walking gait. It turns red when pressure is placed on it.)
When going up and down stairs, there is an ideal standard: You want to use the handrail and the cane at the same time, or prioritize the handrail if it's only on one side. When going up stairs you lead with your good leg and follow with the cane and hurt leg together. When going down stairs you lead with the cane, then the good leg, and THEN the leg that needs help.
Realistically though, many people don't move out of the way for cane users to access the railing, many stairs don't have railings, and many are wet, rusty, or generally not ideal to grip.
In these cases, if you have a friend nearby, holding on to them is a good idea. Or, take it one step at a time carefully if you're alone.
Now we come to a very common mistake I see... Using fashion canes for medical use!
![[Image text] 4 Major Handle Shapes (significant variation and uses). Tourist/Crook/Hook. Classic shape, fashion and medical, easy to hook on things (arm, door, chair, etc), generally solid wood (stronger, heavier). Offset. Newer design, not a fashion handle, only handle for quad-bases, generally better balance, usually aluminum (light + cheap), soft handle, adjustable (rattles/clicks when swinging). Derby/Fritz/Anatomical/Contour. Classic medical shape, many fashion variants, some fashion + medical, varies in many ways, sometimes contoured to hand, comes in foldable styles, many aluminum styles, many customizable styles. Knob/Decorative. Fashion exclusive, knob shape hurts the hand after prolonged pressure (especially with designs), tend to be heavy, "sword canes" have the same issues.](https://64.media.tumblr.com/102d2e5f13a88817eaa44974bc5a7486/f831b3159e1d7635-e2/s500x750/887023dbcfc758db12a7fcf3f258bca52eba2d53.jpg)
(These are 4 broad shapes, but there is INCREDIBLE variation in cane handles. Research heavily what will be best for your character's specific needs!)
The handle is the contact point for all the weight you're putting on your cane, and that pressure is being put onto your hand, wrist, and shoulder. So the shape is very important for long term use!
Knob handles (and very decorative handles) are not used for medical use for this reason. It adds extra stress to the body and can damage your hand to put constant pressure onto these painful shapes.
The weight of a cane is also incredibly important, as a heavier cane will cause wear on your body much faster. When you're using it all day, it gets heavy fast! If your character struggles with weakness, then they won't want a heavy cane if they can help it!
This is also part of why sword canes aren't usually very viable for medical use (along with them usually being knob handles) is that swords are extra weight!
However, a small knife or perhaps a retractable blade hidden within the base might be viable even for weak characters.
![[Image text] 4 Major base shapes (significant variation and uses). Adjustable base. Aluminum, standard modern medical, adjustable height, rubber base, wears down over time. Tripod/ quad base. If you need extra balance. Terrain attachment (varies, this is for ice). Removable, helps stop slipping on ice/snow/sand/etc, some canes have a retractable tip for ice. Classic base. Non-adjustable, custom only, modern standard still has a rubber base.](https://64.media.tumblr.com/78d350cfac4077376b7ce521a9a7d929/f831b3159e1d7635-ab/s500x750/4b4a6b8062c06686baf17c83c28b793bfb89e05b.jpg)
Bases have a lot of variability as well, and the modern standard is generally adjustable bases. Adjustable canes are very handy if your character regularly changes shoe height, for instance (gotta keep the height at your hip!)
Canes help on most terrain with their standard base and structure. But for some terrain, you might want a different base, or to forego the cane entirely! This article covers it pretty well.
Many cane users decorate their canes! Stickers are incredibly common, and painting canes is relatively common as well! You'll also see people replacing the standard wrist strap with a personalized one, or even adding a small charm to the ring the strap connects to. (nothing too large, or it gets annoying as the cane is swinging around everywhere)
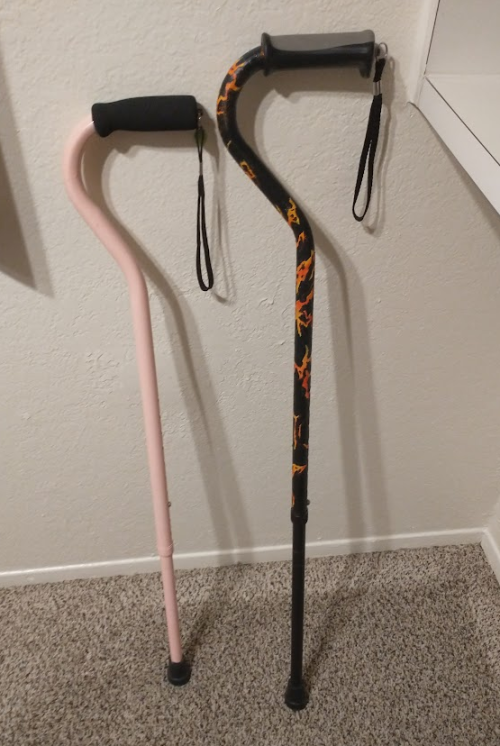
(my canes, for reference)
If your character uses a cane full time, then they might also have multiple canes that look different aesthetically to match their outfits!
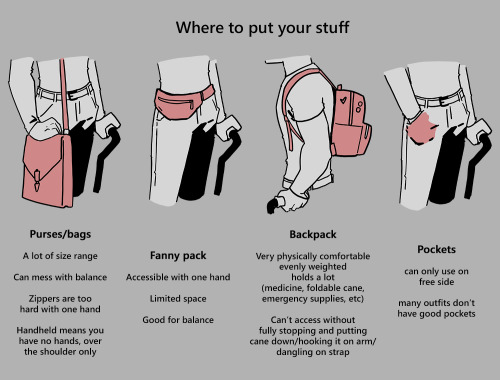
When it comes to practical things outside of the cane, you reasonably only have one hand available while it's being used. Many people will hook their cane onto their arm or let it dangle on the strap (if they have one) while using their cane arm, but it's often significantly less convenient than 2 hands. But, if you need 2 hands, then it's either setting the cane down or letting it hang!
For this reason, optimizing one handed use is ideal! Keeping bags/items on the side of your free hand helps keep your items accessible.
When sitting, the cane either leans against a wall or table, goes under the chair, or hooks onto the back of the chair. (It often falls when hanging off of a chair, in my experience)
When getting up, the user will either use their cane to help them balance/support as they stand, or get up and then grab their cane. This depends on what it's being used for (balance vs pain when walking, for instance!)
That's everything I can think of for now. Thank you for reading my long-but-absolutely-not-comprehensive list of things to keep in mind when writing or drawing a cane user!
Happy disability pride month! Go forth and make more characters use canes!!!
Blog Tag Masterpost
list of all the tags on this blog
Everyone deserves the opportunity to dress their best. That’s why I’m so glad to be able to share Tommy Hilfiger’s innovative #TommyAdaptive collection with you. #TommyPartner
HOLY SHIT THIS IS SO COOL. Making creature rigs to help with acting and motion capture whaaaat
Creature Bionics Website
Hello gamers, local disabled cane user is gonna teach you how to design a cane.
Tl:dr: design a cane based on comfortability and the disability of the character
First things first, you need to know why you’re character needs a cane. Do they have chronic pain? Unhealed injury? Muscle or joint issues? Do they have poor blood circulation which makes them dizzy? Do they need the cane all the time or does their disability fluctuate? Do they use a wheelchair or a walker sometimes?
There’s a lot you should know about a characters ability/disability in order to find what type of mobility aid they should be using.
There are a bunch of different kinds of canes/crutches. The 4 on the left are crutches. The difference between canes and crutches are, crutches are meant to keep weight off your legs as much as possible, and generally you use a crutch on each arm. Canes are used for stability and you usually only use one. Folding canes are great for people who only use their cane sometimes

Great! You’ve picked either a cane or crutches for your character. I’m done right? WRONG. Cane handles.
This is probably the most important part of canes because if you have the wrong handle your wrist will die.

I gently kiss all the canes on the left, they are all very good for grip and wrist, although the middle left is designed for left or right hand so you cannot switch hands with it.
The ones on the right are also pretty good, they wouldn’t be my first choice but they are still great. The top one is also very good as it has a wristband so you can’t drop it as easily. (Trust me when I say I DROP MY CANE SO MUCH)
Sigh. The middle cane handles… the bottom one I have never actually seen but it looks like it would kill my wrist. The top one is uncomfortable for long period uses, but it is good for if you’re a shepherd. And the pimp cane… the knob cane… it’s awful. Just no. It’s hard to grip, it is unstable it’s bad it’s awful I throw it into a fire. Please don’t give your character, they don’t deserve that pain
Now you know the basic ergonomic things, there are different shafts for canes and crutches

You can really get creative with this type of thing, just as long as it looks stable enough.
Here are some good examples of pretty canes that are ergonomic and good to use! (featuring victor arcane who i adore)


Add some cute details to the cane if you want! You can add stickers, colours, grip support. And while I love the concept of cane swords those are very unstable, if you want a cane weapon you can make it lead weighted, put knives in it. A poison vile in the shaft. Be creative.
Just some of these components are important to consider with a disabled character. There’s a lot more to consider with wheelchairs and walkers which I don’t have the experience with.
If you do have any questions my asks are always open to questions about this stuff! I’d love to help if you’re making a disabled character.


A guide to designing wheelchair using characters!
I hope this helps anyone who's trying to design their oc using a wheelchair, it's not a complete guide but I tried my best! deffo do more research if you're writing them as a character
Cheat Code #2 for accommodating disabled characters in sci-fi/fantasy:
How you aid a disability depends on if it's a new development or had always existed.
i.e.: If someone's lost their legs to a griffin biting them off last week, giving them steampunk prosthetic legs is a good aid. There's something they can't do, that they very recently could, that they need to learn to work around. The prosthetic legs still need an adjustment period to learn how to use them, but your character knows how legs should work and can figure it out more easily.
If someone lost their legs because, as a child, they wandered away from the space field trip and got partially eaten by a carnivorous plant, then it depends. Prosthetic legs can technically work, but the longer the character was without legs, the harder it'll be to re-learn how to use them. You might want to go with bionic legs for short distances, but a hover chair for daily use.
If someone was born without legs, then prosthetic legs are more hindrance than they're worth. Your character has never had legs, and has no idea how they're supposed to work.
Imagine if you're in a world of centaurs; you're given prosthetic hind legs, and now expected to be able to climb up cliffs with the grace of a mountain goat. It's a whole new skill you'd have to learn, and you would get annoyed with it very fast; how are they supposed to sync with the legs you already have? How are you supposed to balance? You can't feel anything, you don't know how much space it occupies.
Someone who's always been disabled doesn't need the thing they were born without, they need aid that lets them do what everyone else can in a way they're familiar with. If your character has always been deaf, glasses with subtitles appearing on them are infinitely more useful than aids that let them hear, because hearing when you've always had silence is going to have a steep learning curve and be ridiculously overwhelming.
Your rule of thumb?
Try to give them something they're used to.
Note: This is different with very small children, because they're already learning how to use every part of them. If a toddler in your sci-fi was born without legs, they can be taught to use bionic legs at a very young age, but it has to start early or it'll run into the problems above.
Cheat code 1: How to avoid eliminating disability in your setting
Cheat Code 3: How to make your setting itself disability-friendly
Cheat Code 4: How to personalize your character's disability aid
Ok so at this point I've had two people roll up to me in manual wheelchairs, well, one of them was somebody pushing somebody who was nonverbal at the time, but it still counts. They asked me why I had zip ties around my tires.
It's winter where I'm living and we have really bad snow. And the snow plow people are really bad at their jobs probably because there aren't snow plow people who clean sidewalks. As a solution I got to thinking about how I could increase the traction on my wheels. And the most redneck thing I could think of was taking a bunch of zip ties and tying them around my wheels. They last surprisingly long, and work surprisingly well. It's basically the same premise as chains for your tires during the winter.
I chose to space them out pretty evenly so there's about one for every spoke. You could probably do more or less depending on how many you want and how much traction you get but I wouldn't go more than three per spoke. I realize that it's a bit later in the winter, and I probably should have made a post about this sooner, but I came up with it about a week ago. So please share this, even if you're not disabled, because there are tons of people I know who are stuck in their houses because they can't get around in the snow. A pack of zip ties costs about $5, which compared to $200 knobby snow tires is a big save, and if you want to invest you could get colored zip ties.