
Art, writing tips, misc creative stuff probably, and a bunch if other shit I can't be bothered to organize on this (or another) blog. Don't expect anything from this.
687 posts
As You've Asked For Asks!:
As you've asked for asks!:
Do you have any quick-and-dirty book/fic binding methods a terrified-of-failure novice could use to bang something out to get over the first collywobbling step of Actually Doing The Thing? (this may be something I've been meaning to ask for ages)
yes! I absolutely do! in my opinion the best quick-and-dirty bookbinding method is a no-glue pamphlet: you don't have to mess with glue or measuring or cutting anything, all you need is your text, some paper, a needle and thread. you can use the same needle to punch holes if you don't have an awl.
this is going to be a little long but that's because I'm going to write out some fairly detailed instructions for an A5 sized pamphlet. If you don't want detailed instructions and think you can glean the necessary info from photos, just skip to the photos! I've also linked tutorials.
for preparing the text to printing, in whatever software you use (word, libreoffice, gdocs, whatever) make sure your document is set to page size A5. make it look readable. then save as/export that document as a straight-paged PDF. now go to the bookbinder JS tool (https://momijizukamori.github.io/bookbinder-js/), and upload the PDF. source manipulation: none printer paper size: A4 display unit (you can ignore, or choose cm if it gives you anxiety that it automatically displays points) printer type: select single-sided or duplex accordingly* rotate paper: ignore flip on long side: check if you are printing duplex and if your duplex printer flips the paper on the long side page layout: tick folio page scaling: original page positioning: centered ignore the rest flyfleaf: ignore signature format tick: standard signatures. in the length drop down, this depends on the type of pamphlet you are doing. for folio i generally find 4-5 pages per signature a comfortable thickness. if you have 6 whole A4 pages you can still do that as a single signature or you can split it into two signatures 3 pages each. wacky small layouts: ignore this signature info click the generate preview button to see what your PDF looks like imposed! I love this step especially when I'm doing quarto (A6) or octavo (A7) sized books generate output - click this to generate an imposed PDF
for A6 and A7 sized books the instructions are much the same, except for these you make sure the page size is A6 or A7 in your software, and then you choose quarto or octavo instead of folio. for signature length drop down I keep signature length to 1 for octavos typically and 2 for quartos, as this still refers to sheets of paper, and for octavo 1 sheet of A4 paper will turn into 4 smaller sheets in one signature once folded and cut.
*if you don't have a duplex printer you will have to manually turn the paper to print on the other side. I cannot be arsed with this so I bought a printer capable of duplex printing (I didn't have a printer anyway). if you already have a printer check what it can do as you might be surprised and go from there.
now to the pamphlets! you don't need a cover - I have one for the long stitch pamphlet but for the saddle stitch one I didn't bother and just made sure the first page had a title on it. you can always take a different piece of paper and print a cover on or or just use coloured cardstock and create a simple cover, but a cover is not necessary unless you're doing a long stitch pamphlet. all you need to do is to punch holes and start sewing. there are a few different stitch types below, I wouldn't say any of them are more difficult or easier than others, but they do look different so...pick one you like the look of and go from there?

pamphlet stitch (uneven number of holes) I haven't ever done a pamphlet stitch but here's a tutorial for how to do it: https://www.starpointestudio.com/simple-pamphlet-stitch-book-step-by-step/
saddle stitch (uneven number of holes) I realised that what I was thinking of as a pamphlet stitch is actually saddle stitch, as in this A7 pamphlet:

here's a tutorial for how to sew saddle stitch: https://www.bookbindingworkshopsg.com/saddle-stitch-bookbinding-tutorial/ here's a video tutorial: https://www.youtube.com/watch?v=aWHkY5jOoqM (sealemon has a lot of bookbinding tutorials and I know many people who like her videos, I used her tutorial for coptic binding way back when I first made a book but I can't otherwise vouch for the quality as I haven't used her videos)
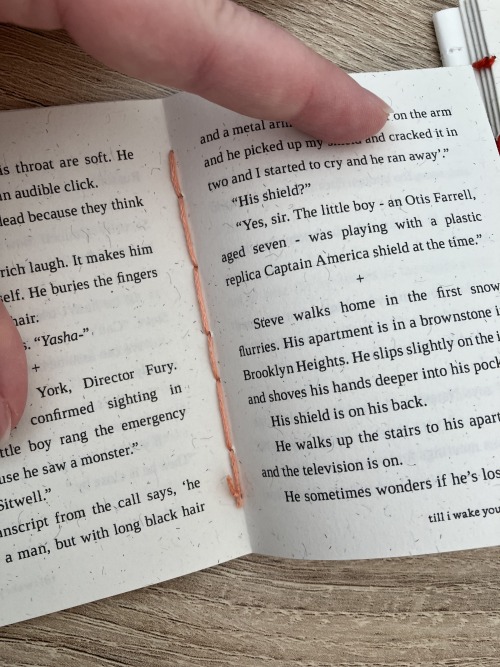
french link stitch (even number of holes) in this one I used french link stitch which I typically use for thicker textblocks that i'm not planning to use tapes with as the french link gives it some robustness, I used it here because I had never done it before and wanted to try it out. I am planning to take these stitches out and re-sew this pamphlet with a cover now that I've found a suitable piece of transformer fanart to use as a cover:

french link tutorial. it's quite long but it has a colour coded bit towards the end that shows how the thread is supposed to link which i find very helpful to visualise: https://www.handmadebooksandjournals.com/bindings/french-link-stitch-binding/
here's a video tutoral from DAS bookbinding (he is my go to for techniques and he has the most soothing Australian accent as well, though fair warning not all of his videos are for beginners): https://www.youtube.com/watch?v=O4ZPdbaM-Ws
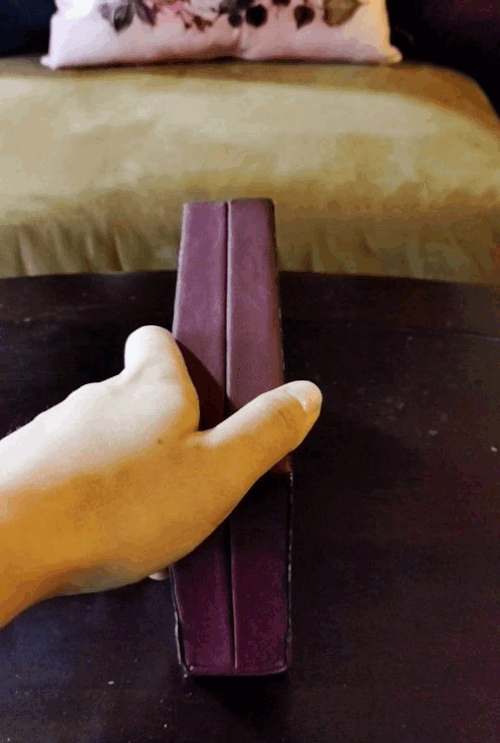
long stitch (even number of holes) for this one I used long stitch and I had a cover. this one is my favourite variation because I can make these pretty and simple covers and the stitch looks nice on the outside as well, so this one scratches the 'i want to make a book' itch for me.


here's a tutorial that also includes a how to on a cover that is different from my cover: https://lccprintmaking.myblog.arts.ac.uk/files/2020/06/Long-Stitch-Tutorial-A4.pdf DAS also has a video tutorial for long stitch but it's like three videos long, maybe watch it later :'D here's one I haven't watched but seems decent: https://www.youtube.com/watch?v=XnignTL_wDQ
you can use saddle stitch for this kind of pamphlet as well, that's what I did for dozens of ships and hundreds of souls (https://ashmouthbooks.tumblr.com/post/681587080267202560).
I hope this helped!!
-
 aurorasleeps-27 liked this · 8 months ago
 -
 sirquacklesdefoof liked this · 9 months ago
 -
 rchunee liked this · 9 months ago
 -
 honeyvanity reblogged this · 9 months ago
 -
 moonkissedsol liked this · 9 months ago
 -
 gothgleek liked this · 9 months ago
 -
 bluehoursofmorning reblogged this · 9 months ago
 -
bluehoursofmorning liked this · 9 months ago
-
 its-tiny reblogged this · 9 months ago
 -
 phantom-jelly liked this · 9 months ago
 -
 letosatie liked this · 9 months ago
 -
 weebulove liked this · 10 months ago
 -
 ginthompson reblogged this · 10 months ago
 -
ginthompson liked this · 10 months ago
-
 d0g-m0tif liked this · 10 months ago
 -
 undersummerstars reblogged this · 10 months ago
 -
 kj-yikes reblogged this · 10 months ago
 -
 spots-of-gold liked this · 10 months ago
 -
 writer-at-the-table reblogged this · 10 months ago
 -
writer-at-the-table liked this · 10 months ago
-
 ghostlandtoo liked this · 10 months ago
 -
 sanddfalcon reblogged this · 10 months ago
 -
 willmallard reblogged this · 11 months ago
 -
 thelodestardirective reblogged this · 11 months ago
 -
 patchworkideas liked this · 11 months ago
 -
 ofstoriesandsongs liked this · 11 months ago
 -
 mm-mendell reblogged this · 11 months ago
 -
 fuzzy-peachchild liked this · 11 months ago
 -
 natchi-disday reblogged this · 11 months ago
 -
 roeyourboaty liked this · 11 months ago
 -
 solhaelan liked this · 11 months ago
 -
 minimammoth liked this · 11 months ago
 -
 originalaccountname liked this · 11 months ago
 -
 dimondlite reblogged this · 11 months ago
 -
 ajs624 liked this · 11 months ago
 -
 aureliagone reblogged this · 1 year ago
 -
aureliagone liked this · 1 year ago
-
 shibazakisauce liked this · 1 year ago
 -
 mpchev reblogged this · 1 year ago
 -
 universal-translator liked this · 1 year ago
 -
 grimmpages liked this · 1 year ago
 -
 tealaesthetic reblogged this · 1 year ago
 -
 13reasonstoeatthatcake liked this · 1 year ago
 -
 nicecream liked this · 1 year ago
 -
 sootstuff liked this · 1 year ago
 -
 daskum reblogged this · 1 year ago
More Posts from Assassin-sadboy
Everyone pick up your government-assigned fursona, grab your two colors then combine it with this random animal picker. Tell us what you get and no rerolls, I don't make the rules.
Who wants to make a peller box?
Guess what! I finally gathered my pages of scribbled notes, my camera of haphazard in-progress pictures, and finally compiled a set of instructions for making one of these bad boys!


And not only that, but I've got two versions of this baby. I like mixing and matching my unit families because sometimes 1/32 inch sparks joy and sometimes 14 mm is just so convenient, but especially since all of my chipboard comes in english thicknesses, here's a version of the process for my fellow imperial units weirdos:
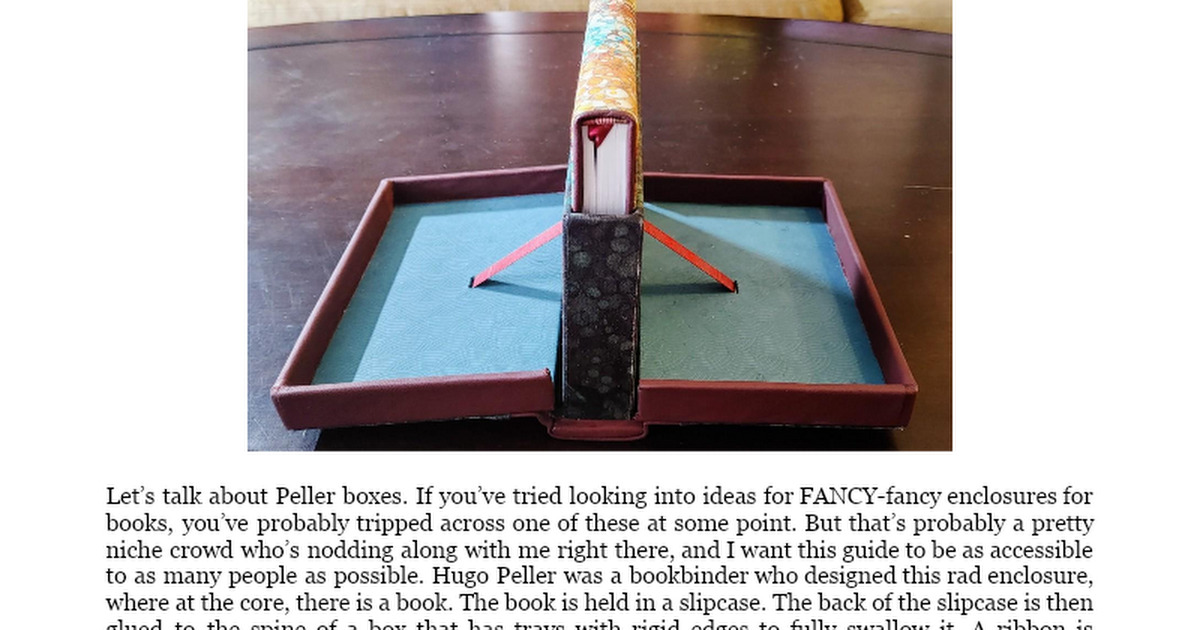
And here's one for the sensible folks of the world, raised on a base-ten system rather than dividing everything in half and then in half and then in half-- I won't subject you to inches, when there's a workaround, but I was tempted! Have your localized version of the story and have fun with it:
Mad credit of course goes to Hugo Peller, who developed these things in the first place, but also to Jack Fetterer, who preserved a set of notes from a 1990 class, which, as far as I can tell, are the most complete set of instructions available online. But I'm an engineer, I couldn't be satisfied there, I had bludgeon it into a system of equations, sorted by usage and material. And I also go into some of the hiccups I ran into trying to follow those class instructions, like being a green amateur at leatherwork, or not having the equipment to saw plywood boards in my apartment. These instructions still do make some unfair assumptions about the base knowledge level of anyone who wants to give this a try, like using bookcloth rather than plain cloth, but I may try to loop back and adjust that soon.
I can't claim any kind of expertise in this type of work, but I beat my head against an interesting problem, and it's time to share what I got out of it! And, secret goal, I want to help more people make more cool things, and maybe improve on my process in ways I can absorb and chew on in the future. Save my work, change it, I dare anyone who sees this to improve it!! I want it to be better. Credit would be cool, and of course the actual experts I leveraged for this deserve all the credit in the world, but that's not my priority. I want the world to have more exciting things in it, and I want more people to have exciting skills. Go forth and go nuts!!
Bookbinding for Beginners by a Beginner Part 2
Am back there were some things that I missed stating in my last post. And starting up where I mean to continue. I may add things as I go, fair warning, but there is a lot to recover and sometimes I walk away and go "Welp.... forgot that thing". But for the sake of things not being overwhelming I tried to get the most "Up front" stuff done and out of the way in part one.
And I would like to take this time to say: Take it slow, pace yourself. There is no race. And the learning curve is steep in areas. You have to be ok with making mistakes because it WILL happen. Accept that you've made a mistake but don't get upset with lost time or materials. Make a note of what happened and have a journal on hand if you'd like to see how far you've come and the "OK so.... that didn't work. Don't do that again." At the end of the day we're here to line our shelves with lovely wonderful stories and have the pride of "I did this ain't that cool?"
There are a few optional things you might want to consider.
A paper guillotine this is to make the pages of your bind more tidy, but there is nothing wrong with a deckled edge.
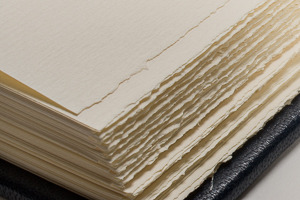
example of deckled edges. It's just a fancy way of saying 'uneven'. There are ways to trim your project with a crafting knife / box cutter and a ruler but my experiments have yielded not so great results. Likely, it's due to several factors: One I don't know my own strength half the time, Two "light but firm pressure" means exactly "Well which is it cause for me those are two different things". Three See one. So deckled edges it is. But if you splurge on a paper guillotine, I salute you. You can also take it slower with a more traditional paper cutter but I recommend measuring twice before committing to a tape marker of where to line your pages up. It is up to you.
Optional but fun: Scrap book paper for decorative end pages. It's fun hunting around a craft store and finding what suits the vibe of the fic you're binding. My only note is aim for something that's not too stiff aim for something fairly easily folded and thin. Card stock like paper won't lay nicely in your book.
End bands these will go on the edge of the spine of your fic but over top of the mull (What is mull? That's coming up)
Mull which is essentially stiff cheese cloth this will add extra structure to your bind
Another option is a Subscription to Canva I only say this because you can sign up for free, but some of the options are locked behind a pay wall. It's fun to play with but the Pro version of Canva also lets you resize your canvas and do custom sizes. I have also done my binders logo in Canva (I actually have two as variants). I also use it to make decorative cover pages.
For your viewing pleasure this is what I came up with. Fun fact about me, I'm a thalassophile (I love the sea and everything about it) since I was consciously aware of the sea. The primary reason WHY I got into book binding is because I am going to be eventually moving onto and living and working off of a boat.


Lucky Seas Bookbinding one and two. Depending on what I feel like using.
Cricut all cricut accessories- there is a mini cricut if you want to dip your toe in. IF you go this route you'll need "HTV" or "Heat Transfer Vinyl"
You can also build your covers in canva and get as cost saving options
Printable sticker paper. OR Heat transfer paper
But this is stuff for covers. I'll get into what you need for covering the chipboard in a minute and give you a "Recipe" for book cloth (Cause I ain't got time nor the funds for some of the book cloth that is out there) but if you want to splurge for your project by all means look and see what is out there. But make note of this- you can just cover your book case in paper and just use sticker paper. I will recommend getting some sort of transparent contact paper to protect your cover (I will go through all of this in future just make a mental note of this)
Now for I promised:
I will be using Celestial Navigation as my example fic of how to down load a fic.

You're going to go to AO3 and go alllll the way over to "Download" and hit "HTML" you can either have it pop open right away or you can go to your downloads and open it up along with your word processor of choice.
You're going to hit Control A (PC) or Command A (Mac), Control/Command C, and then go to your word processor and hit Control/Command V. And listen to the take off noise your computer brand of choice inevitably wants to do while the fic makes it's way from the HTML over to the word processor.
What this all did was copy EVERYTHING and plop EVERYTHING (Save for comments) onto your document. Feel free to save what you have this far and pat yourself on the back you're about to start type facing.
I'm a minimalist in my designs but I have expanded a touch in terms of what I'm doing just to know and experiment for what works for me and what doesn't.
I will reiterate that I will be using Microsoft Word but I'm sure there's away to do this on other processors I just don't know how to do the other one's. I know Mac has something called "Pages". I never worked with it. I will try to add as many visuals as possible but some of my instructions will be "Go to this tab, click X Y and Z to make a thing happen".
Just know that this is what works for me and this is how I've managed to bumble through thus far. This is hardly perfect and I'm still very much experimenting with EVERYTHING. IF you find a better simpler way of doing things- by all means do so.
There's even a way to set up a template when you fire up Word but I've yet to figure it out.
But for now the fun begins- there is some tedium with this but it's best done with music or something on in the background that you can easily listen too but not watch.
First and foremost what you need to do is make the formatting into "Booklet" How to get there is:
Next up hit command A again. Yes... trust me. There might be a lot of this going on for a little bit while you fiddle and fart your way into a typeset you like.
Indent first line and line spacing is found here: Home Tab, Paragraph section hit the arrow pointing down towards the document- next to that is Line and Breaks- hit that if widow and orphan control is clicked unclick it what that does is allows paragraphs to be broken up and will flow into the next page.

Widow/Orphan control example:

Font: For me personally I do Garamond at 11 or 12 depending on my mood. I just like how it looks but find a font type that pleases your eye.
To get rid of hyperlinks:
Line spacing I set mine to 1.5 lines for easier reading. You can keep it to 1 or bump it up to two but the more space between lines means the larger the text block (AKA the book itself) will be.
Now I go back and highlight all of the fic information, and go to the popup menu after highlighting and take the line spacing down to 1 and remove the indents.
I also like to go to the headings section and get rid of the indents one by one on the chapter headings and then center them in the page. Go in front of the Chapter title EX "Chapter 1" and hit backspace until the indent is gone Highlight, there should be a pop up that allows you to change formatting, font and where the indent is.
This is all in the Layout Tab of Word:
Margins- I keep my margins at 1" all directions just because of how it looks on the page but you can have that as narrow as you please.
Next Page- separating the document to make type facing easier. What this does is make the document have "Chapters" within the document. Do this between Chapter one and the first few pages- the opening blank pages, title page ECT.
Double click on the header and footer on the document itself and click "link to previous"
What this does is make sure headers and footers (page numbers and the like) do NOT go up to the "Section" above the area you're working.
Word of note- I like having Chapters start at the beginning of a fresh page so I will go to the beginning of the Chapter Title "Chapter One" and hit "Next Section" and it will jump automatically to a new page.
You might also want to open up the navigation panel so you can hit the headings tab (I have mine set with Navigation Panel already open I don't recall how to get there, play around BUT the Navigation Panel will look akin to this on the Left Hand side of the document:

I downloaded "The Prize" to continue the examples as best I can sometimes it's hard to screen grab what I need on an already done document.
You can also add section breaks but leave it linked to previous to continue page number flow.
So you know selecting "Different odd and even pages" means that if you set a fun or different font for the page numbers you will have to go to ex page 2 and unlink the section from the previous.
Do this for headers as well. But that this does is give you the option to put the author's name and fic title alternating on odd and even pages:

Headers and footers:
With headers and footers section still highlighted hit "Page Number" "Format Page Numbers" Hit "Start at" and hit "One" for the section with the main text body.
This... I will admit took some fiddling for me to figure out. There were some frustrated noises and some choice words at times. But if you hit Layout, Next Page it should prevent you some heart ache instead of just constantly hitting the Enter Key and hoping for the best.
Different Odd and Even Pages what this means and how it works:
In my experience you will have to go to the first 1-3 pages to unlink everything from the Previous Section so it doesn't show up on the beginning pages of the document- but if you like the look of it, more power too you. It's your fic. It's going to be on your shelf at the end of the day. Follow your joy. I'm just letting you know what I do.
You will also have to unlink to previous section with the footers as well, and if you choose a different font and you want the numbers to match through the whole text you will have to input that. Hit the "Pages" Navigation and use that to scroll through things quickly so you can check your work and see if you're happy.
I'm kinda a fan of leaving the headers with the author's name and fic title alternating on pages OFF but I have experimented with it a little bit just to know what it looks like and what it does.
But here is an example of alternating Headers for Sabrecmc's "The Prize" (It was on my To Bind List and since Sabrecmc has given their blessing I'm hoping they don't mind me going "Alright people need visuals.... and this is what I'm working on."

To get the header from the left to the right side- hit tab and type what you please you can also highlight and set colour and font type. This is just Garamond for now for ease of example and reading for now.
Choices choices choices.
Some fic binders like to keep everything including author's comments at the beginning and ends of fics. Personally, I remove them just to keep the flow of everything. You can have a section at the back of the fic if you'd like with all of the comments but that is entirely up to your own personal preference. This is the fic for your shelf make it in a way that makes you happy.
Now all the way at the top of the fic I want you to insert 6 blank pages. But keep in mind this is front and back of pages in a book. Two blank pages on the document equals one page. Some binders go more than that depending on what all they like to do. You'll figure out what you like and what works for your project. Think Bob Ross- Happy little trees and do what you want.
But for me in the document: Pages 1 and 2 are blank as a sort of buffer page, 3 is the title page with the fic name and author and likely some simple design, 4 is all of the fic information- I keep the pairing, chapters, any additional or important tags or warnings, rating and a QR code to link back to the original fic. Page 5 is either left blank but I have added images as something fun for the hell of it that fits the fic, page 6 is my logo. In earlier experiments I played with where my logo goes this works for me I think but it may change in the future. IF you want to have a table of contents by all means add some pages to do so. I don't find it necessary so I don't do it.
To insert an image- for QR codes or title pages:
QR codes can also be just dragged and dropped I've been lazy and dragged and dropped and resized them from there.
I also put a disclaimer in red font: "This is for personal use only and is not intended to be sold! Retail value is estimated 25$" That is to cover the cost of the materials you have used or made in the process of your book that way if your fic somehow ends up in a donation bin it can't be sold for very much.
This is what the info section of a completed fic looks like for me:

To insert an image:
Insert Tab (Next to Home Tab) , Picture- next to the "Table" section, hit the drop down menu and hit "Upload from this device" and select where you have saved the QR Code to, desktop downloads what have you.
It should appear on your document and you can resize it as you please, if you click on the image there should be a pop up with a grey looking rainbow with lines- that's important for QR codes I have it "in line with text"
for fun headers "Have image behind text"
This is.... getting LONG as hell... so I'm going to stop here. But this should give you a jumping off point to start with your fan binding. Play around! Have fun.
Last few Tips:
Home Tab- in the paragraph section- if you need to know what the nitty gritty of what's going on in the document is- hit the backwards looking "P" with the line that's the sign for "Enter" on your keyboard. So you can see what that looks like I don't use it cause it clutters everything for my eyes, but it won't show on the final product. You can turn that on and off at your leisure
Insert Section: Scroll along the top until you see "Word art" one more over "Drop Cap", That's how you can get fancy letters at the beginning of the chapter. Sometimes you DO need to add some spaces between the Letter you're Drop capping and the rest BUT what that window looks like is this When you hit "Drop Cap Options" you can set whatever font you please for however many lines I typically do 3 but the more lines you drop the larger the letter. Tinker with it have fun.

There will likely be more type facing goodies next post... but after I get done type facing I'll get into getting the document ready for printing, how to print and what to do with that shopping list I gave you in that previous post.
REFERENCES, LINKS AND HELPFUL PEOPLE!
Some links for your consideration you will need this for future reference so book mark these:
French Link Stitch
Perfect bound books (AKA Paper backs)
Fun Fonts to spice up the document body itself, you can also import them into Canva.
Da font
1001 Free Fonts
Another resource to keep in mind for ink is this site here if you have cartridge printers see if you can't get a refillable set for your printer so you don't have to sell your arms, your legs, your first born and your house to keep printing your fic projects.
These two tiktokers right here explained everything the best, they are worth checking out even if you don't have Tik Tok. They've been going at this longer than me and don't go "OH SHIT I FORGOT A THING" constantly.
EDIT ONE! This is the punch cradle I have it makes it easy for french links for me
HoneyMinCo Sea Lemon
this quote from hbomberguy’s plagiarism video really resonated with me:
“creative people have trouble recognising their skills as skills, because eventually they feel like second nature. […] this stuff really is valuable. if it wasn’t, people wouldn’t be stealing it. creativity doesn’t feel special or unique until you realise people have to plagiarise it”
your craft is and always will be valuable, please never let anyone make you doubt that
I’ve been in such a funk since the concert. I’m not even sure I enjoyed myself that much. maybe I did. I don’t know