Fan Binding - Tumblr Posts
I’m doing my first ever fic binding, and I made some fun art for the cover, but I see everyone else tends to do minimalist stuff with some graphics and the titles and such?
And I do love that, but now I’m not sure that my cover is okay because it’s more like a fanart piece than the elegant covers I see people do for these…
Any advice?
Bookbinding for Beginners by a Beginner Part 2
Am back there were some things that I missed stating in my last post. And starting up where I mean to continue. I may add things as I go, fair warning, but there is a lot to recover and sometimes I walk away and go "Welp.... forgot that thing". But for the sake of things not being overwhelming I tried to get the most "Up front" stuff done and out of the way in part one.
And I would like to take this time to say: Take it slow, pace yourself. There is no race. And the learning curve is steep in areas. You have to be ok with making mistakes because it WILL happen. Accept that you've made a mistake but don't get upset with lost time or materials. Make a note of what happened and have a journal on hand if you'd like to see how far you've come and the "OK so.... that didn't work. Don't do that again." At the end of the day we're here to line our shelves with lovely wonderful stories and have the pride of "I did this ain't that cool?"
There are a few optional things you might want to consider.
A paper guillotine this is to make the pages of your bind more tidy, but there is nothing wrong with a deckled edge.
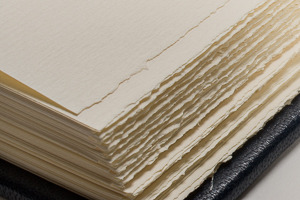
example of deckled edges. It's just a fancy way of saying 'uneven'. There are ways to trim your project with a crafting knife / box cutter and a ruler but my experiments have yielded not so great results. Likely, it's due to several factors: One I don't know my own strength half the time, Two "light but firm pressure" means exactly "Well which is it cause for me those are two different things". Three See one. So deckled edges it is. But if you splurge on a paper guillotine, I salute you. You can also take it slower with a more traditional paper cutter but I recommend measuring twice before committing to a tape marker of where to line your pages up. It is up to you.
Optional but fun: Scrap book paper for decorative end pages. It's fun hunting around a craft store and finding what suits the vibe of the fic you're binding. My only note is aim for something that's not too stiff aim for something fairly easily folded and thin. Card stock like paper won't lay nicely in your book.
End bands these will go on the edge of the spine of your fic but over top of the mull (What is mull? That's coming up)
Mull which is essentially stiff cheese cloth this will add extra structure to your bind
Another option is a Subscription to Canva I only say this because you can sign up for free, but some of the options are locked behind a pay wall. It's fun to play with but the Pro version of Canva also lets you resize your canvas and do custom sizes. I have also done my binders logo in Canva (I actually have two as variants). I also use it to make decorative cover pages.
For your viewing pleasure this is what I came up with. Fun fact about me, I'm a thalassophile (I love the sea and everything about it) since I was consciously aware of the sea. The primary reason WHY I got into book binding is because I am going to be eventually moving onto and living and working off of a boat.


Lucky Seas Bookbinding one and two. Depending on what I feel like using.
Cricut all cricut accessories- there is a mini cricut if you want to dip your toe in. IF you go this route you'll need "HTV" or "Heat Transfer Vinyl"
You can also build your covers in canva and get as cost saving options
Printable sticker paper. OR Heat transfer paper
But this is stuff for covers. I'll get into what you need for covering the chipboard in a minute and give you a "Recipe" for book cloth (Cause I ain't got time nor the funds for some of the book cloth that is out there) but if you want to splurge for your project by all means look and see what is out there. But make note of this- you can just cover your book case in paper and just use sticker paper. I will recommend getting some sort of transparent contact paper to protect your cover (I will go through all of this in future just make a mental note of this)
Now for I promised:
I will be using Celestial Navigation as my example fic of how to down load a fic.

You're going to go to AO3 and go alllll the way over to "Download" and hit "HTML" you can either have it pop open right away or you can go to your downloads and open it up along with your word processor of choice.
You're going to hit Control A (PC) or Command A (Mac), Control/Command C, and then go to your word processor and hit Control/Command V. And listen to the take off noise your computer brand of choice inevitably wants to do while the fic makes it's way from the HTML over to the word processor.
What this all did was copy EVERYTHING and plop EVERYTHING (Save for comments) onto your document. Feel free to save what you have this far and pat yourself on the back you're about to start type facing.
I'm a minimalist in my designs but I have expanded a touch in terms of what I'm doing just to know and experiment for what works for me and what doesn't.
I will reiterate that I will be using Microsoft Word but I'm sure there's away to do this on other processors I just don't know how to do the other one's. I know Mac has something called "Pages". I never worked with it. I will try to add as many visuals as possible but some of my instructions will be "Go to this tab, click X Y and Z to make a thing happen".
Just know that this is what works for me and this is how I've managed to bumble through thus far. This is hardly perfect and I'm still very much experimenting with EVERYTHING. IF you find a better simpler way of doing things- by all means do so.
There's even a way to set up a template when you fire up Word but I've yet to figure it out.
But for now the fun begins- there is some tedium with this but it's best done with music or something on in the background that you can easily listen too but not watch.
First and foremost what you need to do is make the formatting into "Booklet" How to get there is:
Next up hit command A again. Yes... trust me. There might be a lot of this going on for a little bit while you fiddle and fart your way into a typeset you like.
Indent first line and line spacing is found here: Home Tab, Paragraph section hit the arrow pointing down towards the document- next to that is Line and Breaks- hit that if widow and orphan control is clicked unclick it what that does is allows paragraphs to be broken up and will flow into the next page.

Widow/Orphan control example:

Font: For me personally I do Garamond at 11 or 12 depending on my mood. I just like how it looks but find a font type that pleases your eye.
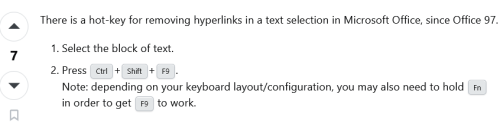
To get rid of hyperlinks:
Line spacing I set mine to 1.5 lines for easier reading. You can keep it to 1 or bump it up to two but the more space between lines means the larger the text block (AKA the book itself) will be.
Now I go back and highlight all of the fic information, and go to the popup menu after highlighting and take the line spacing down to 1 and remove the indents.
I also like to go to the headings section and get rid of the indents one by one on the chapter headings and then center them in the page. Go in front of the Chapter title EX "Chapter 1" and hit backspace until the indent is gone Highlight, there should be a pop up that allows you to change formatting, font and where the indent is.
This is all in the Layout Tab of Word:
Margins- I keep my margins at 1" all directions just because of how it looks on the page but you can have that as narrow as you please.
Next Page- separating the document to make type facing easier. What this does is make the document have "Chapters" within the document. Do this between Chapter one and the first few pages- the opening blank pages, title page ECT.
Double click on the header and footer on the document itself and click "link to previous"
What this does is make sure headers and footers (page numbers and the like) do NOT go up to the "Section" above the area you're working.
Word of note- I like having Chapters start at the beginning of a fresh page so I will go to the beginning of the Chapter Title "Chapter One" and hit "Next Section" and it will jump automatically to a new page.
You might also want to open up the navigation panel so you can hit the headings tab (I have mine set with Navigation Panel already open I don't recall how to get there, play around BUT the Navigation Panel will look akin to this on the Left Hand side of the document:

I downloaded "The Prize" to continue the examples as best I can sometimes it's hard to screen grab what I need on an already done document.
You can also add section breaks but leave it linked to previous to continue page number flow.
So you know selecting "Different odd and even pages" means that if you set a fun or different font for the page numbers you will have to go to ex page 2 and unlink the section from the previous.
Do this for headers as well. But that this does is give you the option to put the author's name and fic title alternating on odd and even pages:

Headers and footers:
With headers and footers section still highlighted hit "Page Number" "Format Page Numbers" Hit "Start at" and hit "One" for the section with the main text body.
This... I will admit took some fiddling for me to figure out. There were some frustrated noises and some choice words at times. But if you hit Layout, Next Page it should prevent you some heart ache instead of just constantly hitting the Enter Key and hoping for the best.
Different Odd and Even Pages what this means and how it works:
In my experience you will have to go to the first 1-3 pages to unlink everything from the Previous Section so it doesn't show up on the beginning pages of the document- but if you like the look of it, more power too you. It's your fic. It's going to be on your shelf at the end of the day. Follow your joy. I'm just letting you know what I do.
You will also have to unlink to previous section with the footers as well, and if you choose a different font and you want the numbers to match through the whole text you will have to input that. Hit the "Pages" Navigation and use that to scroll through things quickly so you can check your work and see if you're happy.
I'm kinda a fan of leaving the headers with the author's name and fic title alternating on pages OFF but I have experimented with it a little bit just to know what it looks like and what it does.
But here is an example of alternating Headers for Sabrecmc's "The Prize" (It was on my To Bind List and since Sabrecmc has given their blessing I'm hoping they don't mind me going "Alright people need visuals.... and this is what I'm working on."

To get the header from the left to the right side- hit tab and type what you please you can also highlight and set colour and font type. This is just Garamond for now for ease of example and reading for now.
Choices choices choices.
Some fic binders like to keep everything including author's comments at the beginning and ends of fics. Personally, I remove them just to keep the flow of everything. You can have a section at the back of the fic if you'd like with all of the comments but that is entirely up to your own personal preference. This is the fic for your shelf make it in a way that makes you happy.
Now all the way at the top of the fic I want you to insert 6 blank pages. But keep in mind this is front and back of pages in a book. Two blank pages on the document equals one page. Some binders go more than that depending on what all they like to do. You'll figure out what you like and what works for your project. Think Bob Ross- Happy little trees and do what you want.
But for me in the document: Pages 1 and 2 are blank as a sort of buffer page, 3 is the title page with the fic name and author and likely some simple design, 4 is all of the fic information- I keep the pairing, chapters, any additional or important tags or warnings, rating and a QR code to link back to the original fic. Page 5 is either left blank but I have added images as something fun for the hell of it that fits the fic, page 6 is my logo. In earlier experiments I played with where my logo goes this works for me I think but it may change in the future. IF you want to have a table of contents by all means add some pages to do so. I don't find it necessary so I don't do it.
To insert an image- for QR codes or title pages:
QR codes can also be just dragged and dropped I've been lazy and dragged and dropped and resized them from there.
I also put a disclaimer in red font: "This is for personal use only and is not intended to be sold! Retail value is estimated 25$" That is to cover the cost of the materials you have used or made in the process of your book that way if your fic somehow ends up in a donation bin it can't be sold for very much.
This is what the info section of a completed fic looks like for me:

To insert an image:
Insert Tab (Next to Home Tab) , Picture- next to the "Table" section, hit the drop down menu and hit "Upload from this device" and select where you have saved the QR Code to, desktop downloads what have you.
It should appear on your document and you can resize it as you please, if you click on the image there should be a pop up with a grey looking rainbow with lines- that's important for QR codes I have it "in line with text"
for fun headers "Have image behind text"
This is.... getting LONG as hell... so I'm going to stop here. But this should give you a jumping off point to start with your fan binding. Play around! Have fun.
Last few Tips:
Home Tab- in the paragraph section- if you need to know what the nitty gritty of what's going on in the document is- hit the backwards looking "P" with the line that's the sign for "Enter" on your keyboard. So you can see what that looks like I don't use it cause it clutters everything for my eyes, but it won't show on the final product. You can turn that on and off at your leisure
Insert Section: Scroll along the top until you see "Word art" one more over "Drop Cap", That's how you can get fancy letters at the beginning of the chapter. Sometimes you DO need to add some spaces between the Letter you're Drop capping and the rest BUT what that window looks like is this When you hit "Drop Cap Options" you can set whatever font you please for however many lines I typically do 3 but the more lines you drop the larger the letter. Tinker with it have fun.

There will likely be more type facing goodies next post... but after I get done type facing I'll get into getting the document ready for printing, how to print and what to do with that shopping list I gave you in that previous post.
REFERENCES, LINKS AND HELPFUL PEOPLE!
Some links for your consideration you will need this for future reference so book mark these:
French Link Stitch
Perfect bound books (AKA Paper backs)
Fun Fonts to spice up the document body itself, you can also import them into Canva.
Da font
1001 Free Fonts
Another resource to keep in mind for ink is this site here if you have cartridge printers see if you can't get a refillable set for your printer so you don't have to sell your arms, your legs, your first born and your house to keep printing your fic projects.
These two tiktokers right here explained everything the best, they are worth checking out even if you don't have Tik Tok. They've been going at this longer than me and don't go "OH SHIT I FORGOT A THING" constantly.
EDIT ONE! This is the punch cradle I have it makes it easy for french links for me
HoneyMinCo Sea Lemon
Hello! As someone who really really wants to attempt bookbinding, could I ask how you started? I am very overwhelmed with the amount of materials and equipment bookbinders use and it is not within my budget to get most of them, which is really discouraging :,)
I would love to know some cheap(er) alternatives to certain materials and which materials, in your opinion, is the most essential and worth splurging money on! I particularly have a lot of issues with using leather because it is WAYY out of both my budget and skill level haha!
Additionally, what are some of the reasources you used to learn how to bookbind? :o
Thank you!!! (It's alright if you don't respond to this! I was just wondering :])
hi, hello!!! im sorry for the late reply!!
to start with--i definitely dont use leather for the same reason!! even imitation leather is expensive, and tbh i like the ability to play around with colors and shapes that working primarily with bookcloth and paper affords me. you can either make your own bookcloth using regular fabric, a binder like HeatNBond, and tissue as long as you have an iron--or you can purchase it from places like amazon, hollander's, or other bookbinding supply companies. leather is ~fancy~ shit.
as for essential tools, that sort of depends on what youre trying to set out to do. western "cased" bindings require more material as a baseline, but glue-free bindings like coptics and japanese stabs require much less! really, as long as you have paper, a needle, thread, and cardboard, you can make a book! here are some of the tools i use, as well as some alternatives:
bonefolder(s) - i have two, a "traditional" one and a square angled one, both real bone. this is something i would consider an essential item, because you will use it for almost everything. you can buy a cheap teflon folder at your local craft store, but really anything you can use to crease your pages and evenly tuck your folds would work. a firm piece of plastic, a thick card--hell, a 6in ruler would work!
ruler(s) - god, i have so many rulers, both imperial and metric, in so many different shapes and materials. the ones i use the most are my 12in/30cm double sided metal ruler and my 3x4in/70x100cm double sided metal square, but as long as you have something you will be set. you can find cheap wooden or plastic rulers at your local dollar store!
weights - this includes freestanding weights and a press. while i do use a press, i also have some bricks from my local hardware store that ive wrapped in craft paper (because cleanliness is essential), a mason jar filled with rocks, and a giant stack of cookbooks. i use all of these for different things, but getting a few bricks would probably be your cheapest option; mine were $0.62 each at lowe's, lol! you dont need a press. anything that will get you even, heavy pressure will work!
waxed thread - you can use any sewing thread you want and wax it yourself by running the wax along the thread! small beeswax blocks are relatively inexpensive and will last quite a while, and regular sewing thread won't break the bank. you can certainly buy pre-waxed thread, but making your own works just as well.
awl - i have two awls and a punch cradle, and genuinely none of these are "essential". straight up just stick a sewing needle in a wine cork, bestie, and youve got yourself an awl. punch cradles are also totally optional; just make a guide with some cardstock so you know where to punch your signatures and youre set.
paper - this is the big rabbit hole, of course. fancy handmade papers can get REAL expensive and dont even get me started on procuring paper with the proper grain direction. HOWEVER, im currently using a mid-tier premium "printer" paper as my fill (though ill be switching to proper stuff when i run out) and you can definitely use regular sheets youd find anywhere with only minor issues. as for decorative paper--anything works! regular scrapbook paper is perfectly fine, and you can buy 12x12 booklets online or at your local craft store for cheap--it seems like theres always some on sale.
bookcloth - mentioned above, but making your own is probably the cheapest way to do it! however--bookcloth is only essential if youre doing a cased-in binding imo. if youre doing coptics/stabs/open sewn/glue-free/etc. bindings, you dont need it.
glue - glues are tricky. traditionally people use a combination of paste and PVA. however, you can use whatever glue you want so long as youre okay with the drawbacks of using high-moisture stuff. gluesticks, craft glue, whatever. you can also make your own paste with flour and water! if youre looking for some of the things id recommend getting the "good" version of, though, i would pick PVA. i buy mine by the half-gallon and its worth it, and i actually prefer it over nori paste (what can i say--im impatient! and paste takes 24 hours to dry).
cutting tools - this is the one absolute thing i would recommend getting: a good boxcutter with replaceable blades and a large cutting mat. this is the essential tool of all time, because while you can use scissors its nearly impossible to get a straight line on anything. i have a workpro w011043a, an xacto xz3601, and three pairs of scissors of various lengths--and my workpro is what i reach for the most. cutting mats can run a little expensive, but i cant stress enough how much easier your life will be with an open blade + cutting mat as your primary cutting setup.
chipboard - i use several different thicknesses of greyboard for my covers and spines, but you can genuinely use whatever cardboard you have on-hand. got an amazon box? that works!
of course, this is by no means a comprehensive list of tools--but these are my go-to tools for every bind! a lot of the fancy stuff like edging, foiling, bookmark-making, etc, is totally optional and opting out of those will significantly reduce your overhead costs. you can also start out with the inexpensive stuff and upgrade as needed! bookbinding is daunting and yes it does have a bit of an initial investment, but there are definitely ways to make it work if youd really like to get into the hobby. you can also look at starter kits on etsy, too! theyll often come with some of the essential tools as well as materials to make your first book, so you can try it out to see if youd like the hobby without going ham.
as for resources to get started, here are some of what ive used!! also not comprehensive because everyone is different, but a great place to start.
hope this helps!!!


Cover Design Mock-Ups for my fan-binding project of 'this story that we found ourselves in' by the incomparable @eskawrites
Photo and artist credit for covers 4-6 under the cut.
4. Painting - Alyssa Monks - Morning After II (2014) (https://www.alyssamonks.com/2010-2014/)
5. Photograph - Elsa Boscarello Photography (https://www.elsaboscarello.com/blog/laketahoeproposal)
6. Photograph (Snowy New York Street) - Photographer Unknown (if you know, please send me a message!)