556 posts
Shit Ok So

shit ok so…………
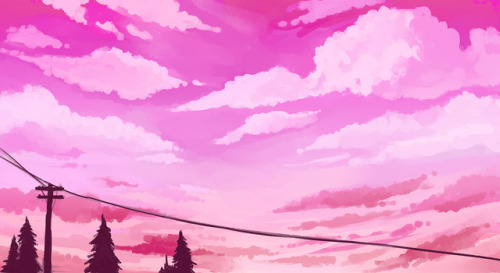
1) the flat colours are NOT bucket filled because my line art is lazy. Don’t be fooled. It’s lazy.
2) don’t forget about composition!!!!!! It’s important!!

3) the overlay layer goes underneath the lumi&shade and lumi layers. Blue’s original colours were very cold. By adding a warm-toned overlay layer, I was able to “warm up” her colour palette as well as darken the overall piece for a the more intimate effect I was going for. As below:

4) I’ve done a glow tutorial in the past and the concept is basically the same.

5) the last effect is a noise layer that apply through GIMP rather than SAI. The noise layer darkens the piece just a tad bit more, as well as gives the picture a grainy and “cinematic” finish which I like in these kinds of pieces. I don’t use a noise layer all the time, but for something with dramatic lighting and closeness like this, I love using noise layers to add a finishing touch.

Don’t be afraid to experiment with different techniques! These are just basic ones that I use!
-
 agentsoflegends liked this · 10 months ago
 -
 thehumandino liked this · 11 months ago
 -
 thiefofgildedsheets liked this · 1 year ago
 -
 gunrabba liked this · 1 year ago
 -
 jaqueline24-2-0 liked this · 1 year ago
 -
 linden-leaf liked this · 1 year ago
 -
 coupdefoudredart reblogged this · 2 years ago
 -
 pixeldragon-45 liked this · 2 years ago
 -
 itrip liked this · 2 years ago
 -
 katiewolfgirl7 liked this · 2 years ago
 -
 qaqelol liked this · 3 years ago
 -
 pensasleep liked this · 3 years ago
 -
 forestdreamersworld liked this · 3 years ago
 -
 swirling-skies liked this · 3 years ago
 -
 violent-l1ghts liked this · 3 years ago
 -
 lala-2-awsome liked this · 3 years ago
 -
 eldritchghost2 liked this · 3 years ago
 -
 t1tak1 liked this · 3 years ago
 -
 zandoodlez liked this · 3 years ago
 -
 nyx-nicte liked this · 3 years ago
 -
 chromacat liked this · 3 years ago
 -
 knowingoverseer liked this · 3 years ago
 -
 nikkimatsunos reblogged this · 3 years ago
 -
 wildtheorem liked this · 3 years ago
 -
 liwja liked this · 3 years ago
 -
 gaia-n-dragons liked this · 3 years ago
 -
 evomanaphy liked this · 3 years ago
 -
 oreopata reblogged this · 3 years ago
 -
 draknesse liked this · 3 years ago
 -
 aliencasket liked this · 3 years ago
 -
 red-1nk liked this · 3 years ago
 -
 clefairy-says reblogged this · 3 years ago
 -
 dumbboxhead liked this · 3 years ago
 -
 juniperize liked this · 3 years ago
 -
 echotalia reblogged this · 3 years ago
 -
echotalia liked this · 3 years ago
-
 alkrita liked this · 4 years ago
 -
 theespidey liked this · 4 years ago
 -
 crowpanacea liked this · 4 years ago
More Posts from Coffine-chan
waitwaitwait how does this perspective drawing stuff work
Okay, fair warning: I just picked up this thing like a few hours ago, my hands are rattling, my muses are excited and I’m so glad I went to Krenz aka cushart’s little seminar where he spoke extensively (in a language I haven’t practiced in a long time. aka not english) about the importance of “grounding” a character in order to make them realistic and believable.
The seminar was great because I actually… didn’t understand any of the perspective tutorial that I’ve read off the internet before this? The seminar was basically like a missing link for me, so I hope that I can share that in this long post.
So be prepared for long post!
Based on the seminar, he said the biggest issue with character posture and design he has seen many people do is that it’s based on assumptions and conjectures. Most of us absorb posture, dynamism and foreshortening by looking at other people’s works and imitating/recreating them (myself also being a big offender in this). Basically, he’s saying that there should be a structured approach for you to get into posing a character in your art /while/ allowing you to blend the character into a background seamlessly. He used a chunk of Mandarin jargon that I’m unfortunately unfamiliar with, nor am I familiar with the phrases in english, so take my phrasing with a word of salt:
1) Find/make/use a 16-square box.

Boring, I know.
2) Stretch it to your liking to determine the most important plane your character will be interacting with.

I used this plane because it’s an extreme example of how the grid can be used. Here’s an example of a sketch I did earlier with the 16-square grid being utilised as a normal 45 degree floor plan:

Anyway, back to my blank example, the angle of the 16-square will be mainly determined by your camera angle! The one I did is for a wall. The grid is mainly there to help you project the shapes of the object you want to draw! To help illustrate things, here’s an example of a L-shaped sofa or whatever leaning against the “wall” of perspective grid:

The lecturer basically said that it’s the easiest to draw the character/pose/object out in a side-view first, so that you can identify the position of each of the prominent points when you translate it into the 3D/grid plane. His explanation was borderline mathlike and was going into the area of geometry, which I’m not very good at. But basically, it’s about finding out how much “space” each part of your drawn object can take up, much like drawing geometrical shapes in maths class!
3) Draw a side-view of the pose you want.

Top left you can see I scribbled out the side-view of a horrible excuse of a pose. The most important things you have to find out is the angles and planes of note from the pose. Mr. Krenz mentioned equating the notable planes as an unfolded surfaces of a cardboard box; you can tilt at certain points, but it has identifiable angles, which is important for you to determine the angles of your torso, legs, etc and helps solidify your perspective angles when you draw em.
For the pose I drew, the points of note are: the head is leaned towards the “wall”, and the hand goes straight down; but notice how the back is curved and the butt is not close to the wall. This is important.
You’ll also notice that I drew a horrible excuse of a box projected out of the four squares in the 16-square grid. This is the important part! There’s actually some maths shenanigans as to the proportion of the box and how it relates to your anatomy, but I think the safest way to go is to assume a box projected out of 4 squares is equivalent to a torso. so that box = the size of one torso. that means everything from above the hip in the pose should fit into the box.
Remember how I harped on the position of the butt and hands and the angles? This one is for the next step:
4) Draw in basic spheres and shapes. Ignore anatomy for now.

If you see each part of the body as shapes (spheres, squares, rectangles), it’s easier to plot them out in relation to the angle of the perspective grid. Over here, you can see that the shapes are drawn in correspondence with the perspectives. I won’t cover much on this part, mostly because there’s already a hundred other perspective-box-shaped-how-to-translate-to-human tutorials out there that explains it a great deal better than I do. The vital point to take out of this part is that you must plot according to the position of each key point– the back curve, the hand angle, etc onto the geometric shapes when drawn. The box should help you out in this I hope.
5) Finally! Fleshing it out!
Yep. This is also where anatomy fixing happens, if you see the need.

Notice how the angle of the lad’s mantle, vambraces, shin guards, etc corresponds to the geometric shapes scribbled out earlier. This step becomes immensely easier with practice, but basically the gist is that the geometry lines help you determine the direction of the clothes and stuff you have to flesh out.
6) Not necessary, but put in shadows and shading to help solidify the scene.

I thinned out the scribbles here and dabbed on a dark color to immediately portray that the kid’s hiding in the shadow of some doorway. See, immediately there’s a background! And he does look like he’s sitting there and no immediate worries of how the anatomy or angles of things out of place, because the 16-square has already determined it for you beforehand.
Conclusion!?
I think the important part is that personally, this is easier for me to get into instead of looking purely at theories of horizon lines, vanishing points, etc because honestly, it is very difficult to see those if you’re drawing character-oriented pieces. While this technique is not foolproof and is actually more complicated (read: there’s actual math shenanigans in it that i didn’t get into), I think this is a good starting point for artists of any level to start training their eye to see in order to make characters better blend into the backgrounds.
Hope this helped and sorry for the length!


HAPPY NEW YEAR! Here’s beautiful fedora!Dadzawa w elegant!Shinson 🎊🎉✨✨🖤💜