
They/them - AroaceLego MOCs and photography with a wide range of different characters and environments, every Wednesday (in theory-)
63 posts
Custom Water Toa !

✨Custom water Toa !✨
Another one ! (Slightly less giant)
Details below the cut !
Front/back views


That one, too, is experimental, albeit in another style. I tried to remain closer to actual Bionicle size this time. Many fun details and technics here, so we’ll go from the feet all the way toward the head.
So, starting with the feet ! I have a complex of normal feet and Visorak legs held by a single connector. They have a wide angular range, but given that the connector connecting the socket to the feet is alone, a foot can also have a 360 rotation angle horizontally (not natural-)
The legs don’t have much special traits, except the upper legs using two socket with axle holes on top and a silver foot as armor on the side.
The body is where things get interesting. The Rahkshi silver shell is held by the silver claw above it at a chest plate, while part of the back is hidden behind a Rahkshi foot. The body is very triangular because it’s framed by these sockets with a silver piece in the middle, which gives it a nice aesthetic. The arms are an equivalent, with some tubes directly in the shoulders to offer a flexible piece which also limits the movements.
Finally, the head is not a head. I’ve made it like that because of the translucent Kanohi, that way it looks brighter, the inconvenient being that the backside of the head is quite literally an empty shell.

Now for the lower part of the arms : no socketed hand because who needs hands when you have a trident (bident ?) ! The main piece obviously comes from a Rahkshi, and the magic is wishing the silver connector. It used to be a lightsaber hilt from the larger Star Wars figs, but it looks good practically everywhere, including here !
Also, here below is a picture of the angle range of the arms (not much, oops).

-
 no-04s-slowly-collapsing-life reblogged this · 9 months ago
 -
 lekorojams reblogged this · 9 months ago
 -
 gryphongirl liked this · 9 months ago
 -
 mask-of-prime reblogged this · 9 months ago
 -
mask-of-prime liked this · 9 months ago
-
 ihavegoodfeeling liked this · 10 months ago
 -
 degenerate-mystery-inc-whore liked this · 1 year ago
 -
 scalesthegecko liked this · 1 year ago
 -
 0m3g45n1p3r4lph4 liked this · 1 year ago
 -
 janoha liked this · 1 year ago
 -
 ghost-mantis reblogged this · 1 year ago
 -
ghost-mantis liked this · 1 year ago
-
 backsideways4514 liked this · 1 year ago
 -
 zovis reblogged this · 1 year ago
 -
 thewayofthebionicle reblogged this · 1 year ago
 -
 bionyx64 reblogged this · 1 year ago
 -
 anasianfriend reblogged this · 1 year ago
 -
anasianfriend liked this · 1 year ago
-
 katakuna23 liked this · 1 year ago
 -
 herora-nuva liked this · 1 year ago
 -
 toaofconfusion reblogged this · 1 year ago
 -
toaofconfusion liked this · 1 year ago
More Posts from Enteroctopusdarkysilis
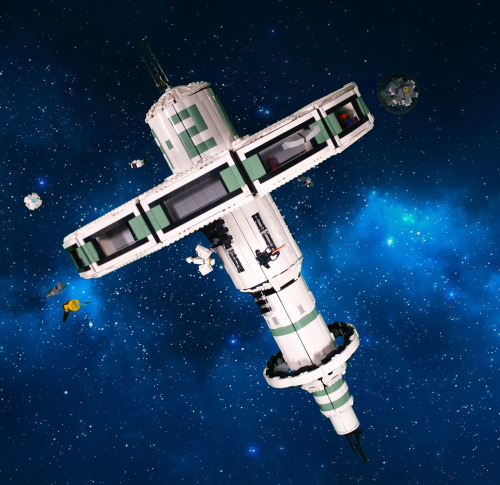
✨Trade Space Station !✨
[1/4] >Next>
Finally...More than 60 hours of work, I can present my masterpiece. I have been working and planning this project for a long time. Given the sheer amount of things to talk about, I will split all of my rambling in (at least) four posts : one about the concepts, ideas, and general aspect (you're here !); one about the technical side of things; one depicting how the project evolved (using pictures taken during the construction); and one dealing with all the smaller details, ships, and such.
Enough with planning, though. Explanations, other images and more explanations below the cut !
(less) edited picture of the build :

So. You might see, now that I got rid of all that pesky editing (or most of it) that there is a big arm holding the thing in place. It's easily a fifth of all the work of this build, because I absolutely wanted to hold this thing at an angle, and it's heavy, at around 15 kilograms (33 pounds). I'll talk about the technical difficulties of that in a later post, but it was important for it to be solid, because the station was the central piece of my second ever (very small) lego exhibition. AND it allowed me to meet the recruiter of a much larger exhibit. Long story short, in a month, I'm presenting this piece again (just before my exams, whoops-).
Anyway. Not only is it heavy, but it's also quite tall and wide. Around a meter at the highest point (tilted or not), while the diameter of the main ring is at around 0.75m. Quite a difficult thing to move around. Or is it ? Well, yes and no.

Here are all the main components (excluding the holding arm), when I move the piece around. Of course, all the ships are detachable (it allows me to move them around from one day to the other), but the dome carrying the antenna can also be removed, and then, the entire ring can be disconnected (that, too, was quite a challenge).
Removing the ring obviously makes it waaay easier to transport, because a single wooden plank can then be used (again, except for the arm, but that thing was made to be sturdy, so it can be transported with less care); and , once the dome is removed, I can just let the central cylinder stand upside-down (useful for storage). The only trouble I found with this system is that I once connected the ring the wrong way around, meaning everything in the small hangars was upside down. Quite an embarrassing moment.
Speaking of the hangars, I initially wanted to keep them all empty, to store ships inside, but it didn't really offer this piece the sparkle of life. Setting up these small decors inside most of them, with colors contrasting with the general theme of the build, was actually a really good addition.
The colour scheme as it is now is not exactly the one I had planned at the start of the project. I originally planned on using bright light orange (bricklink colour name) instead of sand green, but I found out that this colour was tough to find in large quantities, and I already had quite a bunch of the sand green, so this tragic decision was made. I think it would have offered a more vibrant colour to the build (resembling a Subnautica default palette, which I enjoy quite a lot), but in hindsight, the green works really well, appart from a small detail I'll expand on in a minute.
What's really funny for this project is that, when it started, I actually only wanted a nice way of showcasing all the little space ships that I tend to make whenever I have access to a small amount of cool pieces. Then came a long time where I only daydreamed about it and planned how I would want it to go, and only when I had a clear vision did I start the actual building process. So, taking all that into account, you can probably double the amount of time I spiritually spent on this project.
What I knew is that I wanted to get this huge ring held by beams to the station's body, which made the build both more interesting and more complicated that it would have been. But the challenge was appealing.
At first, the main body was completely flat and white, but I soon had to add texture, both because it was becoming ugly and because the 2*2 white curved slopes were starting to diminish fast. The first modifications I did were to add the sand green curved slopes instead to create stipes, then letters : the big A-2 you can easily spot. With the few bits of lore that I have created for this piece, you have to imagine that there are hundreds of these stations spread in the galaxy, which can be easily described through 3 criteria : the Letter, the Number, and the Colour. That would mean that, if you wanted to meet with someone at the exemplar I made, you would say something along the lines of 'Meet you at Sand Green A2'.
Texture-wise, the other element of the largest cylinder is the exposed bits of machinery, very classic in sci-fi, I know, but it does work well in this context. The second cylinder has much less textures, with only a few grates, and some 2*1 ingot pieces (because they look cool); but it also has its own, smaller ring (diameter slightly larger than the largest cylinder's).
Then come the smaller cylinders, which don't have much texture, except in their transition from one to another (barely visible in any of the pictures, but it exist).
Overall, I'm also really happy of how round it looks, given that circles are not my speciality.

Here is a completely unedited picture of the support arm (Lewa for scale), with a nice counterweight which might be necessary to hold the entire thing in place (it may not be, but I'm not trying to remove it. Bad idea.).
As you might notice, my studio is not a shelf anymore. I built something new from scratch with a green screen, because I thought it would make my editing job easier. And it would have, if I didn't use sand green in my build. Anyway, I'm keeping this for a few days, to snap some pictures of the MOCs which don't fit in my shelve (and are not green, meaning editing will be easier.
Here is the 'studio' from an outside point of view :

I know it's quite a mess outside of my clean perimeter, but I do as I can. You can see one light in the foreground, but there is also one (less visible in the background), symmetrical to the first one, and a third one behind and above the camera (outside of the picture).
You may also notice a lot of sorting boxes. Sorting pieces can greatly improve your productivity, if you label all your box correctly. Covered by the greenscreen is essentially a shelf full of these sorting boxes, labelled by colour and piece type, and it was really practical. Anyway. Thank you for reading until this point, I guess ? If you survived through all this rambling, you probably deserve something...
I mean- Have these pictures I took during the exhibition, I guess...


(You can notice that these are two different days because of the ships’ placement).

✨Trade space station !✨
<Previous< [2/4] >Next>
Today’s gonna be about the progress of the build in time, which allows me to ramble about the building process. Yay !

Before actually commenting the build. You may notice chocolate and my (empty) tea mug. They should be apparent in most of the earliest pictures (there was not enough space on the table for them at the end of the project, sadly~
So, here, you can see that my first step was to see the scale of my project. The template of the large ring to see how much space it would take, and the small ring to see how round I could make it (and at the bottom, you can see the white curved pieces. Enjoy this view, it won’t last.)
You can also notice above that I already stared making some small ships.

The next day ! You can see on the left my long rod. This was the ideal height for the central cylinder. I also created the first core of the build (replaced later because too fragile), and the first arms to hold the ring (too fragile too).

Progress ! This is the moment I realised my original color scheme would not work (you can see orange and bright green on the side, which I tried before the sand green).
I had half of the big cylinder added (you can see the slots left for the additional details) and another naked half on the right side. And my collection of boxes on the table is growing. It’s only getting worse after that.

See ? More boxes (and pieces) scattered all around. And a hammer, too. I at this point mostly finished the big cylinder (or so I thought, some reinforcements were necessary), started the smaller cylinder, and realised white pieces were running out. I also still haven’t touch the ring yet, as I wanted to stay focused on one bit.

Mostly done with the cylinders at the point (you can even see the start of the smallest one on the right side). Agin the boxes grow ominously.
Since it was time to start the ring, I created a replica of a sixth of it. Given that there were twelve sections, I wanted to be sure of the design before starting to build them all, starting with the facade. It took some fiddling around (you can see these aren’t symmetrical, as I was trying out different designs). Really, if you have this kind of things to do, try to make it in a vacuum first, you’ll gain a lot of time later, once the prototype has every problem answered (mine were mostly the curve, and the link between each plates (solved with mod 1*2 black plates).

See ? After the prototype was done, I simply built all of the facades and attached them (you can see my 1*4 curved pieces were all missing at the time though).
I kept the prototype on the side, because I’ll still need it later. I also am missing half of the ring (the part above, since there is only a structure below), because I was not sure of how everything would fit, and I waited until these parts were assembled before making it, in case adjustments were needed.

Here is the top part ! And all the hangars done, too. It took me a surprising amount of time to do all twelve of them…

Huge progress ! There is no more room on the table for the boxes, but you can see them…on the floor, on the left…Lot was done, from the bottom cylinder now finished along with its ring, the covering pieces of the big ring (except the internal faces), the hat of the station, and a huge reinforcement for the six arms, which was done separately). At this point, except for a few details, the station itself is finished.

And there is a picture taken moments before disaster. The station is done (ignoring the transitions between cylinders) the arm…supposedly, too.
Sadly, the arm wasn’t, in fact, finished. If you read the first post, you will notice it isn’t as bulky, and isn’t attached on baseplates yet.
Well, guess what ? When I finally tried to see if the arm would hold onto the station, it broke. Rather, two pieces broke, then the rest came down, and so did the station, which shattered on the floor below. Luckily for me, the main cylinder was so dense it practically completely survived. Most of the hangars of the rings only broke section per section, so it only took a few hours to get it back together, but much more time to make the arm solid. And now, it can hold the station for ten hours without flinching ! So, here is a lesson. If something you do fails when you do it with your heart, let the rage flow through you and build it back out of spite. It works* !
*don’t hold me accountable for any failure using that method

✨Yet another combat mech !✨
A bit of laziness here, I couldn’t bring myself to get proper pictures, so I got old ones from when one of my LEDs broke, hence the blueish lighting-
Lore and closeups below, and previous work here !
Mech closeups :


Pilot closeup :

Lore time (world explanation in previous works..) !
So, Scorcher (the mech) is terrifyingly large, next to most others, which is already impressive, but it’s also one of the most equipped ones on the field : large circular saw, flamethrower, integrated calculation computer, you named it. The only real weak point is the reservoir in the back, which is what the flamethrower is powered by, and it’s hard to reach because one has to get behind Scorcher to get it.
The pilot is well equipped too, with last gen holographic equipment and a powerful high resolution display helmet, under which he somehow manages to fit all his hair. But he’s not alone, since he also have an entire team behind him (called Dragon, for obvious reasons), which helps him during and outside of combats, making this make one of the bests there are.
Unrelated to the lore, the large dome used for the head falls off every time I try to move something. It may have plot armor in the lore, but in real life I think a fly could beat it. Most of these joints are rigid, except at the waist, which is a mistake I probably won’t make ever again, it’s terrible. I’m also glad I stole the arms of another minifig for this one, because it was quite bland with purely red arms.
A tangent about hexagons
Because the project I’m working on brought it, I found it interesting, and I thought some people might need it.
So, as I’m working on a quite large project (hopefully done by next week, although I have doubts on that), and the base structure of it is more or less hexagonal. Anyway, here are some of my tips to get good hexagonal shapes.
The easiest way to do this is obviously with hinges and plates, like that :

While not necessarily accurate, it’s cheap and efficient, albeit squishy, and can be expanded to any size.
Instead, we can go the technical way, and use maths, by considering that a hexagon is the combination of 6 equilateral triangles. We end up with this :

Practically unbreakable, very stable, and can be made with as much technical bricks as possible, so it is easily expandable, but it’s harder to attach it to classic bricks.
So, none of these two designs are really good alone, whether on pure usability, or on durability. Alone, that is. Now, here is the fun part : thanks to the way Lego works…


…they work together ! And, with some modified 2*2 plates, they mostly hold to one another ! Isn’t that awesome ? What’s more is that, while I’m using 2*4 plates and a 7 holes technic bars, that also works with 2*6 and 11 holes bars, which is good.
Now, let’s apply this knowledge to make a solid prism with an hexagonal base :

By using a bunch of plate and two of these hexagonal bases, we get a hollow tube, which is solid through the hexagons, but can still break because of a diagonal force. To fix that, we need to add supports between the supports, like so :
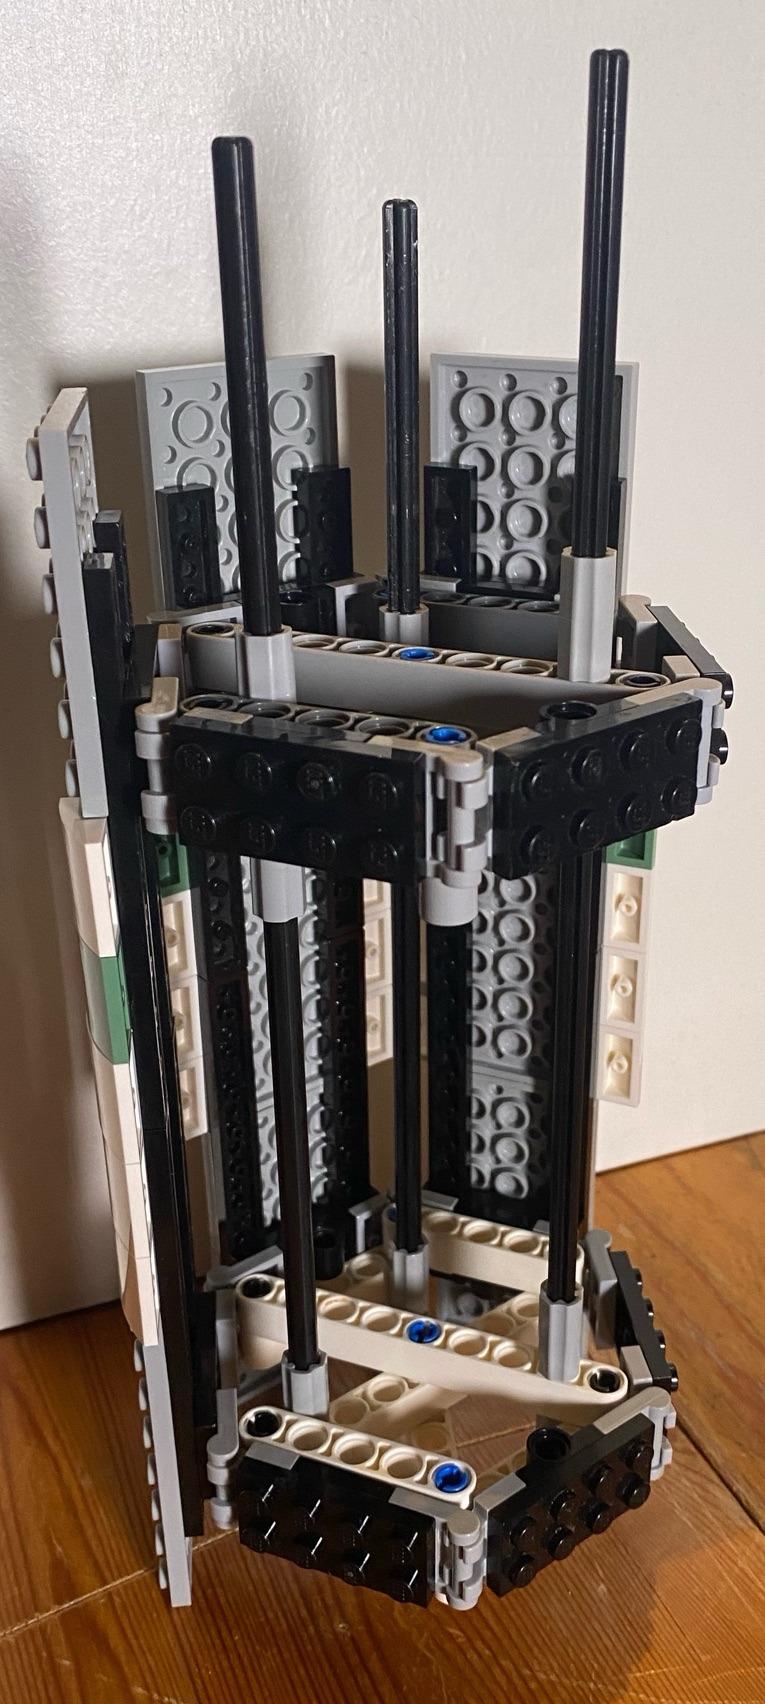
This also means that this design becomes stackable. Congrats, you made a long hexagon tube ! It can also be round, with the right modifications, notably with 2*2 curved tiles :

It fits perfectly, and it’s good to make solid near-circles !
Sorry for the photos’ quality !- They were taken quite late with my phone, and without proper lighting.


✨Custom bionicle (again) !✨
Two more from my Ru-Fahi series !
Details and rambling below !
Jaller Ru-Fahi


…Because I couldn’t not include him. Realistically, all Toa Mahri a good to some extent, but this is peak Toa material right here. One of the first I acquired, one of the best looking ones, too. The base body is practically the same as the original, with some twists, but I mostly made him thicker and upgraded his sword, which is better with a guard and a proper handle. Well, that, and the Hannah, obviously. Sure, the original one was cute, but here me out :


Look at it, and behold ! It might be slightly bigger than the original, have only four legs, and need a larger chain (which I found just earlier in a box of misc Hero Factory pieces, and is better than a basic Lego chain), but doesn’t it look very cute and wholesome and dangerous ? Also, I gave it actual joints, because it deserves it, and removed the Kordak blaster because it didn’t need it anymore. I really love making arthropods with bionicle (I have more for later~).
Pohatu Ru-Fahi


Definitely looks awesome. The original is Pohatu Phantoka from the Rockoh T3 set (because I have one and a half of this set). It is the coolest version of Pohatu (because orange>brown, obviously). Lot of modifications on that one, from the custom jet pack to the arms and the legs. The arc pieces for the front arms are more or less of placeholders because I was niece a good piece to make the arms larger, but it turned out alright. The blades are also stolen from the half Rockoh, and the piece underneath, if anyone recognises it, is from Pohatu Nuva, because it’s a neat reference. And the tube is somehow remaining in the Kanohi, despot the fact that there is not any proper connection for it tand hold onto.

Also, can we talk about this leg ? If you ignore how incredibly illegal this whole piece is (ball joint stuck by the light grey part and small black and grey piece not completely connected to the rest), I think that’s the best shape I managed to get so far, and it reflects nicely what I have envisioned (Pohatu being able to run/jump easily because of the shape). And, it had the added advantage of fitting perfectly with the orange piece above when the knee bends.
Last but not least, I also have started a potential candidate for Toa of air, despite a lack of proper Kanohi, even with my extensive collection. My first candidate would have been Lewa Phantoka from the Axalara T9, but this one has a special place in my heart, so won’t be touching it and it will proudly remain in his shelf (along with the untouched Pohatu). So, maybe another of this series soon ! But probably not. And if I miss posting custom bionicle too much, I have a (complete) collection of entirely custom Toa, but I’m afraid they won’t fit in my studio (they’re big, too big).