aka @rmgrey-author | Rowan Grey • writer • graphic artist • mix maker • tutorial maker • ABSOLUTE STEREK TRASH • multiship af
441 posts
COLOR TUTORIAL #1
COLOR TUTORIAL #1
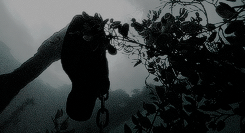
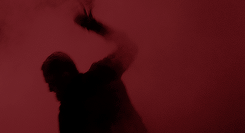
Color Porn Lydia.
Another tutorial, this time with a lot of contrasting and color, featuring a Crying Banshee. This will be part one of a two or three part theme I’m trying to establish. Mostly working with color porn and contrasting.
I am using Photoshop CS5, and this is not a beginner tutorial, but it isn’t too hard either.
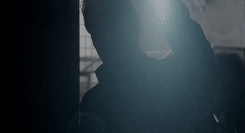
I will be showing you how to turn this:

into this:

First start with a duplication of the background layer, then resize and crop how you want. My cap is 500x280. Next add a black and white gradient map and set the blend mode to soft light. Duplicate the layer and set the opacity to 45%. Now some lighting. Levels, curves and levels again; these are the settings I used.


Then a gradient map,

black, #000000; pink, #f10055. Set it to darken and make a layer mask to color the background. The mask will end up looking like this.


After that layer you want to hold CTRL and click into the black and white box for the curves layer, so that it selects only the parts of the face you highlighted with curves. Then make a levels adjustment.

Next you want to make a new layer, empty and select a small round brush, soft. Then a nice pink color, close to the color that you used for the background, so we can color the lips. I used this color #e40559. Then change the blend mode to multiply and change the opacity to 34%.
This screenshot has a lot of tight subtle emotion and fear, and I did want to focus on that, so I made another curves layer; output 140, input 114 and then mask it so the layer is hidden. Use a white brush to paint over the tear and some on her eyelids. Erase and blend as needed. Here is my finished mask.

Then another curves for her eyes. This one should be output, 106; input, 135. Then mask and use a soft round brush again. This was my end mask.

This is where the cap should be right now.

More curves. This time we mask it for the irises; the first curves should be output, 142; input, 100.


That’s the eyes right now. Next I added a simple selective color, just focusing on black (+5).
Take a soft brush, black; and make a new layer. Color only the left side of the cap, like so:

Gradient fill next, just to add to the shading on the left:

Now another solid color, pink same color as the background. Mask it and use a soft brush to blend it over the background and onto some of Lydia’s hair. The blend mode is color and the opacity 25%.

Add a selective color again, +5 black. Then another, for red adjustments.


Next is a vibrance layer, masked for the face.

Vibrance +28, saturation +14.
Next a gradient fill, now this one will focus on adding even more color to the right hand side. #000000, #e09696.

And focus it on the right, this was my mask.

Blend mode hard light, 38% opacity.

This should be masked for only the hair. Just to adjust and bring Lydia’s gorgeous strawberry blonde hair out of the pink background. Next another magenta selective color.

This is how it looks so far.

I added two textures, very subtle and sharpened after. Texture 1, set that to lighten and 24% opacity. Texture 2, this one I did screen at 16% opacity. Lastly, you press CTRL, ALT, SHIFT+E to stamp the image. Which just means you create a layer on top of everything that blends all the layers but also keeps the originals. Then filter>sharpen>smart sharpen; amount 500, radius 0.3, more accurate and remove gaussian blur.

Here’s a second example of another screencap using pretty much the same methods:

DOWNLOAD THE PSD HERE.
-
 theultracharmingladynoire liked this · 3 years ago
 -
 peachesandmints reblogged this · 4 years ago
 -
 saltzstar reblogged this · 4 years ago
 -
 margificons reblogged this · 4 years ago
 -
 alltoowsll liked this · 4 years ago
 -
 achilleius liked this · 5 years ago
 -
 fuck-you-i-am-spiderman liked this · 5 years ago
 -
 gangtaes liked this · 5 years ago
 -
 benvisnabrina liked this · 5 years ago
 -
 cantfightfatetoo liked this · 5 years ago
 -
 psblogtips reblogged this · 5 years ago
 -
 woozapooza reblogged this · 5 years ago
 -
 mary-crawleys liked this · 5 years ago
 -
 luminies liked this · 5 years ago
 -
 fashionistazayn reblogged this · 6 years ago
 -
 drunkxabi liked this · 6 years ago
 -
 tveditxs reblogged this · 6 years ago
 -
 pohnine reblogged this · 6 years ago
 -
 padmeamdala liked this · 6 years ago
 -
fashionistazayn reblogged this · 6 years ago
-
 tittensindtoll liked this · 6 years ago
 -
 photoshopstyn reblogged this · 7 years ago
 -
 samurais-archive reblogged this · 7 years ago
 -
 lattefairy liked this · 7 years ago
 -
 redwidows-archive reblogged this · 7 years ago
 -
 jaehyuuunns reblogged this · 7 years ago
 -
jaehyuuunns liked this · 7 years ago
-
 elizabehtholsen liked this · 7 years ago
 -
 jayloxoxo liked this · 8 years ago
 -
 lexiesrecources reblogged this · 8 years ago
 -
 quirkyresources liked this · 8 years ago
 -
 jongdaesbigtoe liked this · 8 years ago
 -
 mosguitoland reblogged this · 8 years ago
 -
 amendswithshadows reblogged this · 8 years ago
 -
 myphotoshopstuff reblogged this · 8 years ago
 -
 caecilians liked this · 8 years ago
 -
 nastywitch liked this · 8 years ago
 -
 nekrofilth liked this · 8 years ago
 -
 glorybeat liked this · 8 years ago
 -
 nothingholic-s liked this · 8 years ago
More Posts from Lycaens
I’m sorry that I smell like cigarettes and that I’m not with you and some days I feel full and others I feel empty I’m glad that we share the same moon it’s almost as gorgeous as you are dear


satan, he disguises himself as the angel of light. his servants are the false apostles of righteousness. they don’t deserve this. they don’t deserve paradise.


we were both created in chaos, we were both born to destroy
more stuff about the signs
aries
they look like don’t mess with me but actually they’re love me
too smart
they don’t care a lot about emotions… unless their own
one of the easiest ways to lose them is lying to them
cry baby
they talk too much, so it’s hard to know when they’re serious
somehow they can convince people to do the most stupid things
sexually frustrated 24/7
they’re strong like when everything is going to shit they have strength and don’t let themselves get dragged
they move their hands a lot when talking
they’re the kind of people who bite their lips when thinking and accidentally bleeds
taurus
on the outside they look very calm and quiet, but in the inside they burn like hell (they’re too intense)
they don’t lose control easily but they do lose it often
they have a hard time trusting/believing in people’s emotions
they could kill you if you hurt an animal
a great part of them have a great sleeping schedule
they care too much about people they love
they cheat on board games
very good friends
too selective when choosing who to spend their time and energy with
they move their eyebrows a lot in their facial expressions
stubborn
they don’t let people go completely
their hugs are the best hugs when you have a bad day
gemini
emotional mess (they feel nothing in the right way)
they know a lot of useful shit
but they don’t know what sleep means
being bored is the worst thing that can happen to them (they get too mean, like little children)
narcissistic af
they’re never wrong
they express their feelings in thousands of different ways, however none of them seem to work
incomprehensible love for snacks
misunderstood
they cover their feelings with humor/indifference 87% of the time
they can make anyone laugh, no kidding
they lie to themselves
sensitive af, if you spend a lot of time with them you’ll see they’re such babies
very insecure
random happiness/sadness attacks
their brain is an exhaused roller coaster
innocent without wanting to be
they seem to fit everywhere but nowhere at the same time
cancer
they look like love me but actually they’re like i fuck with you or you fuck with me
they don’t know how to handle their feelings, so they don’t
drama,,,drama,,,dRAMa,,..drama
they can be too selfish
unpredictable af
leave me alone, but give me attention
their cellphone is part of their body
their true friends knows their family (even if they have never seen them) because of all the stories they tell, all the time
they victimize themselves a lot
they know how to listen and they give the best advice ever but they don’t use it
that kind of people who their first impulse when doing eye contact with someone is smiling
they care a lot about what other people think
they plat a lot with their hands and lips
the most adorable people when they’re not angry
children loves them
they can tranquilize people quickly
misunderstood because they don’t let anyone understand them
leo
very sharp ideas/way of thinking
high moral
they need constant acceptance/validation
if you do them one you pay ten
always reading your intentions
they tend to joke about other people insecurities
they tend to do good things for people without even realizing
despite being surrounded by people, they still can feel very alone
they talk to themselves when nobody’s whatching
insecure af
a lot of craziness under the calm person they have
they wink a lot
will never cry or look vulnerable in front of others (unless they totally trust that person)
virgo
they always look like they want to kill someone (maybe they do)
public nerds
the most damaged sleeping schedules lol hello it’s 4 am
they read weird things
super committed and and helpful
they get angry when things are not done in their way
they’re the midpoint between introvert and extrovert
they have a great stalking until they have no crush anymore
they can’t tolerate it when someone is angry at them, even if they’re the ones to blame
their favorite acronym is lmao… laughing my anxiety off
they do this face a lot > 😏
libra
they’re always in love
they listen to shitty music but won’t admit it
super emotional
they probably don’t know what is happening right now
they get too weird when they’re not comfortable
a stranger is a person they’re not friends with yet
they have good intentions
creative
they blush easily
they have a hard time saying no
they hide things so they don’t disappoint people they care about
they try to make everyone happy, even if it’s exhausting
scorpio
they try to look rude, actually they’re cry babies
dark mind, bright personality
they have secret hobbies
they crave love
talking to them will make you either appreciate life or want to jump off a bridge
they get easily offended
scary when angry
protective with people they love
they hate being ignored
random laugh attacks
they can make you laugh in the most fucked up moments
they’re that kind of people who give more priority to the problems of those who love than their own
they easily connect with music
sagittarius
ready to disappear in any moment
they have watched every. movie. on netflix
using my emotions? caring about yours? nah, tomorrow… maybe
34 hour-long naps
they fuck up 10 moments and make a very epic one
they have a hard time when apologizing
they have a hard time when asking for help, they believe they can do anything
would yell at strangers if needed
intentionally do things and then say they weren’t planned but went well anyway
they tend to be sad before sleeping
this is probably not a good idea but i’ll do it anyway
very competitive, but never satisfied
capricorn
superiority complex
more party souls than you could imagine
they just want you to shut the fuck up
they’re cute until you’re obstrusive
able to intimidate people for good or for bad
they recognize their mistakes and then apologize without making a lot of drama
they keep their cool in the craziest situations
have random acts of love, like biting, cuddling, etc…
can make you feel important one minute and shit in the next minute
always have backup plans
physical appearance is important
always have weird obsessions
they play a lot with their feet
they need hugs and you to show them love, but will never say it
aquarius
they disappear with no reason
cuter than you
they get confused when choosing between good and bad
everything is overrated for them
they’re addiced to memes
feelings out of control
they’re the special snowflakes
cannabis 23/7
they will know if you lie
they lose their shit often
they think and feel more than they show
rebels
the smartest ones
pisces
they don’t like dealing with their responsabilities
they like music more than they like you
they like attention but not too much
will never accept being the 2nd option for someone
can listen to you for hours, without making it awkward
fake friendliness (sometimes)
too weird but in a sweet way
super funny. their humor is either too simple or too hard to understand
they overwhelm your mind
big heart, even bigger imagination
confused af
if you really analyze them they look like they’re stoned
translated from x