
I not a bot. Literally just a chronic werido and lurker :,(I don't really know how to communicate with people I really wish I did.Fandoms: Team Fortess 2, Rise of the TMNT, Don't Hug Me I'm Scared, and various life skills.
364 posts
So You're Taking Care Of Your Computer's Software Health. NICE! But What About Its Physical Health?
so you're taking care of your computer's software health. NICE! but what about its physical health?
because yes, computers do need the occasional real-world checkup to make sure that they're running well. but what exactly does that entail? i see many posts about maintaining software health: limit your browser tabs, ensure your antiviruses are working properly, so on and so forth, but checking the physical components is something i sparsely see discussed here.
so what's the deal with physical maintenance? well, have you ever had your computer hack and wheeze trying to keep up even if your OS and all your drivers are up to date and functioning? if you've never opened up your computer before, you may be shocked to find just how FILTHY it can get in there:

take a closer look at that snout dust! PTOOEY .. BLECKH
computers are much more likely to accumulate internal dust if they're sitting on the floor, and especially if they're near any vents and/or if you have pets.
ok, you've figured out how to open your device and now you're staring at the second coming of the dust bowl in your gaming rig. what now? let's explore some basic cleaning tips, deep cleaning pointers for your CPU/GPU, and tips to help keep maintain your computer's physical health in the future.
first of all, turn off your computer and unplug it (for my computer, i turn it off, turn off the PSU switch, unplug it, and then press the power button for about 30 seconds to drain the capacitors and minimize static risk)
generally, you're gonna want to have THESE items:
some sort of face mask (dust masks are best, but anything that'll help keep the harmful dust out of your lungs will generally work)
a can of compressed air (or an electric duster if you're ~fancy~. they look and function like turbo blowdryers)
a vacuum will be useful if there's a LOT of dust, best to use in combination with an anti-static cleaning kit
if you ARE gonna use a vacuum, spray every attachment you use with an anti-static spray. disturbing large amounts of dust creates a lot of static, and electronics are very sensitive to that.
it's never a bad idea to grab an grounding wristband as well, but as long as you wear loose clothes and always keep some part of your skin in contact with the case, you should be ok. (i don't know how much this applies to laptops and smaller devices, since the cases for those are typically plastic)
if there's staining (like from smoke) or there's more gunk caked on than you thought, you can gently clean electronic components with a brush/paper towel/microfiber and medical-grade isopropyl alcohol ONLY. do not use any other cleaning alcohols for this task.
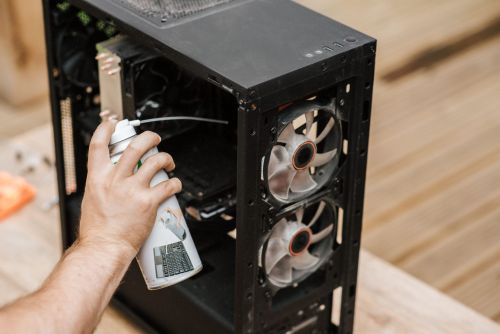
before you do anything, TAKE THAT FUCKER OUTSIDE! always clean a dusty device where the wind can carry that shit away, because oh my GOD will it fuck up your lungs like crazy. (that, and compressed air cans have fluorocarbons in them, which isn't great to breathe in either)
most of the time, you'll probably be fine just using an air duster. for compressed air cans, spray the dirty surfaces in short bursts. an electric duster can be constantly blown. when dusting fans, make sure that you're holding the blades still as to not accidentally make them spin too fast (ESPECIALLY with an electric duster!), since that can damage the mechanism that makes them spin.
however, if there's a lot of dust, it may be better to give it a vacuuming first. anything from a handheld to a shop vac will work, and attachments with brushes on the end will help tons with loosening up even more dust. and of course ALWAYS make sure that you're spraying any attachments with anti-static spray, and keep a hand on the case of the computer to electrically ground yourself since the hose will be in contact with the internals.
if there's any left over, give it a blast with the duster.
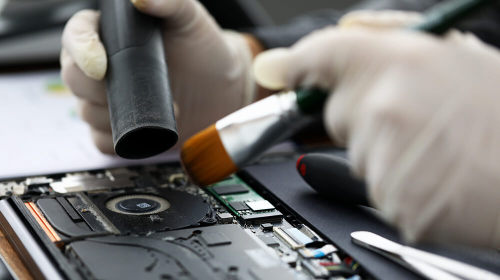
in some rare cases, there may be some extra gunk caked onto the internals, and you may have to really get your hands in there or take components out individually. if you don't have an anti static wristband (the ones with an alligator clip) do your best to ALWAYS keep your skin in contact with the case as you're finagling around in there.
it's probably a good idea to have disposable gloves on for this. grab your isopropyl and towel of choice (microfiber is ideal, but dirtier PCs may need disposable paper/shop towels), soak it a little bit, and gently scrub off the gunk n' grime as needed.
with heat sinks specifically, since they're just big blocks of metal, they're the one part of a component that can be cleaned under water. if a dusting doesn't suffice, gently scrub it with a brush under warm, soapy water, rinse thoroughly, and let it dry on a towel for a few hours before reassembling it into the electronic components.
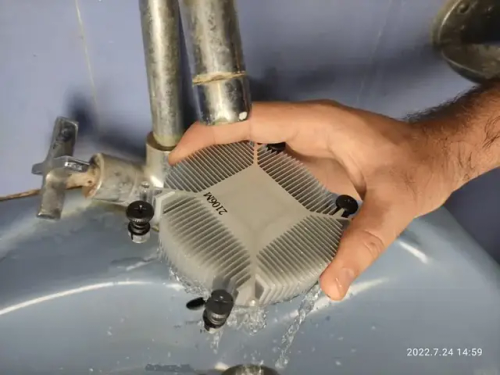
if there's still little bits stuck in the radiator fins, stick an isopropyl-soaked q-tip in there to push it out.
the dust settles, everything's put back together, and it's all clean in there again. YAY!!!!! but what if you're still experiencing temperature problems? well, it typically comes down to either the CPU or GPU:
IF ITS THE CPU: if you took off the cooler to clean it, then i hope you remembered to dab some fresh thermal paste on there. you should be replacing thermal paste few years, otherwise it dries out and loses its effectiveness.
the type you use makes a huge difference too; i like to use arctic's mx-4, it has excellent thermal conductivity while still being an electrical insulator, so spillover isn't a problem. if you go for a liquid metal compound, please do your research first, since some of them can run the risk of corroding the cooler pipes and/or the CPU's outer casing.
to replace thermal paste, make sure that the crusty old paste is sufficiently scrubbed off the contact points of both the CPU and cooler. again, use isopropyl for this. once it's all cleaned off, put about a pea-sized amount of paste on the CPU and carefully lower the cooler onto the mounting bracket before fastening it in place. (also it really doesn't matter how you put the paste on, as long as it ends up covering most of the contact area)

also if you're still using the cooler your CPU came with, you should probably get a better cooler. especially if you're doing gaming or using graphically/mathematically intensive software. sorry. the stock coolers that most CPUs come with are mid as hell. you can get a nice ARGB one for less than 20 USD i promise its worth it
IF ITS THE GPU: like CPUs, your graphics card also needs to have its thermal paste cleaned out and replaced every so often. but they also utilize a second thermal material called thermal pads. these are usually made of either silica gel or a very thick clay-like grease, and come in different thicknesses. my favoured pads are owltree's 12.8w grease pads, the assorted pack comes with enough for about 4-5 GPUs.
taking apart a GPU seems scary, and understandably so; they're incredibly expensive and hard-working pieces of technology! but i've done it twice now, and it's actually surprisingly simple (as long as you keep track of all the damn screws... im lucky there's a magnetized screw mat in the house i can use)
i recommend watching a deep clean/teardown video of the GPU model you have before digging into it yourself. generally, they separate into 4 distinct portions: the outer shell, the heatsink, the board, and the backplate.
the shell contains the fans and any possible RGB elements. it'll have 1-2 controllers plugged into the board, one for the fans and one for the lighting elements if there are any. once the case is unscrewed, unplug these connectors with a firm squeeze and tug.
these tend to be surprisingly dusty on the inside, so it's probably a good idea to blast it with a duster. again, make sure to hold the fans so they don't overspin. you can also remove the fans from the shell and clean them individually if you'd like.
the heatsink is BIG and heavy, and you can do all the same stuff here that you would with a CPU cooler heatsink. it may take a bit of effort to tug off if the thermal materials are really making it stick to the board. once it's off, scrub the old thermal paste, blast it with a duster, and wash under soapy water if needed before rinsing thoroughly and leaving it to dry for a while.
the backplate is just a flat piece of metal that protects the back side of the board. usually all this will need is a simple wipedown.
the board is where all the magic happens, and will usually have a layout that's something like this:
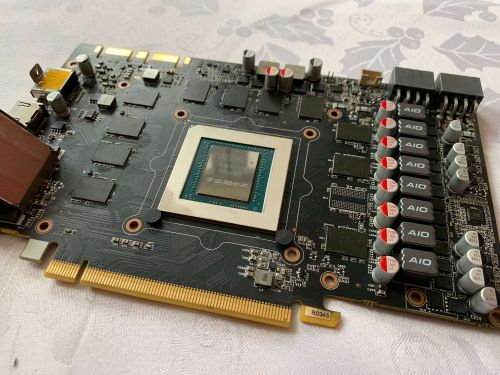
clean up as needed; gently scrub off old thermal paste, scrape off the old thermal pads (but take close note of how thick they are so you can replace them with the correct pads), and brush/wipe down the dust and grease on each side as needed. take care to avoid touching the PCIe connector too much (the bar of golden pins that juts out from the bottom)
thermal padding varies from card to card (i recommend checking thermal pad placements for your gpu in water cooling guides, even if you're not doing water cooling) but it's typically gonna be on THESE spots:

the VRAM chips surrounding the die (main chip) along with the small black chips next to the capacitors will require thermal pads the most. cut each one to size, carefully peel off the plastic films, and press each piece onto the chips.
now you can grab your thermal paste and put some on that big shiny die. now take your freshly pasted/padded board and CAREFULLY lower it back onto the heatsink. i highly suggest having a good source of lightning for this, since shifting around the pieces too much trying to get them to align properly can displace the thermal pads and mess with how the paste spreads.
screw the heatsink tight to the board, and double check to make sure that the pads and paste are snug against the heat sink. now put the backplate and shell back on and BAM YOU'RE DONE! with the paste and pads i used, i was able to bring down the temperature of my cards by a good 10-15 °C.
ok you've done all this deep cleaning shit and your computer is happy and healthy. what can you do for your computer's health in the future?
DUST AT LEAST ONCE A YEAR. haul that thang outside and spray that shit out to stop it from building up for too long.
KEEP IT OFF THE FLOOR. if you can, of course, not everyone has the desk room for it. computers accumulate dust easier when they're close to the floor. if you do need to keep it on the floor, you might have to dust it every 6-8 months rather than once a year.
AND STOP PUTTING YOUR LAPTOPS ON SOFT SURFACES I SWEAR TO GOD
GET A FAN CONTROLLER. motherboards are DOGSHIT at maintaining fan speeds!!!! there are physical fan hubs that use controller software, but if you can't afford that, fancontrol by rem0o is a stellar software-only option.
IF YOU DON'T ALREADY HAVE CASE FANS, GET THEM. the number of fans depends on the motherboard form factor your case can accommodate (ATX cases typically have 6-8), but having that air circulation is very important to maintaining ideal temperatures. arctic makes fantastic budget-friendly fans.
IF YOU HAVE AN NVMe HARD DRIVE: please put an aluminum heat sink on that thang. they get toasty :(
OK THATS IT I THINK. if anyone else has tips they wanna add, go right on ahead. ok thank you bye your computer will love you
-
 radiant-7 reblogged this · 4 months ago
 -
 neverenoughdice liked this · 4 months ago
 -
 heart-shot reblogged this · 4 months ago
 -
 sinriddenbody liked this · 4 months ago
 -
 flyoctoflyy liked this · 4 months ago
 -
 kostecko27 liked this · 4 months ago
 -
kostecko27 reblogged this · 4 months ago
-
 radicalhighway reblogged this · 4 months ago
 -
 klutzydusk reblogged this · 4 months ago
 -
 be-gay-do-crime-ahaha reblogged this · 4 months ago
 -
be-gay-do-crime-ahaha liked this · 4 months ago
-
 goreador liked this · 4 months ago
 -
 thecourtsknight reblogged this · 4 months ago
 -
 shikiimisaki liked this · 4 months ago
 -
 saltysmoothie reblogged this · 4 months ago
 -
saltysmoothie liked this · 4 months ago
-
 rosegolddoodle252 reblogged this · 4 months ago
 -
 nevermore117 reblogged this · 4 months ago
 -
nevermore117 liked this · 4 months ago
-
 kernalphage liked this · 4 months ago
 -
 the-omniscient-tardigrade liked this · 4 months ago
 -
 ace-space-rock liked this · 4 months ago
 -
 idontcareaboutthiswebsitebro liked this · 4 months ago
 -
 llatimeria reblogged this · 4 months ago
 -
llatimeria liked this · 4 months ago
-
 gemboundprism reblogged this · 4 months ago
 -
 thelittletoadintheroad reblogged this · 4 months ago
 -
thelittletoadintheroad liked this · 4 months ago
-
 slnnohan liked this · 5 months ago
 -
 leedie-reblogs reblogged this · 5 months ago
 -
 thatfluffymuffin reblogged this · 5 months ago
 -
 evybeans liked this · 5 months ago
 -
 cryptic-rainfall liked this · 5 months ago
 -
 springhealed-walker reblogged this · 5 months ago
 -
 angel--fish reblogged this · 5 months ago
 -
 tailesssheepdog reblogged this · 5 months ago
 -
 melchoinsassy liked this · 5 months ago
 -
 garfield-is-a-trans-icon liked this · 5 months ago
 -
 deltastorm101 reblogged this · 5 months ago
 -
 vulpini-mage reblogged this · 6 months ago
 -
 dragonmons liked this · 6 months ago
 -
 tiny-sour-angel liked this · 6 months ago
 -
 cutelittleexo reblogged this · 6 months ago
 -
cutelittleexo liked this · 6 months ago
-
 a-commas-a-pause liked this · 6 months ago
 -
 cognitohazard liked this · 6 months ago
 -
 myxtape liked this · 6 months ago
More Posts from Sadpandaus
Ways You Should Know to Stop Apps from Running in Background
If you use Windows 11, you can choose to disable some certain apps to run in background. Which means they will not be able to perform any tasks when you are not actively using them, thus saving battery and system resources.
Which Windows 11 apps can be chosen to stop running in background
In Windows systems, apps that can run in the background have the ability to keep sending and receiving notifications, syncing information, and staying up to date, even when you are not actively in these apps’ windows, which are commonly called Background Apps. These apps usually do not have a direct UI (user interface). Once deployed and configured, they launch automatically at startup and run continuously.
Some apps from the Microsoft Store can run in background. For example, Communications apps, like WhatsApp, Slack, or Microsoft Teams; News and Weather apps. If you find an app using a lot of battery when running in background or you do not need an app which is not crucial for the system at all , you can choose to disable its background permissions on your Windows 11 with the 4 methods in this article. By disabling background apps, you can reduce system resource usage and improve overall performance of your Windows 11.
Method 1. Disable a background app in Settings
You can stop an app from running in background using Windows Settings.
Step 1. Open the Installed apps page in Settings
Step 2. Open Advanced options of the app
Another way to access to the permissions of the background apps page is through the Battery usage. You might also find other apps here rather than those in the page of Installed apps. Below is how to navigate to it:
Windows Settings-System-Power & battery
Step 3. Choose Background apps permissions to Never
Noted: Repeat the above steps to disable multiple background apps. But if you want your Windows 11 to stay connected and get app updates, you must set at least one background app to Always.
Method 2 Disable all background apps in Group Policy Editor
The second way to disable a background app is to use the Group Policy Editor app.
Step 1. Open Group Policy Editor
Step 2. Navigate to App Privacy
Open the following key in Local Group Policy Editor:
Step 3. Disable Let Windows app run in the background
Method 3 Disable all background apps in Registry Editor
If you know Registry Editor well, you can also disable a background app by modifying the value in it. Be careful when using the Registry Editor, or any incorrect changes might cause negative consequences on system stability and functionality. It is recommended to create a backup or system restore point before making any changes in the Registry Editor.
Step 1. Open Registry Editor
Step 2. Navigate to AppPrivacy
Open to the following key in the Registry Editor app:
HKEY_LOCAL_MACHINE\SOFTWARE\Policies\Microsoft\Windows\AppPrivacy
Step 3. Create a new value in AppPrivacy
Step 4. Set the value to 2
Method 4 Disable a background app with Wise Care 365
Wise Care 365 is an optimization and maintenance software that helps improve the performance and stability of Windows computers. It offers various features such as system cleaning, privacy protection, disk defragmentation, and more. It also includes tools like Startup Manager, Registry Cleaner, and Disk Cleaner to optimize your system.
By using the Startup Manager feature in Wise Care 365, you can easily disable any unwanted background apps. Now free download this useful tool at WiseCleaner.
Step 1. Open System Tuneup tab
Step 2. Find the desired app in Startup Manager
Step 3. Disable the desired app
Once you find the desired app or apps, check the boxes in front of them, and click on the Optimize button.
The 4 methods above can help disable your unwanted background apps and save battery and resources of your Windows computer. To find more source about disabling a background app, please click here.


saving my favourite twitter thread here just in case
Want to learn something new in 2022??
Absolute beginner adult ballet series (fabulous beginning teacher)
40 piano lessons for beginners (some of the best explanations for piano I’ve ever seen)
Excellent basic crochet video series
Basic knitting (probably the best how to knit video out there)
Pre-Free Figure Skate Levels A-D guides and practice activities (each video builds up with exercises to the actual moves!)
How to draw character faces video (very funny, surprisingly instructive?)
Another drawing character faces video
Literally my favorite art pose hack
Tutorial of how to make a whole ass Stardew Valley esque farming game in Gamemaker Studios 2??
Introduction to flying small aircrafts
French/Dutch/Fishtail braiding
Playing the guitar for beginners (well paced and excellent instructor)
Playing the violin for beginners (really good practical tips mixed in)
Color theory in digital art (not of the children’s hospital variety)
Retake classes you hated but now there’s zero stakes:
Calculus 1 (full semester class)
Learn basic statistics (free textbook)
Introduction to college physics (free textbook)
Introduction to accounting (free textbook)
Learn a language:
Ancient Greek
Latin
Spanish
German
Japanese (grammar guide) (for dummies)
French
Russian (pretty good cyrillic guide!)
I have … a tip.
If you’re writing something that involves an aspect of life that you have not experienced, you obviously have to do research on it. You have to find other examples of it in order to accurately incorporate it into your story realistically.
But don’t just look at professional write ups. Don’t stop at wikepedia or webMD. Look up first person accounts.
I wrote a fic once where a character has frequent seizures. Naturally, I was all over the wikipedia page for seizures, the related pages, other medical websites, etc.
But I also looked at Yahoo asks where people where asking more obscure questions, sometimes asked by people who were experiencing seizures, sometimes answered by people who have had seizures.
I looked to YouTube. Found a few individual videos of people detailing how their seizures usually played out. So found a few channels that were mostly dedicated to displaying the daily habits of someone who was epileptic.
I looked at blogs and articles written by people who have had seizures regularly for as long as they can remember. But I also read the frantic posts from people who were newly diagnosed or had only had one and were worried about another.
When I wrote that fic, I got a comment from someone saying that I had touched upon aspects of movement disorders that they had never seen portrayed in media and that they had found representation in my art that they just never had before. And I think it’s because of the details. The little things.
The wiki page for seizures tells you the technicalities of it all, the terminology. It tells you what can cause them and what the symptoms are. It tells you how to deal with them, how to prevent them.
But it doesn’t tell you how some people with seizures are wary of holding sharp objects or hot liquids. It doesn’t tell you how epileptics feel when they’ve just found out that they’re prone to fits. It doesn’t tell you how their friends and family react to the news.
This applies to any and all writing. And any and all subjects. Disabilities. Sexualities. Ethnicities. Cultures. Professions. Hobbies. Traumas. If you haven’t experienced something first hand, talk to people that have. Listen to people that have. Don’t stop at the scholarly sources. They don’t always have all that you need.
Are you constantly wanting to do A Thing but never know how to do The Thing?
Does figuring out where to start a task and knowing what steps need to be taken to complete the task stress you out?
Lemme introduce you to...
goblin.tools
For example, you want to clean your oven.
You simply go to the website and in the "Add new item" box, you type "clean the oven". You can then also use the lil chillies next to the plus to change the level of breaking-down you'd like. Next, hit the magic wand-looking button to break it down!

You can check off items as you go, and further break things down if desired!
It works on large tasks such as planning a cross-country trip, writing a book or going on vacation and smaller tasks such as cleaning an oven.
There's also tools for task time estimation, meal-prep that takes into account dietary constraints, equipment and such, and a braindump compiler.
It's available as an IOS/Android app for less than a dollar, or a free web app. I can't hype this up enough, the developers deserve so much love for this.