Side-blog managed by someone who tends to stack resource and tutorial posts under her blogs' drafts as future references for anything useful in life. Circa 2014. REOPENED.
230 posts
AKs Guide To Suits


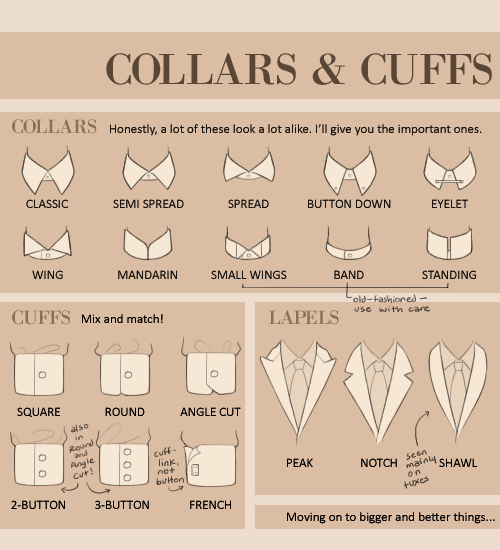
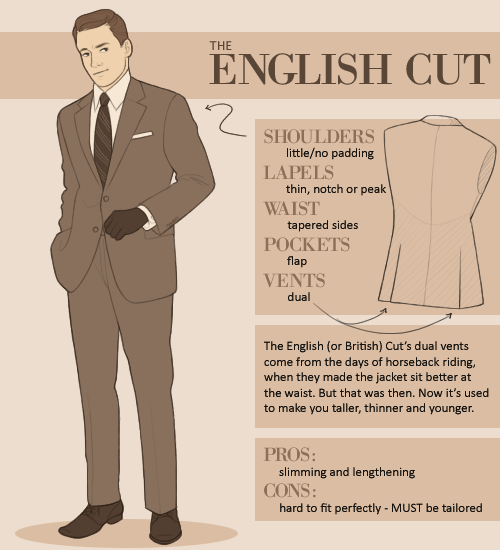


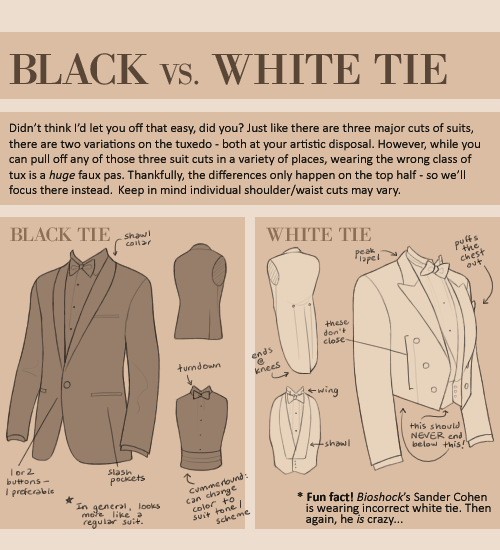
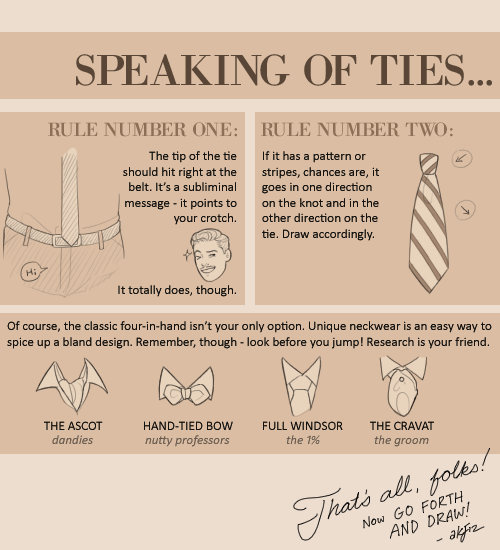
AK’s Guide to Suits
An introduction to the finer details of menswear, and how to get them right in your… aw, hell, why am I describing it here? Read the intro!
-
 void-designs liked this · 8 months ago
 -
 d0g-m0tif liked this · 9 months ago
 -
 creekcats liked this · 10 months ago
 -
 darcosuchus reblogged this · 10 months ago
 -
darcosuchus liked this · 10 months ago
-
 pirefyrelight reblogged this · 10 months ago
 -
 tweee0223 reblogged this · 10 months ago
 -
 anicehomicidaltree liked this · 10 months ago
 -
 thebootstrap-paradox reblogged this · 10 months ago
 -
thebootstrap-paradox liked this · 10 months ago
-
 pinkyndx-blog liked this · 10 months ago
 -
 crocojaws liked this · 10 months ago
 -
 booboothefatuus reblogged this · 10 months ago
 -
booboothefatuus liked this · 10 months ago
-
 eldritchtransmasccrow reblogged this · 10 months ago
 -
eldritchtransmasccrow liked this · 10 months ago
-
 genderfaunmushroom liked this · 10 months ago
 -
 pyrriax reblogged this · 10 months ago
 -
 hexblades-curse liked this · 10 months ago
 -
 magnetic-orb liked this · 10 months ago
 -
 twosdate liked this · 10 months ago
 -
 severeinfatuation reblogged this · 10 months ago
 -
 ninthphilosophy liked this · 11 months ago
 -
 devourer-of-acetone reblogged this · 11 months ago
 -
 lady-tempest reblogged this · 11 months ago
 -
 pandamorphic liked this · 11 months ago
 -
 androdragynous liked this · 11 months ago
 -
 bobthedragon2 reblogged this · 11 months ago
 -
 bobthedragon liked this · 11 months ago
 -
 sunkentowers reblogged this · 11 months ago
 -
 projectmoonlightproductions reblogged this · 11 months ago
 -
projectmoonlightproductions liked this · 11 months ago
-
 barbaravitoriatp reblogged this · 11 months ago
 -
 likewinteritself liked this · 11 months ago
 -
 dontknowplatypus liked this · 11 months ago
 -
 isoboto reblogged this · 11 months ago
 -
 strawnabery liked this · 11 months ago
 -
 pixiealtaira reblogged this · 11 months ago
 -
pixiealtaira liked this · 11 months ago
-
 apathyofthesympathetic reblogged this · 11 months ago
 -
 rewrittenwrongs liked this · 11 months ago
 -
 another-random-stranger liked this · 11 months ago
 -
isoboto liked this · 11 months ago
-
 forlorn-kumquat liked this · 11 months ago
 -
 aboutblankpages-blog-blog liked this · 11 months ago
 -
 ten-ten31 liked this · 11 months ago
 -
 brokenart-jukebox liked this · 11 months ago
 -
 sakarrie liked this · 11 months ago
 -
 mydetheturk liked this · 11 months ago
More Posts from Starrylibraryofresources


WOO TUTORIAL
the artwork used in the example can be found here
the pencil & leads i use for cyan underdrawings can be found here & here
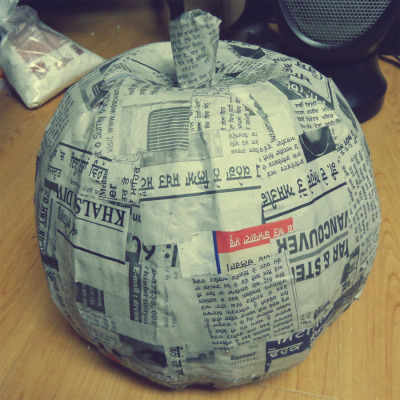
How to make a pumpkin head
Since I defs didn’t want to carve a real pumpkin to put on my head and get nasts pumpkin insides all over my hair I decided to paper mache one. Unfortunately there was no good tutorials anywhere so I will share my trial and error knowledge.
First I got some supplies: 1 Punch balloon (they’re rounder and larger they regular balloons), some paper mache stuff in a bag, cardboard, a glue gun, paint, sculpey clay, tape, some news paper and some water and flour mixed together.

I then put at least three - five paper mache layers of newspaper with flour water on the balloon. I also measured my head and left an opening at the bottom. (NOTE: Don’t put tape on the balloon and try to peel it off after you’re done paper macheing, RIP)

After that’s all dry I put glue gunned some cardboard onto it to give it some pumpkin like ridges.

Then I filled the gaps between the cardboard and the newspaper with the paper mache in a bag stuff. Wait for it to dry. (Note: Don’t pop balloon until the paper mache in a bag stuff is dry cause it holds a LOT of water and your paper mache project will sink, RIP) After that I popped the balloon and lightly dampened the top with a sponge and water until it was wet enough to slowly press down into more of a pumpkin shape.

After it’s all dry I taped a stem I made out of card board on the top and put another layer or two of newspaper mache over top.
More drying wait time (you can use your oven on the lowest setting to make it dry faster) then I sanded it down and cut out a face with an exacto blade.

I added a little bit of backing behind the face on the inside with the paper mache in a bag to give it more of a 3D look which wasn’t that noticeable but oh well, it kidna worked… After all that stuffs done I painted it all white otherwise the newsprint would bleed through and make my colours not as bright, I also added some sculpey clay to the brow area to give it some more emotion in which I used an iron to dry it with cause it was too late to put it in the oven with paint all over it (Note: Put clay on before painting).

I sprayed it with a sealer before painting colours on it cause I find acrylics do weird things sometimes. After it was all dry I begin to paint.


I also painted the inside a red and added a kinda head rest thing on the inside since when I pushed the top down it made an uncomfortable point at the top when putting it on your head. Then once it was all dry I sprayed it with some more sealer, added some cool stuff like stitches with some ribbon and blood which I used nail polish for a shiny effect and put in some lights which weren’t very effective when my head was in the pumpkin but that’s okay, it still looked cool.

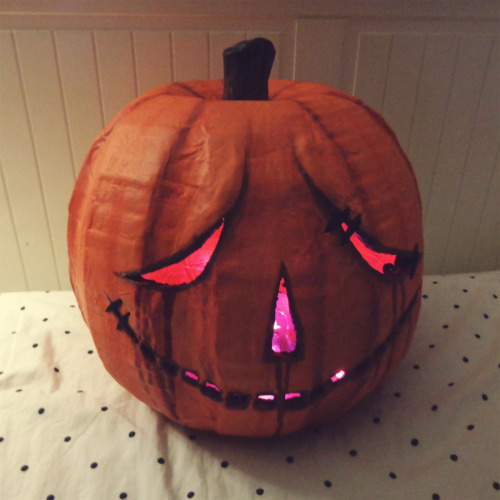
And that’s that!

Hope this helps some people, Enjoy!
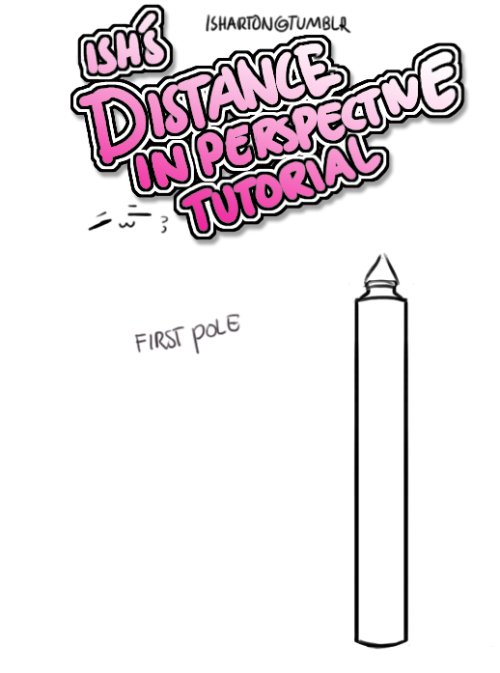

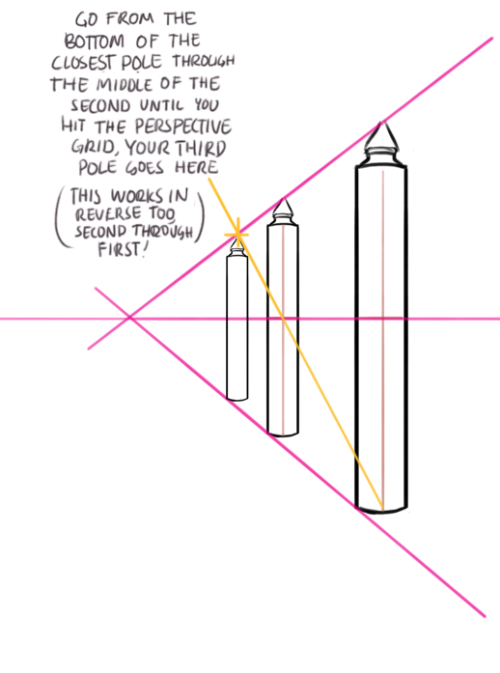

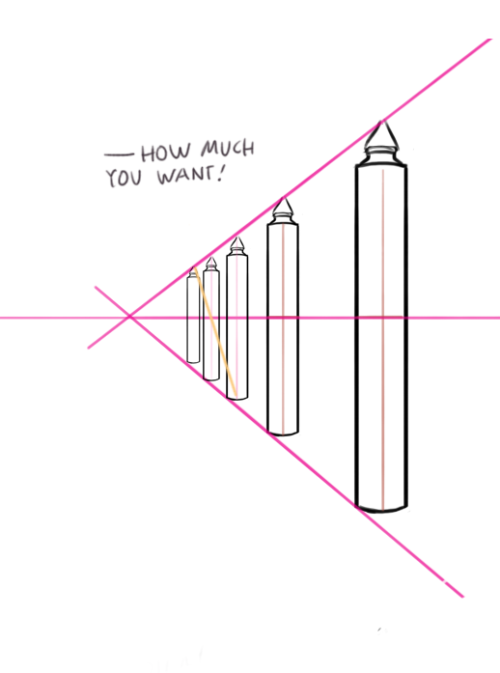

Thing i learned some time ago! hope you all find it helpful ( perspective grids can be your friend!)
How to Prepare for Your First Artist Alley

I did my very first artist alley at AOD2015! I did a lot of research beforehand to help prepare, but one thing that I thought was missing from all the articles and blog posts I read was a step-by-step guide from the perspective of a beginner. So, I decided to put one together myself! I’m not entirely sure if this is the right way of preparing, but this is what I did and it worked for me.
If you’d like to know how I did it, read on!
Keep reading
FireAlpaca is now COMPLETELY a Paint Tool SAI alternative!
BITMAP WATERCOLOR BRUSHES, Y’ALL!!! Want to make some SAI brushes in FireAlpaca? Check out THIS handy Guide!

Want to make this brush? Just make a perfect circle and save it (I call mine “round”) and use it as the bitmap, and copy the settings above. It works pretty nicely :D
