Side-blog managed by someone who tends to stack resource and tutorial posts under her blogs' drafts as future references for anything useful in life. Circa 2014. REOPENED.
230 posts
How To Make A Pumpkin Head
How to make a pumpkin head
Since I defs didn’t want to carve a real pumpkin to put on my head and get nasts pumpkin insides all over my hair I decided to paper mache one. Unfortunately there was no good tutorials anywhere so I will share my trial and error knowledge.
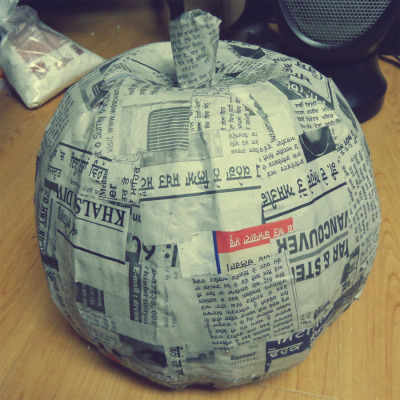
First I got some supplies: 1 Punch balloon (they’re rounder and larger they regular balloons), some paper mache stuff in a bag, cardboard, a glue gun, paint, sculpey clay, tape, some news paper and some water and flour mixed together.

I then put at least three - five paper mache layers of newspaper with flour water on the balloon. I also measured my head and left an opening at the bottom. (NOTE: Don’t put tape on the balloon and try to peel it off after you’re done paper macheing, RIP)

After that’s all dry I put glue gunned some cardboard onto it to give it some pumpkin like ridges.

Then I filled the gaps between the cardboard and the newspaper with the paper mache in a bag stuff. Wait for it to dry. (Note: Don’t pop balloon until the paper mache in a bag stuff is dry cause it holds a LOT of water and your paper mache project will sink, RIP) After that I popped the balloon and lightly dampened the top with a sponge and water until it was wet enough to slowly press down into more of a pumpkin shape.

After it’s all dry I taped a stem I made out of card board on the top and put another layer or two of newspaper mache over top.
More drying wait time (you can use your oven on the lowest setting to make it dry faster) then I sanded it down and cut out a face with an exacto blade.

I added a little bit of backing behind the face on the inside with the paper mache in a bag to give it more of a 3D look which wasn’t that noticeable but oh well, it kidna worked… After all that stuffs done I painted it all white otherwise the newsprint would bleed through and make my colours not as bright, I also added some sculpey clay to the brow area to give it some more emotion in which I used an iron to dry it with cause it was too late to put it in the oven with paint all over it (Note: Put clay on before painting).

I sprayed it with a sealer before painting colours on it cause I find acrylics do weird things sometimes. After it was all dry I begin to paint.


I also painted the inside a red and added a kinda head rest thing on the inside since when I pushed the top down it made an uncomfortable point at the top when putting it on your head. Then once it was all dry I sprayed it with some more sealer, added some cool stuff like stitches with some ribbon and blood which I used nail polish for a shiny effect and put in some lights which weren’t very effective when my head was in the pumpkin but that’s okay, it still looked cool.

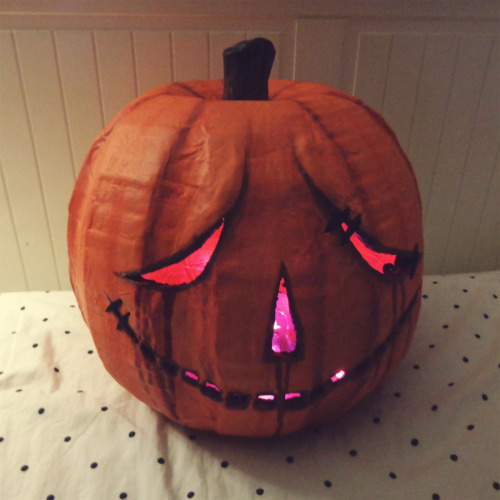
And that’s that!

Hope this helps some people, Enjoy!
-
 angstrydenbytch reblogged this · 8 months ago
 -
 nannichuan liked this · 8 months ago
 -
 fakeartgoddesss reblogged this · 8 months ago
 -
 katacala liked this · 8 months ago
 -
seep-5 reblogged this · 8 months ago
-
seep-5 liked this · 8 months ago
-
 witchyfashion reblogged this · 8 months ago
 -
 pen-tagoms liked this · 8 months ago
 -
 pattycakepat liked this · 8 months ago
 -
 draconiscanis liked this · 8 months ago
 -
 noxith-sky reblogged this · 8 months ago
 -
noxith-sky liked this · 8 months ago
-
 rymecityslime liked this · 8 months ago
 -
 bespectacled-bookwyrm liked this · 8 months ago
 -
 zincellia liked this · 8 months ago
 -
 oncillaphoenix reblogged this · 8 months ago
 -
 sirius-bizdness liked this · 8 months ago
 -
 vainaliensstuff liked this · 8 months ago
 -
wikisico liked this · 8 months ago
-
 justanotherfan1001 reblogged this · 8 months ago
 -
 pastelxkittenz liked this · 8 months ago
 -
 dazeddreamer-16 liked this · 8 months ago
 -
 useful-garbage reblogged this · 8 months ago
 -
 heythere-pal reblogged this · 8 months ago
 -
 skaianmage reblogged this · 8 months ago
 -
 eriquin liked this · 8 months ago
 -
 shortlesbian reblogged this · 8 months ago
 -
 boy-coyote liked this · 8 months ago
 -
 artsandfaps liked this · 8 months ago
 -
 tomominarsh liked this · 8 months ago
 -
 t0nitrus liked this · 9 months ago
 -
 samott liked this · 9 months ago
 -
 ladymavet reblogged this · 9 months ago
 -
 goblin-knight-bastard-man liked this · 9 months ago
 -
 heavenlycheesedanish liked this · 9 months ago
 -
 alexxxks liked this · 9 months ago
 -
 dr-harleen-quinzell reblogged this · 9 months ago
 -
 shy-blue-waters reblogged this · 9 months ago
 -
 missmarsmadness liked this · 9 months ago
 -
 polgara6 liked this · 9 months ago
 -
 esperata reblogged this · 9 months ago
 -
 voidsnarrator reblogged this · 9 months ago
 -
voidsnarrator liked this · 9 months ago
-
 maybetheressomethingmore reblogged this · 9 months ago
 -
 madowoah liked this · 9 months ago
 -
 ri0tsn0tdiets liked this · 9 months ago
 -
 paquitasacount liked this · 9 months ago
More Posts from Starrylibraryofresources
For any other artists following me
I just found this website that has lots of free, transparent textures available to download. Useful for drawing clothes and things, or just to make a wallpaper or something ^-^


SAI to FireAlpaca translations
Basically for when you see some awesome tutorials and/or brush settings for SAI and you want to try replicating them in FireAlpaca (sort of)
SAI has a bunch of brush settings that aren’t available in FireAlpaca, so if you’re at a loss, you have to make due with ingenuity until FA improves with more Brush settings D: (Some settings and effects can be created with the help of a Bitmap, Scatter, or Scatter Watercolor Brush, if you know what effect you’re going for.)
In order to edit some of these settings, you usually have to make a new “Watercolor” style brush in FA.
“Stabilizer” (drop down option) = “Correction” (drop down option)
“Blending” in SAI = “Ease of Mixing Colors” in FA “Persistence” = “Load Color” “Density” = “Opacity” (although please note that in FA, opacity with Watercolor brushes is extremely tricky to manage. Even at a low opacity, brushes can still be pretty opaque, which can yield some undesirable results.) “Min. Size” = “Min. Width”
Press: (checkboxes) Dens., Size, Blend = “Opacity by Pressure”, “Size by Pressure” (Blend by pressure isn’t available as a setting)
Also, with Watercolor brushes, the hard/soft edge of a brush is usually an all-or-nothing sort of setting in FA. So good luck, and happy customizing!
Fun shiny bubble letters
Use the fringe effect and a large round pen tool

Use the erase tool and make little shine spots^

Use airbrush to blend and add a extra shiny effects

For extra stuff, you can use preserve opacity to make a fun gradient, use binary for tiny, hard sparkles, and use a white pen to make the letters overlay, etc!
i want to eat it now
hhhhh your art is so beautiful u v u. I'm wondering if you could do some references on backs? Of course only if you have time and feel like doing so o v o;;;


forgive my handwriting I HOPE THIS HELPS A LITTLE BC IM NOT RLY SURE IF IT MAKES SENSE also here are some pics of rl backs which you can also locate via google 1,2,3,4,5(nsfw bc butt)