Side-blog managed by someone who tends to stack resource and tutorial posts under her blogs' drafts as future references for anything useful in life. Circa 2014. REOPENED.
230 posts
Hhhhh Your Art Is So Beautiful U V U. I'm Wondering If You Could Do Some References On Backs? Of Course
hhhhh your art is so beautiful u v u. I'm wondering if you could do some references on backs? Of course only if you have time and feel like doing so o v o;;;


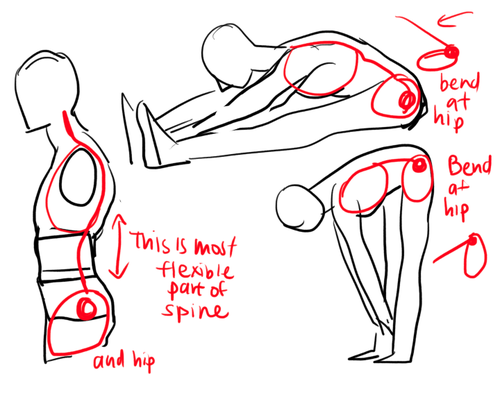

forgive my handwriting I HOPE THIS HELPS A LITTLE BC IM NOT RLY SURE IF IT MAKES SENSE also here are some pics of rl backs which you can also locate via google 1,2,3,4,5(nsfw bc butt)
-
 user-with-no-name liked this · 8 months ago
 -
 manycowboypirates liked this · 8 months ago
 -
 landipan liked this · 9 months ago
 -
 d0g-m0tif liked this · 9 months ago
 -
 goartplease liked this · 9 months ago
 -
 goddessofcoloredpencils liked this · 9 months ago
 -
 the-letter-horror-lover liked this · 9 months ago
 -
 givemethelore reblogged this · 9 months ago
 -
givemethelore liked this · 9 months ago
-
 toffeesbabbles reblogged this · 9 months ago
 -
 sweethoneybear reblogged this · 9 months ago
 -
sweethoneybear liked this · 9 months ago
-
 killlerfang1 liked this · 10 months ago
 -
 enzaiety liked this · 10 months ago
 -
 h1ghndry liked this · 10 months ago
 -
 escuerel liked this · 10 months ago
 -
 a-boring-boi reblogged this · 10 months ago
 -
 hiimsuperawkwarddontmindme liked this · 10 months ago
 -
a-boring-boi liked this · 10 months ago
-
 arthalo reblogged this · 11 months ago
 -
 diabolic-wave liked this · 11 months ago
 -
 artking-4 reblogged this · 11 months ago
 -
 mochi-paradise liked this · 1 year ago
 -
 origami-crab liked this · 1 year ago
 -
 velqur liked this · 1 year ago
 -
 imperiel liked this · 1 year ago
 -
 kammavenus liked this · 1 year ago
 -
artking-4 reblogged this · 1 year ago
-
 courtjestrr liked this · 1 year ago
 -
 marikolove07 liked this · 1 year ago
 -
 zorosnavigator liked this · 1 year ago
 -
 cremebrulee-69 reblogged this · 1 year ago
 -
cremebrulee-69 liked this · 1 year ago
-
 archiveoffavstuff reblogged this · 1 year ago
 -
 mistkissedmoon liked this · 1 year ago
 -
 k4karma liked this · 1 year ago
 -
 ikolaiigh liked this · 1 year ago
 -
 starrylibraryofresources reblogged this · 1 year ago
 -
 kaoarika liked this · 1 year ago
 -
 ghostlyculturepeach liked this · 1 year ago
 -
 goeth878897 liked this · 1 year ago
 -
 voidref reblogged this · 1 year ago
 -
 llama-grimoire liked this · 1 year ago
 -
core29394 liked this · 1 year ago
-
 nuttseeker liked this · 1 year ago
More Posts from Starrylibraryofresources
Fun shiny bubble letters
Use the fringe effect and a large round pen tool

Use the erase tool and make little shine spots^

Use airbrush to blend and add a extra shiny effects

For extra stuff, you can use preserve opacity to make a fun gradient, use binary for tiny, hard sparkles, and use a white pen to make the letters overlay, etc!
i want to eat it now
how did you do the perspective blur in your doof piece :0 ?

Photoshop’s Gaussian Blur is my savior. I’ll try to do a quick walkthrough of how I go through the process too because I use blur A LOT, and not just for perspective – I switch between Paint Tool SAI and Photoshop CS4 for reference.
This first step is a personal preference one, but I’ll include it nonetheless. I use a very hard brush for my line art/coloring, so the first round of blur goes to soften the line art.

In photoshop, go to your top menu bar, click Filter > Blur > Gaussian Blur. For softening the vanilla image i usually do 0.4 - 0.6. The difference is very slight but very important to me, it gets rid of a lot of the pixelyness. NOW the main bit.

Time to put it through another round of Gaussian. I usually bump it up to about 6 - 7. I take the super blurry image back into SAI and put it on a layer above the first softened image. Using the eraser tool set on density (under the advanced options of the tool) I start dabbing away at the top blurry layer to reveal the cleaner one underneath. I don’t have any images from before I added more lighting over Doof but this’ll give you the idea of the effect it achieves.


It gives the picture an atmospheric sort of haziness to it that I loooove. Some things need just a bit more of a push, like his leg for example, so I didn’t erase any of the top blurred layer airbrushed it with the background’s dusty color. That’s it!

Pardon me for such a long post haha but I hope I fully covered it!
my brush settings on FireAlpaca
A type:


type: bitmap brush min width: 0% brush spacing: 90 check: size by pressure opacity by pressure rotate apply fore grand color brush control opacity: 85%
——————————————————————————
B type


type: bitmap brush min width: 0% brush spacing: 25 check: size by pressure opacity by pressure rotate apply fore grand color brush control opacity: 50%
——————————————————————————
I used default pen brush, default watercolor brush and A type brush in this picture.
firsrt, I drew the outline with default pen brush. I painted the color of skin and hair with default watercolor brush. and then I used A type brush after flatten image.

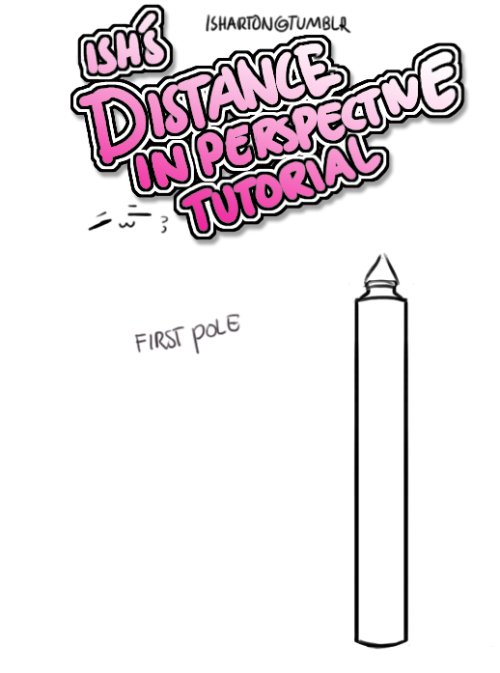

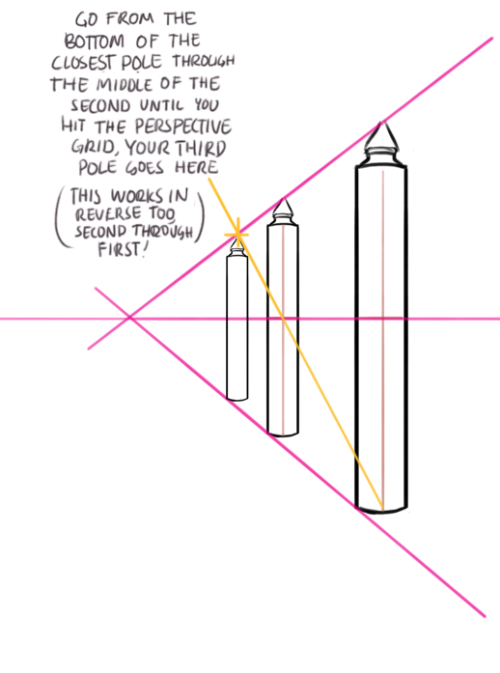

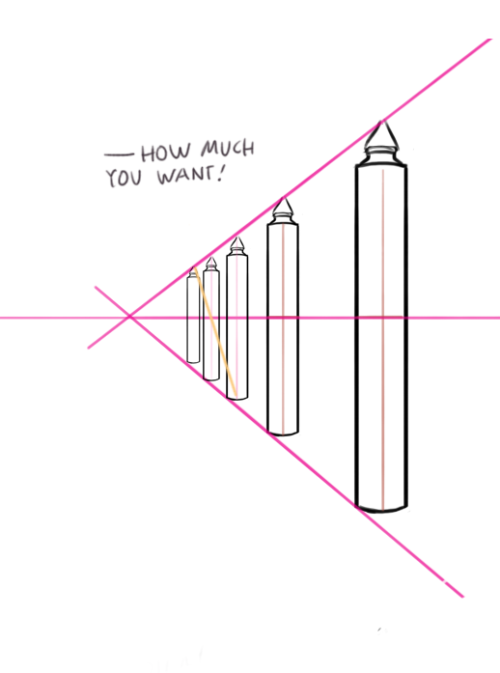

Thing i learned some time ago! hope you all find it helpful ( perspective grids can be your friend!)
For any other artists following me
I just found this website that has lots of free, transparent textures available to download. Useful for drawing clothes and things, or just to make a wallpaper or something ^-^