
Hi VeganKaktus - I've Removed Myself From The Sims2packrat Group. I Haven't Be Helpful To The Group In
Hi VeganKaktus - I've removed myself from the sims2packrat group. I haven't be helpful to the group in so long. I'm still willing to help out if needed, but to be honest, I'm not sure how I can do that.
Hello celebkiriedhel! :-D
I hope it wasn’t me who made you feel like you had to leave! If you ever want to join again though, feel free to message me and I’ll gladly send you an invite (and thank you for being willing to help out if I need help! :-))
(Also, I hope you don’t mind me answering this publicly, whenever I reply to asks I always save them in drafts first (since I really hate writing in the inbox itself) but by doing this it seems I couldn’t answer you privately. Sorry about that!)

-
 celebkiriedhel liked this · 4 years ago
 -
 kaylynn-langerak liked this · 4 years ago
More Posts from Vegan-kaktus
Replies :>
@kooli-sims replied to your post:
I love it! Thank you!
@kaiquisition reblogged your post and added:
yay for mail! thank you :D
You’re both very welcome! :-D
@inlovewiththebeatles replied to your post:
I think, you did an great job!<3
Thank you (;´༎ຶД༎ຶ`) ♡
@jennamaxon replied to your post:
Those are great - looking a bit used might be good too.
Thank you! I was thinking that as well, so I ended up using EA’s texture around the edges (which are llooking a bit used) and it turned out much better! Also, tumblr seems to have made me unfollow you? Just wanted to let you know I didn’t unfollow/softblock you or anything :-)
@knowledgeaspiration reblogged your post and added:
makes me think of -
I’ve been blessed with edits of this meme twice now and I LOVE IT
@grilledcheese-ccstash reblogged your post and added:
yo this is cool as fuck
I’m glad you think so! :-D


I genuinely can’t decide if I like my textures or not, hmm. I’m also not sure if I want them to be so clean. I now remember why I didn’t finish them last year, ha-ha..
(These are the kids homework only, I haven’t started yet on the teen ones. Also, not my illustrations!)
Hi! I know that you don't take requests, but I just wanted to send it, before I forget it. So Hugelunatics made the penguin into a sculpture and I was wondering, if you could add your dresses from the default into it. Thats makes sense? Only answer this, when you reopen the requests, okay? Thank you for your wonderful creations, have a great day :)
Hello anon! :-D I can totally do this. My requests are closed bc I have so many things in my WIP folder I want to finish, but small things like this is totally okay :-) Do you want the hat added as well? If that’s the case, I have to make it a new object unfortunately. If you only want the clothing, then I can just make some recolors. It’s no problem for me to add the hat, but I’m thinking the deco will have an unnecessary high polycount if I add it. Hugelunatic’s deco is 2064 and with the hat it’s 2796 (<- and that’s the polycount of my penguin default replacement as well).
So what do you think? Do you want me to make some recolors only? Or do you want me to make it a new object and add the hat (+ recolors)?
For anyone wondering, HugeLunatic’s cute penguin deco can be found here :-)
Tutorial: How to default the penguin
@grilledcheese-aspiration asked me if I had any step-by-step tutorial on how I defaulted the penguin, but I had none, so I made one! :-D (beware of long post and many pictures beneath the cut)

Before we begin, this is a tutorial on how to default the penguin and add new meshes to it, not just a simple texture replacement. If you’re wondering why I’m making a tutorial on this it’s because the penguin has too many morphs and can’t be exported out of Milkshape, but I found a way around that :-)
With that out of the way, you have to have SimPE with NVIDIA DDS, Milkshape with the plugins and the seasons expansionpack of ts2 installed. It might be possible to do this with blender or any other meshing program, but I will only be showing how I did it with Milkshape.
If you know how to extract files etc (the basic stuff), you might want to start at Part 2: Adding new meshes, 4. I would say this tutorial is fairly beginner-friendly, since I did my best to show every single step.
Part 1: Extracting neccessary files
1. Open up SimPE, search for “penguin” in finder and click on start:

(bigger image)
2. Scroll down a bit until you find the files we need: penguin_surface_txmt*, penguin_tslocator_gmdc, penguin_untagged0_shpe and penguin-surface_txtr. Double click on them one at a time to open them, then right click - extract and save them somewhere (you might want to name them txmt, gmdc, shpe and txtr so it’s easier knowing what’s what).
*I use Nopke’s penguin fix so if you do as well and don’t want your added mesh(es) to the penguin to be covered in snow, extract the txmt from his fix instead of EA’s original.

(bigger image)
3. You’ll want to double click on the penguin-surface0_lifo file if you’re planning on editing the texture as well to get the highest resolution of the texture. You're not supposed to extract it though, just right click on the image and choose export and save it somewhere.

4. Make a new package in SimPE: File - New or CTRL + N if you use any of Chris Hatch’s updated versions of SimPE.

5. Right click somewhere in the middle of SimPE and choose “Add”:

6. A window will pop up. Locate your extracted files (txmt, gmdc, shpe, txtr) and import them all, then save your file and give it a name.
Part 2: Adding new meshes
1. In my case, I’m going to show how I added the hat, but it should be fairly the same for whatever you want to add to the penguin, the only difference will be the joint assignment later.
2. Open your accessory/whatever’s mesh (in my case, the hat) in SimPE and export the gmdc by right clicking on it and choosing “extract”, then save it somewhere. You have to extract one texture as well. Open up a recolor, right click on the image and choose “export” (like you did with the penguin lifo file).

(bigger image)
3. Open up Milkshape and choose File - Import - Sims2 UniMesh Import V4.09A, then a window will pop up.

(bigger image)
4. Now, if your mesh you’re planning to add to the penguin is too big/small, you’ll want to import that mesh first and use Tools - Scale All... (it’s the third option from the bottom) and play around with it a bit until you get it the right size. I usually do it like this:
import mesh, scale and then import the penguin mesh to see if it’s the size I want. If not, I undo the import (CTRL + Z or Edit - Undo) and then undo once again to get the mesh back to original size. Then I do “scale all” again and repeat the process until I’m happy with the size.
Why you have to do it this way is bc if you have both the hat (in my case) and the penguin mesh in Milkshape when you use “scale all”, everything will scale, including the penguin mesh.
When you import the penguin’s mesh it will ask you if you want to “Create Blend Groups?” and then it will ask you “Some Skin Weights do not total 100%. Do you want these corrected?”. It doesn’t actually matter if you choose yes or no, since we will not be exporting the penguin mesh anyway so you can choose no but I clicked yes on both options bc you never know.

5. To move your mesh around in Milkshape, go to the “group” tab and double click on your mesh group to select it (it should turn red) and then go back to the “model” tab and click on “move”, then use any of the three grey windows to move your selected mesh around.
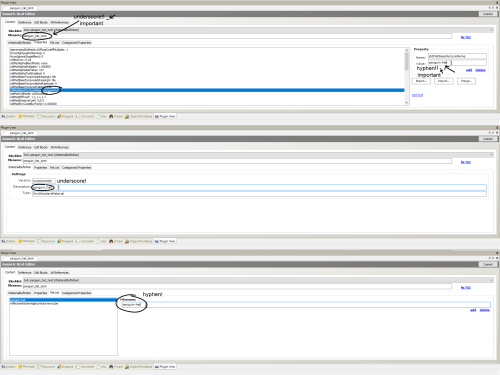
When you're happy with the size and have put the new mesh where you want it to be on the penguin, click on your mesh group in the group tab and rename it if you want. I named my hat group like this: (click on rename after you’ve edited the name, otherwise it won’t save your new name)

6. Then click on comment. A window like this will pop up:
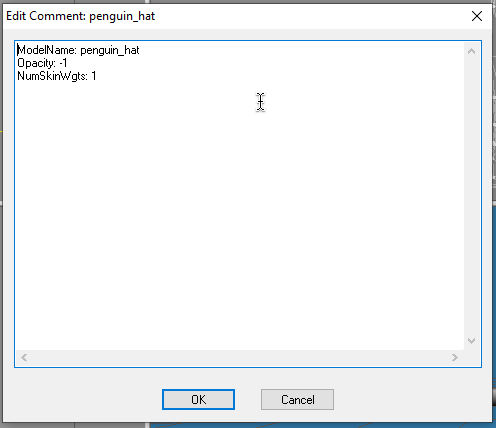
7. If you renamed the group, you have to write your new name at the top after “ModelName:” like seen in the image above. After ModelName: [insert your group name here] you should have something like: Opacity: -1 and NumSkinWgts: [a number between 1-3] like also seen in the image above. Click on OK to apply the changes. By now you’ll want to save the file as a .ms3d just in case something goes wrong. It’s always nice with a backup. You can save it by going to File - Save As... (or CTRL + SHIFT + S).
8. Now that you’re done with the mesh and has saved it as a .ms3d file, delete the two penguin_surface mesh groups and all their morphs if you clicked yes to the “Create blend groups?” (in other words: everything but your added mesh group). After that you’ll want to export it by going to File - Export. Export it as Milkshape 3D ASCII and save it somewhere.

(bigger image)
Part 3: Bone assignment
1. Before you can import the new mesh, you have to go to Extra - Preferences and check the "Advanced Mode" box then restart SimPE.
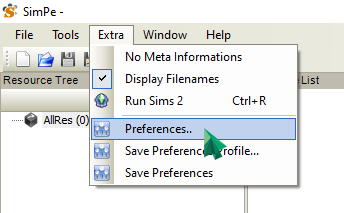

(bigger image)
2. After restarting SimPE, open up your .package file with all of the penguin extracted resources in SimPE and click on the penguin_tslocator_gmdc. Click on “import” and choose your exported Milkshape 3D ASCII mesh. It should then be added to the gmdc like this:

(bigger image)
3. Click on the groups tab, then select your newly imported mesh group. Now, you want to click on the bar under “Joints:”

(bigger image)
4. Then this list will pop up:
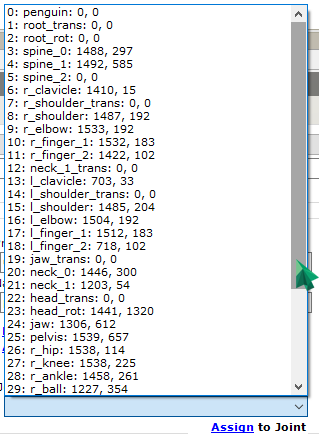
5. Now all you have to do is find the correct joint to assign your newly imported mesh to. It can be tricky to find the right joint, or perhaps it’s just me not being comfortable with joints yet haha :p I’m thinking the joints with “0, 0″ may be empty joints, in other words: the penguin doesn’t have/use them, but I’m not sure (but it makes sense, doesn’t it?). Anyway, when you’ve assigned it to what you think is the correct joint, click on “assign” and then click on commit to apply the changes.
Part 4: Creating necessary resources
1. Now that you’ve successfully added the mesh to the penguin, we need to create a txmt, add a txtr file and edit the shpe. We’ll start with the txtr.
If you want to edit the penguin’s texture, right click on “penguin-surface_txtr” and choose “Clone” so you get two of them. Open up your photo editor of choice, import the penguin-surface0_lifo_512x512.png and edit it (if you want to that is). When you’re done, save it as a .png, click on one of the two “penguin-surface_txtr”, right click the image, choose “Build DXT” and import your edited texture. Commit the changes. (These steps are shown down below if you don’t know how to import it.)
2. Click on “penguin-surface_txtr” and rename it to whatever your new mesh name is. In my case, it’s “penguin-hat_txtr”. After you’ve renamed it, click on “Fix TGI” (this is important since it gives your edited resource a new instance number so it won’t overwrite the original resource you extracted (or cloned it from). Right click on the image and choose “Build DXT”.

(bigger image)
3. Choose DXT3 or DXT5 (I never use DXT1, it completely destroys the quality. DXT3 is the one I use 99% of the time) click on “open” and find your mesh’s texture and choose it. Click on “Build” an then commit to save the changes.

4. Now it’s time for the txmt. Click on “penguin_surface_txmt” (remember you have to extract the txmt from Nopke’s fix if you don’t want your added mesh to be covered in snow during winter) and change the name to your new added mesh’s name. For me, this is “penguin_hat”. You’ll need to edit it in 4 places. After editing, click on “Fix TGI” and then on “commit” to save the changes.
(bigger image)
5. Now for the shpe. Click on "penguin_untagged0_shpe” and click on “add”:

(bigger image)
6. “Subset Name” is your mesh group name (the mesh group name in the gmdc) and “Material Definition File” is the txmt. For me it’s “penguin_hat” in both. Click on commit after editing to save the changes.

(bigger image)
7. And you’re done! Save the file, drop it in your downloads folder and see if everything’s working. If you use “boolprop testingcheatsenabled true” you can shift + click on the mailbox and under “Make NPC ...” you can choose “penguin” to force one to visit your lot. Simslice also has a penguin summoner here (<- booty link) it’s the “penguin_summoner.rar”. This is much faster than waiting for the penguin to randomly come by.
Help etc.
I think I’ve explained every step correctly, but it’s very possible that I’ve forgot something or made a mistake somewhere. Let me know if you find any! Also, if you can’t understand something, let me know and I’ll try to explain it again.
And ofc, if you need any help, feel free to comment, send an ask or message me :-)

I also like maxis' color scheme for the mail carriers. From what I see in movies, isn't blue just the standard color for mail staff uniform in the us? If anything I'm just kinda jealous of the better looking meshes from latter generations, but I'd rather have the awesome functional bag from ts2 than the boring mail conjurers from ts4
Glad to hear that! I don’t live in the US so I can’t speak for the color there, I searched when I started defaulting the mail outfit though and all I saw was blue as well :p
Are you talking about these 4t2 mail outfits? (defaulted here) and I found this shorts version for AF just now! I actually quite like those. I’m personally not a fan of skirts, so I'm thinking, perhaps I could do a second default using shorts for AM+AF and add the ts2 bag to the outfits? :-) would you be interested in that? I’m unsure if the bag will match the clothes color though, but I can try and if it doesn’t I can tweak it a bit. Also, you’d have to live without morphs, since no one has added them to that outfit and creating morphs are still something I can’t do :-(