Arttutorial - Tumblr Posts


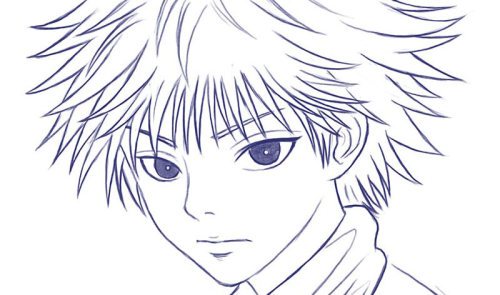
My pencil tutorial! More on instagram: @gvaat. Hope you enjoy!


Part one of volume rendering. Hope you guys enjoy. On instagram: @gvaat
What do you need to start doing digital art?
The ultimate comprehensive guide for the absolute beginners.
Now, you’ve probably decided to venture into digital art, or digital painting to be more precise but you are a little unsure what you need to get a good start without making too many mistakes.
I am a digital artist myself, so this guide will be very practical and based on my experience and also many other artists, not just some guide you find on a tech blog. And also, this guides assumes that you want to be serious in digital art, not some casual hobby.
Now without further ado, let’s dive in to the important parts shall we?
EQUIPMENT
1. A laptop
When looking for one do take note that it should have
About 8gb ram or more
Minimum of 1gb dedicated ram on graphics card, preferably 2gb.
Screen size about 14-15 inch is good.
You might be thinking why not a tablet? Most tablets do not have the computing power to handle large files, which you will do, when doing nice digital illustrations. The screens are too small, forcing you to zoom in and out often, disrupting workflow. And keyboard shortcuts saves a lot of time.
Of course if you don’t mind, a desktop or workstation with large monitors of even Cintiq (tablet monitor) will be the best ideal solution. But that will add up to quite a lot of budget. And a desktop is not portable. Laptop nowadays have enough power to do some heavy digital art. The ram are what is important to work with digital art in a reliable speed, if you get anything less than that, then you might encounter some major annoyances in speed when your file size starts to get big. Besides, those specs are readily available and will last you for quite some time without needing to upgrade.
2. A graphics tablet
There’s not much brand available in the market of tablets, the most popular on is of course Wacom. But there is also various chinese/taiwan brand available in the market.
My recommendation is: Wacom Intuos
Preferably A4 size. Unsurprisingly, wacom is also the most expensive brand there is. If budget is a little tight, you can get wacom bamboo that is cheaper, with less sensitivity pressure, but you probably won’t notice it anyway. If you get smaller than A4, your wrist might get sore/tired easily after prolong hours of painting.
The other brand are actually really usable too, but they require batteries on their pen, and I hate having to forget replacing them and having them dying on crucial moments. Of course, they are much cheaper than wacom, so there’s that.
In my experience, a wacom intuos is very durable, and will last you a very long time. I am using an old version that is wacom intuos 3 A4 size. It has dropped on the side before, thereby having a crack, but the tablet is still functioning fine, and I haven’t replaced a nib for ever. So I think in the long run, it is a very good investment. Get a good tablet, and if you take care of it, it will probably last you many many years.
SOFTWARE
Now there are several popular brands in the market, and from time to time, I always found people asking which software they should use and buy. While different software cater to different needs, not all software are made equal.
The software that you often hear are probably:
Photoshop (PS)
Sai
Clip Studio Paint (CSP)
Corel Painter
Procreate and Medibang etc
You can read my detailed review of PS and Painter here.
But let me throw a short gist here: You want to get serious and go far in digital painting, so you want a software that is robust, reliable and provide powerful tools for professional work.
In the end, only 3 remain: CSP , PS, and Painter.
I won’t delve in to the rest, but simply, they don’t have enough professional features to carry you far.
Now don’t get me wrong, anyone can create great art with whatever tools, hell some can even paint with MS Paint and Mouse. But the appropriate and powerful tool can carry your skills far than MS Paint and mouse will ever do.
This is not a debate about good art, it’s a guide on the most useful tool for the job. So let’s move on, and I’ll give you a brief description on what each software does.
Corel Painter:
If you want to emulate traditional media look and artistic brushes, Painter is easily the king. Here is what painter can do (all my art):
That oil painting look can be achieved in Painter easily, and it has much more tools like Palette Knife, Watercolors and Pen etc.
Plus Painter can also create some very sleek line work like this:
Painter has a “paint on a path” feature, that allows any kind of brush to produce very sleek line work.
So, line art and Traditional look: Use Painter
Though I have to warn you, the brush control panel is extremely robust and can seem quite daunting at first. And Painter has many annoying quirks and glitches that can be annoying, which you can find out in detail in my review.
Photoshop
In summary Photoshop is king, you can read a detailed review here.
If you are looking to create art like this:
Or this (and also top banner art):

Then PS is the answer. It has all the tools you need to do from A to Z.
Concept art, speed painting, character design: use PS
If you want to do line art though, PS is quite bad at line stabilization, it will look like this at best:
As you can see it’s not bad, but it can’t produce that sleek and cleanliness that Painter can. While Painter can do it in one stroke, PS needs to do it with multiple stroke and eraser. So if the lines are only used for sketching like me, then PS is fine, otherwise it’s not.
Clip Studio Paint
I haven’t dabbled very long in CSP to produce a complete art with it. But CSP is very geared towards those who wanted to create manga in it’s purest form.
It has multiple options to create Manga panels, it also have plenty of options for those half-tone shadings. The brushes provided within are also catered to making manga. While CSP can also be used to make paintings, it doesn’t have features as robust as Painter or PS. CSP also has good line stabilization. There’s one thing it stands out though. CSP is cheap. So in summary:
If you want to make comic/manga: Use Clip Studio Paint.
CONCLUSION
“In summary, get a decent laptop, an A4 intuos tablet, and Photoshop to get started. If budget is an issue, save on software first. PS uses subscription for $20 a month, CSP standard version is only $50 (cheap!).”
Now that you have everything ready, let’s get started on learning how to create digital art..... on another tutorial! If you found this helpful, please reblog, thanks!
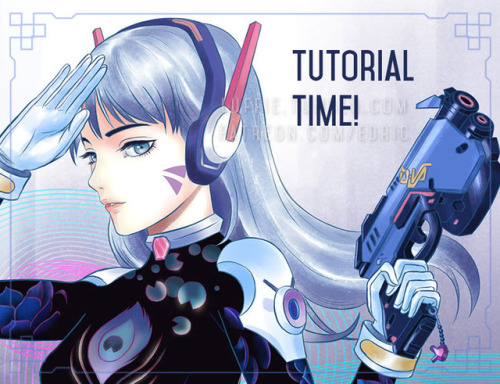
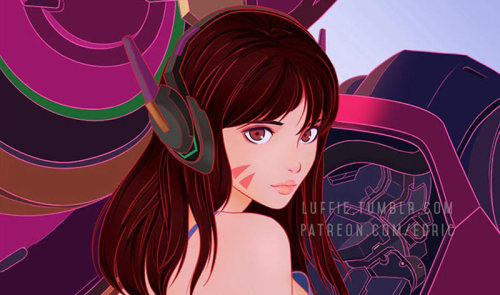
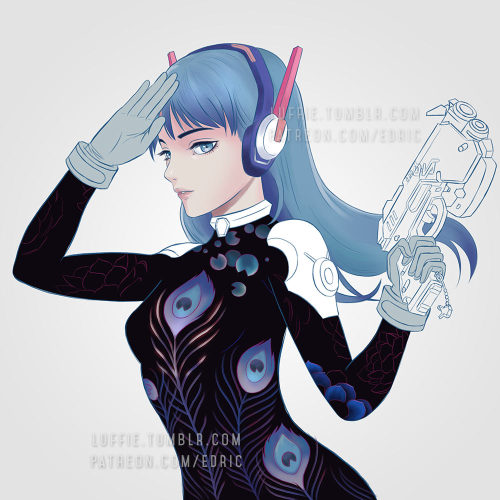
D.va Line Art Tutorial: Basic Level
I’ve been wanting to create some art tutorial for some time and I’ve finally did it! I hope there is some wisdom you get from this Tutorial, so let’s start!
Now this is a simple tutorial, so there wouldn’t be many advanced techniques, but the good thing is, it is simple, so that almost everyone can follow through, of course in the future, I will create even better tutorials that are easier to learn and understand.
I’ve always like illustrative art, and with my passion in digital painting, sometimes I try to combine them both together, and this is one of the result. In the future, I will try to constantly create many such illustrative art.
Software Used: Photoshop CS6, Corel Painter (optional)
Dimension: Approx 3000px x 3000px
1. Drawing stage
Now this is the part that I cannot teach you here: drawing.
It really depends on your drawing skills, and for those who can;t draw so well, my strong advice is: draw on paper.
While I did this in digital out of convenience, nothing beats drawing straight on paper. Drawing digitally will hardly improve your drawing skills at all if any (my observation & exp), but drawing on paper will improve your accuracy and drawing memory much much faster and better.
Take your time drawing, if you have a good base drawing, then everything else will be nice and easy, so don’t rush it.
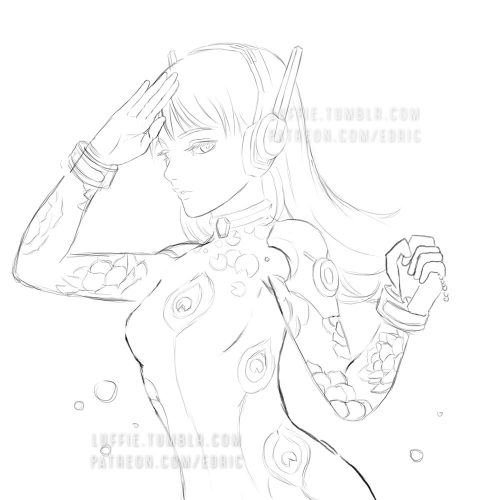
2. Outlining Digitally

Depending on your preferences, you can just draw any patterns, but my design here is about Peacock & Lotus design, with the Peacock symbolizing Dva’s penchant for showing off, as for the Lotus... well it’s pretty!
As you can see here, some of my outlines are pretty sleek and smooth, and that’s because I create a new clean outline on top of my previous rough drawing. This is usually quite important in terms of line drawing/painting. It makes the process easier and the whole image more clean and finished.
Painter Technique: Now, I create my drawing in my favorite app Photoshop, but Photoshop it’s not for being very bad in making smooth lines, so you have to use another program to do that.
Currently, my favorite program for creating such smooth lines is Corel Painter. You can search for “Brush Smoothing” setting, and set the “Damping” to around 80 for a good line stabilization.
While I forgot which brush I use for this, I now recommend the 2B pencil with 100% opacity (The blue lines). Make them on a different layer.
Try and create the lines with as little strokes as possible. For long curved lines like the hair, you can utilized Painter’s awesome “Paint on a path” feature, just check it on the top toolbar settings. It allows you to create a path and paint straight onto it, thus saving the frustration of redrawing again and again to get that smooth long lines.
For the red lines, “Concept Art Jitter Smooth” Under the Chalk section.
Other Software Technique: This line art technique can also be done with other software with brush stabilization feature like SAI, or Clip Paint Studio, and many others, so don’t worry if you don’t have Painter.
3. Base Colors
Now the next step is to bring the image back to Photoshop for coloring. Use the pen tool and create the basic shapes and fill them with block colors in different layers.
Now it is tempting to use the Lasso or the Paint bucket to fill, but don’t. The lasso tool has problem in creating smooth lines (which we need), and also the paint bucket (I’ll explain next time how to use it in another Tutorial).
If you have created the paths and shapes in different layers, then you can lock the layer transparency and start painting with the real desired colors.
Here I used the soft Airbrush in PS to paint it some reddish hue around her cheeks and forehead. Don’t worry about getting the colors very accurate for now, since you have separated them to different layers, it is very easy to make adjustments later on. Also, don’t forget to add a background, preferably grey or some neutral colors. It helps better to gauge the value of the colors later on, if you put white, most colors seem too dark, and of you put black, colors will seem too bright.
4. Start Painting
On a layer above the body, I painted the peacock leaves by using the Lasso tool, fill colors, and use airbrush to paint it highlights and shadow.
For the Lotus leaves, I use the Lasso, but I don’t fill it, since I want the blackness of the suit to come through. And instead of using the Airbrush, I use the PS standard round brush, with shape dynamic off and opacity pressure on, I painted with downward strokes lightly to create the leaf textures, and painted the same way again with brighter colors, and add a final highlight and the tip of most leafs.
5. More Painting
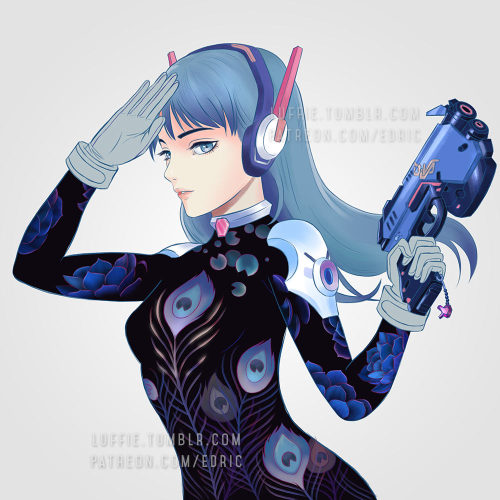
Continue painting the leafs, and the the shoulders, before moving to other parts like the gun. I’ve also added more leafs underneath the original leaf layer, since I felt it looked a bit empty. For the glow of the feathers, I simply create a layer on top of the outline layer, and set it to “color dodge”, and add some bright colors.
If the colors look weird/off, simply use Hue/Saturation to edit them till it looks right, then color pick from that section and paint the rest.
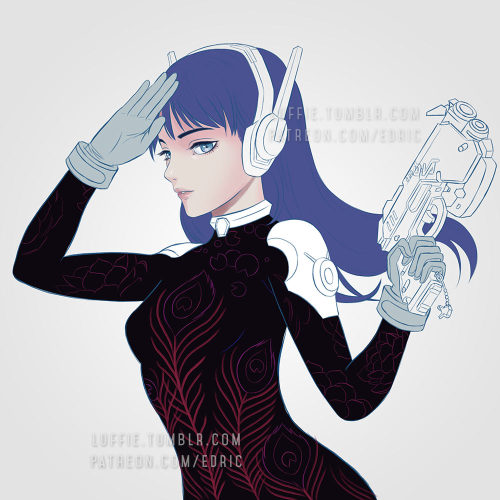
6. Finishing/Editing
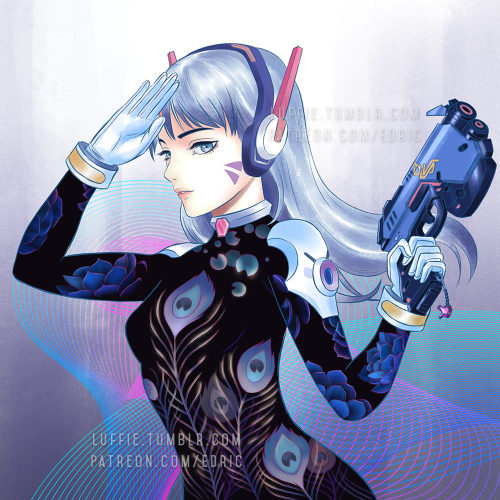
As you can see, I changed the hair, since I wasn’t satisfied with the previous color. To get the bright look, you need to start with a white base. And as with the gloves, shoulders and hair, I changed their base colors to white.
Then with my texture brush, I simply painted according to the form, and leave some white shining through in the middle. This will created those “white sheen” you see here. Then for the hair, I painted darker colors near the tip/end of the hairs. I’ve also brighten the her face in the process.
For the background, I was actually a little clueless on what to paint. So I just painted some light strokes using the same textured brush and add a design element on it. Maybe next time, with better planning, I will create better backgrounds.
End Note:
So there you have it, and as you have learnt, there isn’t any complicated techniques behind this picture, and if you have prepared each stage accordingly step by step, everything later will become easier. Of course this is not the most detailed tutorial as some steps can be broken down even further to make it clearer, but that is for future tutorials!
If you like my work and would like to learn more and support me, please do consider supporting me at Patreon.com/edric . It truly helps me a lot to devote more time to create this tutorials and art, plus you will also get my custom brushes and PSD file so that you learn better, and of course, Patrons receive special tutorials. Every bit of support helps, and are truly truly appreciated!!!
Or you can buy me a coffee for late night painting too here :https://ko-fi.com/edricartist

Tracer Art Walkthrough: Basic Level
SInce this art consists of mostly the same technique as my previous Dva art tutorial http://luffie.tumblr.com/post/164178679923/dva-line-art-tutorial-basic-level-ive-been
So I won’t be delving much into techniques but describe more about my thoughts and the process that is going on in creating this artwork.
A failed attempt at manga style
This art actually predates the Dva version, and initially it wasn’t my main idea to create something like this.
Initially, I wanted to create a simple manga styled line art on Tracer. It looked fine at first...

But as I look at it longer, it was clear that something was not right.... Tracer looked a little dumb and may I say... a little down syndrome. So I decided that this is not going to cut it and rework the whole face again.

Now the face actually looked much better, but because I am very nitpicky, I also felt that her eyes looked off and weird, so I went in and readjust it again into....

THIS.... This looked so much better, at least her eyes looked normal now.
By now, I have decided that it gets a little boring to try and paint the usual tracer with the usual style. So I thought of trying something more unconventional, like making it into more illustrative style, and also attempting to use colors that are quite off the mark from the official Tracer design.
As you can see, I added patterns that depicts her lightning speed, and even some butterflies to show that she floats like one. No bees, because she her guns doesn’t exactly sting though.

Again, the same technique as before, I fill in block colors and started shading some of them to get the feel of the color harmony that I wanted to put, something that lies mainly with orange and blue. This is starting to look like a different Tracer definitely.

As the colors are more or less finalized and the background added, I felt that the color scheme is really nice and suitable, this is gonna be awesome.
I painted in all her extra decorations and also the roman numbers, though it is hard to see here due to its color.

While I really like the color scheme, I felt it lack that final oomph, and so I saturated the colors a little and make th e orange more reddish and the blue just slightly more purplish (if that’s a word!). I also inverted the color of her speed trails to make it more obvious, plus a little more texture to the background and I call this sweet artwork done!
The pose is actually derived from me imagining Tracer saying good bye to her normal life, now that she can no longer live without her chronal accelerator, thus the little sadness in her look.
Since this was my first work employing this style, I can say that many things can be improved further as I am not yet very accustomed to it. But it does produce interesting results and I desire to develop it further. If you like my tutorials or have some great suggestions, do not hesitate to tell me!
If you like my work and would like to learn more and support me, please do consider supporting me at Patreon.com/edric . It truly helps me a lot to devote more time to create this tutorials and art, plus you will also get my custom brushes and PSD file so that you learn better, and of course, Patrons receive special tutorials. Every bit of support helps, and are truly truly appreciated!!!
Or you can buy me a coffee for late night painting too here :https://ko-fi.com/edricartist