Digital Art Tutorial - Tumblr Posts
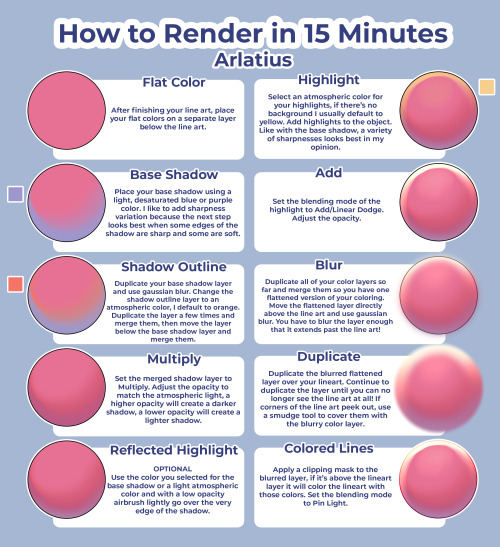
fast rendering tutorial for when you dont want to put in any effort


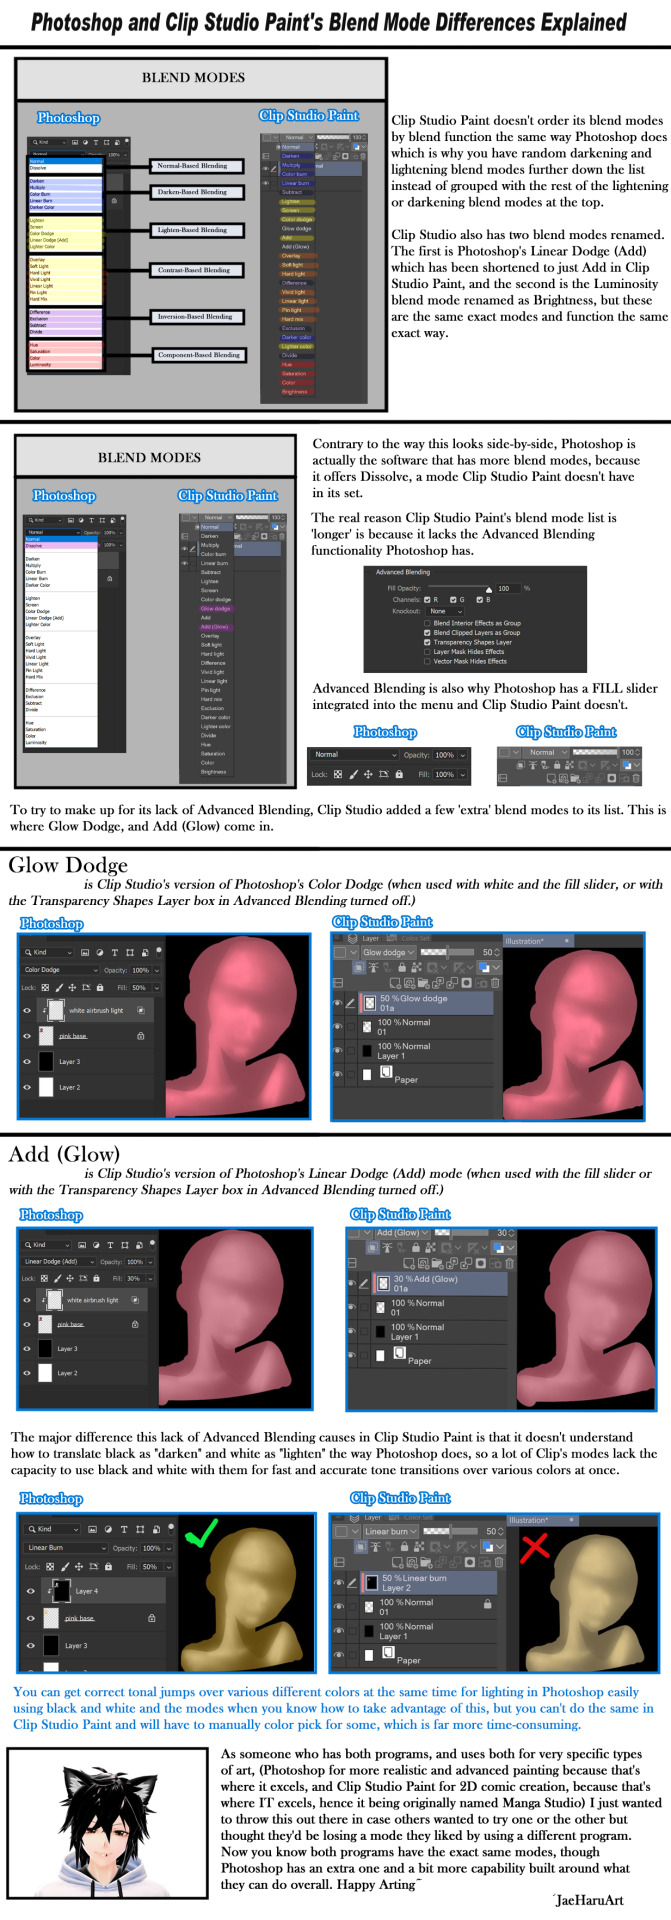
Photoshop and Clip Studio Paint's Blend Mode Differences Explained
Patreon: https://www.patreon.com/JaeHaruArt?fan_landing=true
LinkTree: https://linktr.ee/jaeharuart

Layer Effects Tutorial by Robin

Glow Tutorial by chicinlicin

BREAKING DOWN MY ART
The artwork I'm breaking down.
(Added text descriptions to the images (I did my best) in case you don't understand my handwriting)
![[An artwork of Sun making a Gregory doll/puppet in his room. The artwork is showing patches of the sketch and colorless lineart under it in different spots of the canvas. Over the artwork are handwrited the words “BREAKING DOWN MY ART”. There is a doodle of my persona, Lyna, in the middle with their hands clapped near their mouth, like taking a deep breath]
[There is a yellowish orange notebook paper like background used in all of the images]](https://64.media.tumblr.com/1ca4113463efefaeb6bea8a78dd80b53/8fba4b4509df1a84-6d/s500x750/c392af9838968059ffde6e65ab95808dfbdaddf0.png)
![[In the top left corner is a sketch of the artwork previously mentioned. Right beneath it's the fully completed artwork. A red arrow travels from the sketch to the artwork. At the middle right is a drawing of my persona with their hands clapped away from their face this time, now looking at the screen with a crooked smile and an apologetic look with text bubbles that says "I don't know if I'm going to be able to explain how I went from THIS- TO THIS-". A doodle of a small happy Lyna walking to the right with a text bubble that says "but here WE GO"]](https://64.media.tumblr.com/1716504d59530eba4a986c977199e980/8fba4b4509df1a84-c3/s500x750/d45083a44829ffdaf1058b8029ae949cad1d1ddb.png)
![The SKETCH
[At the top left corner is the sketch of the drawing I'm going to break down]
First I drew Sun in the pose. I used my own hands as reference for his.
I thought the canvas looked empty so I searched a video of their room and drew the background. (struggling because the guy wouldn't stop for more than a second to look at the room. I made up the perspective of the objects in the room).
That's it.
I rarely use references for anything. Normally I will remember the shape of any object after seeing it a few times or drew it once or twice before, same goes for objects in perspective. I will look at references when I can't figure out the shape or want to be very precise. Also a whole wall of my room is a mirror so I just glance at it while posing. I am my own anatomy reference [painting nails emoji] [sparkles emoji]
[There is a doodle of my persona grabbing their head with it's noodle arms, thinking hard of a klein bottle (an infinite three-dimensional surface) while making microwave sounds]
Note to add: I normally spend between 3 and 6 hours on these kind of sketches, sometimes more, depends on how much is going on in the scene.
2nd note to add: draw always the background first, even if it's just a guideline of the place the character is going to be standing. Is easier to make the character feel part of the rest of the background. (Also, try making your sketch as clear a s possible, your future you will be thankful)](https://64.media.tumblr.com/5cee1fcdfba269fe71085b5fa741d685/8fba4b4509df1a84-92/s500x750/016961e3e2eafad7a5a2eab2978a2fb6ad7c492f.png)
![The LINEART
The brush I use for the sketch is the same one I use to lineart, color and render. I even use it to erase.
[Under the text is pointed a tool called alternate transparent color, to convert the brush into an eraser conserving the brush texture. At the right of it an image of my custom brush with also the RGB of the color I use to sketch and lineart, being R78 G26 B13]
I change the size and opacity depending on what I need at the moment.
[To the left a line example of what I can do with the brush and how it erase]
My lineart is just a meticulously cleaned up version of the sketch. I even shade it while I clean it on the same layer, it helps me with depth and gives a better (semi)realistic look. The same way I draw and shade traditionally with a pencil, except that here I need to erase more than on paper.
[In the middle of the image beneath the text are two images of Sun's face, the sketch version on the left and the lineart on the right. Beneath the sketch one another two sketch and lineart images, this time of Suns hands holding a needle with a strand attached to it]
Some parts I'll clean completely the shape and then shade lowering the opacity of my brush.
[Red arrows point at examples of the lineart]
Some others I'll just make a “black” blur and with my brush with low opacity (and a regular eraser) erase until it looks right.
[Red arrows point at another example of the images. Under the text is an example draw step by step of how I drew a finger joint of Sun]](https://64.media.tumblr.com/d22311f9178364f23021c13b1ef0b273/8fba4b4509df1a84-15/s500x750/65108ce66353bf348ba516d0338cca0dd1cf32dd.png)
![I separated the sketch layer in three layers to make it easier to clean (and to not constantly mess up)
[Underneath the text are three images of the lineart lined up from left to right: Sun sitting on the floor making the doll, the items in the room and walls, the wooden floor]
And together they look like this.
[Another two images lined up, the one on the left has all the three layers one over the other clipping together]
And like this after I filled inside the silhouette of each layer.
[The image on the left has been cleaned so the layers don't clip over each other]
There goes 20+ hours of my life.](https://64.media.tumblr.com/8f48c7b37af01b83f94a503303ce3690/8fba4b4509df1a84-a4/s500x750/ef6b35d9763ebcd8d107e3c64df8e90d0baad6bc.png)
![The COLORING
When I fill up the silhouette I use a base color, yellow for Sun and, in this case, grays for the background.
[Underneath the text are two images of the drawing colored, the one on the left has Sun painted in yellow and the background painted in gray, the one on the right it’s been painted with the corresponding colors of Sun and the room.]
[Underneath at the bottom left corner the fully painted image without the lineart, just color, it looks horrible. It has the words “without lineart” written in white on the right top corner]
I fill each part of the character and objects with their corresponding colors, not completely covering the base color. Like this.
[Underneath the text an example of two blocks of color. One yellow and the other painted with red over it no completely covering the yellow, getting 5 tones of color]
Again, lowered the opacity of my brush, this time to mix the colors and get new tones to ALSO shade the color layer. This way each color of the character conserves a little bit of yellow and warmth too, and also gives texture [sparkles emoji]
(If it was Moon I would have used indigo so his colors would conserve blue and cold)](https://64.media.tumblr.com/ca013b1da2b37ee97f331beeae4a9721/8fba4b4509df1a84-1d/s500x750/a6d8f2110277e13ca1228cee4dbf9751a45a7015.png)
![I added some sewing and stitching details and colored the lineart
[Four image examples of the drawing, three pointing at sewing details and one showing colored lineart.]
[At the bottom of the image two examples of the artwork, one with the lineart not colored, still brown, the other with the lineart colored, looks lighter.]](https://64.media.tumblr.com/9d0a2605b04e43e08923d73822c9c4d7/8fba4b4509df1a84-51/s500x750/97bd7ffb684682982569583ce4e9bd5140fc140c.png)
![The RENDERING (finally)
I fused and duplicated a copy of the drawing, made that layer a darker color (brown/reddish), set it to multiply, lowered opacity and erased the parts where the light would be hitting. Made a second multiply layer, this time just shading inside with a brownish orange.
[Two images of just the shading of Sun like has been described, they’re messy]
[At the bottom left corner a image of the two shade layers fused together with a lightning layer, it has the words “Looks like this together with a lightning layer over them” at the top right corner of the image]
There's no need to give the shading a more polished look, the imperfections won’t be noticeable because of the already shaded and detailed lineart and coloring.
Same for the background.
[At the bottom right corner same image examples as before but for the background]](https://64.media.tumblr.com/ff15fea779a51c613afb69fe5a43c336/8fba4b4509df1a84-cd/s500x750/ce38449a5aff3d155fe887deb240401e474a48f9.png)
![[At the top of the image three image examples of the artwork, from left to right labeled as “No render”, “1st Shade layer” and “2nd Shade layer”]
This is already good but there is one last thing.
LIGHT REFLECTION (sparkles around the words)
I think light reflection is what really sells this as looking “3D” or “real”. Light bounces everywhere on everything it touches. You can test this in an illuminated room, holding a white piece of paper close to any shadow of your body or items in the room and moving it around, you’ll see how the light bounces on the paper to the surface illuminating it white (same with any light/saturated color)
[at the bottom left corner two image examples of a Chica and Moon plush and Suns elbow. The image on the left has no light reflection, the one on the right has light reflection]
I used the airbrush for this.
[At the bottom right of the image the same reflection example, this time red arrows point at the places the light is being reflected and is pointed in red “red bounces on chica and the floor, white and pink bounces on the house and floor, blue bounces on the floor, etc, etc. Red from ribbons and ruffles bounces on Suns body.”]
And so on everywhere I could think of the light would bounce.](https://64.media.tumblr.com/5524debb24ae9147c059a4d21cf2bfd5/8fba4b4509df1a84-09/s500x750/f9a76613a75534ab6cb8b26adc0e78c89103c6fc.png)
![And finally, one last lightning layer (it’s not very noticeable but trust me, is there) for final touches.
[Two images of the finished artwork. The one on the right has a few more light details]
And that’s it.
That’s how I spent 30+ hours of my life in a month to draw this.
Why?
Because I thought that I could
AND THEN I DID
Also, someone on reddit said this part looks like Ennard and I don’t know how that happened but I haven’t stopped thinking about it in a year.
[At the bottom right corner is a cropped image of the artwork of some wooden planks. A red arrow points at the specific part where some random textures do seem to make a shape.]](https://64.media.tumblr.com/c8bea5bb45ed5d5ce6b27c06a55b9d2a/8fba4b4509df1a84-7f/s500x750/6d06ae830f6b4e90b3d3f16c804b29e6499a2b05.png)
Basically my rendering process and art techniques for all of my artworks. There is more to it of course but this post was centered on this whole drawing specifically and had to keep each description brief or this would have gotten excessively long. Besides, I've improved since this drawing and I do some things a bit diferently than before.
I can make more of these kind of post in the future explaining how I get to figure out the shapes and colors of things, basically how I draw.
A time span
BONUS
![BONUS: Because I have no self love (and I use more realistics proportions in my artstyle)
[An image of the artwork with all of the mistakes I could find pointed out with red scribbles]](https://64.media.tumblr.com/49d51f2247395ba82aac82f68920ee2b/8fba4b4509df1a84-9b/s500x750/0c52937a96ed3b3dbc3da3414bf0fc35b6b26e9b.png)
Don't take this last image as if now the artwork is completely wrong because of "bad proportions". This is a self critique, by the estandars I put to myself. Putting that aside, it's still a good artwork, I did a pretty good job on this one and I hope one day to find the same motivation to surpass it.

tutorial under cut!!
@greyedworlds
///
Keep reading


a bit too overwhelmed to do something big right now, so i made a super cheaty 6 minute star tutorial, or to be pedantic, 5 minutes and 43 seconds. It’s not super accurate, but it fulfills all of your primal speed demon extraterrestrial urges, trust me.
the “fluffy” brush I’m using is “4.Environment - Smokey” from concept&illustration and the stars are from deevad’s set. concept and illustration also has a star set, but the individual stars don’t scale up, only the range of the scatter, which i think loses some of the wonder effect. This was done on krita, but can still be done on anything with vivid light, overlay, and a random scatter option in brush settings.

https://www.clipstudio.net/how-to-draw/archives/161327
Drawing Clouds - Tutorial
By Ann Maulina
Great environment tutorials, worth checking out!