Lego Clone Wars - Tumblr Posts

✨Clone wars diorama !✨
Another one, technically the largest I have posted (yet~), featuring the 212th and a (placeholder) Jedi.
Of course, closeups and additional details below !
Views from directly in front/above :


Before I continue, I must confess it. This horrendous mistake, which you might spot by paying close attention to the right part of the image.
Yes. I somehow created an offset on the entirety of the wall’s height.
Overall, I’m quite happy with this one, mostly the environment, which turned out great (except for the offset….). What I’m not really sure leases with are the cheap AT-RTs from the battle packs, which are too bulky, but it works well enough for the moment, and since I’m not exposing to any connoisseur, it does the job.
Most of the minifigs are from these battle packs too, except for the Jedi, which is actually a savage oppress with a cloak, but every time I try to just remove the minifig, it feels like something is missing. The paratrooper captain has the hold grey kama and pauldron which always work well, even if it could have done with an additional visor.
Anyway, let’s get going with the closeups !
AT-RT scenes :


On the left, an engineer (my favorite kind of clone) fixing a broken down leg, with the help of one of the pilots. It was hard to get the minfigs in a 'lively' position, and the photo doesn’t render it correctly. The small white backpack is a piece I’ve stolen from the 501st specialist pack, because it’s nice.
On the right, a paratrooper with a completely inaccurate rocket launcher (the clone wars’ ones don’t look as cool, though). I quite like the way this part came together, even if it’s just a small detail.
Explosion scene :


I’ll admit it’s my first try with building explosions, and I’ll hopefully improve.
On the right, the clone says hi ! Well. No. He doesn’t, but it’s what he looks like on the photo, which I funny, I’ll admit, but not the image I wanted to convey, even if technically he’s set properly, as a projectile caused by the explosion.
The picture on the right convey the feeling of movement much better, with the clone shooting on the left, the others running along, and the paras being blown.
Other scenes :


The focus on the left is the droid ! I really like how it’s sprawled over that rock. Other droids can be found in the diorama, notably one being crushed by the rocket launcher AT-RT, partially under a rock, and part of one in the explosion.
On the right, we see a paratrooper down (but still fighting !) with, at his side, a medic applying a hypo. While it’s hard to see with this picture, he has a pouch at his side, and some chroma-black legs, because I was missing a pair of legs the medic has prosthetic legs, isn’t that awesome and convenient ? That is a lesson to learn, any lack can become lore ! Well, kind of. It’s what I also did with the Kashyyk MOC : I was missing all but the helmet of my ninth minifig, so I turned it into a grave of the missing squad member.

✨Assault on the droid factory (P1) !✨
A decently-sized MOC I've been working on for the past few weeks. These is the landing platform of the factory, and, hopefully, I will take some time to make the actual factory inside, which is nothing more than an idea, at the moment.
Closeups and details under the cut !
The door :

I have a lot of fun with the mountainside of this MOC : It's been a while since I last did rocky terrain (or any terrain at all), and it is an enjoyable process. Most of the bottom is supported by large rock pieces (for structural integrity), but anything around and above the door is meticulously hand crafted from slopes. I also added some little plants here and there to break the dull grey, including some weird spiralling plants, because alien environment.
The door itself is just a bunch of slopes, and then two black sections. It's not moving and will remain in this half-opened state indefinitely.
The bridge :

Really the heart of the MOC, both visually and structurally. While it's covered everywhere, there are technic bars running under the large plates, and that's what allows everything to stay together. Just below the landing platform, you might spot one small antenna acting as a pillar. It's only there to keep the bridge in this position, as most of the charge is held by the mountain. It was a bit dull at first, so I added the cable running under it, and the small barriers, which fit the aesthetic without being overwhelming.
As for the action, here is a brief summary of what story I'm trying to tell : a squad of ARC are infiltrating a droid to destroy it, using a stolen CIS ship. Upon their arrival, they face heavy resistance.
Trying to breath life in these scenes is really fun, and it uses multiple tricks, from the droid falling off the bridge to the one being pushed by the shield, plus the clone jumping on a droid to stab it. Speaking of, here they are !
The clones :
MOC postures :


Rest postures :


Custom clones ! I absolutely love making these, and I still have a lot of similarly customised ones on my shelves. The ARCs from the battle pack look awesome, and even if they all have the same prints and color, it doesn't take much to change their appearance.
Sadly, I couldn't find enough kamas for all of the, so only the first and third ones have one. Same goes for the pauldron, so only the three first have one (plus the fifth, but it's a different kind which, I think, comes from a mando). For visors and rangefinders, the choice was mostly arbitrary, because I have a lot of each, so I tried to guess who of the clones would need them, according to their roles (because they have roles. And names, too ! From left to right : Orders, Surge, Bacta, Gears, and Stalker.) I also used the kneeling posture, which is, essentially, in half my TCW MOCs (just check out this one if you're doubting me. Or if you want to see a really cool thing, too.)
A lot of weapons are at least partially custom too :the left clone's weapon (hands can be attached at the bottom of the weapons as a grip); the Z-6 for the next one (would be better if Lego had black versions of the grey pieces, but alas, they don't exist as of yet), the shield (held together by an actual 2*3 shield piece, and the printed GAR cog is just the perfect piece to go with it), the rocket launcher (as screen accurate as I could do, which is to say not much). I also used a fancy silver knife as a vibroknife, because why not, after all ?
Another worthy addition :

While Lego's default ARC backpacks are pretty cool, I find this technic really nice to add a proper communication antenna : one lever attached to the side of a minifig roller skate piece. The connection is not very secure, but since it's only used for display, it's alright.
The ship :


As some might have seen already, this is a variation of the 8036 separatist shuttle. It is a bit longer than the original, and have more details on top. I changed the original antenna for a fencing sword piece, which looks better, and adjusted the dorsal wing a wing, as well as the side, to add the CIS-stickered pieces.
Mostly, this version has so much more playability than the original : it was only made to accommodate a droid pilot and one passenger. This version can fit : one pilot and one astromech in the front, plus a whole bunch of minifigs in the back; and the two parts are connected. Ironically, it won't ever be seen, but it still is a nice thing to know.
You're still here ? Well, I guess you enjoyed this MOC then. If it is the case, stay tuned, because I still have one big TCW diorama which I need to figure how to showcase, and another one in the making, which will also be terribly hard to showcase, but that will be a problem for later me !
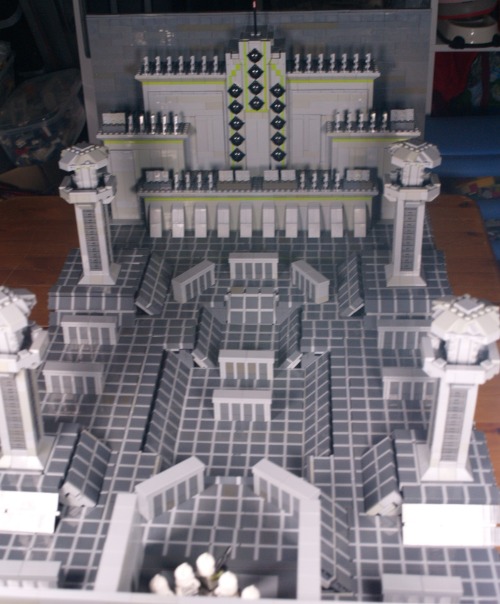
✨Kamino’s citadel challenge !✨
I am…very excited about this one. I’ve had this vision for a long time, and I’m so happy it’s ended up looking like that.
Now, there are a lot of things I’ll go into details along close ups under the cut; the only thing I’ll mention above is that I’m very grateful for TCW’s episode guides’ artworks, without which this would have been quite a hassle.

Okay ! Before diving into all the details and things, here is a view from above, to really display how big it is. Dimension-wise, the plank I built it on is around 110*70cm.

Now of course, the first detail which is noticeable is the floor, because, well, it’s everywhere.

This was probably the most challenging part of the build, because making a grid out of Lego is tough. Most of it is rows and rows of dark square, light lines, separated by 1*n tiles. It was the easiest way to get this pattern with as if it were just tiles; because this is one of the objectives I had here : most of this MOC is smooth, except for a few zones (usually voluntarily).
The fact I used this technic means that the floor in most place isn’t very stable, but it actually holds up pretty well because of some hidden connection points with the foundations underneath, which are mostly hidden under the cover blocks.

Here for instance, I’m using modified 1*2 bricks with a Technic hole : it hold the cover block, and it also attaches the floor to the foundation.
Of course, another problem I ran into were slopes. Much harder to get a smooth effect with the technic I’ve used, so it’s a bit wonky and unstable. Also, most them are not aligned properly, which is visible in the picture above (and some area have some really big misalignments because of a few problems I probably won’t bore anyone reading this with).
Now, since they’re also here, I can deal with the cover blocks. These were, among the details, the hardest to figure out, to get a good size while keeping some texture. Eventually I came up with this design, which, ironically enough, uses the same technic the floor uses, in a different orientation.
Another detail : the miradors :

This is one of the first elements I had in place, because I needed them to get a good sense of scale (and was made better by an existing concept art of a tower alone). Most of it does not have anything noteworthy, except for one illegal technic I used (can you spot it ?)
The pillar holding the roof of the mirador is using a technic I had in my toolbox for a long time, but had never had the occasion to use : if you take two 'brick' bricks and attach them perpendicularly on a snot brick, the small space separating the lines of 'bricks' align to let a 1*n tile in. It’s somewhat reliable (for an illegal technic) and an easy way to get octogonal shapes.
Now, before looking at the Citadel itself, let’s turn around for a minute.

This point of view obviously isn’t the intended one, but it’s still worth noting, if only for some composition.
Notice that the wall here is quite small (smaller than the miradors, even), and light gray; it’s in contrast with the towering dark gray wall on the other side, behind the citadel, which technically should give at least some impressions even to the people who never saw TCW.
Anyway, it’s also on this view that we can see most of my slope struggles, including the central one, which is the biggest I had to do.
And I can’t not mention the most important element :

What would be the challenge without a squad of clones to take it on ? These clones (4 privates and a sergent) are ready to fight ! Well. Kinda. I wish I could have actual cadets, but they are not part of the Lego universe (and the floor was enough of a fee, I can’t afford to get customs figures too). I wish I had the Dominos though. I have TBB Echo, and I plan to get my hands on Fives at some point, but they wouldn’t fit here, sadly, so instead I used some movie accurate clones (because all the others are used for a project I still haven’t posted..maybe later…)
Notably, I at some point tried to get the elevator to work - needless to say it was a disaster (it’s too close to the plate underneath to make something working).
Now, without further ado. The citadel.

I’m very proud of it. I got the proportions just right (I actually made some measurements to make sure of it), and there is just enough texture to not make it bland while leaving it as artificial. This alone took roughly 8-10h (which were all spent during an accidental all nighter, whoops), but it was worth it. It’s completely empty inside, and, in fact, the wall behind it isn’t full as well, anything behind the citadel is opened. The spikes are simple 1*3 angle plates illegally connected, and the walls’ small details were made with a bunch of modified 1*2 plates, there isn’t anything really special in it.
The only really complicated zone was the middle tower, because I had to put all the cannons while keeping it clean and smooth, and including the vertical lime lines. It was a fun challenge. And I included the 'flag' At the top, too, just a red transparent cone on a stick (there’s no need for more), which peeks above the gray wall (for composition and because of a lack of pieces).
Anyway, such a long project deserves one behind the scene photo :

Yes, my desk is messy (and include my mandatory tea cup).
On the left, you can see my remaining floor tiles, which have not been used yet; and just under the citadel, you might notice the foundations visible; it’s a checker of 2*2 tiles which gives my floor a good base to be fixed on. There are also some slopes which haven’t been placed yet (in front of the background miradors), and at this steps, there were no cover blocks or walls yet.
As far as my tools go, you might notice brick separators scattered all around my work environment (I never have enough of those), as well as a tablet in the bottom right hand corner (which i use to check and measure concept arts), and in the middle, the red triangle is an official (albeit old) Lego measurement tool which counts in stud, Lego bar holes and axe length.
Also visible, finally, is the bottom of the foundations, which are stacks of 1*2 bricks (each of the three floor layer is separated by a height of 3 bricks), which means that looking directly under it can lead to watching the dark basement of my build (which isn’t aesthetic…).
Anyway, if you read until here, thanks, I guess ? I still have a few TCW related stuff (a small one next week, some other in the foreseeable feature), so feel free to stick around and maybe leave a note, if you feel like it ? That’s it, bye !